Rose electronics UltraVista Pro VWL-CH-DP02 User manual

UltraVista Pro
Video Wall Image Processor
Installation
and
Operation Manual
10707 Stancliff Road
Houston, Texas 77099
Phone: (281) 933-7673
tech-

LIMITED WARRANTY
Copyright Rose Electronics 2016. All rights reserved.
No part of this manual may be reproduced, stored in a retrieval system, or transcribed in any form or any means, electronic or mechanical, including photocopying and
recording, without the prior written permission of Rose Electronics.
manual-ultravista-pro-2016-11-03
Rose Electronics warrants the UltraVista Pro to be in good working order for one year from the date of
purchase from Rose Electronics or an authorized dealer. Should this product fail to be in good working order at
any time during this one-year warranty period, Rose Electronics will, at its option, repair or replace the Unit as
set forth below. Repair parts and replacement units will be either reconditioned or new. All replaced parts
become the property of Rose Electronics. This limited warranty does not include service to repair damage to
the Unit resulting from accident, disaster, abuse, or unauthorized modification of the Unit, including static
discharge and power surges.
Limited Warranty service may be obtained by delivering this unit during the one-year warranty period to Rose
Electronics or an authorized repair center providing a proof of purchase date. If this Unit is delivered by mail,
you agree to insure the Unit or assume the risk of loss or damage in transit, to prepay shipping charges to the
warranty service location, and to use the original shipping container or its equivalent. You must call for a return
authorization number first. Under no circumstances will a unit be accepted without a return authorization
number. Contact an authorized repair center or Rose Electronics for further information.
ALL EXPRESS AND IMPLIED WARRANTIES FOR THIS PRODUCT INCLUDING THE WARRANTIES OF
MERCHANTABILITY AND FITNESS FOR A PARTICULAR PURPOSE, ARE LIMITED IN DURATION TO A
PERIOD OF ONE YEAR FROM THE DATE OF PURCHASE, AND NO WARRANTIES, WHETHER EXPRESS
OR IMPLIED, WILL APPLY AFTER THIS PERIOD. SOME STATES DO NOT ALLOW LIMITATIONS ON HOW
LONG AN IMPLIED WARRANTY LASTS, SO THE ABOVE LIMITATION MAY NOT APPLY TO YOU.
IF THIS PRODUCT IS NOT IN GOOD WORKING ORDER AS WARRANTED ABOVE, YOUR SOLE REMEDY
SHALL BE REPLACEMENT OR REPAIR AS PROVIDED ABOVE. IN NO EVENT WILL ROSE
ELECTRONICS BE LIABLE TO YOU FOR ANY DAMAGES INCLUDING ANY LOST PROFITS, LOST
SAVINGS OR OTHER INCIDENTAL OR CONSEQUENTIAL DAMAGES ARISING OUT OF THE USE OF OR
THE INABILITY TO USE SUCH PRODUCT, EVEN IF ROSE ELECTRONICS OR AN AUTHORIZED DEALER
HAS BEEN ADVISED OF THE POSSIBILITY OF SUCH DAMAGES, OR FOR ANY CLAIM BY ANY OTHER
PARTY.
SOME STATES DO NOT ALLOW THE EXCLUSION OR LIMITATION OF INCIDENTAL OR
CONSEQUENTIAL DAMAGES FOR CONSUMER PRODUCTS, SO THE ABOVE MAY NOT APPLY TO YOU.
THIS WARRANTY GIVES YOU SPECIFIC LEGAL RIGHTS AND YOU MAY ALSO HAVE OTHER RIGHTS
WHICH MAY VARY FROM STATE TO STATE.

Contents
Disclaimer 1
System Introduction 1
Compatibility 1
Features 1
Package contents 3
UltraVista Pro Models 4
Input Cards 4
Output Cards 4
System Installation and Setup 5
Operation and Configuration 6
Establishing Connection between UltraVista Pro and Controlling PC 6
User Administration 8
Video Wall Set Up 9
Video Wall Settings 9
Channel Mapping 10
Signal Source Settings 11
VGA Signal Property 12
OSD 12
Update EDID 13
VGA <---> YPbPr 14
Modify Name 15
Add Mode 15
Creating and Laying Out Display Windows 16
Test Signal 17
Scene File Backup 17
Background Image 18
Input Signal Preview 19
Maintenance and Repair 20
Technical Support 20
Safety and EMC Regulatory Statements 21
Safety information 22
General 24
Chassis 24
Input Cards 25
Output Cards 25

Figures
Figure 1. 2U and 4U Chassis Models 4
Figure 2. VGA Input Card 4
Figure 3. DVI Single-Link Input Card 4
Figure 4. HDMI Input Card 4
Figure 5. SDI Input Card 4
Figure 6. Fiber Input Card 4
Figure 7. DVI Dual-Link Input Card 4
Figure 8. DVI-I / VGA Output Card 4
Figure 9. SDI Output Card 4
Figure 10. System Diagram of UltraVista Pro 5
Figure 11. Configuration Software Desktop Icon 6
Figure 12. User Login Window 6
Figure 13. Menu Bar 6
Figure 14. Communication Setting Window 7
Figure 15. Users Menu Bar Button 8
Figure 16. User Management-ADMIN Window 8
Figure 17. Video Wall Screen Layout Setting Window 9
Figure 18. Group Menu Bar Button 10
Figure 19. Screen Group Setting Window 10
Figure 20. Signal Source 11
Figure 21. Active Signal Sources 11
Figure 22. Signal Source Configuration Menu 12
Figure 23. VGA Property Setting Window 12
Figure 24. OSD Properties Window 12
Figure 25. EDID Menu Bar Button 13
Figure 26. Opened EDID Configuration File in EDID Editor 13
Figure 27. EDID Edit Configuration Button 13
Figure 28. EDID Configuration Descriptor Blocks 13
Figure 29. Modifying the Screen Resolution Using the EDID Editor 14
Figure 30. Set VGA Type Window 14
Figure 31. Modify Signal Information Window 15
Figure 32. Source Image Cropping Mode Window 15
Figure 33. Creating Display Windows for the Video Wall 16
Figure 34. Specifying Whether A Display Window is to be Above or Below Another Window 16
Figure 35. Test Signal Window 17
Figure 36. Working with Scenes 17

Figure 37. Background Picture Menu Bar Button 18
Figure 38. Background Image Operation Window 18
Figure 39. Preview Menu Bar Button 19
Figure 40. Input Signal Preview 19
Figure 41. Previewing input signals 19
Appendices
Appendix A – Part Numbers 23
Appendix B – Specifications 24
Appendix C – Serial Control Sequences 26

INTRODUCTION
UltraVista Pro Manual 1
Disclaimer
While every precaution has been taken in the preparation of this manual, the manufacturer assumes no
responsibility for errors or omissions. Neither does the manufacturer assume any liability for damages resulting
from the use of the information contained herein. The manufacturer reserves the right to change the
specifications, functions, circuitry of the product, and manual content at any time without notice.
The manufacturer cannot accept liability for damages due to misuse of the product or other circumstances
outside the manufacturer’s control. The manufacturer will not be responsible for any loss, damage, or injury
arising directly or indirectly from the use of this product (See limited warranty).
System Introduction
Thank you for choosing Rose Electronics UltraVista Pro Video Wall. The product is a flexible tool for creating
multiple screen video displays. It supports a wide variety of input and output signal formats, and allows the
creation of multiple groups of output screens with different characteristics. Two different chassis styles support
the display of either two or four video input windows simultaneously on a given output group. The ability to
zoom or crop video windows further adds to the power of display groups.
The UltraVista Pro is a high performance video processing workstation with pure hardware architecture for
spectacular video wall performance. Advanced image processing technologies such as high definition video
signal collecting, real time and high resolution digital image processing, and advanced three-dimensional
digital filtering are integrated in UltraVista Pro . It employs large-capacity, high-speed FPGA and crosspoint
switching to ensure the real-time processing of input signals, providing data consistency and guaranteeing
excellent video displaying.
UltraVista Pro supports a wide variety of input signal formats, including, CVBS, YPbPr, VGA, DVI, Dual-link
DVI, HDMI, SDI, twisted pair signals, and optical signals. The output signal of UltraVista Pro supports DVI-I,
twisted pair signal, and optical signal. For DVI-I signal, RGB analog signal and DVI digital signal can be
transmitted concurrently, which means that video signals can be displayed on a video-wall, backed up, and
transmitted to another group of displays simultaneously. The resolution of a single output channel can reach up
to 1920*1200@60Hz. Users can also upload and display ultra-high resolution static background images with
UltraVista Pro.
A range of UltraVista Pro models are available, which differ in features and functions. The largest UltraVista
Pro supports video wall display on 144 screens. UltraVista Pro also allows groups of screens to be displayed at
different resolutions, providing powerful video combinations in large screen systems.
Compatibility
Video
Input Interface VGA, YPbPr, CVBS, DVI, HDMI, SDI, DVI Dual-Link, DisplayPort
Output Interface VGA, DVI, HDMI, SDI
Max Resolution 1920 x 1200 @ 60 Hz or 3840 x 2400 @ 30 Hz (4K)
Control
Serial Accepts RS-232 serial control communication
Ethernet Through Control Software over CATx cable
Features
■Cross-screen Displaying: Each signal can be displayed in the cross-screen state, which means adjacent
screens can jointly display the content of a single signal to form the whole graphic as a “window”.
Customers can also zoom the windows, and drag them to anywhere on the screen

UltraVista Pro Manual 2
■Four Windows per Screen: UltraVista Pro supports a maximum of four windows in a single screen,
allowing users to view more video signals with a smaller number of screens. The layout of the windows can
be configured separately.
■Picture in Picture: A window can be overlaid upon another window, forming a “picture in picture”. The
overlaid window is not restricted to the boundaries of the window beneath, allowing flexibility in display
layout.
■Input Signal Preview: All input signals can be previewed in the UI of software before being displayed on
the screens. This enables the operator to detect the input status and display signals correctly.
■Crosspoint Switch: UltraVista Pro employs crosspoint switch technology which offers high speed switching
and transmission. Compared to the “bus” switching architecture, where all the signals need to share the
bandwidth of the bus for transmission, crosspoint switching assigns each signal a unique channel to avoid
collision, delay, and instability.
■Four Windows per Screen: The main modules, including input cards, output cards, switch control card,
cooling fan, and power supply, are all designed to plug directly into the main-board, which makes it very
flexible and convenient to configure the product for each application. It is unnecessary to disassemble the
device when replacing modules. Input and output cards also support ‘hot-plugging’ which means that users
can plug and unplug input or output cards when the UltraVista Pro is operating. No restarting or refreshing
is required, and other signals will not be affected.
■FPGA architecture: UltraVista Pro employs a hardware FPGA-based architecture to provide excellent
image processing performance. There is no embedded operating system to cause crashes, collisions, and
blue screens. The result is a highly stable product which provides uninterrupted around the clock operation.
■Resolution Real-Time Total Adaptation (RRTA): UltraVista Pro employs Resolution Real-time Total
Adaptation technology to support customized resolutions for different groups of screens. In other words,
the resolution of each group of screens can be configured separately in the software, which offers flexibility
and convenience.
■Graphic Cropping and Signal Upscaling: The all input video signals can be cropped and any section of a
video image can be zoomed in or out after cropping. Upscaling ensures the zoomed sections will be
displayed without loss of signal quality.
■Character Superimposition: UltraVista Pro supports superimposition of characters in video signals for easy
identification of signal sources. Character font, size, position, and color can be customized for each source.
■Ultra-high Resolution background Image: UltraVista Pro’s built-in storage allows multiple ultra-high
resolution background images to be uploaded, for display behind video screens.
■Scenes Saving, Loading, and Displaying in Loop: Any configured arrangement of video signals displayed
can be saved as “scenes”. UltraVista Pro supports up to 32 scenes to be saved locally. The saved scenes
can also be set to be loaded and displayed in loops.
■HDCP-Compliant: UltraVista Pro’s HDMI and DVI input cards support HDCP, which allows the display of
HDCP encrypted content.
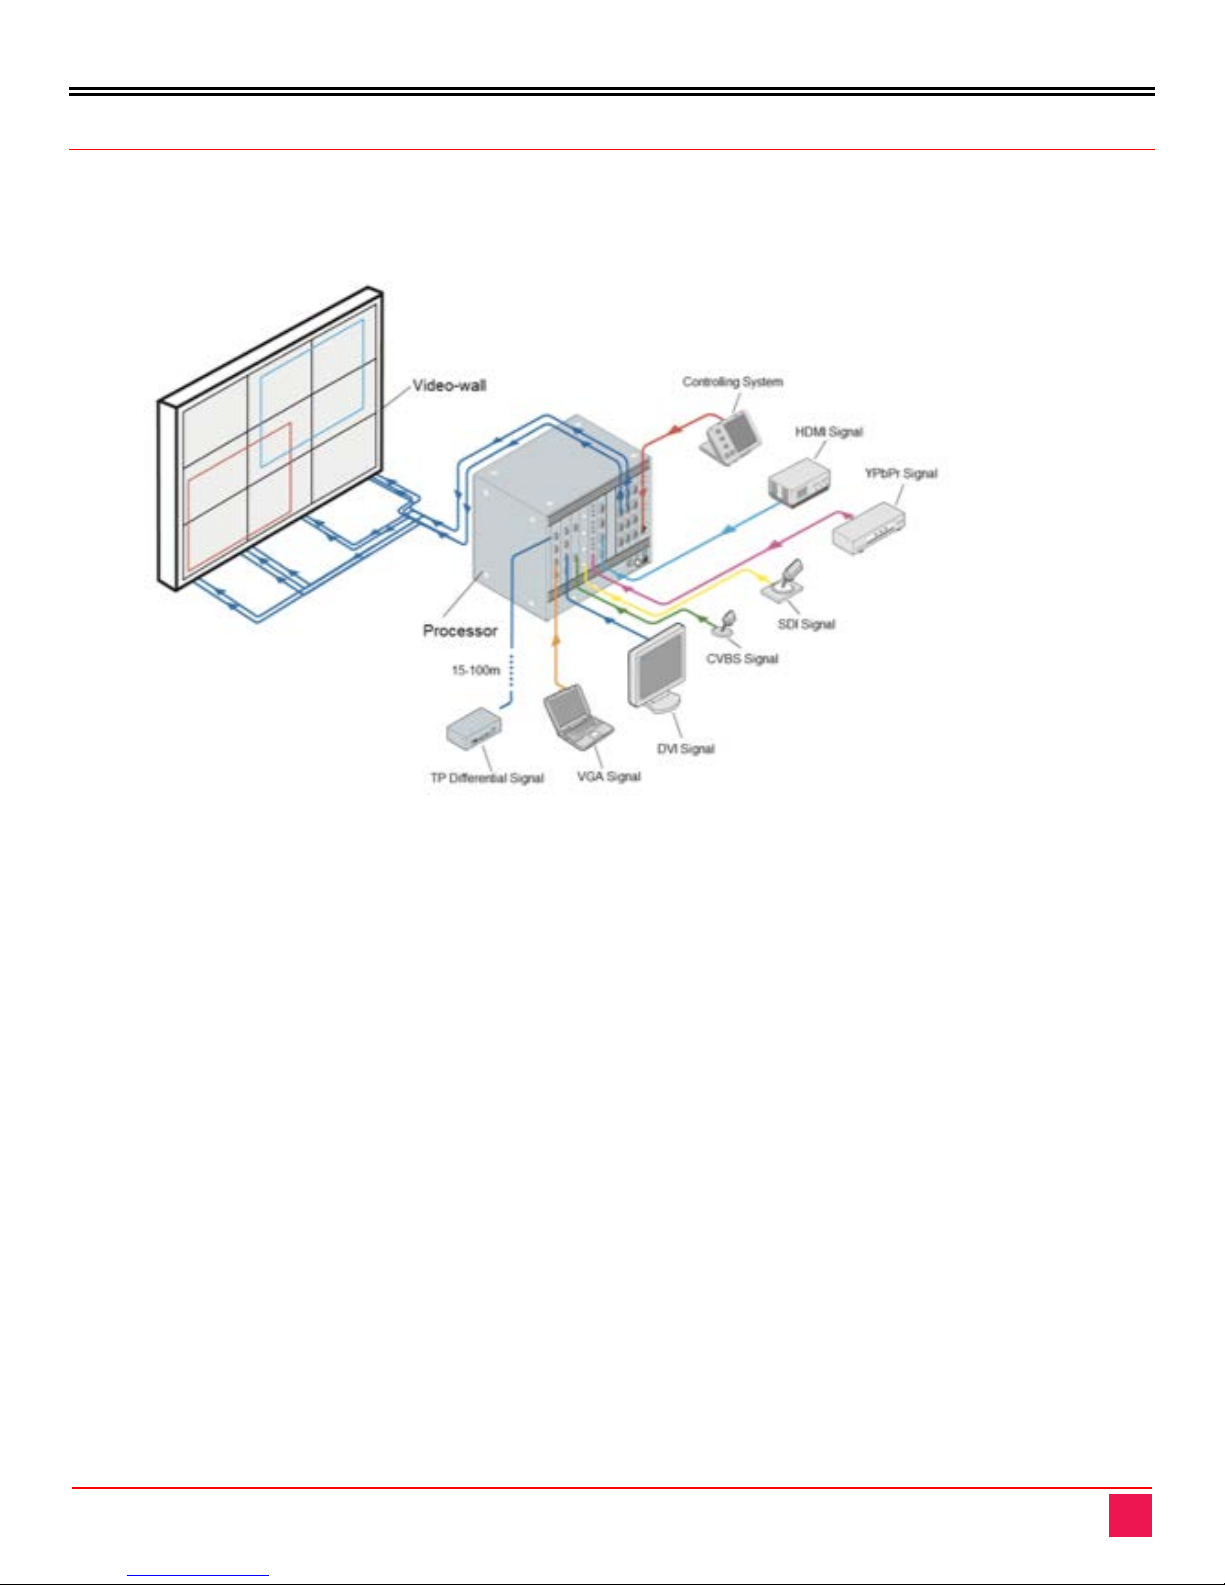
■Controlling and Management: UltraVista Pro software allows users to manage and control the processor
from an external computer. The software is compatible with Windows2000/XP/Vista/7/8. The computer can
be connected to UltraVista Pro by CATx cable (TCP/IP) or RS232 cable. The software can also control up
to 4 traditional matrix switches when they are cascaded (RS232) to the processor. The UltraVista Pro can
also be configured and controlled through serial commands issued by an external controller.
■Redundant Power Supply: UltraVista Pro can be provided with dual power supplies on request. The
redundant supplies provide load balancing, with either supply capable of powering the device in the event a
supply fails during operation.

UltraVista Pro Manual 3
Package contents
■UltraVista Pro unit
■Power cord
■Manual
Additional cables can be ordered separately. If the package contents are not correct, contact Rose Electronics
or your reseller so the problem can be quickly resolved.

MODELS
UltraVista Pro Manual 4
UltraVista Pro Models
The UltraVista Pro comes in several models to fit the needs and complexity of the individual video wall
installation. The unit comes in a 2U, 4U, 8U or 14U chassis. All the chassis have models which support 2
output windows per screen. In addition, 4U and 8U chassis also come in models that support 4 output windows
per screen. The 2U and 4U chassis models are shown below.
Figure 1. 2U and 4U Chassis Models
Input and output cards that support various video interfaces can be installed in these chassis to provide for the
best match to the needs. Some of the available cards are shown below. A complete listing of all chassis
models and input and output cards can be found in Appendix A – Part Numbers.
Input Cards
Figure 2. VGA Input Card
Figure 3. DVI Single-Link Input Card
Figure 4. HDMI Input Card
Figure 5. SDI Input Card
Figure 6. Fiber Input Card
Figure 7. DVI Dual-Link Input Card
Output Cards
Figure 8. DVI-I / VGA Output Card
Figure 9. SDI Output Card

INSTALLATION AND OPERATION
UltraVista Pro Manual 5
System Installation and Setup
The UltraVista Pro is easy to install. Connect the appropriate video cables from video sources to the
appropriate connectors on the input cards. Connect DVI-I, HDMI, or BNC cables from the unit’s output
connectors to the appropriate displays. Apply power to the Video Wall Processor.
Figure 10. System Diagram of UltraVista Pro
In order to set up the video wall, install the configuration software on a Windows based PC, laptop, or tablet.
Connect a CATx cable between the Video Wall Processor’s RJ-45 connector and the control PC for a TCP/IP
interface. Alternatively connect the control PC serially to the UltraVista Pro’s RS-232 connector. Configure the
input signals as desired, directing the video sources to the appropriate groups of output displays. If needed,
identify and save the configuration details for future recall.
Setting up the video wall with the aid of the configuration software is described in the following section. A listing
of the serial commands can be found in Appendix C – Serial Control Sequences.

UltraVista Pro Manual 6
Operation and Configuration
This section describes how to set up and configure the video wall using the HadesView configuration software.
Once the UltraVista Pro is connected to a controlling Windows PC through a CATx cable, the configuration
software can be used as described below.
Establishing Connection between UltraVista Pro and Controlling PC
Install the supplied HadesView configuration software on a Windows PC. Double click the HadesView icon on
desktop after the software has been installed.
Figure 11. Configuration Software Desktop Icon
The User Login window will be displayed. The User Name field will have ADMIN selected and the Password
field will be empty. Click the OK button.
Figure 12. User Login Window
The configuration software’s menu bar contains three tabs: Software Operation, Basic Operation, and Tools.
Figure 13. Menu Bar

UltraVista Pro Manual 7
1. Begin by clicking the Communication Setting option in the Software Operation tab. This will display the
Communication Setting window.
Figure 14. Communication Setting Window
2. If an Ethernet connection is to be used, the default IP address and port number of the unit are
192.168.1.65 and 1024. The IP address of the controlling PC must be changed the first time to
192.168.1.x (where xis a number from 0to 255). This will put in the same network space as the unit,
and allow them to talk to each other. Once this communication has been established, the IP address of
the unit can be changed to one more suitable to the network it is in, and the IP address of the
controlling PC reset to its previous setting.
3. Alternately, to establish a serial connection, select the appropriate computer COM port, and ensure that
the baud rate is set to 9600.
4. Click the OK button to save the settings.
5. Finally, click the Connect button in the Software Operation tab to connect to the unit.

UltraVista Pro Manual 8
User Administration
User Administration provides the means to set up user list and access rights to the UltraVista Pro. This is
accomplished by following the steps below.
1. Click the Users button on the Tools tab’s menu bar to set up individual user accounts.
Figure 15. Users Menu Bar Button
2. This displays the User Management-ADMIN window. Enter the username and password for a user
account. The user’s level of access can be set by selecting the access level from the Type drop down
list. Click the Add button to add the new user. Repeat until all users have been added.
Figure 16. User Management-ADMIN Window
3. An existing user account can be viewed and modified by selecting it in the User List, making the
necessary changes and clicking the Edit button. An account can be deleted by selecting it and hitting
the Delete button.
4. Click the OK button to save the changes and exit the window.

UltraVista Pro Manual 9
Video Wall Set Up
This section describes the steps to set up the video wall and customize the video wall. Not all options may be
required for a particular layout.
Video Wall Settings
The video wall can be set up in the Screen Layout Setting window. It can be accessed by clicking Layout in the
Software Operation tab. Here, logged in users can set the output resolution, layout, and the gap between
displays for up to 4 groups of video walls. For example, the figure below shows the settings for video walls 1
and 2. Their output resolution is 1920x1080@60Hz, layout is 3x4, and the gap is 0.
Figure 17. Video Wall Screen Layout Setting Window

UltraVista Pro Manual 10
Channel Mapping
Click the Group button in the Basic Operation tab’s menu bar to assign physical output cards to positions in a
video wall grouping.
Figure 18. Group Menu Bar Button
The Screen Group Setting window is displayed. Assign the desired output cards from the Output Card List to
the video wall and click the OK button when complete.
Figure 19. Screen Group Setting Window

UltraVista Pro Manual 11
Signal Source Settings
The list of signal sources can be found in the left side Signal Management pane.
Figure 20. Signal Source
The icon of each signal source turns green when an input signal is detected on a corresponding channel.
Figure 21. Active Signal Sources

UltraVista Pro Manual 12
Users can configure a signal source by right-clicking on it in the Signal Management pane. This brings up the
signal source configuration menu. The individual menu options are described below.
Figure 22. Signal Source Configuration Menu
VGA Signal Property
The VGA Signal Property option allows users to set the signal properties of VGA Signal Sources.
Figure 23. VGA Property Setting Window
OSD
The OSD option allows characters to be superimposed on the video of a Signal Source. Font, size, color, and
position on the video image can be configured. OSD Mode 1 selects a transparent background, and OSD
Mode 2 selects a solid background.
Figure 24. OSD Properties Window

UltraVista Pro Manual 13
Update EDID
This option allows the user to select an EDID configuration file (*.dat) to be used with a Signal Source, typically
for specifying an unusual resolution. Files can be captured from video displays with the EDID Editor program
supplied with the configuration software. The program also allows modification of existing files to create new
files.
The EDID can be modified by clicking the EDID button on the Tools tab’s menu bar.
Figure 25. EDID Menu Bar Button
This opens the EDID Editor program. On the File menu, click the Open menu option to open an EDID
configuration file.
Figure 26. Opened EDID Configuration File in EDID Editor
Click the edit button on the menu bar to modify the menu bar to edit the file. The edit button is displayed below.
Figure 27. EDID Edit Configuration Button
Open the Detailed Timings tab, and choose the first Descriptor Block.
Figure 28. EDID Configuration Descriptor Blocks

UltraVista Pro Manual 14
The parameters for the desired screen resolution can be set, particularly the H Active, V Active and Pixel
parameters. These respectively set the number of horizontal pixels, number of vertical pixels and the refresh
rate. It is recommended that the refresh rate not be modified.
Figure 29. Modifying the Screen Resolution Using the EDID Editor
It is suggested that once changes have been made, the changes not be saved to the original configuration file,
but saved as a new file.
Once the updated EDID Configuration file has been created, use the Update EDID menu item of the Signal
Source Configuration Menu. Choose the newly created file when asked for, and the signal source will apply the
new EDID.
VGA <---> YPbPr
This menu option allows a user to select the signal format of VGA Signal Sources.
Figure 30. Set VGA Type Window

UltraVista Pro Manual 15
Modify Name
The name of the signal source can be specified with the Modify Name menu option. This will help to identify
and manage the signal sources.
Figure 31. Modify Signal Information Window
Add Mode
The Add Mode menu option allows users to crop the video image of a signal source by specifying the
horizontal and vertical starting pixels of the cropped signal, as well as the width and height of the video. The
cropped mode can then be assigned a name.
Figure 32. Source Image Cropping Mode Window
This manual suits for next models
5
Table of contents
Other Rose electronics Computer Hardware manuals