8
Protection Circuitry
The RMB-1095 features a thermal protection
circuit that protects the amplifier against po-
tential damage in the event of extreme or faulty
operating conditions. Unlike many designs,
the RMB-1095 protection circuit is indepen-
dent of the audio signal and has no impact
on sonic performance. Instead, the protection
circuit monitors the temperature of the output
devices and shuts down the amplifier if tem-
peratures exceed safe limits.
In addition, the RMB-1095 includes overcurrent
protection which operates only when load im-
pedances drop below 2 ohms. This protec-
tion is independent for the left, right and center
channels with separate front panel PROTEC-
TION LEDS for each.
Most likely, you will never see this protection
circuitry in action. However, should a faulty
condition arise, the amplifier will stop play-
ing and the PROTECTION LEDS on the front panel
will light.
If this happens, turn the amplifier off, let it cool
down for several minutes, and attempt to iden-
tify and correct the problem. When you turn
the amplifier back on, the protection circuit
will automatically reset and the PROTECTION
LEDS should go out.
In most cases, the protection circuitry activates
because of a fault condition such as shorted
speaker wires, or inadequate ventilation lead-
ing to an overheating condition. In very rare
cases, highly reactive or extremely low im-
pedance speaker loads could cause the pro-
tection circuit to engage.
Input Signal Connections
The RMB-1095 gives you a choice of two dif-
ferent kinds of input connections — conven-
tional unbalanced RCA type connections (such
as found on nearly all audio equipment) or
balanced XLR-type connections for use with
some high-end preamps or digital processors
featuring this lower noise connection.
NOTE
:To prevent loud potentially damaging
noises, make sure the amplifier is turned
off when you make any signal connections.
RCA Inputs (unbalanced)
See Figure 2
When a component with RCA connectors –
such as a preamplifier or surround sound pro-
cessor – supplies signals to the RMB-1095,
the RCA-type phono plug inputs should be
used.
Select high quality audio interconnect cables.
Connect each of the outputs from the pream-
plifier or signal processor to the correspond-
ing UNBALANCED INPUT of the RMB-1095.
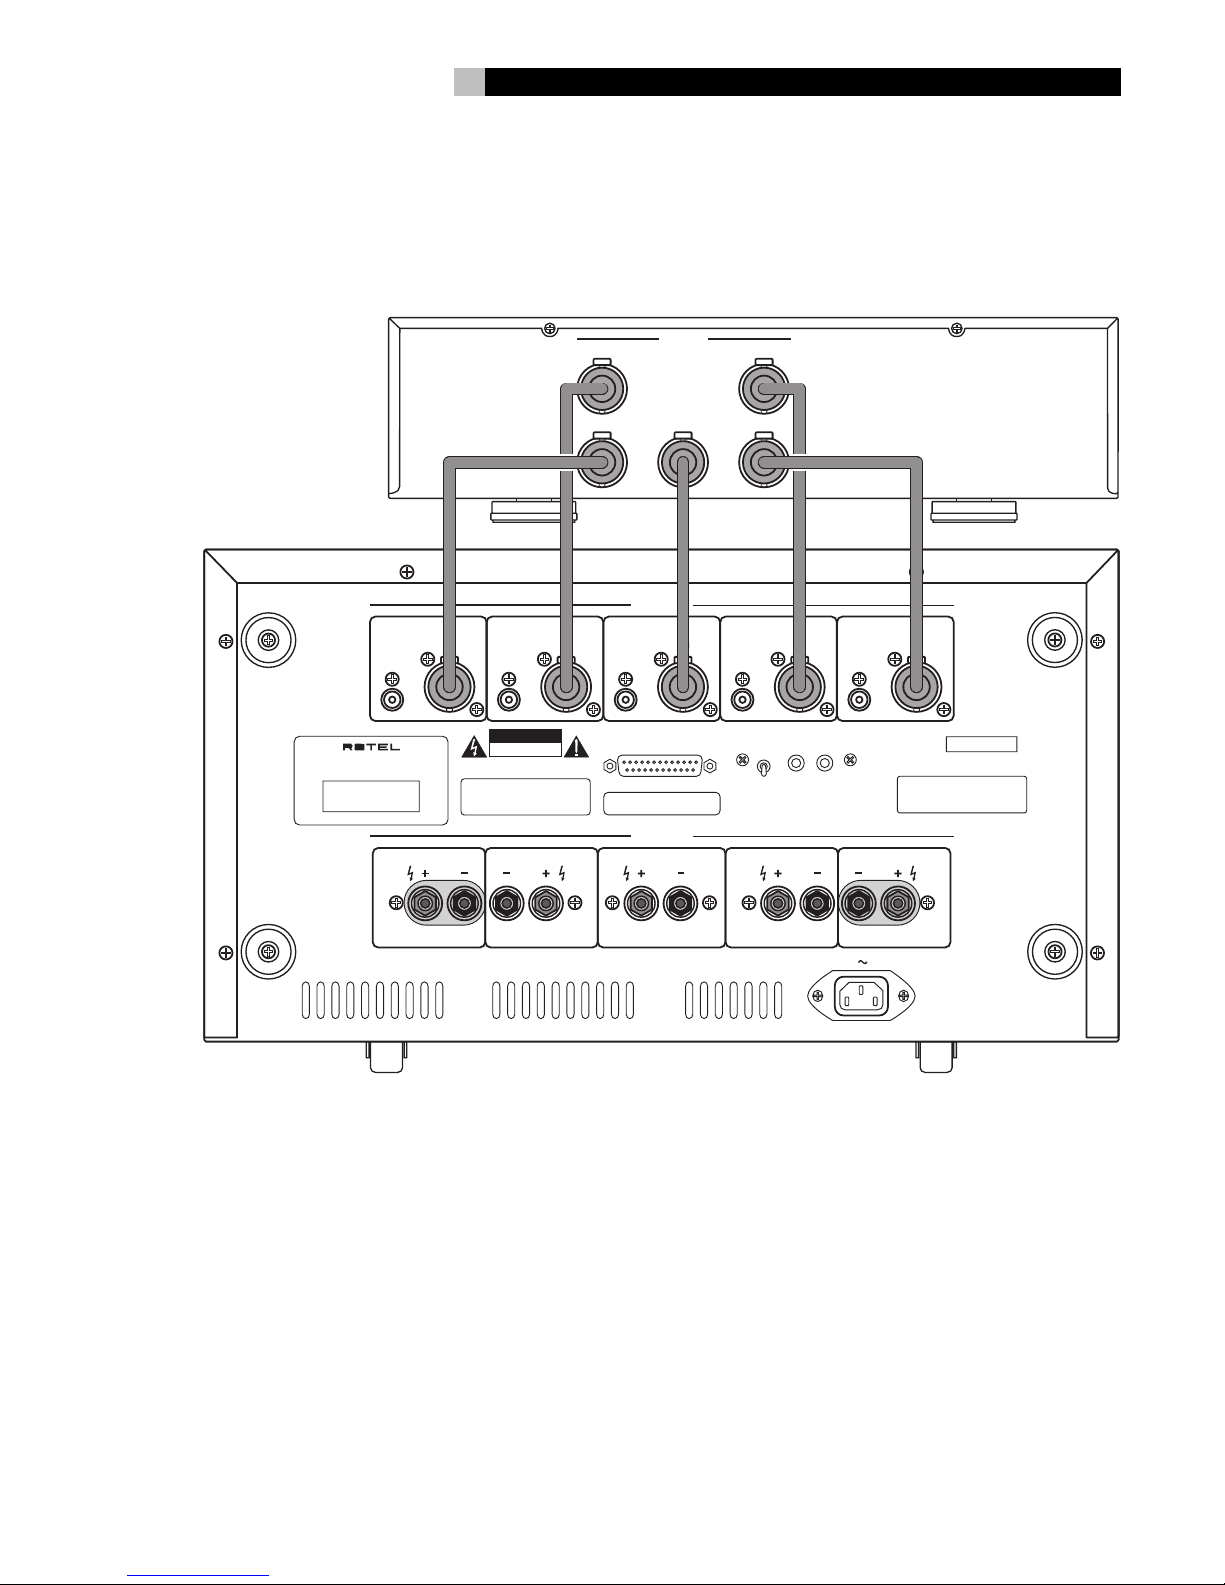
XLR Inputs (balanced)
See Figure 3
If you are using one of the high-end pream-
plifiers or processors with low-noise balanced
signal outputs to drive your RMB-1095, you
may choose to use these low-noise XLR-type
connections. See your authorized Rotel dealer
for the appropriate cables.
Connect XLR audio interconnect cables from
each of the outputs from the preamplifier or
signal processor to the corresponding BALANCED
INPUT of the RMB-1095.
DB25 Connector Input
The RMB-1095 is also equiped with a DB25
type input. This input is typically only used in
professionally-installed custom systems. The
DB25 input duplicates the function of the five
RCA inputs. For information regarding how
to use this input, contact your nearest autho-
rized Rotel service center.
NOTE: When using the DB25 input you
must insert the supplied open-circuit RCA
plugs into the unbalanced inputs. Use only
the open circuit plugs supplied with the
RMB-1095; do not use “shorting plugs”.
The open circuit plugs engage a switch un-
der the center pin of the RCA connector
that ensures the DB25 connector input has
the proper impedance.
Speakers
Speaker Selection
The nominal impedance of the loudspeaker(s)
connected to the RMB-1095 should be at least
4 ohms. As a general rule, only one speaker
shoud be connected to each of the sets of
speaker terminals. When two speakers are
connected in parallel to one of the speaker
terminals, the effective impedance the ampli-
fier sees is cut in half. For example, when driving
two pair of 8 ohm speakers, the amplifier sees
a 4 ohm load. If you plan on connecting two
speakers to one of the terminals of the
RMB-1095, select speakers with a nominal im-
pedance of 8 ohms or higher. Speaker im-
pedance ratings are less than precise. In prac-
tice, very few loudspeakers will present any
problems for the RMB-1095. See your autho-
rized Rotel dealer if you have any questions.
Speaker Wire Selection
Use insulated two-conductor stranded wire to
connect the RMB-1095 to the speakers. The
size and quality of the wire can have an au-
dible effect on the performance of the system.
Standard speaker wire will work, but can result
in lower output or diminished bass response,
particularly over longer distances. In general,
heavier wire will improve the sound. For best
performance, you may want to consider spe-
cial high-quality speaker cables. Your autho-
rized Rotel dealer can help in the selection
of appropriate cables for your system.
Polarity and Phasing
The polarity – the positive/negative orienta-
tion of the connections – for every speaker
and amplifier connection must be consistent
so all the speakers will be in phase. If the po-
larity of one connection is mistakenly reversed,
bass output will be reduced and stereo im-
aging degraded. All wire is marked so you
can identify the two conductors. There may
be ribs or a stripe on the insulation of one
conductor. The wire may have clear insula-
tion with different color conductors (copper
and silver). There may be polarity indications
printed on the insulation. Identify the positive
and negative conductors and be consistent with
every speaker and amplifier connection.
RMB-1095 Five Channel Power Amplifier