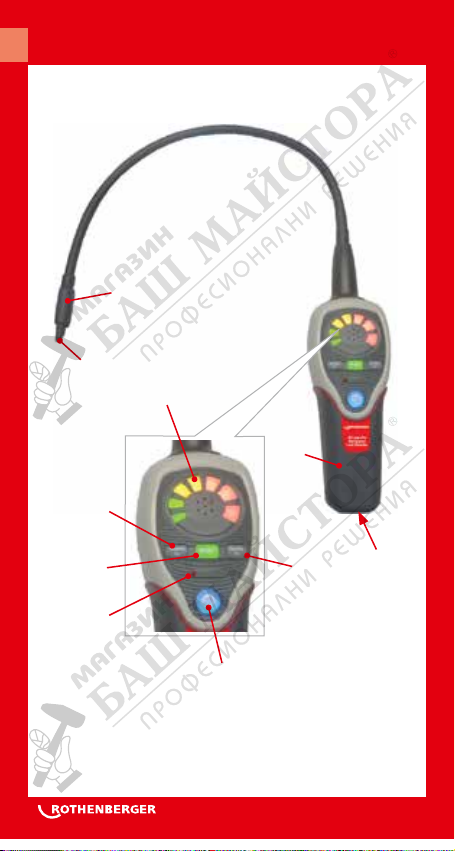
Rothenberger ROLEAK Pro User manual

DE Bedienungsanleitung
EN Instructions for use
FR Instruction d’utilisation
ES Instrucciones de uso
IT Istruzioni d’uso
PT Instruções de serviço
DA Brugsanvisning
SV Bruksanvisning
NO Bruksanvisning
FI Käyttöohje
PL Instrukcja obslugi
CS Návodkpoužívání
RU Инструкцияпо
использованию
ROLEAK Pro
ROLEAK Pro
rothenberger.com

8
9
10
3
2
1
4
5
7
6
A Overview

1
Intro
DEUTSCH Seite 2
Bedienungsanleitung bitte lesen und aufbewahren! Nicht wegwerfen!
Bei Schäden durch Bedienungsfehler erlischt die Garantie! Techni-
sche Änderungen vorbehalten!
PУCCKИЙ Страница 105
Прочтите инструкцию по эксплуатации и сохраняйте её для
дальнейшего использования! B случае поломки инструмента
из-за несоблюдения инструкции клиент теряет право на
обслуживание по гарантии! Bозможны технические изменения!
ENGLISH - Original User Manual page 11
Please read and retain these directions for use. Do not throw them
away! The warranty does not cover damage caused by incorrect use
of the equipment! Subject to technical modications!
FRANÇAIS page 19
Lire attentivement le mode d’emploi et le ranger à un endroit sûr! Ne
pas le jeter ! La garantie est annulée lors de dommages dûs à une
manipulation erronée ! Sous réserve de modications techniques!
ESPAÑOL página 28
¡Por favor, lea y conserve el manual de instrucciones! ¡No lo tire! ¡En
caso de daños por errores de manejo, la garantía queda sin validez!
Modicaciones técnicas reservadas!
ITALIANO pagina 37
Per favore leggere e conservare le istruzioni per l´uso! Non gettarle
via! In caso di danni dovuti ad errori nell´uso, la garanzia si estingue!
Ci si riservano modiche tecniche!
PORTUGUES pagina 46
Queiram ler e guardar o manual de instruções! Não deitar fora! Em
caso de avarias por utilização incorrecta, extingue-se a garantia!
Reservado o direito de alterações técnicas!
DANSK side 55
Læs betjeningsvejledningen, og gem den til senere brug! Smid den ikke
ud! Skader, som måtte opstå som følge af betjeningsfejl, medfører, at
garantien mister sin gyldighed! Ret til tekniske ændringer forbeholdes!
SVENSKA sida 63
Läs igenom bruksanvisningen och förvara den väl! Kasta inte bort
den! Garantin upphör om apparaten har använts eller betjänats på
ett felaktigt sätt! Med reservation för tekniska ändringar
!
NORSK Side 71
Les bruksanvisningen og oppbevar den vel! Ikke kast den! Oppstår
skader på grunn av betjeningsfeil opphører garantiens gyldighet!
Tekniske forandringer forbeholdes!
SUOMI Sivulta 79
Lue ja säilytä tämä käyttöohje! Älä heitä pois!
Takuu ei kata käyttövirheistä aiheutuvia vahinkoja! Oikeudet teknisiin
muutoksiin pidätetään!
POLSKI strony 87
Instrukcjê obslugi prosze przeczytac i przechowac! Nie wyrzucac!
Przy uszkodzeniach wynikajacych z blêdów obslugi wygasa gwaran-
cja! Zmiany techniczne zastrzezone!
CESKY stránky 96
Návod k obsluze si prosím přečtěte a uschovejte jej! Nevyhazujte jej!
V prípade poškození zpusobeném chybnou obsluhou zaniká záruka!
Technické změny jsou vyhrazeny!

11
ENGLISH
Markings in this document:
Danger!
This sign warns against the danger of personal
injuries.
Caution!
This sign warns against the danger of property
damage and damage to the environment.
Call for action
Contents Page
1 Features 12
2 Technical Data 12
3 Function of the Unit 13
3.1 Overview (A) 13
3.2 LED Leakage Indicator 13
3.3 Commissioning 14
3.4 Operation 15
4 Replacing new sensor 17
5 Cleaning 17
6 Customer service 18
7 Disposal 18

12 ENGLISH
1 Features
ROLEAK Pro is the perfect tool for the maintenance of
air-condition or cooling systems provided with compres-
sor and refrigerant. This unit uses a newly developed
semi-conductor sensor which is very sensitive to a
variety of general used refrigerants.
●Microprocessor control with advanced digital
●signal processing
●Multi-color visual display
●High-median-Low leak sensitivity selector
●Low battery indication
●Semi-conductor gas sensor
●Detection of R-134a, R-410A, R-407C, R-22,
●R-32, HFO-1234yf…
● 15.5” (40 cm) exible gooseneck
●Reference Leak source included
●Reset of ambient concentration
●Long-life, DC brushless fan
●Automatic zero and background compensation
2 Technical Data
Measurable Refrigerants:
R-134a, R404A, R407C, R410A, R22, R32, HFO-
1234yf etc.
Sensitivity:
High Medium Low
R-32, R134a 3 g/year 15 g/year 30 g/year
R-22 4 g/year 20 g/year 40 g/year
Alarm Method .................. Buzzer, Tricolor LED bar
indicator
Power Usage................... 4x AA size (6V DC) alkaline
batteries
Length of Gooseneck ...... 40 cm (15,5”)
Dimension........................ 173 x 66 x 56 mm
Weight ............................. approximately 400 g

13
ENGLISH
Battery Durability ............. approximately 7 hours normal
use
Auto power OFF .............. 10 minutes
Disable Auto Power O: Press and Hold “Hi” button
then power on the meter.
Warm-Up Time ............... approximately 45 seconds
Operating Temperature... 0 ~40 °C
Humidity........................... < 80% RH
Storage Temperature....... -10 ~60 °C
Humidity........................... < 70% RH
Altitude............................. < 2000 m (6500’)
Scope of delivery: Alkaline batteries (AA) X 4 pcs, User
manual, reference leak, carry case.
3 Function of the Unit
3.1 Overview (A)
1Sensor 6Reset Button
2Sensor Protector 7Low Battery Indi-
cator
3LED Leak Indicators 8Power On/O
4Sensitivity Lo Button 9Battery Cover
5Sensitivity Hi Button 10 Battery Cover Screw
3.2 LED Leakage Indicator
Base Concentration Indication
More
Highest Concentration Indication

14 ENGLISH
3.3 Commissioning
Installing Batteries:
Loose the screw and
remove the battery com-
partment cover located on
the bottom of the unit.
Install 4 “AA” size alkaline
batteries.
Reinstall the battery cover by aligning it with the
handle.
When the batterie-durability is reached, a red LED
illuminates to indicate low battery. The batteries should
be replaced as quickly as possible.
Automatic Ambient Reset Feature:
This Refrigerant leak detector features an Automatic
Ambient Reset function that sets the unit to ignore
ambient concentrations of refrigerant.
Automatic Ambient Setup - Upon initial power on,
the unit automatically sets itself to ignore the level
of refrigerant present at the tip. Only a level, or con-
centration, greater than this will cause an alarm.
CAUTION! Be aware that this feature will cause the
unit to ignore any refrigerant present at turn on. In
other words, with the unit o if you place the tip up to
a known leak and switch the unit on, no leak will be
indicated!
Ambient Reset Feature – Resetting the unit during
operation performs a similar function, it programs
the circuit to ignore the level of refrigerant present
at the tip. This allows the user to ‚home-in‘ on the
source of the leak (higher concentration). Similarly,
the unit can be moved to fresh air and reset for
maximum sensitivity. Resetting the unit with no ref-
rigerant present (fresh air) causes any level above
zero to be detected.
After the unit is warmed up, the default sensitivity le-
vel is set at “High” and Auto Reset function is “ON”.
Auto Reset function is best used initially when user
is moving around trying to identify leakage source.
Once the leak source is determined, cancel the Auto
4 „AA“ size
alkaline
batteries

15
ENGLISH
Detect function to proceed with leakage measure-
ment.
Auto Reset function should be turned OFF when use
in xed position leakage detection.
Feature Sensitivity Adjustment:
The Instrument provides thress levels of sensitivity.
When the unit is switched on, it is set to the high sensi-
tivity level.
To change the sensitivity, press the Sensitivity
Lo key.
When the key is pressed, the visual display will momen-
tarily show the two left LED‘s (green) indicating Low
Sensitivity level is selected.
To switch back to High Sensitivity, press the Sensitivity
Hi key.
The two right LED‘s (red) will light momentarily indica-
ting high Sensitivity level is selected.
Low Sensitivity level (Green LED)
Medium Sensitivity level (Orange LED)
High Sensitivity level (Red LED)
3.4 Operation
WARNING! Do not operate this instrument in
the presence of gasoline, natural gas,
propane, or in other combustible atmosphe-
res.
How To Find Leaks?
NOTE: A sudden whip ping of the leak detector probe or
„blowing“ into the sensor tip will aect the air ow over
the sensor and cause the instrument to alarm.
Power-Up key:
The ON
OFF key turns the Refrigerant leak detector instru-
ment ON or OFF function.

16 ENGLISH
Press it once to turn on the Refrigerant leak de-
tector, the display will illuminate with ash, for 45
seconds to eat up the sensor. After this period the
unit can be used.
Auto reset & Reset function key:
When the Auto Reset function is turned ON, the meter
will monitor background status and ne tune itself.
When Reset LED light is on, it indicates it is in ON
mode.
Press Reset button and hold for 2 seconds the
Reset light will turn o and Auto Reset function is in
OFF mode.
When the Reset light is o, it indicates the Reset func-
tion is in manual mode.
Press the Reset button once to enable manual
Reset function.
Verify the condition of the unit and sensor:
Set the sensitivity level to “Hi”.
Open the leak check bottle cover and slowly move it
closer to snake tube nozzle.
If the indication moves up to high from low then we
should move the check bottle away and the LED should
go o again. This shows that the unit is under working
condition.
If the unit does not perform as we expect, bring the unit
for maintenance at your local sales oce.
Enter the measuring mode:
Place the tip of the leak-detector probe as close
as possible to the site of the suspected leak. Try
to position the probe within 1/4 inch (6 mm) of the
possible leak source.
Slowly move the probe past each possible leakage
point.
When the instrument detects a leak source, the
audible tone will alarm. Additionally, the visual
indicators will light from left to right, Green LED then
Orange LED then Red LED (highest concentration)
as increasing of level indicate that the location is
close to the source.

17
ENGLISH
When the Instrument signals a leakage, pull the
probe away from the leak for a moment, then bring it
back to pinpoint the location. If the refrigerant leak is
large, setting the sensitivity switch to LOW will make
it easier to nd the exact site of the leak.
Return the sensitivity switch to HIGH before se-
arching for additional leaks.
When you‘ve nished leak-testing, turn OFF the
instrument and store it in a clean place, protect the
leak detector from possible damage.
4 Replacing new sensor
The sensor has a limited operative period. Under nor-
mal operation, the sensor should work more than one
year. Expose the sensor under high density of refrige-
rant (>30000ppm) will shorten its life cycle rapidly. It
is important to ensure that sensor surface is free from
water droplets, vapor, oil, grease, dust and any or all
other forms of contaminant. Furthermore, to ensure
good working condition of the unit, sensors must be
replacement periodically when its operative life is over.
WARNING! When replacing new sensor, the
worn-out sensor may be HOT!
Remove cone cap cover
from the tip of snake
tube.
Pull out old sensor and
insert the new sensor into
the plug.
Seal the cap cover over the plug.
5 Cleaning
The Instrument plastic housing can be cleaned with
standard household detergent or isopropyl alcohol.
Care should be taken to prevent the cleaner from en-
tering the instrument. Gasoline and other solvents may
damage the plastic and should be avoided.
WARNING! The detergent or isopropyl
alcohol might damage the sensor, please
keep them from the sensor through the
process.
Sensor protector
Sensor

18 ENGLISH
6 Customer service
The ROTHENBERGER service locations are available
to help you (see listing in catalog or on-line) and repla-
cement parts and service are also available through
these same service locations. Order your accessories
and spare parts from your specialist retailer or using RO
SERVICE+ online: + 49 (0) 61 95/ 800 8200
+ 49 (0) 61 95/ 800 7491
service@rothenberger.com - www.rothenberger.com
7 Disposal
Components of the unit are recyclable material and
should be put to recycling. For this purpose registered
and certied recycling companies are available. For an
environmental friendly disposal of the non-recyclable
parts (e.g. electronic waste) please contact your local
waste disposal authority.
Old batteries can be taken to your specialist dealer who
will dispose of them in conformity with environmental
regulations.
For EU countries only:
Do not dispose of electric tools with domestic
waste. In accordance with European Directive
2012/19/EU on waste electrical and electronic
equipment and its implementation as national
law, electric tools that are no longer serviceable
must be collected separately and utilised for
environmentally compatible recycling.
Other manuals for ROLEAK Pro
1
This manual suits for next models
1
Table of contents
Other Rothenberger Measuring Instrument manuals

Rothenberger
Rothenberger Roscope 1000 User manual

Rothenberger
Rothenberger ROLeak Aqua 3Plus User manual

Rothenberger
Rothenberger RO 77 User manual

Rothenberger
Rothenberger ROLEAK Pro User manual

Rothenberger
Rothenberger RO 458s User manual

Rothenberger
Rothenberger ROTEST GW 150/4 User manual

Rothenberger
Rothenberger RO 3200 User manual