UNIVERSAL TOASTER UTX-200L
5
P/N 1010992 Rev. K 03/15
McDonald’s
UNIVERSALTOASTERUTX-200
1
P/N101090409/06
McDonald’s
MODELUTX-200
ManufacturingNumber9210800 and 9210802
Placethismanualin the Toaster section
ofyourEquipmentManual.
Manufacturedexclusivelyfor
McDONALD’S®
BY
A.J.ANTUNES&CO.
180KEHOEBLVD.
CAROLSTREAM,ILLINOIS60188, U.S.A.
PHONE:1-630-784-1000
TOLLFREE:1-877-392-7854
FAX:1-630-784-1650
www.ajantunes.com
TABLEOFCONTENTS
Thismanualisforthe exclusive use of licensees and employees of McDonald’s Systems, Inc..
©McDonald’sCorporationAll Rights Reserved
LIMITEDWARRANTY
TheAntunesFoodServiceEquipment Division of A.J. Antunes & Co. provides the following limited warranty to the original purchaser of all McDonald’s Equipment
manufacturedandpurchasedafterJanuary 1, 2003.
Allcomponentsarewarrantedagainst defects in the material and workmanship for a period of two (2) years from date of original installation, not to exceed 30 months
fromdateofshipmentfrom our factory.
Ifanypartbecomesdefective during the first two (2) years after the original installation date, Antunes Food Service will pay negotiated straight time labor costs to an
AuthorizedServiceAgenttoreplace the part, plus travel expenses up to 50 miles/80 km, 1 hour each way (100 miles/160 km, 2 hours round trip).
AntunesFoodServicereservesthe right to make changes in design or add improvements on any products. The right is always reserved to modify Equipment
becauseoffactorsbeyondour control and government regulation. Changes to Equipment do not constitute a warranty charge.
Thiswarrantyisexclusiveand is in lieu of all other warranties, expressed or implied, including any implied warranty of merchantability or fitness for a particular pur-
pose,eachofwhichis expressly disclaimed. The remedies described above are exclusive, and in no event shall A.J. Antunes & Co. or any of its Divisions be liable
forspecialconsequentialorincidental damages for the breach or delay in the performance of this warranty.
WARRANTYEXCLUSIONS
•ThecostofInstallation.
•Equipmentthathasbeendamaged due to shipment. Purchaser should
makedamageclaimdirectlyupon carrier.
•Alteration,misuse,abuse.
•Improperstorageorhandling.
•Impropermaintenance.
•FailuretofollowproperInstallation instructions, including electrical connec-
tion.
•Improperorunauthorizedrepairs.
•ScheduledMaintenanceproceduresasoutlined in your MRC Card.
•ConsumablessuchasGrillCovers (Release Sheets), gaskets, Conveyor Belt
Wraps,O-Rings,andlightbulbs.
•OvertimeorHolidaycharges.
•Mileageover50miles/80km (100 miles/160 km round-trip), or travel time
overtwo(2)hours.
•Freight,foreign,excise,municipalor other sales or use taxes.
•Consequentialdamagessuchasloss of profit, loss of time, the cost of repair-
ingorreplacingotherproperty which is damaged, or any other incidental
damageofanykind.
OwnerInformation.....................................................2
General......................................................................2
WarrantyInformation.................................................2
Service/TechnicalAssistance....................................2
Specifications.............................................................3
ElectricalSpecifications&Plug Configuration..........3
Dimensions................................................................3
ImportantSafetyInformation....................................4
Installation ................................................................... 5
Unpacking..................................................................5
Location.....................................................................5
AssemblingtheUnit..................................................6
Operation ..................................................................... 7
OperatingInstructions...............................................7
BreakfasttoLunchChange-over ..............................7
ProductLabelsandToasting Product .......................8
BunThicknessCompressionControl Knob Settings9
ViewingtheProgramMode Settings...................... 10
AdjustingToastingQuality......................................10
UniversalToasterSettings.......................................11
UTX-200UnitStatusMode .....................................11
PurgingProductsfromthe Toaster.........................12
ShuttingdowntheUTX-200................................... 12
Maintenance..............................................................13
CleaningtheAccessories,Release Sheet, and
VerticalConveyor...................................................13
Troubleshooting.......................................................15
ReplacementParts...................................................17
WiringDiagram.........................................................35
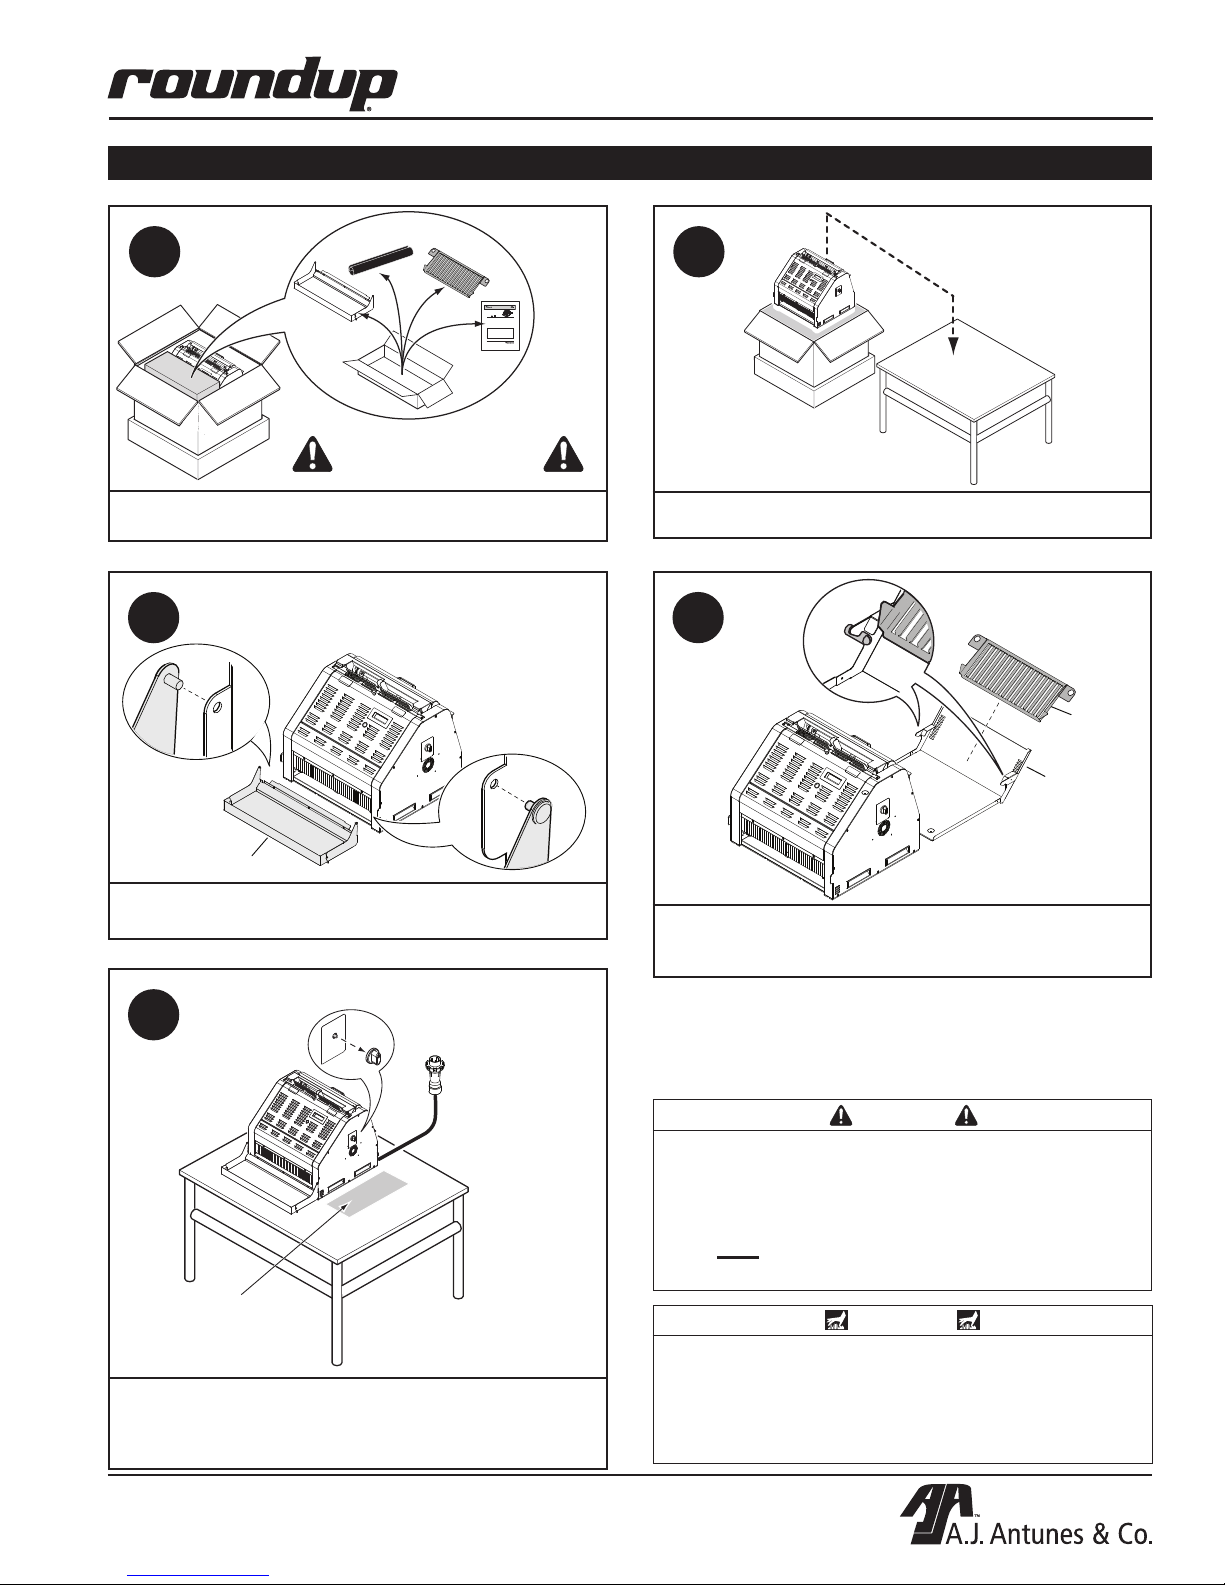
Release
Sheet (2)
Bun
Buffer
Owner’s
Manual
Breakfast
Chute
NOTE: If any parts are missing or damaged,
contact Technical Service IMMEDIATELY at 1-877-
392-7854 (North America only), or 630-784-1000.
INSTALLATION
CAUTION
1. Provide at least 1 inch (25.4 mm) clearance on
both sides of the UTX-200L (or CTX-200L if used
with the UTX-200L) from any combustible wall or
surface. Leave front and back open.
2. Do NOT operate unit on a combustible surface
or counter top.
WARNING
Use caution while the unit is operating. The unit
and accessories will be hot to the touch. Use Heat
Resistant Gloves when removing any accessories
while the unit is operating. Personal injury may
result.
Open the Large Box. Remove and open the Accessory Box.
Set accessories, parts, and manual aside.
DO NOT DISCARD
ACCESSORIES BOX!
1
Remove UTX-200L from box. Place in desired location.
Wipe down the entire unit with a clean damp cloth.
2
Bun Buffer
Wash all metal accessories in hot, soapy water and allow to
air dry. Attach Bun Buffer to front of unit.
3
Plug the power cord into the appropriate outlet.
If CTX-200L is present: Remove Compression Knob from
side of the UTX-200L closest to the CTX-200.
Do NOT discard the knob.
Crumb
Tray
Breakfast
Chute
Insert Breakfast Chute over Crumb Tray TAB END FIRST.
Hook the chute over the top of Crumb Tray. Slide Crumb Tray
fully into unit.
NOTE: CTX-200
can be placed
to the left or right
of UTX-200
closest to the CTX-200
Plug the
Power Cord
into the
appropriate
outlet
5
4
NOTE: Wash all metal
accessories prior to
installation!