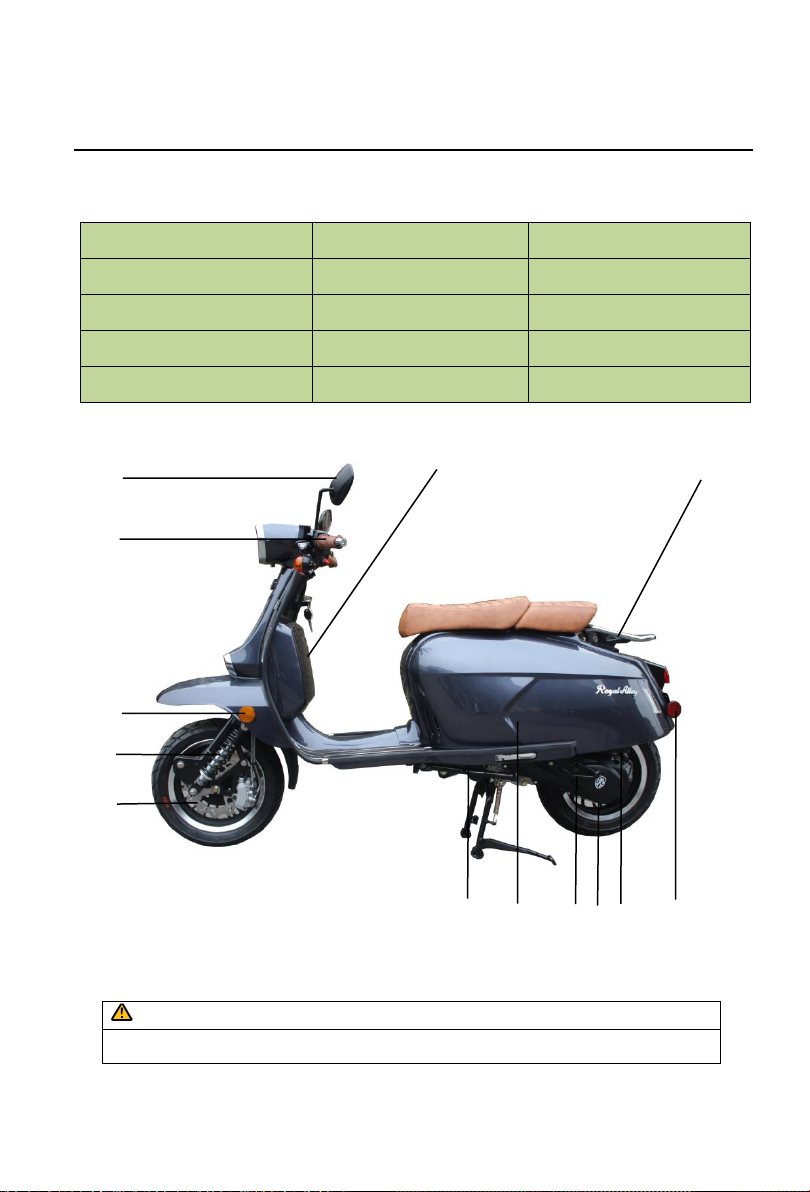
Royal Alloy Grand Tourer 150 User manual

0

1

2
Preface
Thank you for choosing your Royal Alloy Grand Tourer 150/Grand Prix
150 /Grand Tourer 150 Special scooter. Royal Alloy products embody high
technology with reliability and have been designed utilizing RA Engineering
Co., Ltd.’s many years of experience in manufacturing motorcycles and
scooters for travel, commute, leisure, and sporting activities.
This manual explains the use, operation, basic inspection, and maintenance
for your scooter. If you have any further questions about the operation and
maintenance, please contact your dealer.
The scooter is designed to fully meet the exhaust emissions standards
prevailing on the date of manufacture. To maintain the compliance to the
exhaust emissions standards, please carry out the maintenance schedule and
instructions in this manual in cooperation with your dealer.
GENUINE MOTOR OIL is the official lubricant of the Genuine Scooter
Company. Be aware that the use of lubricants not approved by Genuine for use
in your vehicle can lead to damage to your scooter and may void any warranty.
The following important information will appear in this manual:
Caution
Refers to procedures that must be followed. Otherwise, your
personal safety and the safety of others may be compromised.
Note
Refers to procedures that must be followed to avoid
damaging the scooter.
Warning
Refers to procedures that must be followed to avoid injury to
you or other persons or the scooter
Note
² This manual should be regarded as part of the scooter and should be
always with the scooter, including when it is resold.
Note
² This manual contains the latest product information at the time
when it is printed. However, it is possible that the manual may have
slight variations from your scooter. If you have any questions,
please contact your dealer.
Preface

3
WARNING:
California Proposition 65
Operating, servicing and maintaining a passenger vehicle or off-
highway motor vehicle can expose you to chemicals including engine
exhaust, carbon monoxide, phthalates, and lead, which are known to
the State of California to cause cancer and birth defects or other
reproductive harm. To minimize exposure, avoid breathing exhaust, do
not idle the engine except as necessary, service your vehicle in a well-
ventilated area and wear gloves or wash your hands frequently when
servicing your vehicle. For more information go to
www.P65Warnings.ca.gov/passenger-vehicle.
WARRANTY INFORMATION
Your vehicle is covered by a Manufacturer’s Limited Warranty and an
EPA Emissions Related Components Warranty. If you purchased your
vehicle in the state of California, you are also covered by a California
Emission Control System Warranty. Detailed warranty information can be
found in your warranty booklet provided separately from this manual.
Tampering with Noise Control System Prohibited
Federal law prohibits the following acts or causing thereof:
(1) The removal or rendering inoperative by any person other than for
purposes of maintenance, repair, or replacement, of any device or element
of design incorporated into any new vehicle for the purpose of noise control
prior to its sale or delivery to the ultimate purchaser or while it is in use, or
(2) the use of the vehicle after such device or element of design has been
removed or rendered inoperative by any person.
Among those acts presumed to constitute tampering are the acts listed
below:
• Removing the exhaust catalyst(s)
• Removing the exhaust muffler(s)
• Removing, replacing, or otherwise altering the length and/or
shape of the exhaust system.
Preface

4
Precautions for Safe Riding
Please obey all local traffic regulations and consider safety prior to and
while riding. It is advised to control your speed to stay within safe limits.
Before riding the scooter in traffic, it is advised to practice your riding
in a spacious and traffic-free place in order to develop adequate skills to
ride safely and become familiar with the scooter’s controls. Practice is
essential to safety. Please observe any special training and/or government
test required before using your scooter on public thoroughfares.
Safety speed limits vary in accordance with the roads and conditions,
riding skill, and weather. Awareness of speed limits is helpful in avoiding
traffic accidents.
It is dangerous to ride on damp or wet roads. Therefore, high speed
should be avoided, and special care should be taken when turning. Bear this
in mind, the braking distance on rainy days can be twice as much as on dry
days.
Practice before Riding
Knowing Your Safety Speed Limit
Be Careful on Rainy Days
Correct Wearing of Safety Helmet
Precautions for Safe Riding
The following items are indispensable:
²Make safety checks before every journey.
²Regular, thorough inspection.
²Regular, thorough servicing.
²Following the Maintenance Schedule.

5
Wear a safety helmet whenever you ride and be sure to fasten the strap
securely.
Bright-coloured and well-fitted clothing are recommended. Fitted with
EC protection.
The high temperature of the muffler may cause burns. Please park
your scooter to prevent the accidental chance of persons coming into
contact with the muffler.
Modification to the unit is prohibited as it may compromise safety of
riding.
Safety Clothing Recommendation
Caution High Temperature
Indispensable Maintenance and inspection
No Modifications Allowable

6
Content
Scooter Components ........................................................................................... 8
Serial Numbers ................................................................................................. 10
Control Functions ............................................................................................ 11
Instrument Panel Indicators ....................................................................... 11
Ignition switch ............................................................................................ 13
Handlebar Switches .................................................................................... 14
Beam Switch ...................................................................................... 14
Turning Signal Lamp Switch ............................................................. 14
Horn Button ....................................................................................... 14
Starter Button ..................................................................................... 15
Throttle Grip ...................................................................................... 15
Brake Lever ....................................................................................... 15
Engine Stop ........................................................................................ 15
Kick Starter Lever .............................................................................. 16
Main Stand ......................................................................................... 16
Main Stand Side Stand ....................................................................... 16
Seat Lock (1) (2) ........................................................................................ 17
Fuel Tank Cap ............................................................................................ 18
Front Luggage Box .................................................................................... 19
Fuel and Oil Recommendations ...................................................................... 20
Breaking-in of New Scooter ............................................................................. 21
Inspection Before Riding ................................................................................. 23
Battery Connection .................................................................................... 23
Braking Effect and Brake Free Play Inspection ......................................... 24
Front Brake and Anti-Dive Linkage Inspection ......................................... 24
Tyre Inspection .......................................................................................... 24
Fuel Inspection ........................................................................................... 24
Engine Oil Inspection ................................................................................. 25
Transmission Oil Inspection ...................................................................... 26
Ignition Unit and Lights Inspection ........................................................... 26

7
Rear View Mirrors Inspection .................................................................... 27
Reflectors and the License Plate Inspection ............................................... 27
Riding Tips ........................................................................................................ 28
Start Engine ............................................................................................... 28
Prepare to Drive ........................................................................................ 29
Inspection and Maintenance ............................................................................ 31
First Maintenance ....................................................................................... 31
Maintenance Schedule ............................................................................... 32
Body Frame Nuts and Bolts ....................................................................... 33
Battery ........................................................................................................ 34
Spark Plug .................................................................................................. 34
Fuel Hose ................................................................................................... 35
Air Filter ..................................................................................................... 35
Carburetor .................................................................................................. 37
Engine Idle Speed Adjustment ................................................................... 37
Throttle Cable Adjustment ......................................................................... 37
Hydraulic Brake Fluid ................................................................................ 38
Tyres ........................................................................................................... 38
Fuse ........................................................................................................... 39
Troubleshooting ................................................................................................ 40
Storage Procedures ........................................................................................... 42
Specifications .................................................................................................... 44
Reporting Safety Defects .................................................................................. 45

8
Scooter Components
Familiarize yourself with the following parts carefully before using the
scooter.
Right Side View:
○
1Rear light / brake light
○
2Rear turning lamps
○
3Seat
○
4Acceleration grip & right switch
○
5Head lamp
○
6Front turning lamps
○
7Front right shock absorber
○
8Front right-side
reflector
○
9Main stand
○
10 Rear footrest
○
11 Exhaust / Muffler
○
12 Rear right side
reflector
Scooter Components
①
②
③
④
⑤
⑥
⑾
⑩
⑦
⑨
⑧
⑿

9
Left Side View:
○
1Rear-view mirrors
○
2Left grip switch
○
3Front left side reflector
○
4Front left shock absorber
○
5Front disc brake
○
6Side stand
○
7Air filter
○
8Kick starter lever
○
9Rear disc brake
○
10 Rear shock absorber
○
11 Rear left side reflector
○
12 Rear rack
○
13 Glove box
Warning
² Rear rack has a maximum payload of 5 kgs
Scooter Components
①
②
③
④
⑦
⑤
○
11
○
12
○
13
⑥
⑩
⑧
⑨

10
Serial Numbers
The engine number is stamped on the rear of the crankcase assembly.
The chassis number is stamped on the right-side frame rail.
Engine number Chassis number
Please write down your scooter’s serial numbers below for future
reference.
Note
² Use your engine number for convenience in purchasing correct
spare parts from your dealer.
Engine Number
Chassis Number
Serial Numbers
Chassis Serial No.:
Engine Serial No.:

11
Control Functions
1) ① Tachometer
2) ② Fuel Gauge
3) ③⑦ Left /Right Turn Signal Indicator
4) ④⑤ High/Low Beam Indicator
5) ⑥ Trip Odometer Function Button
6) ⑧ Odometer (mile)
7) ⑨ Battery Voltage Indicator
8) ⑩ Speedometer (mph)
Instrument Panel Indicators
Control Functions
①
②
③
④
⑤
⑥
⑦
⑧
⑨
⑩

12
①
Tachometer
The indicator will show the engine RPM.
②
Fuel Gauge
This will show the fuel volume remaining in the fuel tank. When the pointer
points to “F”, the fuel tank is full. When the pointer moves low toward “E”,
the fuel level is low and refilling is necessary.
③
⑦
Left and Right Turn Signal
When the turn signal switch is set to left, the Left Direction Indicator will
flash. When the turn signal switch is set to right, the Right Direction
Indicator will flash. Press the button toward the bar to stop indicator.
④
⑤
High/Low Beam Indicator
⑥
Trip Odometer Function Button
Changing Display between TRIP METER & ODOMETER:
• Turn the ignition key to the on position.
• Press the “MODE” button and release.
• Clear the trip counter history – When the display reads TRIP
METER, press the “MODE” button and hold for 5 seconds,
then release when zero is displayed.
Changing between MPH & Km:
• When the display reads ODOMETER, press the “MODE” button
and hold for 5 seconds then release.
⑧
Odometer
The odometer registers the total distance the scooter has been ridden.
⑨
Battery Voltage Indicator
Indicates the battery voltage. When the level shows “H”, the battery is fully
charged. When the level drops toward the bottom, the battery charge is low,
recharge replacement is necessary.
⑩
Speedometer
Indicates the speed at which you are riding in MPH.
Control Functions

13
Rotate the key to turn power ON or OFF.
ON
Starts Engine
Scooter fully operational
Cannot remove key until turned off
OFF
Turns Engine Off
Key can be inserted or removed
LOCK
Steering bars can be locked to one direction
Key can be inserted or pulled out
When scooter is left unattended, you can choose to lock the steering
handlebars to prevent theft.
1. Turn the handlebars left.
2. Insert key into OFF position. Press the key in and turn it
counterclockwise to LOCK position.
3. Pull out key.
4. Swing handlebars to check if they are locked.
5. To unlock the handlebars, move the key from LOCK position, and
turn clockwise (without pressing) to OFF position.
Note
² If you are having difficulty locking the scooter, turn handlebars
slightly to the right and try again.
Control Functions
Ignition Switch

14
Use this to change headlamp beam. When switch is turned to:
HIGH
High beam is on.
LOW
Low beam is on.
Use this to turn left/right signal lamps on or off to notifying other
drivers that you are turning left of right.
Switch is turned to:
Right
Right signal lamps flash.
Left
Left signal lamps flash.
Center
No signal lamps are on.
Press this button to sound horn.
Handlebar Switches
①
Beam Switch
②
Turning Signal Lamp Switch
③
Horn Button
Control Functions
①
③
②

15
Use this to start engine. To start ignition key to ON, squeeze the rear
brake lever and press button (#7 on image below).
This is used to control engine speed. Rotate throttle toward yourself
(counterclockwise) to increase engine speed. Rotate throttle away from
yourself (clockwise) to decrease engine speed.
By operating brake levers, you can control the speed of the scooter.
You can decrease your speed or come to a full stop when the lever is fully
depressed. Brake is applied by squeezing brake lever gently towards the
grip. Rear brake light will illuminate when lever is squeezed.
Press this button to turn off engine in the event of an emergency. Use
the ignition switch to stop the engine in all other circumstances.
④
Starter Button
⑤
Throttle Grip
⑥
Brake Lever
⑦
Engine Stop
Control Functions
⑦
⑥
⑤
④

16
⑩ ⑨ ⑧
This scooter is equipped with a kick starter located on the left side of
the engine. To start the engine, place scooter on the main stand and depress
the kick starter lever forcefully.
To use the main stand, depress it by foot until the stand is touching the
floor and lift the rear of the scooter backwards until the stand is securely in
place with the rear wheel off the ground. Use the rear rack to assist in lifting
the scooter upwards and backwards.
Always ensure that the scooter is on level ground or pointing uphill on
hard standing before putting the scooter on the main stand.
Never put the scooter on the stand if the machine is pointing downhill
or the floor is uneven or on soft or loose ground.
To use the side stand, depress the end of the stand until it rotates
towards the front of the scooter and stops.
⑧
Kick Starter Lever
⑨
Main Stand
⑩
Main Stand
Side Stand
Control Functions

17
Carefully lift the rear of the front seat with your hands, the seat will lift
open.
Carefully push down the rear of the seat, the seat is secured to the
center section ② by the sucker ①, the seat will be locked.
Seat Lock (1)
To open the seat as follows:
To close the seat as follows:
Seat Lock (2)
Control Functions
①
②
①

18
1. The seat release button is located on the left-hand side and to the rear
of the seat, push the button in and the seat will open.
2. To close the seat gently lower the seat down onto the locking pin.
To access the fuel cap, open the seat. To open the fuel cap, insert the
ignition key into the cap and turn the fuel cap tab clockwise. Please note:
Don’t use the key to rotate the cap since this can cause the key to break.
The key and the lock cover should be rotated at the same time. Close the
fuel cap use the same way.
There is an Operation Notice decal nearby the fuel cap.
To open and close the seat as follows:
Fuel Tank Cap
Control Functions
Operational Notice
With the key inserted and the lock cover
in the upright position, rotate both the key
and the lock cover simultaneously to open
and close the fuel cap.

19
Caution
² Do not keep breakables in luggage box.
² Do not keep valuable items in luggage box.
² Do not place fuel and/or oil in luggage box.
² Only store water-proof items in luggage box
Front Luggage Box
Control Functions
This manual suits for next models
2
Table of contents
Other Royal Alloy Scooter manuals