manuals.online logo
Brands
  1. Home
  2. •
  3. Brands
  4. •
  5. ROYAL GOURMET
  6. •
  7. Griddle
  8. •
  9. ROYAL GOURMET PD1300 User manual

ROYAL GOURMET PD1300 User manual

Customer Service
1-800-618-6798
OWNER’S MANUAL
Use outdoors only! Do not use it in a building,garage or any other enclosed area.
Read the instructions before assembling and using the appliance.
DO NOT use the grill unless it is completely assembled and all the parts are securely fastened.
This grill will become very hot, do not move it during operation.Keep children and pets away.
FOR YOUR SAFETY!
This grill has been made to high quality standards. If you have any questions nor
addressed in this manual, or if you need parts, please call our customer service department,
or send an email to service royalgourmetusa.com.
CONTACT US FIRST!
Learn more at:
@
ᮬ¿¾´» íóÞ«®²»® Ù¿ Ù®·¼¼´» ÐÜïíðð
FOR YOUR SAFETY
ASSEMBLY INSTRUCTION
GENERAL SAFETY INSTRUCTIONS
CONNECTING THE GAS CYLINDER
CLEANING AND CARE
TROUBLESHOOTING GUIDE
WARRANTY
CUSTOMER SERVICE
()
America
the 1-800-618-6798, or send an email to
service@royalgourmetusa.com .
ÚÑÎ ÇÑËÎ ÍßÚÛÌÇ
123
4
12
34
Foot 4pcs Main body 1pc Grease cup 1pc
Griddle 1pc 5 Regulator 1pc
Consider to use a match if fail to light the burner.
ßÍÍÛÓÞÔÇ ×ÒÍÌÎËÝÌ×ÑÒ
1
2
3
4
1
2
soap
GB
4
-The barbecue grill is safe and easy to use.
-Please ensure you only use your barbecue at the correct pressure which the appliance is designed for.
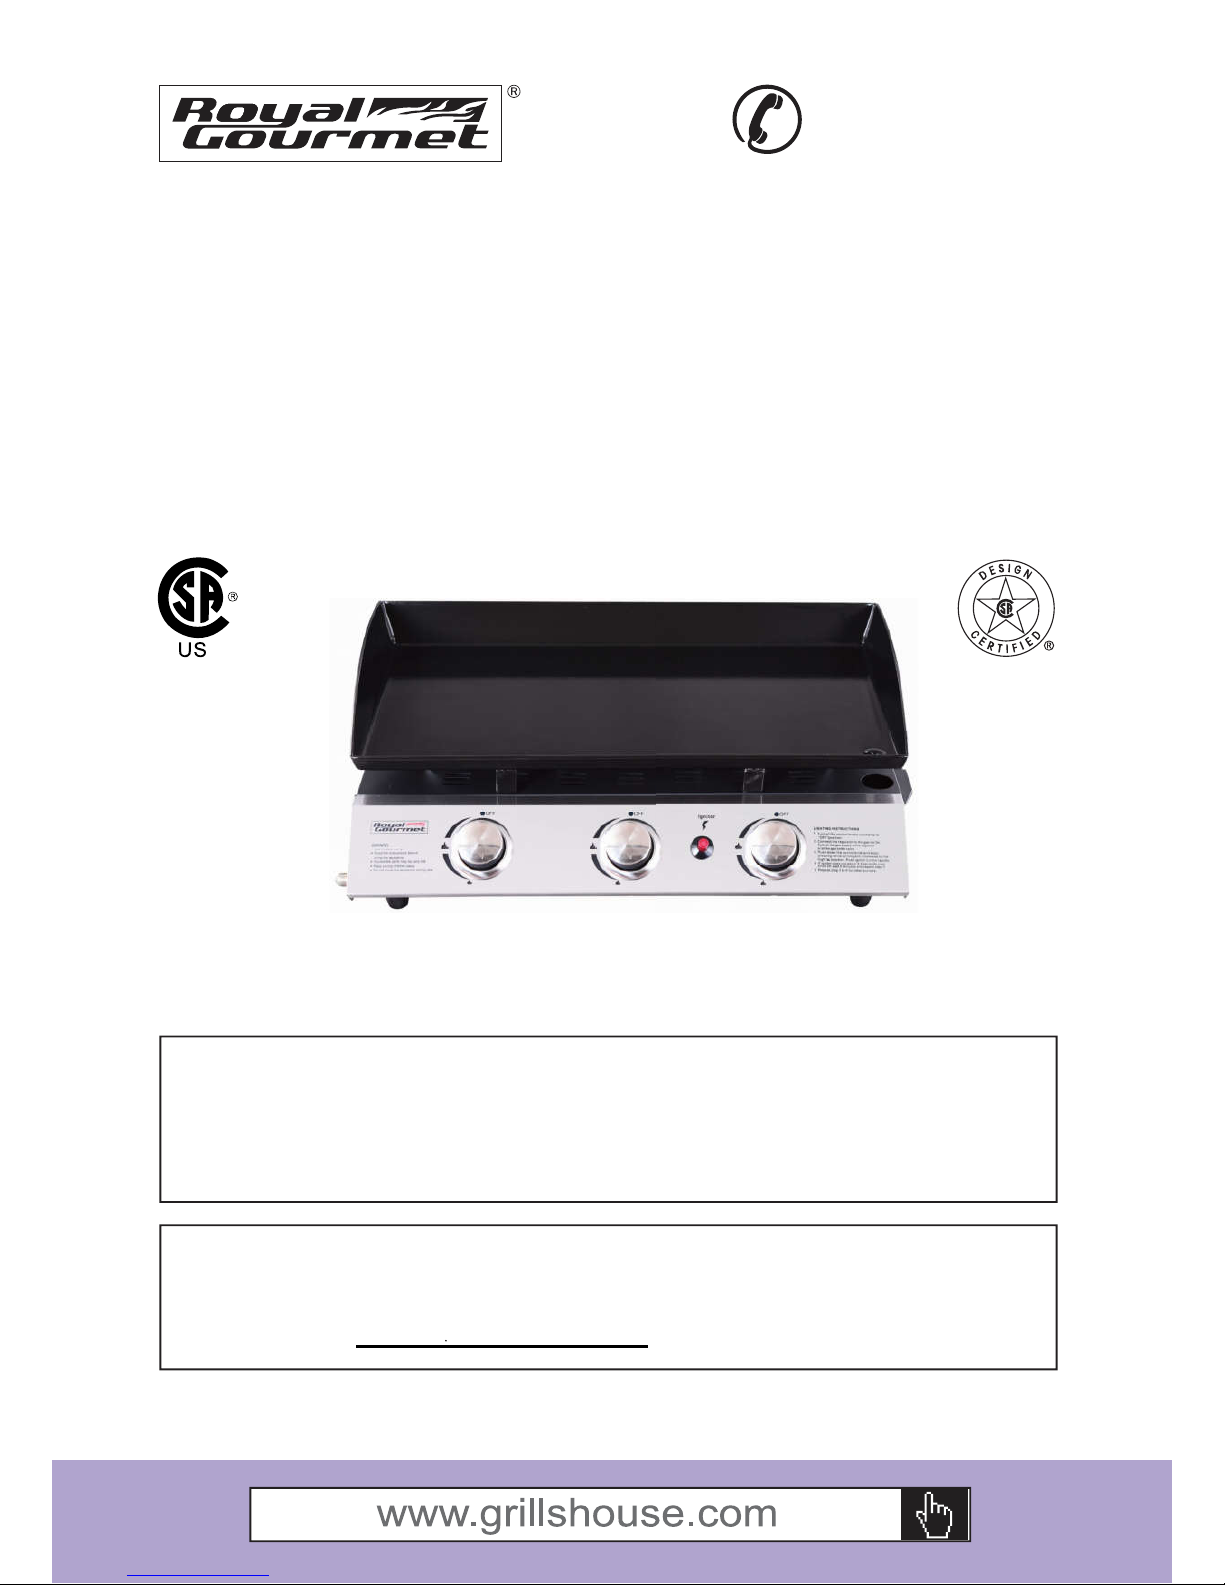
-With a grease tray and a grease cup under the case.
of the user and other people in the vicinity of the area where the appliance is being used. Never use the appliance
in any enclosed covered area.
-When the wind speed is above 2m/s, don’t use gas grill facing to the wind.
-The appliance is designed for use outdoors only.
-Warning! Accessible parts may be very hot. Keep young children away.
-Read the instructions before using the appliance.
-Do not move the appliance while in use.
-Turn off the appliance at the cylinder valve or regulator after use.
-Never mount the cylinder under the barbecue on the base shelf as this could result in serious injury to the user,
other people and/or property.
-The appliance must not have any overhead obstruction. E.g. trees, shrubs, lean to roofs. The appliance must be
install with a clearance of 1m around the appliance.
-Close the valve of the gas cylinder or the regulator after use.
-The use of this appliance in enclosed areas can be dangerous and is PROHIBITED.
INSTRUCTIONS FOR USE
Follow these instructions carefully to avoid seriously damaging your barbecue and causing injury to yourself and to
property.
1. Assemble the barbecue following the assembly instructions carefully.
2. Connect the gas hose to the barbecue. Connect the regulator to the hose.
3. Connect the regulator to the cylinder valve following the regulator instructions supplied with the regulator.
4. Turn all of the control knobs to the ‘OFF’ position before turning on the gas supply to the appliance.
5. Operate the regulator in accordance with the instructions supplied with the regulator.
LIGHTING YOUR BARBECUE
Lighting Instructions
1. Turn the control knob clockwise to “OFF” position.
2. Open the hood before use.
3. Connect the regulator to the gas bottle. Turn the gas supply “ON” at the regulator. Check with the use of soapy
water for any gas leakage between the bottle and the regulator.
4. Push down the control knob and keep pressing while turning it anti-clockwise to the “Full rate” position.
5. If the burner has not lit in 3-5 seconds, turn knob off, wait 5 minutes and repeat step 4.
6. Repeat step 4 to 5 for other burner.
7. Adjust the heat by turning the knob to the High/Low position.
8. To turn the barbecue OFF’: turn the cylinder valve or regulator switch to the ‘OFF’ position and then turn all
control knobs on the appliance clockwise to the ‘OFF’ position.
If the burner fails to ignite, turn all control knobs off (clockwise) and also turn the cylinder valve off.
ÙÛÒÛÎßÔ ÍßÚÛÌÇ ×ÒÍÌÎËÝÌ×ÑÒÍ
Push ignitor button rapidly.
ÉßÎÒ×ÒÙ
1. Turn the control knob clockwise to “OFF” position.
“OFF”
“OFF” “OFF”
“OFF”
GB
5
CONNECTING THE GAS CYLINDER
Please consult your LPG dealer for information regarding a suitable regulator for the gas cylinder.
TO CHECK FOR LEAKS
2. Ensure the control valve is “OFF”.
3. Connect the regulator to the cylinder and ON/OFF valve to the burner, ensure the connections are secure then
turn ON the gas.
before use.
REGULATOR AND HOSE
-Use only regulators and hose approved for LPG at the above pressures. The life expectancy of the regulator is
estimated as 10 years. It is recommended that the regulator is changed within 10 years of the date of manufacture.
-The use of the wrong regulator or hose is unsafe, always check that you have the correct items before operating
-
the barbecue.
-The hose used must conform to the relevant standard for the country of use. The length of the hose must be
1.5 meters (maximum). Worn or damaged hose must be replaced. Ensure that the hose is not obstructed, kinked,
or in contact with any part of the barbecue other than at its connection.
-The hose should not be twisted or kinked when attached to the gas cylinder.
-No part of the hose should touch any part of the appliance. So site the cylinder out to the left hand side of the
appliance at the maximum distant permitted by the hose length.
Storage of an appliance indoors is only permissible if the cylinder is disconnected and removed from the appliance.
When the appliance is not to be used for a period of time it should be stored in its original packaging and stored in
a dry dust free environment.
-The gas cylinder should not be dropped or handled roughly! If the appliance is not in use, the cylinder must be
-
disconnected. Replace the protective cap on the cylinder after disconnecting the cylinder from the appliance.
-Cylinders must be stored outdoors in an upright position and out of the reach of children.
BEFORE USE PLEASE CHECK FOR LEAKS
ÍÌÑÎßÙÛ ÑÚ ÌØÛ ßÐÐÔ×ßÒÝÛ
ÙßÍ ÝÇÔ×ÒÜÛÎ
-DO NOT SMOKE. The cylinder should be changed away from any source of ignition.
-The appliance must be used with 1 LB gas cylinder.
GB
6
CLEANING AND CARE
CAUTION: All cleaning and maintenance should be carried out when the barbecue is cool and with the fuel supply
turned OFF at the gas cylinder.
CLEANING
“ Burning off ” the barbecue after every use (for approx 15 minutes) will keep excessive food residue to a minium.
OUTSIDE SURFACE
Use mild detergent or baking soda and hot water solution. Non-abrasive scouring powder can be used on
stubborn stains, then rinse with water.
If the inside surface of the barbecue lid has the appearance of pealing paint, baked on grease build-up has
allow to completely dry. NEVER USE OVEN CLEANER.
INTERIOR OF BARBECUE BOTTOM
Remove residue using brush, scraper and/or cleaning pad then wash with a soapy water solution.
Rinse with water and allow to dry.
PLASTIC SURFACES
Wash with a soft cloth and hot soapy water solution. Rinse with water. Do not use abrasive cleaners,
degreasers or a concentrated barbecue cleaner on plastic parts.
COOKING GRATE OR GRIDDLE
Use a mild soapy water solution. Non-abrasive scouring power can be used on stubborn stains then rinse with water.
GREASE CUP
1. Please do not open the grease tray during use.
2. Please check the grease cup on time and take away the oil when 1/3 full.
Method: after the grease cup cold, make grease cup up in horizontal line and move it with hook reverse horizontally,
this could take out the grease cup.
CLEANING THE BURNER ASSEMBLY
1. Turn the gas OFF at the control knob and disconnect the cylinder.
2. Remove cooking grate.
3. Clean the burner with a soft brush or blow clean with compressed air and wipe with a cloth.
4. Clean any clogged ports with a pipe cleaner or stiff wire (such as an opened paper clip).
5. Inspect burner for any damage (cracks or holes). If damage is found, replace with a new burner.
7. In some cases your barbecue will light back because of an insect crawling inside the burner venturi or a spider
venturi and pushing into the burner over the burner length.
8. If condition persists consult your gas dealer.
ÌÎÑËÞÔÛÍØÑÑÌ×ÒÙ ÙË×ÜÛ
appreciation of your new griddle.Please don't hesitate to contact us should you have any questions regarding
assembly, performance, warranty, or accessories. We will be happy to order any replacement parts needed.
Please have your model number ready when you contact us. We are here to serve you!
If you need assistance or to order parts: Ý¿´´ ïóèððóêïèóêéçè
Standard Time: 8:00 am to 5:30 pm Monday thru Friday
Thanks for purchasing this Royal Gourmet gas griddle.We are here to help you maximize your enjoyment and
ÉßÎÎßÒÌÇ
ÝËÍÌÑÓÛÎ ÍÛÎÊ×ÝÛ
You have purchased a high-quality gas griddle. Royal Gourmet Corp. provides a warranty for its products
within the framework of its warranty conditions under normal, recreational and non-commercial use of 1 year
from the date of purchase for all components covering defects and manufacturing errors.

Other manuals for PD1300

2

Other ROYAL GOURMET Griddle manuals

ROYAL GOURMET PD1300 User manual

ROYAL GOURMET

ROYAL GOURMET PD1300 User manual

ROYAL GOURMET GG3302S User manual

ROYAL GOURMET

ROYAL GOURMET GG3302S User manual

ROYAL GOURMET GB4000 User manual

ROYAL GOURMET

ROYAL GOURMET GB4000 User manual

ROYAL GOURMET GG4302S User manual

ROYAL GOURMET

ROYAL GOURMET GG4302S User manual

ROYAL GOURMET GB5000S User manual

ROYAL GOURMET

ROYAL GOURMET GB5000S User manual

ROYAL GOURMET PD1201 User manual

ROYAL GOURMET

ROYAL GOURMET PD1201 User manual

ROYAL GOURMET GB4001 User manual

ROYAL GOURMET

ROYAL GOURMET GB4001 User manual

ROYAL GOURMET PD1300 User manual

ROYAL GOURMET

ROYAL GOURMET PD1300 User manual

ROYAL GOURMET GB2000 User manual

ROYAL GOURMET

ROYAL GOURMET GB2000 User manual

ROYAL GOURMET PD1200 User manual

ROYAL GOURMET

ROYAL GOURMET PD1200 User manual

Popular Griddle manuals by other brands

GICO 700 Series Instruction booklet

GICO

GICO 700 Series Instruction booklet

Keating Of Chicago Teppanyaki Griddle user manual

Keating Of Chicago

Keating Of Chicago Teppanyaki Griddle user manual

Keating Of Chicago 24×30 FT Specification sheet

Keating Of Chicago

Keating Of Chicago 24×30 FT Specification sheet

NEFF Z9416X2 manual

NEFF

NEFF Z9416X2 manual

Wells G-13EU Operation manual

Wells

Wells G-13EU Operation manual

Black Stone 1665 owner's manual

Black Stone

Black Stone 1665 owner's manual

Blue Flame BFMG-24 Installation & operation manual

Blue Flame

Blue Flame BFMG-24 Installation & operation manual

Pit Boss PB336GS Assembly guide

Pit Boss

Pit Boss PB336GS Assembly guide

APURO DC900-A instruction manual

APURO

APURO DC900-A instruction manual

SmartLine ACG1 installation instructions

SmartLine

SmartLine ACG1 installation instructions

Cecilware EL-1624 Operation manual

Cecilware

Cecilware EL-1624 Operation manual

Star Manufacturing Star-Max 615MD Specification sheet

Star Manufacturing

Star Manufacturing Star-Max 615MD Specification sheet

Life Smart SG270LB owner's manual

Life Smart

Life Smart SG270LB owner's manual

Members Mark G70302 Assembly instructions & user manual

Members Mark

Members Mark G70302 Assembly instructions & user manual

Twin Eagles TETG user manual

Twin Eagles

Twin Eagles TETG user manual

Camplux FMGG303B Instructions for installation and use

Camplux

Camplux FMGG303B Instructions for installation and use

Smeg GC120 Use

Smeg

Smeg GC120 Use

Dash Go DMS001 Instruction manual & recipe guide

Dash Go

Dash Go DMS001 Instruction manual & recipe guide

manuals.online logo
manuals.online logoBrands
  • About & Mission
  • Contact us
  • Privacy Policy
  • Terms and Conditions

Copyright 2025 Manuals.Online. All Rights Reserved.