manuals.online logo
Brands
  1. Home
  2. •
  3. Brands
  4. •
  5. Rubi
  6. •
  7. Plumbing Product
  8. •
  9. Rubi QUATRO-RQT23 User manual

Rubi QUATRO-RQT23 User manual

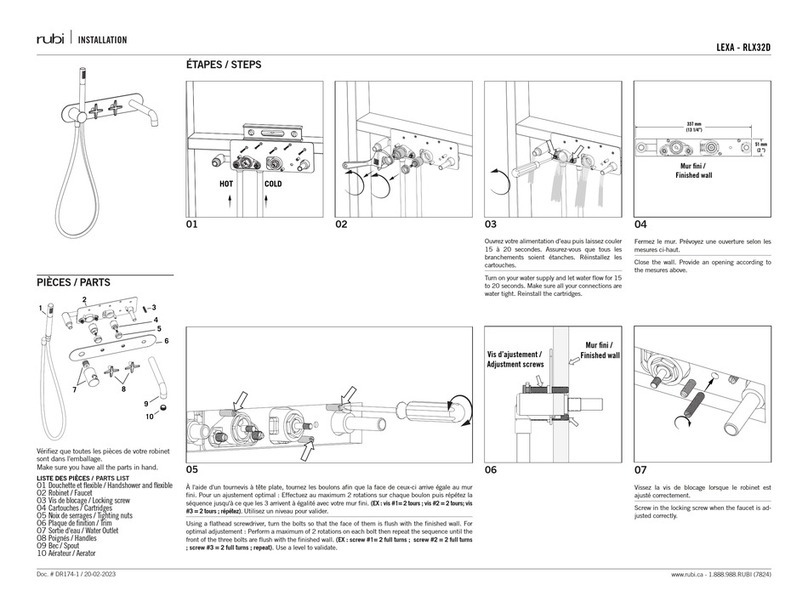
InstallatIon
Doc. # DR105-1 / 16-06-2015 www.rubi.ca - 1.800.463.2197
quatro - rqt23
03
Préparez votre panneau de finition selon
l'illustration ci-haut.
Prepare your panel according the above
illustration.
04
Installez votre panneau de finition au plafond.
Install your panel to the ceiling.
05
Déposez le mitigeur à l'endroit déterminé.
Drop the mixer in place.
07
Dévissez la partie supérieure du déviateur.
Remove the diverter top part.
08
Placez les deux parties du déviateur de part et
d'autre de la surfaceet revissez.
Place both diverter parts on each side of
the installation surface and assemble back
together.
PIÈCES / PARTS
ÉTAPES / STEPS
LISTE DES PIÈCES / PARTS LIST
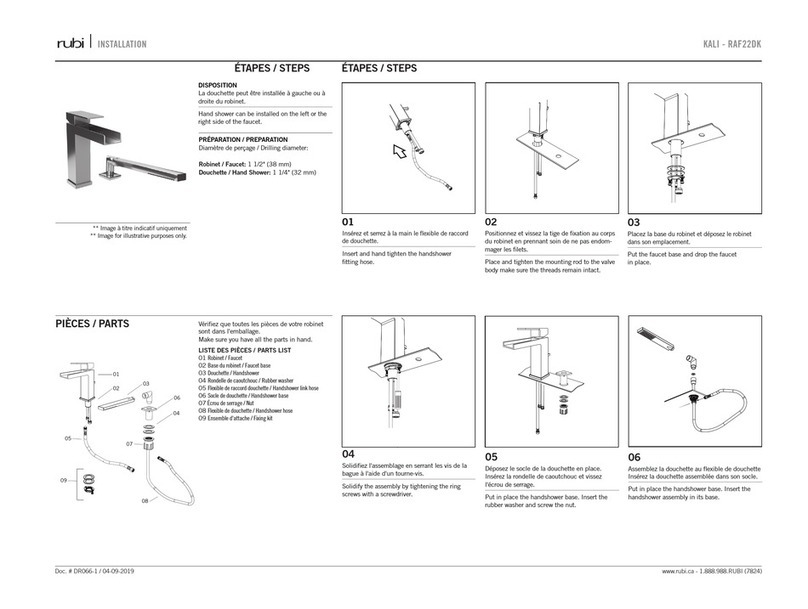
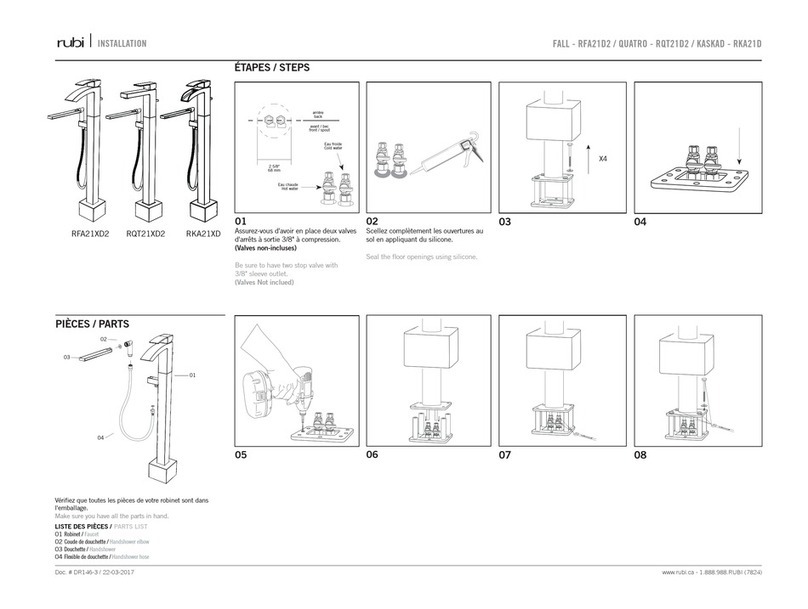
01 Robinet / Faucet
02 Contrôle / Control
03 Douchette / Handshower
04 Jeu de support douchette / Handshower base kit
05 Flexible d'eau mélangée (gris) / Mixed water hose (grey)
06 Jeu d'attache contrôle / Control fixing kit
07 Flexible d'entrées d'eau / Water inlets hoses
08 Flexible de douchette / Handshower hose
09 Jeu d'attache contrôle / Control fixing kit
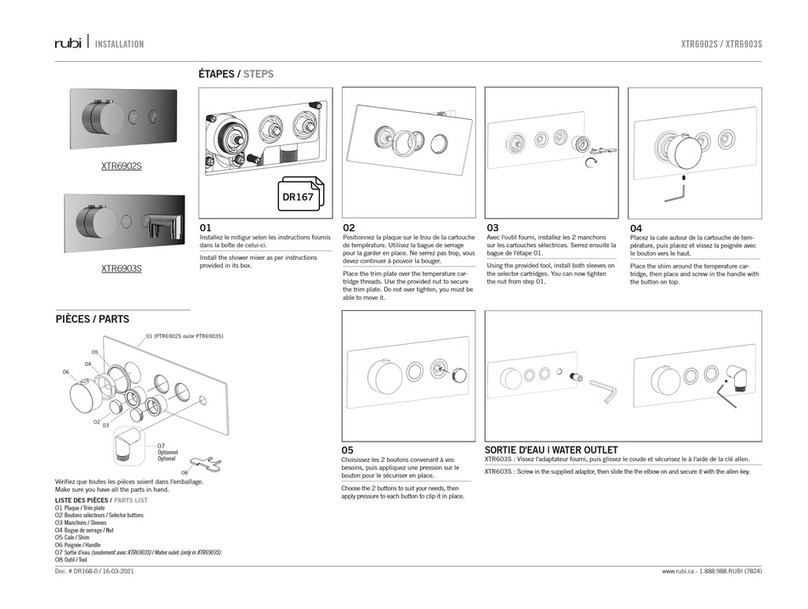
02
Préparez la plomberie nécessaire à l'installation
de votre douche. Chacune des zones de la tête
pluie devra être raccordée à une valve d'arrêt.
Install the required hardware. Make sure each
shower zone has its own stop valve installed.
01
Fixez manuellement les flexibles d'entrées
d'eau au contrôle en serrant fermement sans
exagérer. Eau chaude à gauche, eau froide à
droite et eau mélangée à l'arrière.
Thighten both water inlets hoses to the faucet
manually. Hot water to the left, cold to the
right and mixed water back. Do not over-tight.
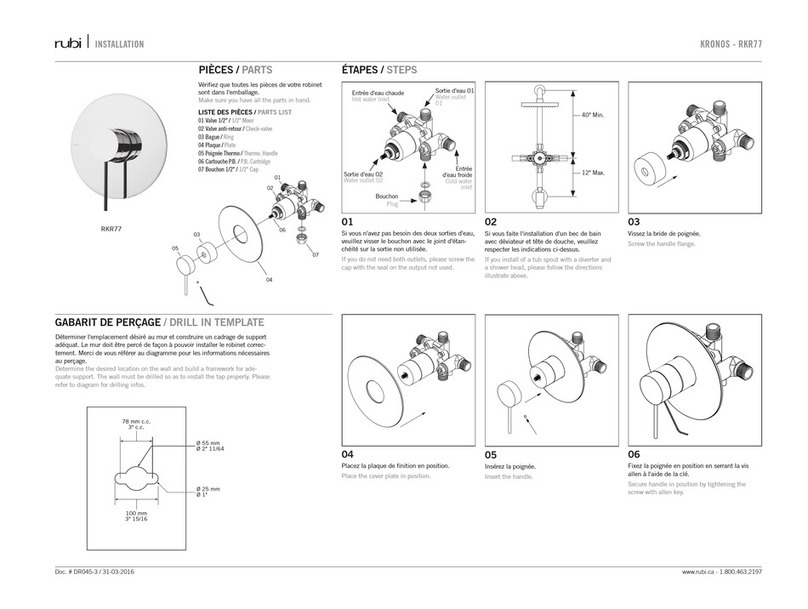
06
Déserrez les vis à l'arrière du robinet et tirez
l'assemblage du déviateur de laiton.
Loosen the set screws and pull down the
brass faucet diverter assembly.
Chaud / Hot
Froid / Cold
Mélangée / Mixed
InstallatIon
www.rubi.ca - 1.800.463.2197Doc. # DR015-1 / 17-07-2015
quatro - rqt23
14
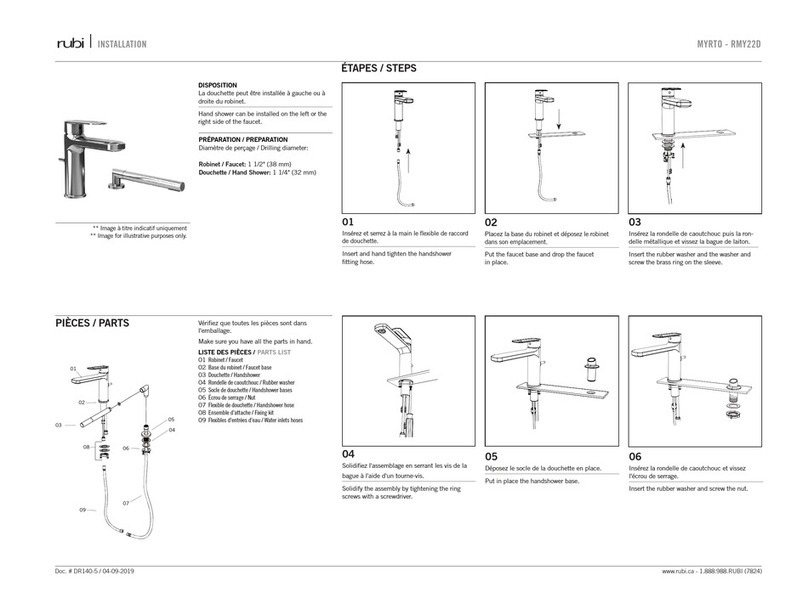
Insérez le flexible et déposez la douchette.
Insert the hose and drop the
handshower in place.
15
Vissez avec une clé le flexible du contrôle à la
sortie du mitigeur.
With a wrench, tighten the hose from the
faucet inlet to the mixer outlet.
17
À l'aide d'une clé, vissez les flexibles d'entrées
d'eau au mitigeur et aux valves respectives.
With a wrench, tighten water inlet hoses from
respective ball valves to the mixer.
16
À l'aide d'une clé, vissez le flexible de raccord
à la sortie du robinet. Vissez ensuite le flexible
de douche au flexible de raccord. Prenez soin
de mettre la rondelle de caoutchouc.
With a wrench, tighten the connection hose
to the faucet outlet. Then, tighten connection
hose to the handshower hose. Be sure to place
the rubber washer.
18
Enlevez l'aérateur et ouvrez le robinet au débit
maximum et testez l'eau chaude et froide de
sorte que tous débris potentiels soient purgés.
Replacez l'aérateur.
Remove the aerator and open the valve at
maximum flow and test the hot and cold water
and make sure any potential debris has been
purged. Replace the aerator.
09
Vissez l'écrou de serrage pour solidifier l'assem-
blage sur la surface.
Tighten the flanged-nut to secure the assembly
to the surface.
10
Positionnez et alignez le joint torique, la plaque
de base et le robinet sur la partie supérieure
du déviateur et serrez les vis-pression à l'arrière
de celui-ci.
Place and align the rubber washer, the base
trim and the faucet on the diverter upper part
and tighten the set-screws.
12
Placez le support, la rondelle de caoutchouc
et l'écrou. Serrez fermement l'écrou
à l'aide d'une clé.
Place the base holder, the rubber washer and
the nut. Firmly tighten the nut with a wrench.
11
Démontez le support de douchette. Placez le
joint torique de caoutchouc sous le support de
douchette et déposez-le à l'endroit déterminé.
Disassemble the shower holder. Place the
rubber O-ring under handshower base and drop
it in place.
13
Vissez la douchette au flexible. Prenez soin de
mettre les rondelles de caoutchouc.
Tighten the handshower to the hose. Be sure to
place the two rubber washers.
Chaud / Hot
Froid / Cold
InstallatIon
Doc. # DR105-1 / 16-06-2015 www.rubi.ca - 1.800.463.2197
quatro - rqt23
CHANGEMENT DE LA CARTOUCHE / CARTRIDGE REPLACEMENT
01
Retirez le capuchon devant la poignée.
À l'aide d'une clé Allen, retirez la vis.
Retirez la poignée, le cache cartouche et l'écrou.
Remove the cap in front of handle. With a Allen key
remove the screw and the handle.
Remove de cartridge flange and nut.
ENTRETIEN
Pour nettoyer votre robinet, un nettoyant liquide sans
abrasifs, de l’eau chaude et un linge doux suffiront pour
faire disparaître saletés, taches et traces d’accumulation de
savon. Rincez après le nettoyage et asséchez avec un linge
doux sec pour retrouver le lustre original de votre robinet.
MAINTENANCE
Do not use harsh abrasives cleaners to clean your faucet.
A mild detergent, warm water and a soft cloth will remove
normal dirt and soap accumulations on its surface. Rinse
throughly after cleaning and polish with a soft dry cloth to
restore original luster of your faucet.
ATTENTION
Installation adéquate /
Proper installation
L'illustration ci-dessous montre une
installation appropriée du flexible. La
courbe du flexible n'est pas écrasée et
permet un raccord adéquat.
The illustration above shows a proper
installation of the hose. The curve of
the hose is not crushed and allows an
adequate fitting.
L'utilisation avec une substance autre que l'eau pourrait endommager et causer un bris
d’équipement. Éviter tout contact, ainsi que l’entreposage, avec les produits ménagers,
chimiques et corrosifs. Ne pas nettoyer avec des produits rugueux ou des matières abra-
sives. Serrez à la main + 1/4 de tour.
Using a substance other than water could damage and cause equipment failure. Avoid
contact and storage, with household products, chemicals and corrosive. Do not clean with
rough or abrasive materials. Hand tighten + 1/4 turn.
Installation inadéquate /
Improper installation
L'illustration ci-dessous montre une
installation inadéquate du flexible. La
courbe du flexible est trop aplatie et ne
permet pas une bonne circulation d'eau.
The illustration above shows an improper
installation of the hose. The curve of the
hose is too flattened and does not allow
a good water flow.

Other Rubi Plumbing Product manuals

Rubi XTR6902S User manual

Rubi

Rubi XTR6902S User manual

Rubi UNO RUN11 User manual

Rubi

Rubi UNO RUN11 User manual
Rubi MYRTO User manual

Rubi

Rubi MYRTO User manual

Rubi RCZ66 Series User manual

Rubi

Rubi RCZ66 Series User manual

Rubi KRONOS-RKR22D User manual

Rubi

Rubi KRONOS-RKR22D User manual

Rubi FALL-RFA21D2 User manual

Rubi

Rubi FALL-RFA21D2 User manual

Rubi VERTIGO RVT22D User manual

Rubi

Rubi VERTIGO RVT22D User manual

Rubi ESPRESSO RBA91ESCC User manual

Rubi

Rubi ESPRESSO RBA91ESCC User manual
Rubi KROnos RKR77 User manual

Rubi

Rubi KROnos RKR77 User manual

Rubi LEXA RLX18 User manual

Rubi

Rubi LEXA RLX18 User manual

Rubi Alex RCA18A User manual

Rubi

Rubi Alex RCA18A User manual

Rubi ABYSS RAB21XD User manual

Rubi

Rubi ABYSS RAB21XD User manual
Rubi KALI-RAF22DK User manual

Rubi

Rubi KALI-RAF22DK User manual

Rubi QUATRO RQT11B User manual

Rubi

Rubi QUATRO RQT11B User manual

Rubi LEXA RLX32D User manual

Rubi

Rubi LEXA RLX32D User manual

Popular Plumbing Product manuals by other brands

HSK Lavida 1900019 manual

HSK

HSK Lavida 1900019 manual

American Standard PORTSMOUTH 4285.100 installation instructions

American Standard

American Standard PORTSMOUTH 4285.100 installation instructions

Hans Grohe Talis N 220 U-Style 1Jet 72806 1 Series Installation/User Instructions/Warranty

Hans Grohe

Hans Grohe Talis N 220 U-Style 1Jet 72806 1 Series Installation/User Instructions/Warranty

Akicon 40118 quick start guide

Akicon

Akicon 40118 quick start guide

miseno KIDO- 2510 installation manual

miseno

miseno KIDO- 2510 installation manual

Speakman SB-2701 instructions

Speakman

Speakman SB-2701 instructions

Zenith HydroTap G4 user guide

Zenith

Zenith HydroTap G4 user guide

American Standard Triumph 7034 installation instructions

American Standard

American Standard Triumph 7034 installation instructions

Sanela SLU 91N Instructions for use

Sanela

Sanela SLU 91N Instructions for use

Sensea EASY VSQ 42 V 51 Assembly, Use, Maintenance Manual

Sensea

Sensea EASY VSQ 42 V 51 Assembly, Use, Maintenance Manual

ICO KONTOUR K4023E installation guide

ICO

ICO KONTOUR K4023E installation guide

KWC ACXX2008 Installation and operating instructions

KWC

KWC ACXX2008 Installation and operating instructions

Elkay Crosstown Stainless Steel Farmhouse Sink with Interchangeable... installation instructions

Elkay

Elkay Crosstown Stainless Steel Farmhouse Sink with Interchangeable... installation instructions

baliv DU-5040 Series manual

baliv

baliv DU-5040 Series manual

baliv WT-240 manual

baliv

baliv WT-240 manual

KWC 802259 Installation and service instructions

KWC

KWC 802259 Installation and service instructions

Gessi RETTANGOLO J 26705 manual

Gessi

Gessi RETTANGOLO J 26705 manual

Glacier bay HD67732W-609006 Installation and care guide

Glacier bay

Glacier bay HD67732W-609006 Installation and care guide

manuals.online logo
manuals.online logoBrands
  • About & Mission
  • Contact us
  • Privacy Policy
  • Terms and Conditions

Copyright 2025 Manuals.Online. All Rights Reserved.