Ruide RCS User manual

U S E R M A N U A L
Version: EN.1808

1
FORWORDS…………………………..........2
PRECAUTIONS……………………………2
SAFETY GUIDE……………………………2
1. OVERVIEW………………………………2
1.1PARTNAMES………………………………………..2
1.2DISPLAY……………………………………………..3
1.3KEYPAD……………………………………………...3
1.4SOFTKEYS………………………………………….3
1.5SYMBOLS&ABBREVIATION……………………....4
1.6QUICKSETTING(☆KEY)…………………………..5
2. PREPARATION………………………….6
2.1UNPACKINGANDSTORING………………………6
2.2INSTRUMENTSETUP………………………….......6
2.3BATTERY…………………………………………….8
2.4REFLECTORS………………………………………8
2.5MOUNTINGANDDISMOUNTING…………………8
2.6
EYEPIECE ADJUSTMENT AND COLLIMATING OBJECT
..
9
2.7INPUTTINGMODE………………………………......9
2.8LEVELING…………………………………………....9
3. ROUTINE MEASUREMENTS………...10
3.1CAUTIONSFORDISTANCEMEASUREMENT…10
3.2EDM SETTING……………………………………..10
3.3HOTKEY…………………………………………....11
3.4STARTSURVEY…………………………………...13
3.5ANGLE MEASUREMENT……………………….....13
4. JOB MANAGEMENT………………….15
4.1OPENAJOB………………………………………..15
4.2CREATEANEW JOB……………………………...15
4.3DELETEJOBS…………………………………….16
4.4DISPLAYJOB INFORMATION…………………….16
5. KEY……………………………..17
5.1SETUPASTATIONWITHKNOWN POINTS…….17
5.2MULTIPLEPOINTRESECTION…………………..19
5.3SETSTATIONDIRECTLY…………………………20
5.4HEIGHTTRANSFER………………………………21
5.5
CHECKING AND RESETTING THE BACKSIGHT DIRECTION
...
22
6. KEY…………………………....22
6.1STAKEOUTANGLEAND DISTANCE……………22
6.2COORDINATESSTAKEOUT ……………………..23
6.3PARTLINE SO…………………………………….24
6.4REFLINE STAKEOUT……………………………...25
6.5GUIDELIGHT……………………………………..25
7. KEY……………………………..26
7.1DISTANCE OFFSETS…………………………….26
7.2MEASURINGANGLE OFFSETS………………...27
7.3TWO-PRISMPOLE……………………………….27
7.4+HALINE…………………………………………..28
7.5INPUTHD………………………………………….29
7.6CALCULATEACORNER POINT ………………...29
7.7COLUMN………………………………………….30
7.8EXTENDTHESLOPEDISTANCE………………31
8. KEY …………………………….31
8.12 POINTREFLINE………………………………...31
8.2REFERENCEARC………………………………..32
8.3REMOTE DISTANCEMEASUREMENT ………...33
8.4REMOTE ELEVATION MEASUREMENT(REM) ..34
8.52-PTREFERENCE PLANE (V-PLANE)………….35
8.63-PTREFERENCEPLANE (S-PLANE)………….36
9. KEY …………………………….36
9.1INVERSECALCULATING……………………….36
9.2DIRECTANDDISTANCE (AZ&DIST)…………….37
9.3CALCULATEAREA ………………………………..39
9.4LINEANDOFFSET………………………………..39
9.5INPUTCOORDINATES MANUALLY……………..41
10. ROADS …………………………….....41
11. DATAMANAGEMENT ………………46
11.1 RAWDATA………………………………………..46
11.2 COORDINATEDATA…………………………….47
11.3 VIEWRECORDS BYSTATION………………….47
11.4 POINT NAMELISTANDCODELIST…………...48
11.5 DATAEXPORTANDIMPORT…………………...48
11.6MEMORYANDFORMAT………………………..49
12. CHECKAND ADJUSTMENT ……….49
13. SPECIFICATION ……………………..56
14. ERROR CODE LIST …………………58
【
APPENDIX-A
】
DESIGN ROAD LINE DATA
……...59
【
APPENDIX-B
】
CALCULATE ROAD ALIGNMENT
……...62

2
FORWORDS
Thank you for purchasing Total Station RCS.
This manual will give a detailed and complete
instruction. Please read it carefully before usingthe
instrument.
PRECAUTIONS
1. Do not collimate the objective lens directly to the
sunlight without a filter.
2. Do not store the instrumentin extremely high orlow
temperature, in order to avoid the sudden or great
change of temperature.
3. When the instrument is not in use, store it in the
case and avoidshock, dustand humidity.
4. If there is great difference between the temperature
in work site and that in store place, you should leave
the instrument in the case till it adapts to the
temperature of environment.
5. If the instrument has not been used for a long time,
you should remove the battery for separate storage.
The battery should be charged once a month.
6. When transporting the instrument should be placed
in its carrying case, it is recommended that cushioned
material should be used around the case for support.
7. For less vibration and better accuracy, the
instrument should be set up on a wooden tripod rather
than an aluminum tripod.
8. Clean exposed optical parts with degreased cotton
or less tissue only!
9. Clean the instrument surface with a woolen cloth
after use.If it gets wet, dry it immediately.
10. Before opening, inspect the power, functions and
indications of the instrument as well as its initial setting
and correction parameters.
11. Unless the user is a maintenance specialist, do not
attempt to disassemble the instrument by yourself
even if you find theinstrument abnormal.
SAFETY GUIDE
INTEGRATED DISTANCE METER (VISIBLE
LASER)
Warning
The total station is equipped with an EDM of a laser
grade of 3R/Ⅲa. It is verified by thefollowing labels.
On the vertical tangent screw sticks an indication label
“CLASS III LASER PRODUCT”.
This product is classified as Class 3R laser product,
which accords to the following standards.
IEC60825-1:2001 “SAFETY OF LASER
PRODUCTS”.
Class 3R/III a laser product: It is harmful to observe
laser beam continuously. User should avoid sighting
the laser at the eyes. It can reach 5 times the emitting
limit of Class2/II with a wavelength of 400mm-700mm.
Warning
Continuously looking straight at the laser beam is
harmful.
Prevention
Do not stare at the laser beam, or point the laser
beam to others‟ eyes. Reflected laser beam is a valid
measurement to the instrument.
Warning
When the laser beam emits on prism, mirror, metal
surface, window, etc., it is dangerous to look straight at
the reflex.
Prevention
Do not stare at the object which reflects the laser
beam. When the laser is switched on (under EDM
mode), do not look at it on the optical path or near the
prism. It is only allowed to observe the prism with the
telescope of total station.
Warning
Improper operation on laser instrument of Class 3R
will bring dangers.
Prevention
To avoid to be harmed, each user is required to take
safety precautions, and take everything under control
within the distance that would incur dangers
(according to IEC60825-1:2001).

3
The following shows the explanation related to
the key sections of theStandard.
Laser instrument of Class 3R is applicable outdoors
and in construction field (measurement, defining lines,
leveling).
a) Only those persons who are trained with related
course and authenticated are allowed to install, adjust,
and operatethis kind oflaser instrument.
b) Stand related warning symbols in the scaleof use.
c) Prevent any person to look straight at or use optical
instrument to observethe laser beam.
d) To prevent the harm caused by laser, block the
laser beam at the end of the working route. When the
laser beam exceeds the limit area (harmful distance*)
and when there are motivating persons, stopping the
laser beam isa must.
e) The optical path of the laser should be set higheror
lower thanthe line of sight.
f) When the laser instrument is not in use, take care of
it properly. The person who is not authenticated is not
allowed to use.
g) Prevent the laser beam fromirradiatingplane mirror,
metal surface, window, etc., especially beware of the
surface of plane mirror andconcavemirror.
* Harmful distance means the maximum distance
between the start point and the point which the laser is
weakened to a degree that doesn‟t harm people.
The internal EDM instrument equipped with a Class
3R/III a Laser has a harmful distance of 1000m
(3300ft). Beyond this distance, the laser intensity is
weakened to Class I (Looking straight at the laser
beam causes no harmto the eyes.)
LASER PLUMMET
The laser plummet built into the product produces a
visible red laser beam which emerges from the
bottom of the product. The product is a Class 2/Ⅱ
Laser Product.
Class 2 LaserProduct is in accordance with:
IEC 60825-1:1993"Safety of Laser Products"
EN 60825-1:1994 + AⅡ:1996: "Safety of Laser
Products".
ClassⅡLaser Productis in accordance with:
FD121CFR ch.1$ 1040:1998 (U.S. Health and
Human Services Secretary, Federal rules code)
Class 2 Laser Products:
Do not stare into the beam or directit unnecessarily at
other persons. Eye protection is normally afforded by
aversion responses including the blink reflex.

2
1. OVERVIEW
1.1 PART NAMES
1. Battery
9. Horizontal Clamp Screw
2. Guide Light
10. RS232, SD Card, Mini USB Port
3. Collimator
11. Screen
4. Objective Lens
12.ATMOSense Detector
5. Carrying Handle
13. Keyboard
6. Telescope Focusing Ring
14. Tribrach
7. Telescope Eyepiece
15. Circular Vial
8. Vertical Clamp Screw
16. Plate Vial
ACCESSORIES
Carrying Case
Fur Brush
User Manual
Battery
Screw Driver
Warranty Card
Charger
Hexagon Wrench
Software CD
Plumb Bob
Cloth
Adjusting Pin
Rain Cover

3
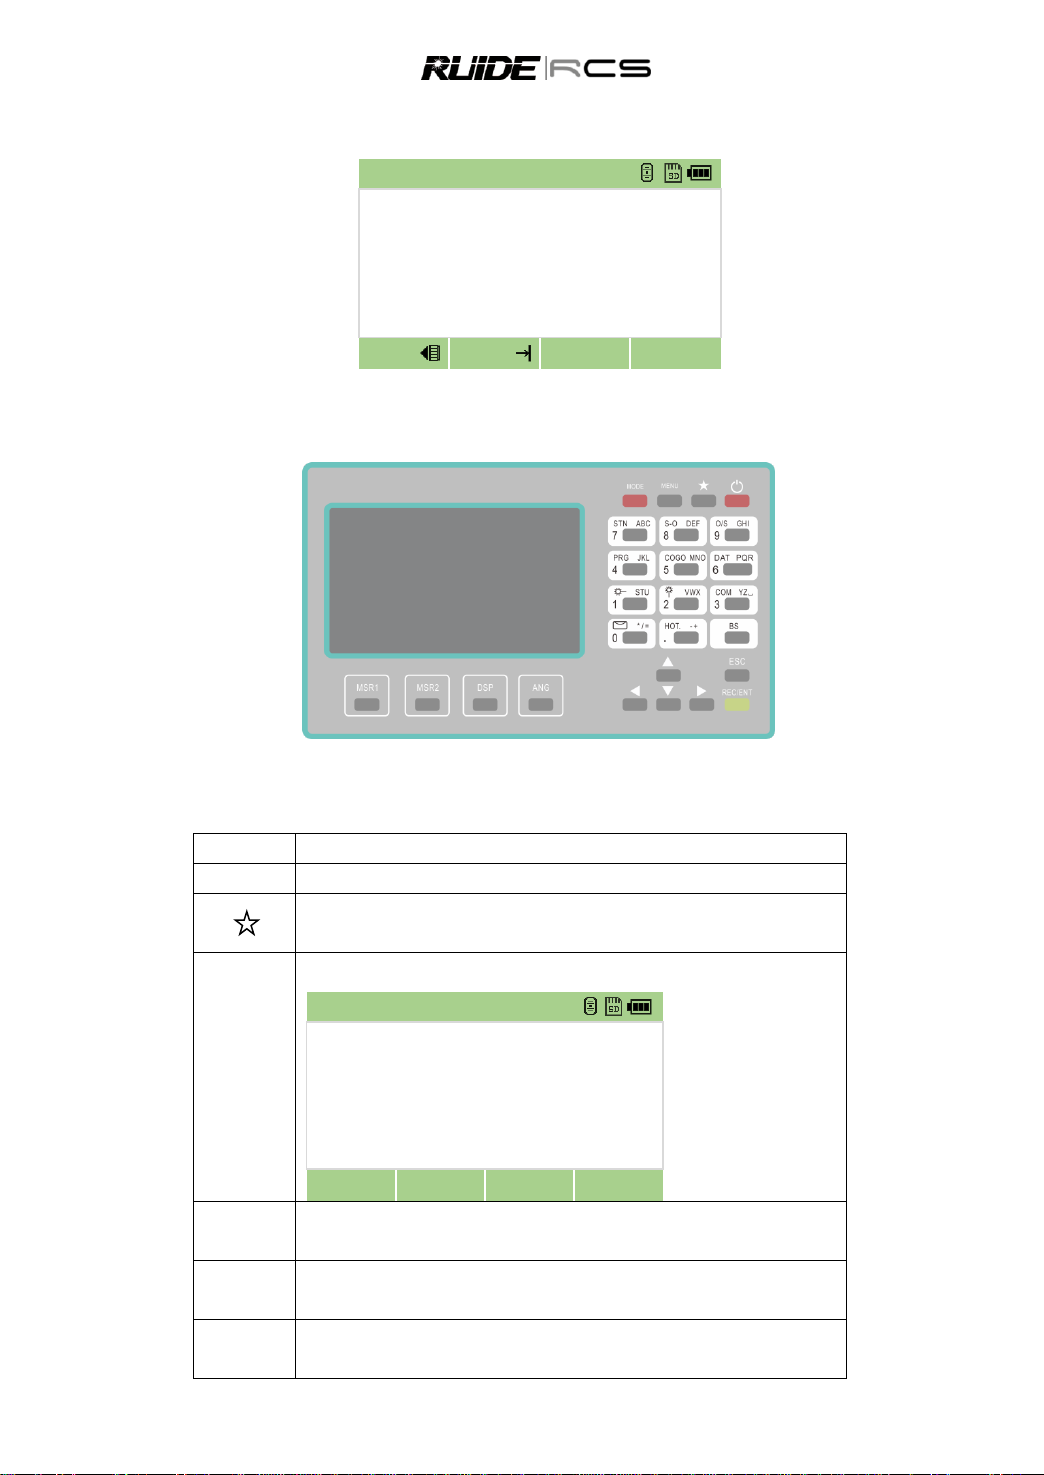
1.2 DISPLAY
Basic Measure
HR
273°13’45”
VA
89°13’45”
SD
m
Pt N
1
R.HT
1.500
m
Meas
Meas
1/4
Angle
Basic Measurement Menu
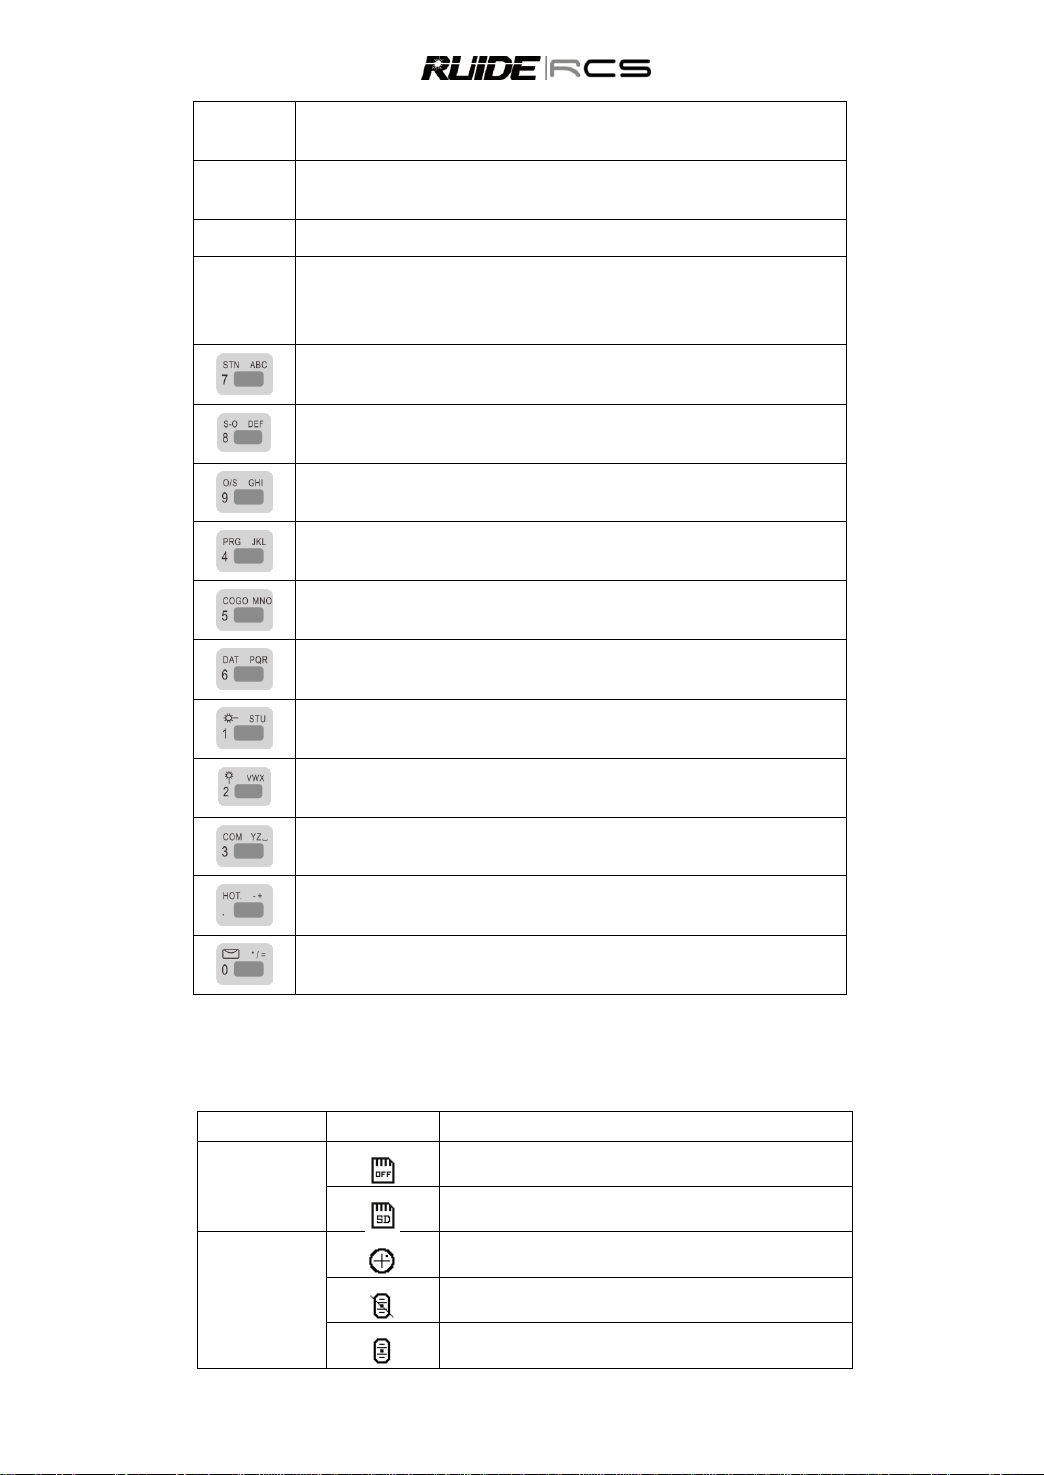
1.3 KEYPAD
1.4 SOFT KEYS
Key
Function
PWR
Power ON/OFF
Star key, includes quick settings for laser plummet, laser pointer, COMM
parameter, PPM, light and sound, etc.
MENU
Displays the Function Menu
Menu
1. Job
6. Data
2. Setting
7. Set Stn
3. Adjustment
8. Stake Out
4. Program
9. Collect
5. COGO
10.Road
Back
Time
Info
MODE
Changes the input mode: alphabetic or numeric;
Launches quick code mode in basic measurement display.
REC/ENT
Accepts the input or records the data. In basic measurement display, press it for 1
secondto select the data saving mode (CP or SS).
ESC
Returns to last screen.
Cancels the data input.

4
MSR1
Measures thedistance withthe mode this key has been predefined. Press it for 1
second to view and change the measuring mode.
MSR2
Measures thedistance withthe mode this key has been predefined. Press it for 1
second to view and change the measureing mode.
DSP
Shiftthe display. Press it for 1 second to launch customizing items.
ANG
Displays the angle measuring menu. Or sets the horizontal angle to zero. Or
continuous angle measuring. Or F1/F2 angle measuring. Or maintains the
horizontal angle.
Displays the Station Setupmenu.
Or inputs the number 7, letter A, B, and C.
Displays the stake-outmenu. Press it for 1 second to display the setting about
stake-out. Or inputs number 8, and letter D, E, F.
Displays the Offset Point Measurement menu.
Or inputs number 9, letter G,H,I.
Displays the Programs menu.
Or inputs number 4, letter J, K, L.
Displays the COGO menu.
Or inputsnumber 5, and letter M,N, O.
Displays RAW, XYZ, or STN data, depending on your setting.
Or inputs number 6, and letter P, Q, R.
Switch for the laser pointer. Press it for 1 second to set the function to be assigned
to this key. Or inputs number 1, and letter S, T, U.
Switch for the laser plummet. Press it for 1 second to set the function to be
assigned to this key. Or inputs number2, and letter V, W, X.
Enter the comm parameter setting interface.
Or Inputsnumber 3, letter Y, Z, and Space.
Displays the HOT menu.
Or inputs –, + and ..
Displays the electric bubble.
Or inputs *, /, =, 0.
1.5 SYMBOLS & ABBREVIATION
Symbols
Symbol
Meaning
The status of
the SD card
Without SD card inserted
With SD card inserted
The working
status of the
dual-axis
compensator
The axis of X and Y direction are on
The compensator is off
The axis of X direction is on

5
The target type
Non-prism
Prism
Reflector sheet
Abbreviation List
HA
horizontal angle
VA
vertical angle
SD
slide distance
AZ
azimuth angle
HD
horizontal distance
VD
vertical distance
HL
Horizontal angle (left): 360° -HA
V%
ratio of slope
N
North coordinate
E
East coordinate
Z
Elevation
PT
point
HT
height
CD
code
PPM
atmospheric correction value
P1
Point 1
P2
Point 2
HI
instrument height
BS
backsight point
ST
surveying station
Tips
*When “d” is in front of any abbreviations above, it means it is a difference
value.
1.6 QUICK SETTING(☆KEY)
Quick settings
1. E bubble
6. Power
2. EDM Laser
7. Voice setting
3. Plummet
8. Quick Code
4. Serial Comm
9. Guide Light
5. PPM setting
Back
Time
Info
Quck settings includes all the commonly-used settings. In the window opened as above, press [1], [2], [3],
[4], [5]… corresponding to the items to choose the settings.

6
1. E bubble
Setting the compensator
2. EMD laser
Turn on/off the laser pointer
3. Plummet
Turn on/off the laser plummet
4. Serial Comm
Setting the comm. Parameters for RS232 port
5. PPM setting
Setting the atmosphere correction
6. Power
Setting backlight and power management
7. Voice setting
Setting the voice
8. Quick Code
Activate or deactivate the quick code function
9. Guide light
Turn on/off the guide light
2. PREPARATION
2.1 UNPACKING AND STORING
· Unpacking
Place the case lightly with the cover upward, and unlock the case, take out the instrument.
· Store of instrument
Cover the telescope cap, place the instrument into the case with the vertical clamp screw and circular vial
upwards (Objective lens towards tribrach), and slightly tighten the vertical clamp screw and lock the case.
2.2 INSTRUMENT SETUP
Mount the instrument on a tripod. Level and center the instrument precisely.
Operation Reference:
1. Leveling and Centering the Instrument by plumb bob.
1) Setting up the tripod
a. Extend the legs to suitable length, make the tripod head approximately leveld to the ground and
tighten the leg screws.
b. Make the center of the tripod and the occupied point approximately on the same plumb line.
c. Step on the tripod to make sure if it is well stationed on the ground.
2) Fix the instrument on the tripod.
Place the instrument carefully on the tripod head and slide the instrument by loosening the tripod
screw. If the plumb bob is positioned right over the center of the point, slightly tighten the tripod.
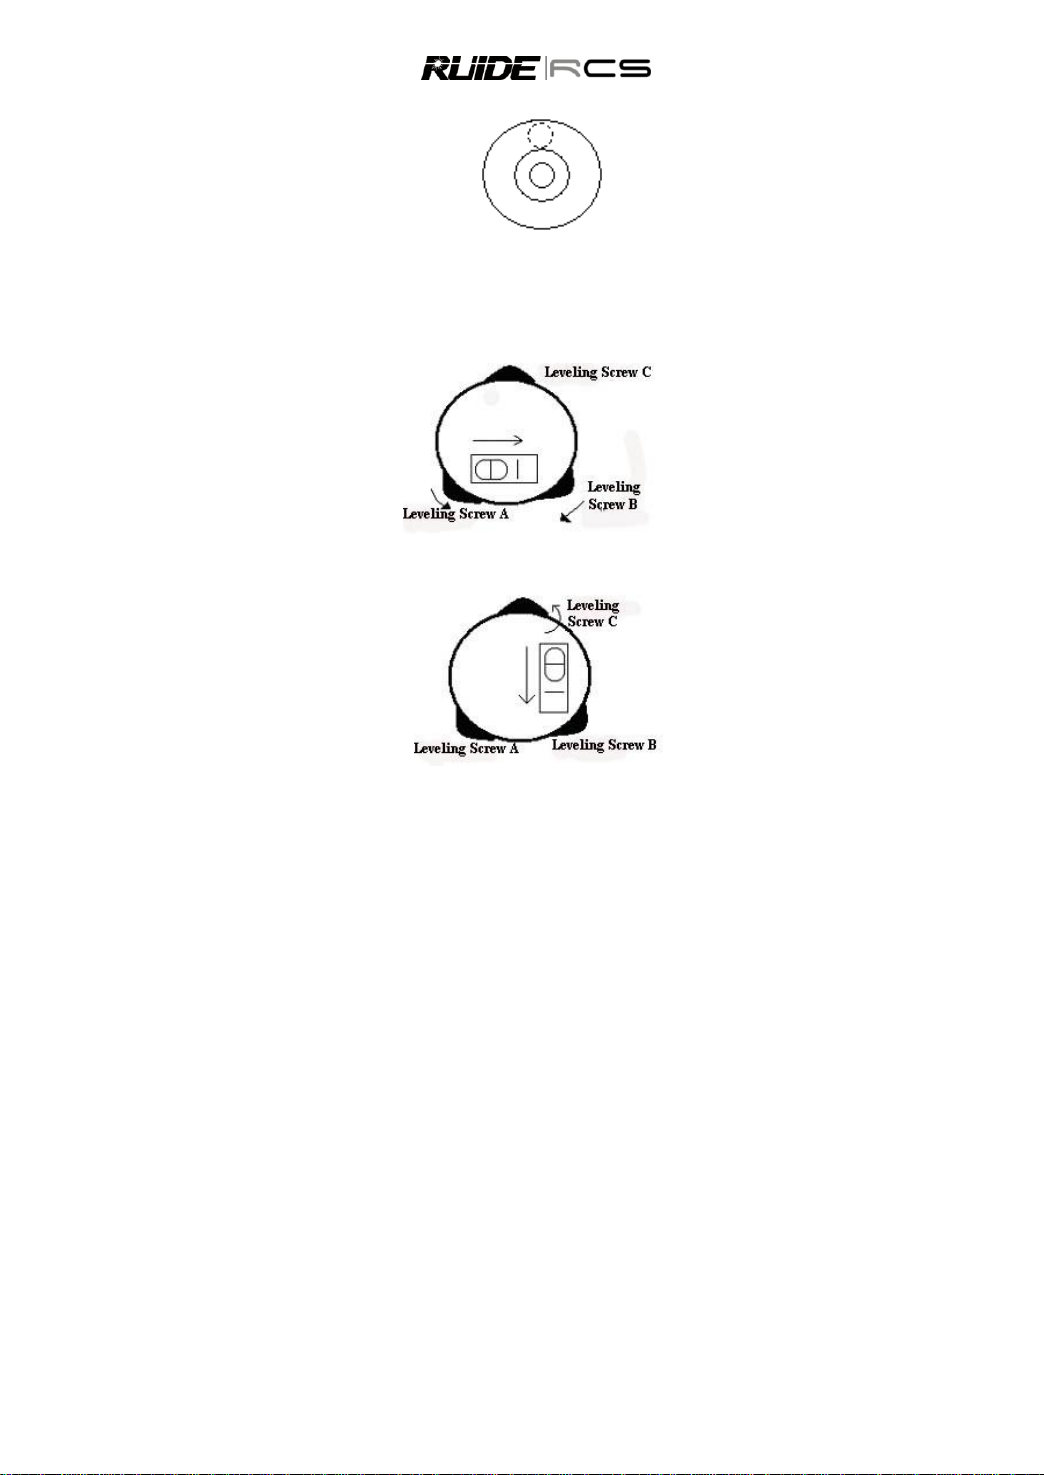
3) Roughly leveling the instrument by using the circular vial.
a. Turn the leveling screw A and B to move the bubble in the circular vial, in which case the bubble
is located on a line perpendicular to a line running through the centers of the two leveling screw
being adjusted.
b. Turn the leveling screw C to move the bubble to the center of the circular vial.

7
4) Precisely leveling by using the plate vial.
a. Rotate the instrument horizontally by loosening the Horizontal Clamp Screw and place the plate
vial parallel to the line connecting leveling screw A and B, and then bring the bubble to the center of
the plate vial by turning the leveling screws Aand B.
b. Rotate the instrument 90º (100gon) around its vertical axis and turn the remaining leveling screw
or leveling C to center the bubble once more.
c. Repeat the steps a and b for each 90º (100gon) rotation of the instrument and check whether the
bubble is correctly centered in all directions.
2. Centering by using the optical plummet.
1) Set tripod
Lift tripod to suitable height, ensure equal length of three legs, spread and make tripod head parallel
to the ground, and place it right above the measurement station point. Prop up tripod on the ground
and fix one leg.
2) Install instrument and collimate the point
Set instrument carefully on tripod, tighten the central connecting screw and adjust optical plummet
to make the reticle distinctly. Hold the other two unfixed legs with both hands and adjust position of
thesetwo legs through observation of opticalplummet. As it approximately aims at the station point,
make all three legs fixed on the ground. Adjust three leg screws of the instrument to make optical
plummet collimate precisely to the station point.
3) Use circular vial to roughly level the instrument.
Adjust length of three legs of tripod; make the circular vial bubble of the instrument in the middle.
4) Use plate vial to level the instrument accurately.
a. Rotate the instrument horizontally by loosening the Horizontal Clamp Screw and place the plate
vial parallel to the line connecting leveling screw A and B, and then bring the bubble to the center of
the plate vial by turning the leveling screws Aand B.
b. Rotate the instrument 90° , make it perpendicular to the connecting line of level screws A and B.
Turn level screw C to make the bubble of the plate vial in the middle.

8
5) Precisely centering and leveling
Through observation of optical plummet, slightly loosen the central connecting screw and move the
instrument evenly (Don‟t rotate the instrument), making the instrument precisely collimating to the
station point. Then tighten the central connecting screw and level the instrument precisely again.
Repeat this operation till the instrument collimate precisely to the measurement station point.
2.3 BATTERY
TIPS
1) The battery operating time depends on the environmental conditions such as ambient temperature,
charging time, times of charging and discharging etc. It is recommended to fully charge the battery before
operation or prepare spare batteries.
2) Distance measurement consumes more power than angle measurement.
3) When the measurement mode is changed, the battery power will not immediately show the decrease
or increase. The battery power indicating system shows the general status but not the instantaneous
change of battery power.
CAUTIONS
1) Use the original charger HC-III.
Remove the on-board battery and connect it to battery charger. When the indicator light on the battery
charger is red, the recharging process is on. When recharging is complete, the indicator lamp turnsgreen.
2) Before removing thebattery from the instrument, make sure that the power is turned off. Otherwise, the
instrument may be damaged.
3) The charger has built-in circuitry for protection from overcharging. However, do not leave the charger
plugged into the power after recharging is completed.
Be sure to recharge the battery at a temperature from 0° to 45° C. Recharging may be abnormal beyond
specified temperature range.
When the indicator light does not light after connecting the battery and charger, either the battery or the
charger may be damaged. Please contact technician for repairing.
4) Rechargeable battery can be recharged 300 to 500 times. Complete discharge of the battery may
shorten its life.
In order to get the maximum life, be sure to recharge it at least once a month.
2.4 REFLECTORS
When measuring distance, a reflector needs to be placed at the target place. Reflector system comes
with single prism or triple prisms, which can be mounted with tribrach onto a tripod or mounted onto a
prism pole. Reflector system can be self-configured by users according to the job.
2.5 MOUNTINGAND DISMOUNTING
Dismounting
If necessary, the instrument (including reflector prisms with the same tribrach) can be dismounted from
tribrach. Loosen the tribrach locking screw in the locking knob with a screwdriver. Turn the locking knob
about 180° counter-clockwise to disengage anchor jaws, and take off the instrument from tribrach.

9
Mounting
Insert three anchor jaws into holes in tribrach and line up the directing stub with the directing slot. Turn the
locking knob about 180° clockwise and tighten the locking screw with a screwdriver.
2.6 EYEPIECE ADJUSTMENT AND COLLIMATING OBJECT
Method of CollimatingAn Object (for reference)
1) Sight the Telescope to bright place and rotate the eyepiece tube to make the reticle clear.
2) Collimate the target point with top of the triangle mark in the coarse collimator. (Keep a certain
distance between eye and the coarse collimator).
3) Make the target image clear with the telescope focusing screw.
If there is parallax when your eye moves up, down or left, right, it means the diopter of eyepiece lens or
focus is not well adjusted and accuracy will be influenced. You should adjust the eyepiece tube carefully
to eliminate the parallax.
2.7 INPUTTING MODE
All characters can be input in the screen.
Press [BS] to delete one character in the left of the cursor.
When the inputting scale is wider than the screen, it can be moved to left automatically. When the
inputting scale is full, it cannot be input anymore.
When anABC is displayed on the upper right corner of the screen, capital letters can be input via the
keypad. While 123 is displayed, numbers can be input. When abc is displayed, lowercase letters can be
input. In any measurement screens or screens that need to be input manually, press [MODE] to shift
between alphabet mode and numeric mode.
In letter inputting mode, 3 letters are set in one key. Every pressing can display one of the letters in the
cursor. For example, inABC mode, press [9] 3 times to input the letter of I.
Characters that have been input can be edited. Press [ ] to move the cursor to the item that needs to be
edited, the cursor will stay on the character and twinkle, input the new character.
2.8 LEVELING
As the tilt sensor is activated, automatic correction of vertical angle for mislevelment is displayed.
To ensure a precise angle measurement, tilt sensor must be activated. The display can be used to fine
level the instrument.

10
If the instrument hasn‟t been leveled roughly, the screen displays that the instrument is out of the
automatic correction range, and that it needs to be leveled manually. Please refer to “2.2 Instrument
Setup” for detailed leveling instruction.
RCS compensates the vertical angle reading as well as both vertical and horizontal angle reading due to
inclination of the vertical axis in the X direction and XY directions.
Press 0 to enter to automatic compensation
function.
Rotate the foot screws to make both values
within 1‟.
Press [▼] to turn on/off the laser plummet
When the instrument isplaced on an unstable stage or in a windy weather condition, the display of vertical
angle is unstable. You can switch off the auto tilt correction function of vertical angle.
If the mode of auto correction is ON, in the condition that the instrument has not been leveled, the
program will demand that the instrument mustbe leveled at first, so as to enter other functions.
3. ROUTINE MEASUREMENTS
3.1 CAUTIONS FOR DISTANCE MEASUREMENT
After setting up and switching on correctly, the Total Station is immediately ready for measuring.
All shown displays areexamples. It is possible that local software versions are different from the basic one.
Example of a possible measuring display:
Basic Measure
HR
273°13’45”
VA
89°13’45”
SD
m
Pt N
1
R.HT
1.500
m
Meas
Meas
1/4
Angle
3.2 EDM SETTING
Press [MSR1] or [MSR2] for 1 second to enter each measurement function it is specified.
Hod [MSR1] for 1 secod
Press navigation key [▲] [▼] [◄]
[►] to select the setting
Press [OK] to save the setting
E bubble
X
0°01’50”
Y
0°00’35”
▼Laser Switch
Exit
XY ON
X ON
OFF
Mode setting
Target
Non-prism ◄|►
PSM-C
0
mm
Mode
Single ◄|►
Record
Auto record ◄|►
Back
OK

11
1)All options in each item in measurement setting:
Target: Prism, sheet and non-prism.
PSM-C: Input prism constant directly (under prism mode). Scale: -999~999mm
Mode: Single, 2 times, 3 times, 4 times, 5 times, Repeat, Tracking.
Record: Enter to record, Auto record, Only measure.This mode controls the mode operation of [MSR1]/MSR2]
in basic measurementfunction.
If “Enter to record” is adopted, a screen of “Rec Pt” is displayed to inform the user to check and confirm before
data is recorded.
“Auto record” is a quick shooting and recording mode. The instrument automatically records the point using the
default PtID, and then returns to the basic measurement screen.
“Only measure” is the default measuring mode. After a measurement, the instrument stops in the BMS and
waits for you to press [REC/ENT] before recording the point.
2) The measurement mode setting of [MSR2] is the same as it. When pressing [MSR1] or [MSR2],
the systemactivatesthe corresponding measurementmodeto measure.
3.3 HOT KEY
[HOT] Key includes the inputting function of target height, temperature & pressure, target selection and
note. It is available on any observation screen.
3.3.1 Set the Height of the Target
To change the height of the target (HT) or temperature, pressure, press [HOT].
Press [HOT] to display the [HOT] key menu.
Press[1] to enter into HT setting function.
Enter the height of the target manually.
Press[REC/ENT] to return to basic
measurement screen.
3.3.2 Set the Temperature & Pressure
Atmosphere Correction:
The speed of light in air is extremely fast. And it is not a constant, but changes with the temperature and
pressure of atmosphere. Once atmosphere correction is set, this instrument can implement atmosphere
correction automatically.
Hotkey
1.
R.HT
2.
T&P correction
3.
Target
4.
Comment
Back
R.HT 123
R.HT
1.500
m
Back
OK

12
Even theinstrument is powered off, the atmosphere correction value is still kept.
The formula of atmosphere correction: (unit: meter))
𝑃𝑃𝑀 = 273.8 − 0.2900 × pressure value (hPa)
1 + 0.00366 × temperature value (°C)
If the pressure unit is mmHg:
1hPa = 0.75mmHg
When disregarding atmosphere correction,setPPM value to 0.
Standard atmospheric condition of Total Station RCS (i.e. the atmospheric condition that the atmosphere
correction value of the instrument is 0):
Pressure: 1013 hPa
Temperature: 20° C
Using [HOT] Key and [2] can set temperature and pressure values. Enter the ambient temperature and
pressure, the PPM value is updated automatically.
Press [2] in HOT key menu to enter into
Temp&Pres Setting.
Input temperature value and press
[REC/ENT] to move to next item. Input pressure
value and press [REC/ENT]
1) The inputting scope: Temperature:-40 - +60° C (step length 0.1° C) or -40 - 140° F (step length 0.1° F)
Air pressure: 420 - 799.5mmHg (step length 0.1mmHg) or 560 - 1066 hPa (step length 0.1hpa)
16.5 - 31.5 inchHg (step length 0.1 inchHg)
2) The atmosphere correction value will be calculated by the instrument according to the inputted
temperature and pressure value.
3.3.3 Select Target Set
Atarget set specifies settings for the target type, the prism constant, andheight of target.
When you change the selected target set, all the three settings are changed.You can use this function to
quickly switch between two types of targets, such as a reflecting sheet and a prism.
To select a target set, use [▲]/[▼] to highlight the target set in the list and press [ENT]. To change the
settings defined in a target set, highlight the target set in the list. Then press “Edit” softkey.
When a target set is selected, the Type and Const values are copied to both [MSR1] and [MSR2] settings.
If you have specified a value for HT, this value is also copied to the current HT.
In Hot Key menu, press numeric key [3] to
enter target function.
Press [▲]/[▼] to select target set, and then
press [ENT].
To edit the target set, highlight the target set
and press Edit.After editing, press [ENT]
T&P correction 123
T.
℃
P.
hPa
PPM
0.0
TP auto
Close ◄|►
Back
OK
Target List
P
-30
0.000
P
-30
0.000
◄
P
-30
0.000
►
P
-30
0.000
N
0
0.000
Back
Edit
Set

13
1)Type=prism/non prism/reflector sheet
Constant=-999 - 999mm
HT=-9999.999 - 9999.999mm
3.3.4 Enter a Field Note
To enter a field note, press [HOT] and then press [4]. This function can be used at any time on any
observation screen. Each note can be up to 50 characters. The note is stored as a CD record in the raw
data.
In HOT Key menu press numeric key [4] to
enter Note function.
Input note and then press [OK].
3.4 START SURVEY
After finishing all settings, you can start surveying. The survey result is displayed in 4 pages including all
data of routine survey. Press DSP to view.
Please set a job, station and backsight azimuth before measurement.
Collimate to the center of target prism,press
[MSR1] or [MSR2].
Display the result of measurement in four
pages, including all normal measure functions such
as measure of angle, distance and coordinate, etc.
Press [DSP] or [▲]/[▼] to view each page.
To change the height of the target (HT), temperature, or pressure, press [HOT].
Settings thatrelate to corrections (T-P, Sea level, C&R) are included in the job settings. These settings are
job-specific. Changing of any item willcreate a new job or shut off all jobs
3.5 ANGLE MEASUREMENT
To open theAngle menu, press [ANG] in the basic measurement screen.
In BMS press[ANG] to enter angle observation
function.
Select the function from the function bar.
COMMENT ABC
NOTE
1.500
m
Back
OK
Basic Measure
HR
273°13’45”
VA
89°13’45”
SD
0.849
m
Pt N
1
R.HT
1.500
m
Meas
Meas
1/4
Angle
Ang Meas.
VA
89°13’45”
HR
273°13’45”
0 set
Lock
HSet
1/2

14
3.5.1 0SET
Press [0 set] to set HAas 0, press [ENT] and then return to basic measurement screen.
In Angle menu press [0 set] to enter to 0SET
function.
Press [ENT], Program sets the current
horizontal angle as 0, and returns to basic
measurement screen.
3.5.2 Enter the HorizontalAngle
Set the horizontal angle to be a certain value.
In Angle menu press [HSet] to enter into the
function ofhorizontal angle inputting.
Input horizontal angle, and then press [ENT]
To enter 159°46′25″, type 159.4625.
3.5.3 Face-1/Face 2 Measurement
Using F1/F2 measurements effectively cancels out mechanical constant error to obtain maximum
accuracy for measuring angles.
If the HA has been adjusted from a F1/F2 measurement, the Backsight also must be measured in F1/F2
during the station setup.
Sight the target in F1.
In Angle menu page 2, press [F1/F2]to enter
into the function of F1/F2 measurement.
The system asks to turn to F2, turn to F2, sight
the target and press [ENT].
The calculated F1/F2 measurements are
displayed
Press [OK] if accept the measured result.
0 set
Set HA to 0°?
Cancel
OK
HSet 123
HA
159.4625
m
Back
OK
Ang Meas.
VA
89°13’45”
HR
273°13’45”
V%
VA
F1/F2
2/2
F1/F2
dHA
-180°00’00”
dVA
253°18’45”
dSD
0.000
Cancel
CP
OK

15
3.5.4 Hold
Hold the horizontal angle reading, and rotate the instrument to the designated direction.
In Angle menu press [Lock] to enter into the
function of horizontal angle inputting.
Use the horizontalclamp screwor horizontal
tangent to sight the target.
Press [ENT] to set the horizontal angle of the
target.
4. JOB MANAGEMENT
Press [MENU] to display the MENU screen. Choose [1] to enter the job management.
4.1 OPEN A JOB
Select the item by [▲]/[▼], and then press
[ENT]to open the job.
* in front of the job means it is the current job
Program sets the job as current job, and
returns to MENU screen
4.2 CREATE A NEW JOB
Press[New]to create a new job.
Enter the new job name (within eight
characters)
Press[Setting] entering the job settings.
Lock
HA Lock!
273°13’45”
Cancel
OK
Job List
*1
Default
2
RUIDE001
◄
3
RCS-02
►
4
SURVEY
New
Delete
Find
Info
Job List
*1
Default
2
RUIDE001
◄
3
RCS-02
►
4
SURVEY
New
Delete
Find
Info
New Job 123
Job Name
Back
Setting
OK

16
Job Settings
The following 12 settings are set when a job is created, and they can‟t be changed.
Item
Option
Scale
0.99000 - 1.01000
T-Pcrn.
ON/OFF
SeaLevel
ON/OFF
C&R crn
OFF/0.14/0.200
Angle
DEG/GON/MIL
Dist
Meter/USAFeet/USAInch/IntlFeet/IntlInch
Temp
°C / °F
Press
hPa/mmHg/inHg
VA0
Zenith/Vertical/Vert± 90
AZ 0
North/ South
Order
NEZ/ENZ
HA
Azimuth/0 to BS
To change the setting in the selected field, press [ ]/[ ]; To move between fields, press [▲]/[▼].
4. 3 DELETE JOBS
In the job list,move the cursor to the job that
you want to delete by [▲]/[▼].
Press[Delete] to delete the job.
Press [OK] to confirm or [Cancel] to cancel.
4.4 DISPLAY JOB INFORMATION
Highlight the job thatyou want to display the
information by pressing [▲]/[▼].
Job List
*1
Default
2
RUIDE001
◄
3
RCS-02
►
4
SURVEY
New
Delete
Find
Info
Confirm
Delete the selected job?
Cancel
OK
Job List
*1
Default
2
RUIDE001
◄
3
RCS-02
►
4
SURVEY
New
Delete
Find
Info

17
Press [Info] to display the job info, including the
job name, number of records and time.
5. KEY
To open the Station Setup menu, press in the BMS.
5.1 SET UPASTATION WITH KNOWN POINTS
5.1.1 Set up a Station with Known Coordinates
In [Stn Setup] menu press [1] to enter intothe
function of using known pointto set station.
Input the point name and instrument height,
press [ENT]
Select an input method for defining the
backsight point:
1.To sight the backsight by entering coordinates.
2.To sight the backsight by entering the azimuth
angle.
Press 1, sight tbe backsight by entering
coordinate.
Job Info
Jobname
RUIDE
Number
11
Time
2018-04-02
15:06:25
Back
Setting
Rename
Stn Pt 123
Pt N
S
Inst.Ht
1.500
m
Input
New
Call
OK
BS select
1.
Coordinate
2.
Angle
Cancel
Table of contents
Other Ruide Measuring Instrument manuals
Popular Measuring Instrument manuals by other brands

WIKA
WIKA TR12 Series Additional operating instructions

SICK
SICK GMS815P-PS-3G Supplementary operating instructions

Storch
Storch CrossLine operating manual

GreenValley
GreenValley LiAir X3 user guide

M-system
M-system KSE-x1 instruction manual

PCB Piezotronics
PCB Piezotronics IMI SENSORS TOM607A01 Installation and operating manual