Russell Hobbs RHBIM12 Installation guide

INSTRUCTIONS AND WARRANTY
MODEL NO. RHBIM12
RUSSELL HOBBS BLACK 12KG ICE MAKER

Congratulations on purchasing our Russell Hobbs Black 12kg Ice
Maker. Each unit is manufactured to ensure safety and reliability.
Before using this appliance for the first time, please read the
instruction manual carefully and keep it for future reference.
FEATURES OF THE RUSSELL HOBBS BLACK 12KG ICE
MAKER:
·
·
·
·
·
·
·
·
·
·
·
·
·
105W
ABS housing
Big transparent window at the top
LCD display control panel
Full/Refill/ ON OFF function buttons
Makes 9pcs ice cubes every time at 7 mins
Working noise less than 60dB
Ice cube in size φ11*32 - bullet-shaped
Ice-making volume 12Kg/24H
Ice-storage capacity 800g
Water tank capacity 1.85L
Refrigerant R600aFor Domestic use only
2 year warranty (1 year retail - 1 year extended warranty upon
registration visit www.russellhobbs.co.za)
IMPORTANT SAFEGUARDS
Important Notices:
When using an electrical appliance, basic safety precautions should
always be followed to reduce the risk of fire, electric shock, and/or
injury, including the following:
1. Read all instructions before using.
2. Remove all packing material and carefully check your ice maker
to ensure it is in good condition and that there is no damage to
the ice maker or power cord and plug.
3. Before using the Ice maker for the first time, please wait 2 hours
after positioning it, and keep the transparent lid open for at least
2hours

4. Pure water is not allowed to be used on this unit, spring water is
recommended.
5. Ensure the voltage is compliant with the voltage range stated on
the rating label, and ensure the earthing of the socket is in good
condition.
6. If the supply cord is damaged, it must be replaced by the
manufacturer or its service agent or a similarly qualified person to
avoid a hazard.
7. Do not incline it over a 45℃angle.
8. To protect against risk of electric shock, do not pour water on cord,
plug and ventilation, immerse the appliance in water or any other
liquid.
9. Unplug the appliance after using or before cleaning.
10. Keep the appliance 20 cm from other objects to ensure the good
heat releasing.
11. Do not use the accessories which are not recommended by
Manufacturer.
12. This appliance can be used by children aged from 8 years and
above and persons with reduced physical, sensory or mental
capabilities or lack of experience and knowledge if they have
been given supervision or instruction concerning use of the
appliance in a safe way and understand the hazards involved.
Children shall not play with the appliance. Cleaning and user
maintenance shall not be made by children without supervision.
Children should be supervised to ensure that they do not play with
the appliance.
13. Do not use the appliance close by flames, hot plates or stoves.
14. Do not switch on the power button frequently (ensure 5min.
interval at least) to avoid the damage of compressor.
15. Metal sheet or other electric objects are not allowed to be inserted
into the appliance to avoid fire and short circuit.
16. Do not use outdoors.
17. Never clean with scouring powders or hard implements.
18. Please keep the instruction manual.
19. Warning: Do not store explosive substances such as aerosol cans
with a flammable propellant in this appliance.
20. This appliance is intended to be used in household and similar
applications such as
–staff kitchen areas in shops, offices and other working environments;
–farm houses and by clients in hotels, motels and other residential
type environments;

–bed and breakfast type environments;
–catering and similar non-retail applications.
21. The refrigerant and insulation blowing gas is flammable, when
disposing of the appliance, do so only at an authorized waste
disposal center. Do not expose to flame.
22. Caution: Flammable refrigerant used! When handing, moving and
use of the ice maker, make sure to avoid either damaging the
refrigerant tubing, or increasing the risk of a leak.
23. The ice maker is to be installed in accordance with the Safety
Standard for Refrigeration Systems, ASHRAE 15.
24. The ice maker shall not be installed in corridors or hallways of
public buildings.
PARTS DIAGRAM

Key (with indicator)
Function
The indicator lights in red when
the water reservoir is lack of
water.
The indicator lights in red when
the ice basket is full.
The indicator lights in green
when making ice.
The indicator lights in green
when select small ice.
The indicator lights in green
when select large ice.
Start or stop the appliance
Select the ice size
CONTROL PANEL
BEFORE FIRST USE
1. Unpack the appliance, then check and make sure that all the
accessories including ice basket and ice scoop etc. are complete.
Please contact with the client service department if some accessories
are missing.
2. Please ensure the ice maker is on a level and stable table or
platform.
3. The incline angle of the ice maker cabinet should not exceed
45°during transportation or use. Do not turn the ice maker upside
down. Doing so could cause the compressor or refrigerating system

to operate incorrectly. Please allow time for the fluids in the
compressor to settle after the ice maker is moved or transported.
Before using the ice maker for the first time, please wait for 2 hours
after the unit has been leveled and positioned into a proper place.
4. The appliance must be placed on a dry and level surface with
sufficient ventilation, far from heat sources such as ovens, heaters
and corrosive gases. Leave an about 20cm clearance on all sides of
the ice maker for proper ventilation.
5. Do not fill the water reservoir with hot water. This may damage the
ice maker. It is best to fill the water reservoir with water of room
temperature or lower.
6. Do not use the appliance at a very cold environment (lower than
5℃).
7. Clean the appliance by following the operation of “CLEANING
AND MAINTENANCE” before operating.
OPERATING INSTRUCTIONS
1. Ensure that the drain plug at the bottom of water reservoir is closed
well.
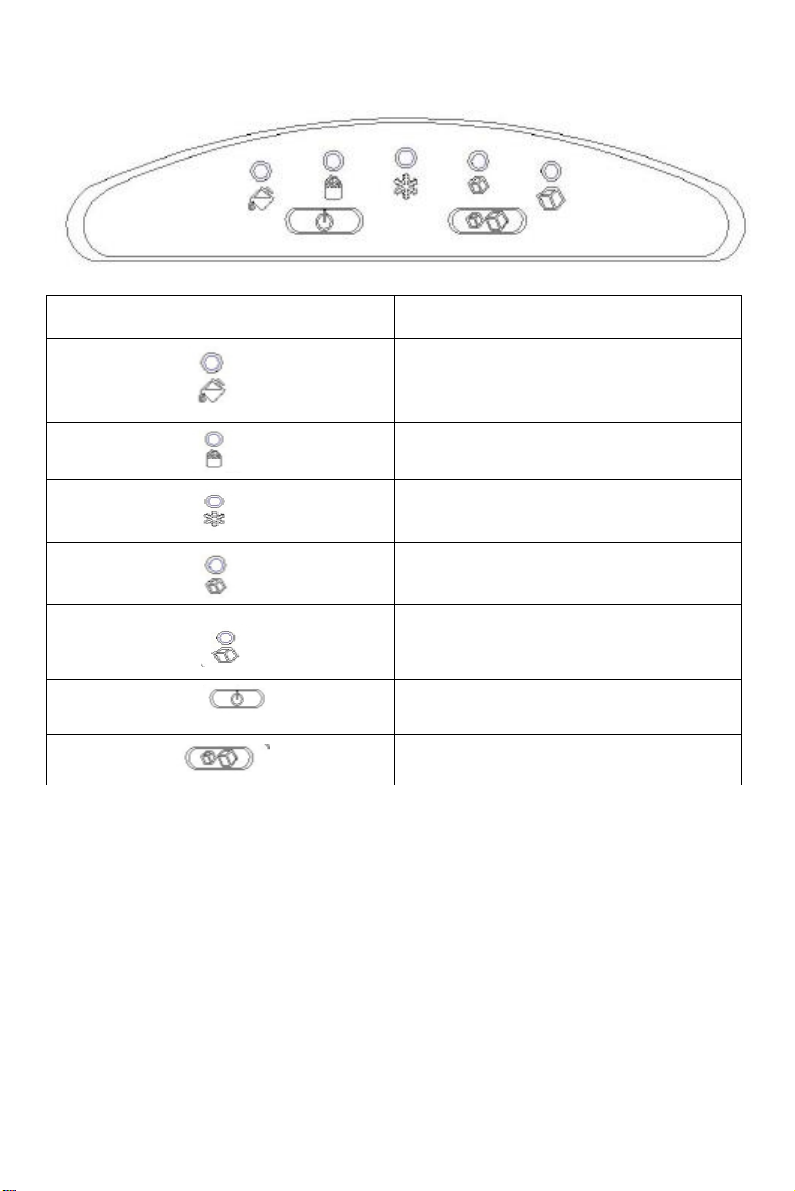
2. Plug the ice maker into the wall outlet, and the “ICE” indicator
blinks.
3. Open the top lid and remove the ice basket.
4. Fill the water reservoir with water
Note: Do not fill above the MAX water level mark.
5. Replace the ice basket and close the top lid.
6. Press the ON/OFF button and the “ICE” indicator will illuminate
solidly.
7. The ice-making cycle will last approximately 6-13 minutes,
depending on the ambient temperature and water temperature.
8. The ice-making cycle starts with water being pumped into the ice
tray situated below the evaporator. Over the next 6-13 minutes ice
forms on the evaporator. Once this has completed, the ice tray will tilt
backwards and the remaining water in the ice tray is drained back into
the water reservoir. The ice cubes are then dropped from the
evaporator and pushed forward into the ice basket by the ice shovel.
The ice tray will automatically move back into position under the
evaporator and start the next cycle.
9. The “ICE FULL” indicator will light up when the ice basket is full
and the ice maker will stop the ice-making cycle automatically. Gently
remove the ice from the ice basket with the ice scoop. About 5
seconds later, the ice maker will restart its ice making function

Problem
Possible causes
Solution
ADD WATER
indicator turns
1.Low water level or lack
of water
1.Stop making ice,
refill water and then
automatically.
10. The “ADD WATER” indicator will light up when the water reservoir
is short of water and the ice-making cycle will stop automatically. At
that time, remove the ice basket and add water to the water reservoir,
and then press ON/OFF button again to restart the ice-making cycle.
11. When you have got your desired amount of ice, stop the ice
making cycle by pressing the ON/OFF button and unplug the unit
from the wall outlet.
12. Open the top lid and transfer the ice to a freezer.
Note: The ice will last in the ice maker for up to 18 hours, depending
on the ambient temperature.
13. Allow the ice maker to reach room temperature.
14. Suggest replacing the water every 24 hours. Please empty the
water reservoir if the ice maker is not used for a long time.
CLEANING AND MAINTENANCE
1. Stop the ice-making cycle by pressing the ON/OFF button, unplug
the ice maker from the wall outlet and allow it to warm up to room
temperature.
2. If residual water is found in the ice tray, gently push the ice tray
back so that all water drains into the water reservoir.
3. Open the drain plug to drain out excess water.
4. Remove the ice basket.
5. Clean the ice maker interior with a soft cloth dampened in warm
water and vinegar. Rinse with a clean damp cloth.
6. Replace the drain plug well in position. Wash the ice basket and ice
scoop in warm soapy water. Rinse and dry.
7. Clean the exterior of the ice maker with a soft damp cloth. Use a
mild dishwashing soap, if necessary.
Note:
1) Do not use organic solvent, boiled water, detergent, strong acid
and strong alkali etc. for cleaning.
2) Do not clean the evaporator.
8. Please empty the water reservoir and dry it for storage if the ice
maker is not used for a long time.
TROUBLESHOOTING

on
2.The water screen at
the bottom of water
reservoir is blocked.
3.Pump malfunction.
press “ON/OFF”
button to restart ice-
making cycle.
2.Do cleaning
3.Send it to the
authorized
department for
repair.
ICE FULL
indicator turns
on
1.Ice basket is full
2.Full ice sensor
malfunction
3.Low-temperature
protection(ambient
temperature≤5℃)
1.Remove the ice
from ice basket.
2.Send it to the
authorized
department for
repair.
3.Fill the water
reservoir with water
ranges between 8℃
and 28℃
ICE FULL
indicator blinks
The ice shovel is
blocked
Remove the ice if
the ice shovel is
blocked by ice, if
not, contact the
service department
for suggestion.
ADD WATER
and ICE FULL
indicators turn
on
simultaneously
The ice tray is not in the
right position.
1.Check if the ice
tray is blocked by
something.
2.The internal part is
damaged.
The ice collects
together.
Making ice takes too
much time.
Stop making ice and
restart the ice-
making cycle after
the ice melts.
The water in the water
reservoir is of too low
temperature.
Fill the water
reservoir with water
ranges between 8℃
and 25℃.
The ice-making
cycle seems
normal but no
ice is produced.
The ambient
temperature or water
temperature is too high.
Start the ice-making
cycle at a
environment with an
ambient temperature

less than 32°C and
fill the water
reservior with some
cold water.
Refrigerating system
leaks
Call customer
service
Refrigerating system
blocks
Call customer
service
Poor ice-making
result
1.Poor heat dissipation.
2.The water temperature
is too high.
3.The ambient
temperature is too high.
1. Leave an 8-inch
clearance on all
sides of the ice
maker for proper
ventilation.
2. Fill the water
reservoir with water
ranges between 8℃
and 28℃
3. Operate the ice
maker at a
environment with an
ambient temperature
between 10℃and
32℃.
STORING THE APPLIANCE
•
•
•
•
Unplug the unit from the wall outlet and clean all the parts as
instructed above. Ensure that all parts are dry before storing.
Store the appliance in its box or in a clean, dry place.
Never store the appliance while it is still wet or dirty.
Never wrap the power cord around the appliance. Do not store
the appliance with the thermostat control/ probe inserted in the
unit, always unplug it. Ensure the thermostat control/ probe is
stored in a safe place where it will not be dropped,
bumped or damage
SERVICING THE APPLIANCE

There are no user serviceable parts in this appliance. If the unit is not
operating correctly, please check the following:
•You have followed the instructions correctly
•That the unit has been wired correctly and that the wall socket
•
•
is switched on.
That the mains power supply is ON.
That the plug is firmly in the mains socket.
If the appliance still does not work after checking the above :
Consult the retailer for possible repair or replacement. If the retailer
fails to resolve the problem and you need to return the appliance,
make sure that:
•The unit is packed carefully back into its original packaging.
•Proof of purchase is attached.
•A reason is provided for why it is being returned.
If the supply cord is damaged, it must be replaced by the
manufacturer or an authorised service agent, to avoid any hazard. If
service becomes necessary within the warranty period, the appliance
should be returned to an approved Home of Living Brands (Pty) Ltd
service centre. Servicing outside the warranty period is still available,
but will, however, be chargeable.
CHANGING THE PLUG
Should the need arise to change the fitted plug, follow the instructions
below.
This unit is designed to operate on 230V-240V current only.
Connecting to other power sources may damage the appliance.
Connect a three-pin plug as follows:
The wires in this mains lead are coloured in accordance with the
following code:

Green/Yellow = Earth
Blue
Brown = Neutral
= Live
According to the Waste of Electrical and Electronic
Equipment (WEEE) directive, WEEE should be
separately collected and treated. If at any time you
need to dispose of this product, please do NOT
dispose of this product with household
waste. Please send this product to WEEE
collecting points where available.

PLEASE AFFIX YOUR PROOF OF PURCHASE/RECEIPT HERE
IN THE EVENT OF A CLAIM UNDER WARRANTY THIS RECEIPT MUST BE PRODUCED.
2 YEAR WARRANTY
1 year retail ⵏ
1 year extended
warranty upon registration*
visit www.russellhobbs.co.za
W A R R A N T Y AND EXTENDED WARRANTY
1. Home of Living Brands (Pty) Limited ("Home of Living Brands") warrants to the original purchaser of this
product ("the customer") that this product will be free of defects in quality and workmanship which under
normal personal, family or household use and purpose may manifest within a period of 1 (one) year from
the date of purchase ("warranty period").
2. Home of Living Brands shall extend the warranty period for a further period of 1(one) year (“extended
warranty period*”), on condition that the purchaser registers the product on the website, within 12 months
from the date of purchase of the product. The website address for registration is as follows:
http://russellhobbs.co.za/info-pages/warranty-info.aspx. The extended warranty period only applies to
products purchased on or after 1 October 2017.
3. Where the customer has purchased a product and it breaks, is defective or does not work properly for the
intended purpose, the customer must notify the supplier from whom the customer bought the product
("the supplier") thereof within the warranty period or if applicable, the extended warranty period. Any claim
in terms of this warranty must be supported by a proof of purchase. If proof of purchase is not available,
then repair, and/or service charges may be payable by the customer to the supplier.
4. The faulty product must be taken to the supplier's service centre to exercise the warranty.
5. The supplier will refund, repair or exchange the product in terms of this warranty subject to legislative
requirements. This warranty shall be valid only where the customer has not broken the product
themselves, or used the product for something that it is not supposed to be used for. The warranty does
not include and will not be construed to cover products damaged as a result of disaster, misuse, tamper,
abuse or any unauthorised modification or repair of the product.
6. This warranty will extend only to the product provided at the date of the purchase and not to any
expendables attached or installed by the customer.
7. If the customer requests that the supplier repairs the product and the product breaks or fails to work
properly within 3 (three) months of the repair and not as a result of misuse, tampering or modification by
or on behalf of the customer, then the supplier may replace the product or pay a refund to the customer,
subject to the supplier’s discretion.
8. The customer may be responsible for certain costs where products returned are not in the original
packaging, or if the packaging is damaged. This will be deducted from any refund paid to the customer.
HOME OF LIVING BRANDS (PTY) LTD (JOHANNESBURG)
JOHANNESBURG TEL NO. (011) 490-9600
CAPE TOWN TEL NO. (021) 552-5161
DURBAN TEL NO. (031) 303-1163
www.homeoflivingbrands.com
www.russellhobbs.co.za
www.facebook.com/RussellHobbsSA
Other manuals for RHBIM12
1
Table of contents
Other Russell Hobbs Ice Maker manuals