RUSTA 629601520101 User manual

Manual/Bruksanvisning/Gebrauchsanweisung/Käyttöohje
NOSEENG DE FI
Item no. 629601520101
Mosquito trap
Myggångare / Myggfanger /
Mückenfalle / Hyttysansa
MOSQUITO POWER TRAP

2
ENG
Mosquito Trap, Mosquito PowerTrap®
Read the user manual carefully to make sure that the product is assembled, used and
maintained correctly, as described in the instructions in this user manual. Keep the user
manual for future reference.
SAFETY INSTRUCTIONS
• Only for outdoor use. Install the unit at least 3 m from buildings and
other structures.
• Never insert your fingers or foreign objects into the unit when it is
switched on.
• Always disconnect the unit from the power source and wait until it
has cooled before touching or moving the unit.
• This unit is intended to be used with LPG. Never try to use any other
type of fuel. If the instructions are not followed, this may lead to
physical injury and/or damage to property and the unit.
• Handle the transformer carefully. Never use the cord to carry the
transformer. Do not pull on the cord to unplug the transformer from a
socket. The low-voltage cable and its protection must not be removed
from the transformer. Keep the transformer and cables away from
heat, oil and sharp objects.
• Store the unit indoors when not in use. Disconnect the LPG cylinder
from the unit before storage and store the cylinder outdoors in a well-
ventilated location.
Thank you for choosing to
purchase a product from Rusta!
Read through the entire manual
before installation and use!
WARNING!
If these instructions are not followed, an accident may lead
to serious personal injury or property damage.

3
UNPACKING
The mosquito trap has been carefully packaged in the factory to prevent any damage
during transport. Open the box carefully and:
• Remove the contents from the box.
• Check the contents of the box against the contents of the package listed on this page.
Mosquito trap
Motor cover
LPG Container and
regulator (sold eparately)
Stand
Collector
Connector
Post
Transformer with
low-voltage cable
Mosquito trap x 1
Transformer x 1
Collector x 1
Post x 1
Holder B x 1
Holder A x 2
Long screws x 4
Short screws x 4
Nuts x 8
Octenol tablet x 1
Gas connector x 1
PACKAGE CONTENTS

4
ENG
MOSQUITOES – YOUR ENEMY
• There are more than 2,700 species of mosquito in the world.
• Most live and die close to where they were born, although some can travel long
distances in the search for a host. Only the female mosquito bites, because she
requires blood to be able to produce fertile eggs.
• Mosquitos require stagnant water in water-rich environments, including fresh water,
salt water marshes, brackish water and water in containers, old tyres, holes in trees
and even plant pots. The female mosquito lays its eggs on the surface of the water
and, in the right conditions, the eggs hatch and grow into adult mosquitoes in just
10–14 days.
• Both the male and female mosquitoes regularly feed on nectar in flowers, but the
females require blood to produce fertile eggs. Therefore, she needs to find a human
or animal to act as host so she can suck blood before she lays her eggs.
• Most mosquitoes in nature never come into contact with people. They draw blood
from birds or other animals. Mosquito species that reproduce among humans and in
residential areas stay near to the place where they hatch.
• Mosquitoes looking for blood use visual, thermal and scent stimuli to find a host. Of
these, scent is most important.
• Of the more than 100 substances found in human breath, only two have been isolated
and identified as important for attracting mosquitoes: carbon dioxide (CO2) and
octenol (1- OCTEN-3-OL). These attractants act as airborne attractants with a long
range and can be detected by mosquitoes at a distance of 30–40 m. At a short
distance, body heat, moisture and lactic acid act as attractants.
HOW YOUR MOSQUITO TRAP FUNCTIONS
The mosquito trap does the following:
• Emits the human attractants, such as breath, smell and body heat, which are irresis-
tible to female mosquitoes, attracting them to the trap.
• Converts LPG into heat, moisture and carbon dioxide, the primary mosquito attrac-
tants that are given o by humans.
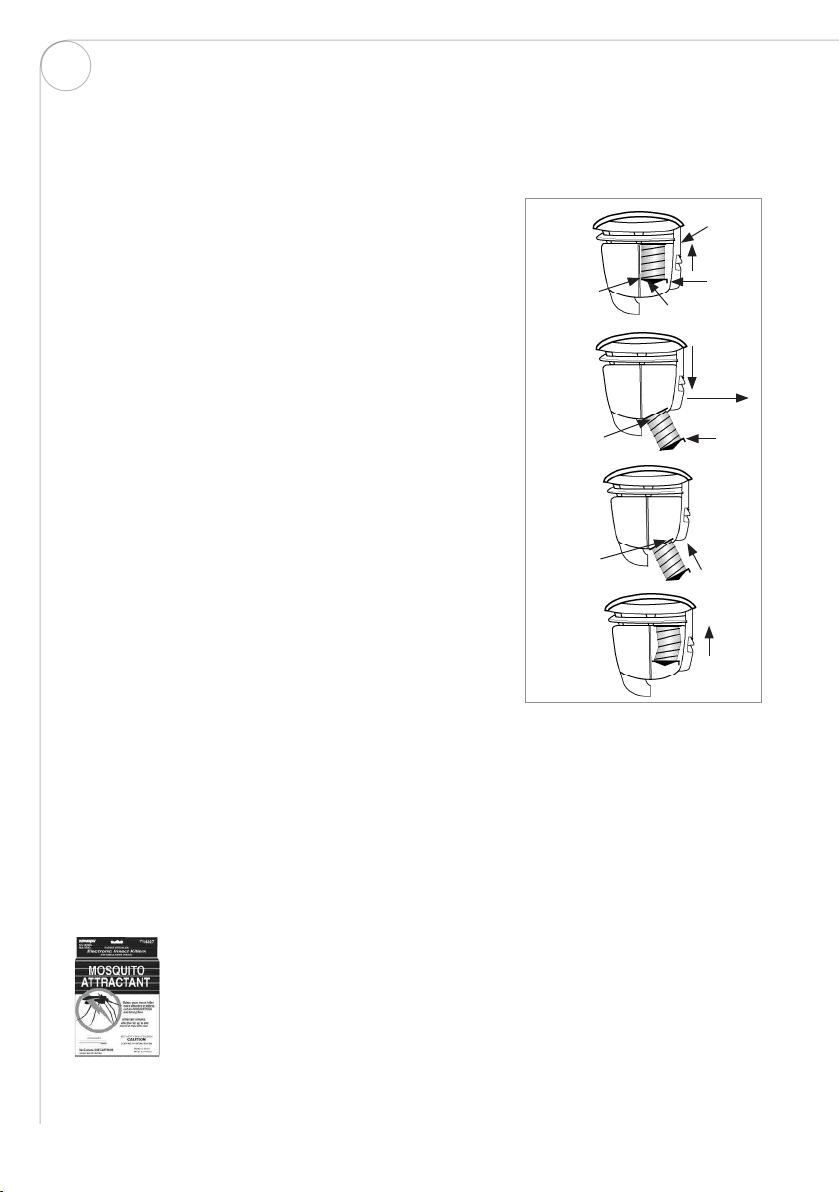
• Releases octenol, a tried and tested attractant for mosquitoes and gnats, in the
carbon dioxide emission for maximum eect.
• Produces a powerful vacuum that pulls in the mosquitoes into a practical, removable
collector, where they quickly dry out and die. It is easy to empty the collector.
• Electronic microprocessor control.
• The mosquito trap does not use ultraviolet light or high-voltage current. Most im-
portant of all: the unit only attracts and kills female mosquitoes.
• The mosquito trap uses an exclusive platinum catalyst that converts air and LPG into
heat, moisture and carbon dioxide (CO2). It does this eciently, eectively and econo-
mically. The catalyst conversion is completely safe and involves no naked flames.

5
Building
6–12 m
Plume
Wind direction
Exhaust of
attractant
Terrace/
balcony Location of
insects
1
Press
3
B
CA
A
Long screw (four
locations)
Nuts (eight
locations)
Short screw
(four locations)
2
D
LOCATION
• The location of your mosquito trap is vital for successful results.
• Your mosquito trap emits a plume of octenol-enriched carbon dioxide, which the
mosquitoes follow as they search for blood. The mosquitoes fly AGAINST the wind
towards the source of carbon dioxide as they look to find a host. As the direction of
the plume depends on the wind direction, the mosquito trap should be positioned so
that the outlet for the attractant is directed in the direction of the wind.
• Female mosquitoes also feed on moisture-rich nectar and fruit juices when they are
not looking for blood. They can normally be found in the shade: around flowers, trees,
bushes and other plants, as well as close to water.
• For the best results, site the unit 6–12 metres from areas where people are active,
close to bushes (but not inside bushes), woody areas or close to standing water
(except for swimming pools).
Choose a location where the plume
of carbon dioxide will blow towards
the area where the mosquitoes
could be. Accurate location will
ensure that the mosquitoes will find
the plume and follow it against the
wind to your mosquito trap before
they discover that there are humans
around (image 1).
ASSEMBLY
ASSEMBLE THE TANK STAND
• Secure the holders A (x2) on the end of
post C using two long screws and two
nuts (image 2).
• Secure holder B to holders A using four
short screws and four nuts. Secure post
C using a long screw and a nut.
• Insert a long screw and nut in holder A in
position D (image 2). Do not tighten.
• Position the LPG cylinder in the stand
between the A holders. Secure the LPG
cylinder by tightening the screw in
position D.
• Install the collector by inserting its rear into the casing. Then
pressthe upper part of the catch and lift the front of the
collector into place (image 3).
• Plug the transformer into a socket. Run the cable from the
transformer to the unit. Take into account the risk of tripping
over the cord.

6
ENG
CONNECTING THE GAS BOTTLE
Depending on which country your insect catcher is intended for use in, you will need to
install the correct gas connection to connect the gas bottle. The gas connection is loca-
ted in a plastic bag in the box labelled with the market it is intended for (figure 4).
Use a spanner to attach the gas connection (figure 5).
WARNING! Check for leaks by moistening the connections with soapy water and
looking for bubbles. If there are any bubbles or a bubbles gets larger, there is
a leak and the connection must be tightened further. If you are unsure, contact
your retailer.
Check for gas leaks each time you disconnect and reconnect an LPG cylinder.
Make sure there are no sparks or naked flames in the area when you check for
leaks. Do not use an LPG cylinder with a damaged valve. Damaged LPG cylinders
with dents or rust must be checked by your LPG retailer.
Only use the regulator that accompanies your mosquito trap.
USE
• Your mosquito trap is fully automatic. It is equipped with a microprocessor that
controls all the functions.
• To use the mosquito trap, connect the transformer to a 230 V AC socket. Connect the
low-voltage cable to the electrical contact at the base of your mosquito trap. LED
lights inside the mosquito trap's motor cover shine red to indicate that the unit has
commenced its start-up cycle. The LPG cylinder valve can now be opened. Around
three minutes later, the fan starts, and goes on and o until the start-up cycled has
concluded.
• The start-up cycle is concluded once the catalyst has reached normal operating
temperature, which takes between 5 and 15 minutes. After that, the fan runs
continuously and the LED lights are blue instead of red. This indicates that the
mosquito trap is operating and is ready to attract and kill mosquitoes.
5
GermanySweden
Norway
Finland
4

7
AUTOMATIC RESTART
If there is a power cut while the unit is in operation, the mosquito trap will switch o until
the power comes back on. The unit’s LPG valve also switches o automatically. When the
power has been restored, the unit will automatically start up again, without you having to do
anything.
CHANGING THE LPG CYLINDER
Fifteen minutes after the unit registers a shortage of LPG (normally due to an empty
LPG cylinder), the LED lights change from blue to flashing red. Switch o the current
and replace the LPG cylinder. If the LPG has not run out and the LED lights flash red, see
TROUBLESHOOTING.
PLEASE NOTE! In order to reset the mosquito trap’s microprocessors after error messages
such as flashing LED lights, the power must be turned o. Disconnect and reconnect the
unit’s electrical contact.
PLEASE NOTE! Most mosquitoes are killed when they pass through the fan and are thrown
to the side on the internal circular mesh. Others end up in the collector, where they quickly
dry out and die. Instructions on removal and cleaning of the circular mesh can be found
under MAINTENANCE.
OCTENOL TABLETT
American government and university researchers have shown that octenol combined with
carbon dioxide (both can be found in our breath) is irresistible to mosquitoes. The mosquito trap
uses a specially formulated tablet that contains octenol (1-OCTEN-3-OL).
Inserting the octenol tablet:
1. Remove the octenol tablet from the sealed pouch and
peel the protective foil from the bottom of the tablet. Avoid
touching the openings in the tablet and always wash your
hands thoroughly after contact.
2. Place the tablet in the rectangular hole in the base of the
air intake duct. Insert the tablet with the underside (the
side with the openings) facing inwards. See image.
MAINTENANCE
1. Once the mosquito trap has been in use for around three to four weeks, the LED lights
will flash red to indicate that the LPG needs refilling.
2. Replace the octenol tablet each time you change the LPG cylinder.
3. Empty the collector regularly to make sure that air can flow properly through the trap.
Press the catch on the front of the collector and pull it down.
Air intake duct
Insert the
octenol tablet
Opening

8
CLEANING
Clean the circular mesh regularly. How to remove the circular mesh: Switch o the
power and allow the unit to cool. Remove the collector.
A. Push up the rear of the circular mesh’s lower ring
into the unit’s casing until the two front catches on
the frontof the circular mesh are released (image A).
B. Pull the circular mesh downwards and forwards
so that the circular mesh’s upper ring loosens and
pull the mesh out of the unit (image B). Remove
any insect remains from the mesh that surrounds
the circular mesh. Wash the mesh with water and
shake o any excess water before replacing it.
C. Replace the circular mesh by holding it at a slight
angle. The two front catches must be on the outside.
Insert the front of the upper funnel ring inside the
unit’s casing (image C).
D. Push the circular mesh up and with the back part
of the lower funnel ring at a slight angle. Press the
circular mesh together until the front catches on
the circular mesh’s lower ring are inside the casing
(image D). Release the circular mesh so that it ends
up in place.
PLEASE NOTE! The upper part of the circular mesh
must be positioned directly under the fan. Replace
the collector. Reconnect the power and restart the
unit.
A
B
Catch
Front
catch
Up
Casing
Forwards
C
D
Up
Up
Down
Front edge of
upper ring of
circular
Upper ring
of circular
mesh
Lower ring
of circular
mesh Push up here
ENG
ACCESSORIES
Octenol mosquito attractant:
MA-1000 makes your mosquito trap
more eective and attracts mosquitoes
and gnats!

9
TROUBLESHOOTING
Problem Cause Action
Red LED lights do not
come on when unit
turned on.
No power in socket. Check that there is power in the
socket.
The unit is not correctly
connected to power unit.
Check the connections from the
transformer to the unit (low-voltage
cable).
The LED lights do not
change to blue once
the unit has been
on for at least 15
minutes.
Lack of LPG. Change the LPG cylinder.
Error in start-up cycle. Switch the unit OFF, wait 5 minutes
and then restart.
The LED lights flash
red.
Lack of LPG. Change the LPG cylinder.
The LPG cylinder’s valve is
closed.
Open the LPG cylinder’s valve.
The regulator is not correctly
connected.
Check that the regulator’s coupling
is correctly positioned and/or is not
leaking.
The unit does not
catch mosquitoes
when the fan is
running and the LED
lights are blue.
The end of the circular mesh is
not positioned over the opening
in the collector.
Connect the end of the circular mesh
to the opening on the collector.
The circular mesh is blocked. Clean the circular mesh. See page 8.
The mosquito trap is not
positioned as instructed.
Move the mosquito trap to a dierent
location. See the guidelines for
positioning in the user manual.
Windy, cold or stormy weather. Wait for more favourable conditions.
RIGHT OF COMPLAINT
By law the product must be returned to the place of purchase along with the original
receipt in the event of a complaint. The user is liable for any damage to the product that
is caused by not using the product for its intended purpose or by not following this user
manual correctly. The right of complaint will not apply in these instances.
INFORMATION ABOUT HAZARDOUS WASTE
Used products should be handled separately
from household waste. They should be taken
for recycling in accordance with local rules for
waste management.

10
SE
Myggfångare, Mosquito PowerTrap®
Läs bruksanvisningen noggrant och se till att produkten installeras, används och
underhålls på rätt sätt enligt instruktionerna. Spara bruksanvisningen för senare bruk
SÄKERHETSFÖRESKRIFTER
• Endast för utomhusbruk. Montera enheten minst 3 meter från bygg-
nader och andra konstruktioner.
• Sätt aldrig in fingrar eller något föremål inuti enheten när den är
påslagen.
• Koppla alltid bort enheten från strömkällan och vänta på att den
svalnar innan du hanterar eller flyttar enheten.
• Denna enhet är avsedd för användning med gasol. Försök aldrig att
använda något annat bränsle än gasol. Om inte bruksanvisningen
följs kan det leda till allvarliga fysiska skador och/eller skada på
egendom och enheten.
• Hantera transformatorn varsamt. Bär aldrig transformatorn i
sladden. Ryck ej i sladden för att koppla loss transformatorn från
ett uttag. Lågspänningskabeln och dess skydd får ej avlägsnas från
transformatorn. Håll transformatorn och kablarna på avstånd från
värmeolja och vassa kanter.
• Förvara enheten inomhus när den inte är i bruk. Koppla loss gasol-
tuben från enheten före förvaring och förvara tuben utomhus på en
väl ventilerad plats.
VARNING!
Om föreskriften inte efterföljs kan en olycka leda till
allvarlig person- eller egendomsskada.
Tack för att du valt att
köpa en produkt från Rusta!
Läs igenom hela bruksanvisningen
innan montering och användning!

11
UPPACKNING
Din myggfångare har förpackats noggrant på fabriken för att förhindra skada under
transport. Öppna kartongen försiktigt och:
• Ta ut innehållet ur kartongen.
• Kontrollera innehållet i kartongen mot FÖRPACKNINGENS INNEHÅLL.
Myggfångare
Motorkåpa
Regulator och gasflaska
(säljes separat)
Stativ
Uppsamlare
Anslutningskontakt
Stolpe
Transformator med
lågspänningskabel
Myggfångare x 1
Transformator x 1
Uppsamlare x 1
Stolpe x 1
Hållare B x 1
Hållare A x 2
Långa skruvar x 4
Korta skruvar x 4
Muttrar x 8
Oktenoltablett x 1
Gasanslutning x 1
FÖRPACKNINGENS INNEHÅLL

12
SE
MYGGAN – DIN MOTSTÅNDARE
• Det finns mer än 2700 olika myggarter i världen.
• De flesta mygg lever och dör i närheten av den plats där de föds, även om några
kan resa miltals i sökandet efter en värd. Endast honmyggan sticker eftersom hon
kräver blod för att kunna producera fertila ägg.
• Myggor kräver stående vatten i vattenrika miljöer inklusive färskvatten, saltvat-
tensträsk, bräckt vatten och i vatten i behållare, gamla däck, hål i träd och till
och med blomkrukor. Honmyggan lägger sina ägg på vattnets yta och under rätt
förutsättningar kläcks äggen och blir till vuxna myggor på bara 10–14 dagar.
• Både han- och honmyggor när sig regelbundet på nektar som finns i blommor,
men honorna kräver blod för att producera fertila ägg. Därför måste hon hitta en
människa eller ett djur som värd för att kunna suga blod innan hon kan lägga ägg.
• De flesta mygg som kommer fram i naturen kommer aldrig i kontakt med männ-
iskor utan hämtar blod från fåglar och andra djur. Myggarter som förökar sig runt
människor och bostäder stannar i närheten av den platsen där de kläcks.
• Mygg som söker efter blod använder visuella, termiska och luktstimulanser för att
hitta en värd. Av dessa är lukten den viktigaste.
• Av de mer än 100 ämnen som hittas i människans andedräkt har enbart två
isolerats och identifierats som viktiga lockmedel för mygg; koldioxid (CO2) och
oktenol (1- OCTEN-3-OL). Dessa lockmedel fungerar som luftburna lockmedel
med lång räckvidd och kan avkännas av mygg på 30-40m avstånd. På kort
avstånd fungerar kroppsvärme, fukt och mjölksyra som lockmedel.
SÅ HÄR FUNGERAR DIN MYGGFÅNGARE
Myggfångaren gör följande:
• Återger de mänskliga lockmedlen andningsluft, lukt och kroppsvärme och skapar
därmed en oemotståndlig kraft som lockar honmyggor till fällan.
• Omvandlar gasol till värme,fukt och koldioxid, de primära mygglockmedlen som
avges av människor.
• Släpper ut oktenol, ett beprövat lockmedel för mygg och knott, i koldioxidutsläppet
för maximal verkan.
• Producerar ett kraftigt vakuum som drar in myggorna i en praktisk löstagbar upp-
samlare där de snabbt torkar ut och dör. Uppsamlaren kan enkelt tömmas.
• Elektronisk mikroprocessorstyrning.
• Myggfångaren använder inte ultraviolett ljus eller hög-spänningsnät. Viktigast av
allt; enheten attraherar och dödar enbart honmyggor.
• Myggfångaren använder en exklusiv platinakatalysator som omvandlar luft och
gasol till värme, fukt och koldioxid (CO2). Den gör det på ett eektivt, verknings-
fullt och ekonomiskt sätt. Katalysatoromvandlaren är fullständigt säker och helt
utan öppen låga.

13
PLACERING
• För framgångsrika resultat är
placeringen av din myggfångare
är avgörande.
• Myggfångaren avger en plym av
oktenolberikad koldioxid som
myggorna följer i sökandet efter
blod. Myggorna flyger MOT vinden mot koldioxidkällan i sina försök att hitta en värd.
Eftersom plymens riktning är beroende av vindens riktning bör myggfångaren place-
ras så att utloppet för lockmedlet är riktat MED vindens riktning.
• Honmyggor när sig också på fuktrik nektar och fruktsafter när de inte söker efter
blod. Dessa brukar finnas i skuggan; runt blommor, träd, buskar och annan växtlighet
och i närheten av vatten.
• För att få bästa resultat, placera enheten 6–12m från områden där människor är aktiva,
på en plats nära buskar (dock ej inne i buskarna), skogiga områden eller i närheten av
stående vatten (utom badbassänger). Välj en plats där koldioxidplymen kommer att
blåsa mot det område där myggornas tillhåll kan finnas. Korrekt placering säkerställer
att myggorna hittar plymen och följer den mot vinden till din myggfångare innan de
upptäcker människors närvaro. Se bild 1.
Byggnad
6-12 m
Plym
Vindriktning
Utblås av
lockmedel
Terrass/
altan Insekternas
tillhåll
MONTERING
MONTERA TANKSTATIVET
• Sätt fast hållarna A (2 st.) på stolpslutet C med
hjälp av två långa skruvar och två muttrar
(bild 2).
• Sätt fast hållare B på hållarna A med hjälp av
fyra korta skruvar och fyra muttrar. Sätt fast
stolpe C med hjälp av en lång skruv och en
mutter.
• Sätt i en lång skruv och en mutter i hållare A
på plats D. (bild 2). Dra inte åt.
• Placera gasoltuben i stativet mellan hållarna
Fixera gasoltuben genom att dra åt skruven på plats D.
• Installera uppsamlaren genom att föra in dess baksida i höljet. Tryck
sedan in övre delen av spärren och lyft upp uppsamlarens framsida
på plats (bild 3).
• Plugga in transformatorn i ett uttag. Dra kabeln från transformatorn
till enheten. Tänk på risken med att snubbla över sladden . Tryck
3
1
B
CA
A
Lång skruv
(fyra ställen)
Muttrar
(åtta
ställen)
Kort skruv
(fyra ställen)
2
D

14
SE
ANSLUTNING AV GASOLFLASKA
Beroende på vilket land som din myggfångare är avsedd för att användas så
behöver du montera korrekt gasanslutning för att kunna ansluta gasolflaskan.
Gasanslutningen ligger i en plastpåse i kartongen märkt med marknaden den är
avsedd för (bild 4). Använd en skiftnyckel för att fästa gasanslutningen (bild 5).
VARNING! Kontrollera eventuellt gasläckage genom att fukta anslutningarna
med tvålvattenlösning och titta efter bubblor. Om bubblor uppstår eller om
en bubbla blir större finns det en läcka och anslutningen måste dras åt
ytterligare. Är du osäker kontakta din återförsäljare.
Kontrollera eventuellt gasläckage varje gång du kopplar loss och återansluter
en gasoltub. Säkerställ att det inte förekommer gnistor eller öppen låga i
det område när du kontrollerar läckor. Använd inte en gasoltub med skadad
ventil. Skadade gasoltuber med bucklor eller rost skall kontrolleras av din
gasolåterförsäljare.
Använd endast den regulator som medföljer din myggfångare.
ANVÄNDNING
• Myggfångaren är helt automatisk. Den är utrustad med en mikroprocessor som
styr alla funktioner.
• För att använda myggfångaren, anslut transformatorn till ett 230-volts
växelströmsuttag. Anslut lågspänningskabeln till elkontakten i botten på din
PowerTrap. LED-lampor som finns inuti myggfångarens motorkåpa lyser rött och
indikerar att enheten har inlett sin startcykel. Nu kan gasoltubens ventil öppnas.
Cirka tre minuter senare startas fläkten, som går till och från, tills startcykeln är
avslutad.
• Startcykeln är avslutad när katalysatorn har nått normal driftstemperatur, vilket
tar mellan 5 och 15 minuter. Efter detta går fläkten kontinuerligt och LED-
lamporna lyser blått i stället för rött. Detta indikerar att myggfångaren är i drift
och redo att attrahera och döda mygg.
5
TysklandSverige
Norge
Finland
4

15
AUTOMATISK OMSTART
I händelse av strömavbrott medan enheten är i drift stängs myggfångaren av tills
strömmen återställs. Även enhetens ventil för gasolen stängs av automatiskt. När
strömmen har återställts startar enheten automatiskt upp igen utan behov av någon
åtgärd.
BYTE AV GASOLTUB
Femton minuter efter det att enheten registrerar en brist på gasol (normalt på grund av
en tom gasoltub) ändras LED-lamporna från blått till blinkande rött sken. Bryt strömmen
och byt till en ny gasoltub. Om det inte är slut på gasol och LED-lamporna blinkar rött,
se PROBLEMLÖSNING.
OBS! För att återställa myggfångarens mikroprocessorer efter felmeddelanden som
blinkande LED-lampor måste strömmen brytas . Koppla loss och återanslut enhetens
elkontakt.
OBS! Huvuddelen av myggorna dödas när de passerar genom fläkten och kastas
mot sidan på den invändiga nättratten. Övriga hamnar i uppsamlaren, där de snabbt
torkar ut och dör. Anvisningar om borttagning och rengöring av nätratten finns under
UNDERHÅLL.
OKTENOLTABLETT
Amerikanska statliga och universitetsforskare har visat att oktenol kombinerad med
koldioxid (som båda ingår i andningsluften) är oemotståndliga lockmedel för myggor.
Myggfångaren använder en specialutformad tablett som innehåller oktenol (1-OCTEN-3-OL).
Så här placerar du oktenoltabletten:
1. Ta ut oktenoltabletten ur den förseglade
påsen och dra bort skyddsfolien från
tablettens under sida. Undvik att beröra
tablettens öppningar och tvätta alltid
händerna noga efter kontakt.
2. Placera tabletten i det rektangulära hålet i
botten på inluftskanalen. Sätt in tabletten
med undersidan (sidan med öppningarna)
vända inåt. Se bilden.
UNDERHÅLL
1. När Myggfångaren har varit i bruk i cirka tre till fyra veckor blinkar LED-lamporna
rött för att visa att påfyllning av gasol behövs.
2. Byt ut oktenoltabletten varje gång du byter gasoltub.
3. Töm uppsamlaren regelbundet så att luft flödar ordentligt genom fällan. Tryck in
spärren på uppsamlarens framsida och dra den nedåt.
Inluftskanal
Placerad
oktenoltablett
Sätt i oktenoltabletten
Öppning

16
SE
TILLBEHÖR
Octenol mygglockmedel:
MA-1000
Gör att din myggfångare mer eektivt
attraherar mygg och knott!
RENGÖRING
Rengör nättratten regelbundet. Så här tar du bort nät-tratten: Bryt strömmen och låt
enheten svalna. Ta bort uppsamlaren.
A. Tryck upp baksidan av nättrattens nedre ring in
i enhetens hölje tills de två främre spärrarna på
nättrattens framsidan frigörs (bild A).
B. Drag nättratten nedåt och framåt så att
nättrattens övre ring lossnar och drag
ut nättratten ur enheten (bild B). Ta bort
insektsrester från nätet som omger nättratten.
Tvätta nätet med vatten och skaka bort överflödigt
vatten innan du sätter tillbaka nättratten.
C. Sätt tillbaka nättratten genom att hålla den
lätt vinklad. De två främre spärrarna ska vara
på utsidan. Sätt in framkanten på den övre
trattringen inuti enhetens hölje (bild C).
D. Tryck nättratten uppåt och med den bakre delen
av nedre trattringen lätt vinklad. Tryck ihop
nättratten tills de främre spärrarna på nättrattens
nedre ring befinner sig inuti höljet (bild D). Släpp
nättratten så hamnar den på plats.
OBS! Nätringens övre del måste placeras rakt
under fläkten. Sätt tillbaka uppsamlaren. Koppla
in strömmen igen och starta om enheten.
A
B
Spärr
Främre
spärr
Upp
Hölje
Framåt
C
D
Upp
Upp
Ned
Framkant på
nättrattens
övre ring
Nättrattens
övre ring
Nättrattens
nedre ring
Tryck uppåt här

17
INFORMATION OM MILJÖFARLIGT AVFALL
Uttjänt produkt ska hanteras separat från
hushållsavfall och lämnas in för återvinning
enligt lokala regler för avfallshantering
REKLAMATIONSRÄTT
Enligt gällande lag ska produkten vid reklamation lämnas in på inköpsstället och
originalkvitto bifogas. Användaren är ansvarig för eventuella skador på produkten om
produkten använts till ändamål den inte är avsedd för eller om bruksanvisningen inte
följts. Reklamationsrätten gäller i sådant fall inte.
PROBLEMLÖSNING
Problem Orsak Åtgärd
Röda LED-lampor
tänds inte vid
påslagning.
Ingen ström i uttaget. Kontrollera att det finns ström i uttaget.
Enheten inte korrekt
ansluten
till nätaggregatet.
Kontrollera anslutningarna från
transformatorn till enheten,
(lågspänningskabeln).
LED-lamporna växlar
inte till blått sken,
när enheten varit
påslagen i minst
15 minuter.
Brist på gasol. Byt gasoltub.
Fel i uppstartscykeln. Stäng AV enheten, vänta i 5 minuter och
starta sedan om.
LED-lampor blinkar
rött.
Gasolbrist. Byt gasoltub.
Gasoltubens ventil är
stängd.
Öppna gasoltubens ventil.
Regulatorn är inte korrekt
ansluten.
Kontrollera att regulatorns koppling sitter
ordentligt och/eller inte läcker.
Enheten fångar inte
mygg när fläkten går
och LED-lamporna
lyser blått.
Nät-trattens ände befinner
sig inte över öppningen på
uppsamlaren.
Anslut nät-trattens ände till öppningen på
uppsamlaren.
Nät-tratten är blockerad. Rengör nät-tratten. Se sidan 16.
Myggfångaren är inte
placerad
enligt instruktion.
Flytta myggfångaren till en annan plats. Se
bruksanvisningen för anvisningar om hur
myggfångaren ska placeras.
Blåsigt, kallt eller stormigt
väder.
Avvakta mer gynnsamma förhållanden.

18
NO
Myggfanger, Mosquito PowerTrap®
Les bruksanvisningen nøye og sørg for at produkten monteres, brukes og vedlikeholdes
riktig i henhold til instruksjonene. Ta vare på bruksanvisningen for fremtidig bruk.
SIKKERHETSFORSKRIFTER
• Kun til utendørsbruk. Monter enheten minst 3 m fra bygninger og
andra konstruksjoner.
• Ha aldri fingre eller noen andre gjenstander inni enheten når den er
slått på.
• Koble alltid enheten fra strømkilden og vent til den er avkjølt før du
håndterer eller flytter enheten.
• Denne enhet er beregnet på bruk med gass. Forsøk aldri å bruka
noen annen brensel eller gass. Dersom bruksanvisningen ikke følges
kan det føre til alvorlige fysiske skader og/eller skade på eiendom og
enheten.
• Håndter transformatoren med forsiktighet Bær aldri transforma-
toren i ledningen. Ikke rykk i ledningen for å koble ut transforma-
toren fra et strømuttak.
• Lavsspenningsledningen og dens beskyttelse må ikke fjernes fra
transformatoren. Hold transformatoren og ledningene unna varme,
olje og skarpe kanter.
• Oppbevar enheten innendørs når den ikke er i bruk. Koble gass-
flasken fra enheten før oppbevaring og oppbevar flasken utendørs på
et godt ventilert sted.
ADVARSEL!
Dersom instruksjonene ikke følges kan det føre alvorlig
skade på person eller eiendom.
Takk for at du valgte å kjøpe
et produkt fra Rusta!
Les gjennom hele bruksanvisningen
før installasjon og bruk!

19
PAKNINGEN
Myggfangern er pakket godt fra fabrikken for å unngå skader under transport. Åpne
esken forsiktig og:
• Ta ut innholdet av esken.
• Sjekk innholdet i esken mot PAKKENS INHOLD.
Myggfanger
Motordeksel
Regulator og gassflaske
(selges separat)
Stativ
Oppsamler
Tilkoblingskontakt
Stolpe
Transformator med
lavspenningsledning
Myggfanger x 1
Transformator x 1
Oppsamler x 1
Stolpe x 1
Hållare B x 1
Hållare A x 2
Lange skruer x 4
Korte skruer x 4
Muttrar x 8
Oktenoltablett x 1
Gassanslutning x 1
PAKKENS INNHOLD

20
NO
MYGGEN – DIN MOTSTANDER
• Det finnes mer enn 2700 forskjellige myggarter i verden.
• De fleste mygg lever og dør i nærheten av det stedet hvor de fødes, selv om noen kan
reise flere mil i søken etter er vert. Det er bare hunnmyggen som stikker fordi hun
behøver blod for å kunne produsere fruktbare egg.
• Mygg krever stående vann i vannrike omgivelser inklusive ferskvann, saltvanns-
sumper, brakkvann og i vann i beholdere, gamla dekk, hull i trær og til og med
blomsterkrukker. Hunnmyggen legger eggene sine på vannoverflaten og under de
riktige forutsetningene klekkes eggene og blir til voksne mygg på bare 10 til 14 dager.
• Både hann- og hunnmygg ernærer seg regelmessig på nektar som finnes i blomster,
men hunnene må ha blod for å produsere fruktbare egg. Derfor må hun finne et
menneske eller et dyr som vert for å kunne suge blod før hun kan legge egg.
• De fleste mygg som kommer klekkes kommer aldri i kontakt med mennesker. De
henter blod fra fugler og andre dyr. Myggarter som forplanter seg rundt mennesker
og bosteder holder seg i nærheten av det stedet de klekkes. Mygg som søker etter
blod bruker visuelle, termiske og luktstimulanser for å finne en vert. Av disse er
lukten den viktigste.
• Av de mer enn 100 stoene som finnes i menneskets åndedrett er det kun to som
er isolert og identifisert som viktige lokkemidler før mygg; karbon (CO2) og oktenol
(1- OCTEN-3-OL). Disse lokkemidlene fungerer som luftbårne lokkemidler med
lang rekkevidde og kan gjenkjennes av mygg på 30-40 m avstand. På kort avstand
fungerer kroppsvarme, fukt og melkesyre som lokkemidler.
SLIK FUNGERER DIN MYGGFANGER
• Myggfangern gjør følgende:
• Gjenskaper de menneskelige lokkemidlene åndedrett, lukt og kroppsvarme og skaper
dermed en uimotståelig kraft som lokker hunnmyggen i fella.
• Gjør om gass til varme, fukt og karbon, de primære mygglokkemidlene som
mennesker avgir.
• Slipper ut oktenol, et utprøvd lokkemiddel for mygg og knott, i karbonutslippet for
maksimal virkning.
• Produserer et kraftig vakuum som suger inn myggen i en praktisk avtakbar
oppsamler hvor myggen tørker raskt ut og dør. Oppsamleren er enkel å tømme.
• Elektronisk mikroprosessorstyring.
• Myggfangern bruker ikke ultrafiolett lys eller høyspentnett. Viktigst av alt; enheten
tiltrekker seg og dreper bare hunnmygg.
• Myggfangern bruker en eksklusiv platinakatalysator som forvandler luft og gass til
varme, fukt og karbon (CO2). Den gjør det på en eektivt, virkningsfull og økonomisk
måte. Katalysatorforvandleren er fullstendig sikker og helt uten åpen flamme.
Table of contents
Languages:
Other RUSTA Lawn And Garden Equipment manuals

RUSTA
RUSTA 604013600101 User manual

RUSTA
RUSTA Vacuum Series User manual

RUSTA
RUSTA 622512960101 User manual

RUSTA
RUSTA 624013440101 User manual

RUSTA
RUSTA 622512790101 User manual

RUSTA
RUSTA KLEMATIS User manual

RUSTA
RUSTA 62251126 User manual

RUSTA
RUSTA 622512890101 User manual

RUSTA
RUSTA Fuglehus User manual

RUSTA
RUSTA Privacy screen Acacia 625901090101 User manual