Rustic Woodworking E-Z Series User manual

www.rusticwoodworking.com
1
E-Z
LOG TENON CUTTER
PRODUCT MANUAL

www.rusticwoodworking.com
2
Copyright © 2019
Rustic Woodworking, Carlton, MN 55718
All rights reserved.
No part of this publication may be reproduced, stored in a retrieval system, or transmitted, in any
form or by any means, without the prior written permission of Sandy at Rustic Woodworking.
IMPORTANT SAFETY INFORMATION
●Use all common sense safety precautions.
●Wear safety glasses and gloves.
●Always be sure to tighten the set screws on both the E-Z Log Tenon
Cutter and the E-Z Sink BEFORE each use, and check tightness
again after a few cuts to be sure they have remained tight. Failure to
do so may result in the cutting arms sliding off the shaft or guide bar
during use. Lose screws may also affect the performance of the
cutter, and may also cause cracking or bending of the shaft,
adjustment bar, or cutting arms.
●The cutting blades are extremely sharp. Please use caution when
handling the cutter, adjusting tenon size, or removing and installing
the blades.
●Be sure that the cutting blades are screwed tight to the end of the
cutting arms. If they become lose during a cut they may break and
y off.
●Be sure the shaft is inserted and tightened properly into your drill.
●Clamp your log or branch securely before drilling or cutting. The log
should not be allowed to turn, twist, or move in any way while you
are drilling the pilot hole, cutting the tenon, or drilling and/or
countersinking the mortise. A lose log or branch can harm you or
others, and also ruin your tools and equipment.
●We recommend using a drill that has a side handle for extra wrist
support.
●Always start slowly when cutting tenons, and increase your drill
speed gradually.
Thank you for your interest in
E-Z Log Tools.
To ensure correct and safe usage with a full understanding of these
products performance, please be sure to read through this manual
completely and store it in a safe location.

www.rusticwoodworking.com
3
E-Z LOG PRODUCTS
E-Z 45° LOG TENON CUTTER
The original E-Z 45° Log Tenon Cutter cuts a
45° tapered shoulder at the ends of logs and
branches. The cutter arms are made from
aluminum. The shaft, guide bar and adjustment
bar are made from steel.
The E-Z 45° Log Tenon Cutter uses one,
double-sided blade to cut a log tenon. A spare
blade is also included and stored on one of the
cutting arms. When one side of the blade gets a
little dull, simply use the included hex key to ip
it over to the sharp side. It is like having four
blades included with your order. Replacement
blades are available at our website,
www.rusticwoodworking.com.Click here for
more information about the blades.
The E-Z 45° Log Tenon Cutter will t into any 1/2” drill, but we do
recommend using a drill with a side handle for extra wrist
support.
A 3/8” pilot hole must be drilled into the end of the log prior to
cutting a tenon. a 3/8” drill bit is included with your order. The
pilot hole guides the cutter to produce a perfect tenon.
To set up your tenon diameter, you simply loosen the screws
on the adjustment bar. You then slide the cutter arms so that
the edge of the cutting blade is the same size as whatever bit you will be using to drill your
mortise. It is just that simple.
Please see the Specications section of this manual for more technical details, and be sure
to check out the Tips and Tricks section to speed up your project.
E-Z 90° LOG TENON CUTTER
The E-Z 90° Log Tenon Cutter cuts at,
90° tenon shoulder, and uses two,
double-sided cutting blades, one mounted
on each cutting arm. The blades are
double-sided, so when one side gets dull,
simply use the included hex key to ip
them over to use the sharp side.
Replacement blades are available at our
website, www.rusticwoodworking.com.
Click here for more information about the
blades.

www.rusticwoodworking.com
4
Flat, 90-degree tenons can be used on
applications where you need to connect a log
to a at surface such as a wall, stair, table,
chairs, or any at wood like 4 x 4’s, square
posts, etc. The 90-degree at tenon will
provide a larger gluing
area, as not only can you
glue the tenon, but glue
can also be applied to
the tenon shoulders.
To make an angled
tenon you simply need to drill the pilot hole at your desired angle.
The cutter will follow the pilot hole. The versatility of a 90° cutter can
be adapted easily to t your particular angle or application.
E-Z 45° LOG SINK (COUNTERSINK)
The E-Z Log Sink is used to countersink your mortise
at a 45 degree angle to match the 45 degree log
tenon shoulder.
This provides greater contact between the mortise
and tenon, may create a stronger joint, and creates a
“beeer” look.
The E-Z Sink comes with two of the most popular
bushing sizes; 1-1/2” and 2”. Both bushings are
secured to the shaft with set screws. They are milled
a few thousand’s of an inch smaller than typical
mortise bit sizes so that they do not bind up when
inserted into the mortise. The bushing which is not
being used can be stored on the top of the shaft.
The bushing to be used should be fastened securely
to the end of the countersink by tightening the set
screw to the at portion of the shank. You then simply insert the bushing into
your mortise and slowly start your drill to countersink the edges of the mortise
to match the 45-degree log tenon. This may require longer tenons, as they
will t deeper into the mortise.
The E-Z Sink is NOT a drill bit. It is a countersink bit.
You must rst drill the mortise using either a 1.5” or 2”
at spade drill bit, or a forstner bit. The E-Z Sink is then
inserted into the mortise. Slowly start your drill so that
the the blades start shaving off the edges of the mortise.
The depth of the countersink will be determined by how
deep you drilled your mortise. Because the tenon ts
deeper into the mortise after it has been countersunk,
you may need to drill a deeper mortise, or trim the
tenon.

www.rusticwoodworking.com
5
KIT INCLUDES:
●(1) Shaft with Adjustment Bar
●(1) Set 45°Log Tenon Cutter Arms (includes two blades - one
mounted and one spare)
●(1) Set 90°Log Tenon Cutter Arms (includes two mounted blades).
●(1) E-Z Log Sink (45°Countersink) with 2 bushings (1.5” dia. and 2”
dia.)
●(1) Allen Wrench for changing cutting arms and adjusting tenon size
●(1) Allen Wrench for removing and replacing cutting blades.
●(1) 3/8” Pilot Hole drill bit
●(1) Padded Hard Plastic Carry Case
Everything protected and stored
in a hard plastic padded case.
Substantial savings over buying each tool separately.
Please see our website for current pricing.
COMPLETE E-Z LOG KIT
COMPLETE
KIT

www.rusticwoodworking.com
6
THIS PRODUCT HAS BEEN
DISCONTINUED.
You can easily build your own strap clamp out of a few
pieces of scrap wood and a ratchet.
Free plans are available on our website.
www.rusticwoodworking.com
E-Z LOG CLAMP
Build Your Own Clamp!

www.rusticwoodworking.com
7
The blades for both the 45° and 90° Log Tenon Cutters are
made from steel. The steel is then hardened to provide a
strong and durable blade. These blades retain their sharp
edge for a long time, no matter what kind of wood you are
cutting. We don’t get many orders for replacement blades
because they last so long, but we do have them in stock in
case you need them.
The 45° and 90° blades are not interchangeable, so please
be sure to order the correct size if you do need a replacement
blade. Also, keep in mind that the 90° cutter uses two blades,
while the 45° only uses one. Order appropriately.
REPLACEMENT BLADES
It’s not always easy to nd a
dropped screw or Allen wrench
in a pile of sawdust or wood
chips. Perhaps you drop your
drill, or a log rolls and bends the
cutter shaft, or something else.
Don’t worry, we have spare
parts available if you need them. You won’t need to buy a
whole new cutter. Just let us know what you need. We have
spare parts in stock.
Use the Contact Form to let us know what you need.
SPARE PARTS

www.rusticwoodworking.com
8
90° Tenon
45° Tenon &
Countersunk Mortise
45° Tenon & Mortise
MORTISE & TENON EXAMPLES

www.rusticwoodworking.com
9
SPECIFICATIONS
●Both of the cutters, 45° and 90°, can easily be adjusted to cut approximately 1” diameter up
to about 3” diameter tenons at the ends of logs and branches.
●Both the 45° and 90° cutters t onto the same shaft. The shaft has a at side on the drill-end
to prevent slippage during use.
●The maximum log diameter that the cutters will accept is about 4-1/2”. If you have a slightly
larger diameter log, you can shave it down at the edges by using a draw knife, shave,
manual or electric hand planer, or a saw so that it will t into the cutter.
●The maximum tenon length is about 2”, which is usually more than adequate. Take a look
at the Tips &Tricks section to learn how to measure and cut log lengths for curves.
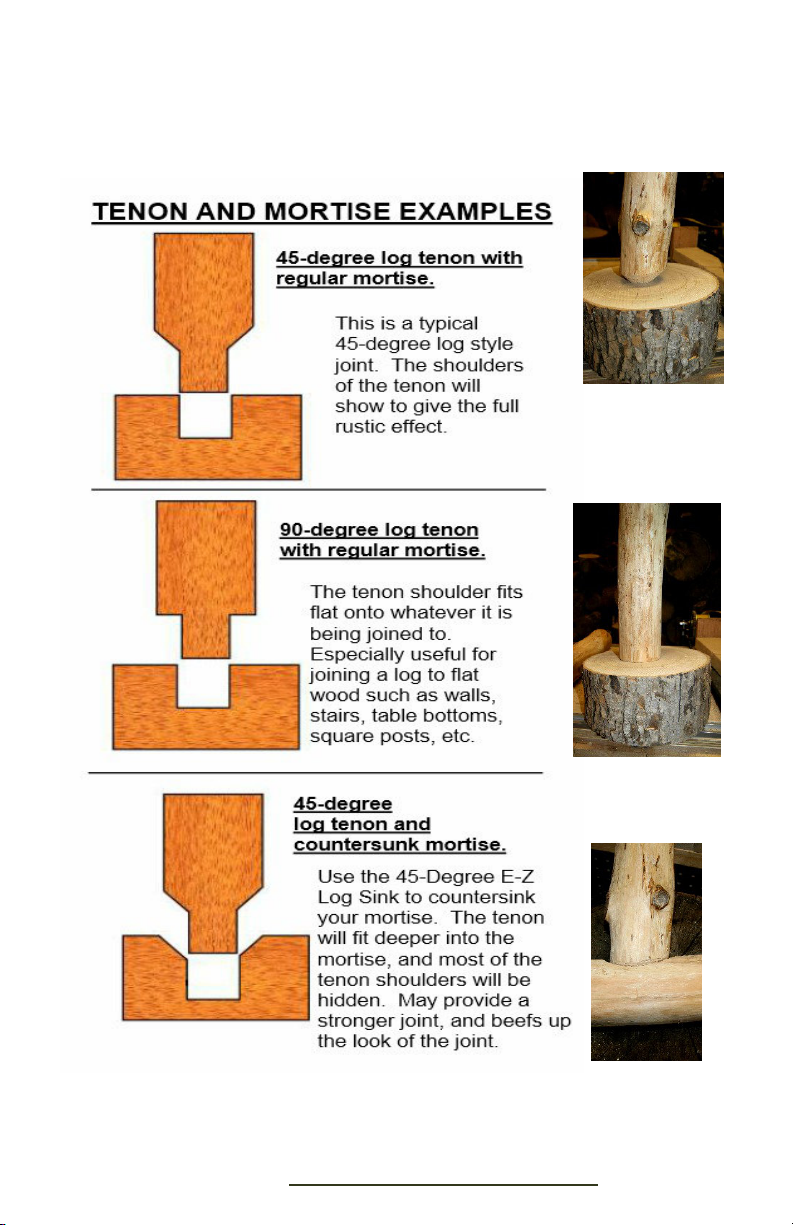
●The E-Z 45° Log Tenon Cutter uses one blade to cut a tenon, which is mounted on the
cutting arm and ready to use. There is also a spare blade which is stored on the non-
cutting arm. The E-Z 45° cuts a 45° shoulder on the sides of the tenon.
●The 90° E-Z Log Tenon Cutter uses two blades to cut a tenon, one on each arm. The 90°
E-Z Log Tenon Cutter will produce a at 90° shoulder on the sides of the tenon.
●The cutting blades are made from hardened steel, and have a cutting edge on both sides.
Each blade is like having two blades. When one side gets dull, use the included Allen
wrench to remove it and ip it over to use the other side.
●The blades for the 45° and 90° cutters are not interchangeable. The blades for the 45°
cutter are slightly longer than the blades for the E-Z 90° Log Tenon Cutter. If you need to
order replacement blades please be sure to order the correct size, and remember that the
90° uses two blades to cut a tenon, while the 45° only uses one blade.
●A pilot hole must be drilled into the end of the log prior to cutting a tenon. A 3/8” Drill Bit is
included to drill the pilot holes.
●The E-Z Log Tenon Cutters will t into any 1/2” drill. We recommend using the highest
powered drill you have with a side handle extra support.
●The drill guide inserts into the pilot hole to guide the cutter. This will help hold your drill
steady to create a smooth tenon.
●One 3/32” Hex Key is included to adjust tenon diameter, switch cutting arms, and to switch
bushings on the E-Z Log Sink (Countersink) bit.
●One 3/16” Hex Key is included to install or replace cutting blades.
●Two of the most popular sized bushings are included with the E-Z Log Sink. One is used to
countersink a 1.5” mortise, and the other to countersink a 2” mortise. Both bushings can be
attached to the Sink during use by tightening the set screws. The E-Z Log Sink is not a drill
bit. You must rst drill the mortise.
●A 3/8” drill bit is included to drill the pilot holes at the ends of logs and branches.
NOTE: We no longer ship printed versions of this Product Manual, the free Ratchet Strap Plan or
the Center Finder Plan unless requested. All are available to download for free from our website.

www.rusticwoodworking.com
10
GETTING STARTED
We suggest that you use some scrap logs at rst until you
are sure that you have the tenon diameter set correctly. It
may take a few tries. Use one scrap log to cut a tenon,
and another to drill a mortise.
After you have adjusted the tenon diameter so
that it ts properly into the mortise you have
drilled, save time the next time you need to cut
the same sized tenon by making a set-up block now. See
the Tips and Tricks section of this manual to nd out how.
Keep in mind that new, green wood may shrink or split
while drying. You can avoid this by working with dry or
semi-dry logs. For small diameter “green” tenons, you may
be able to minimize shrinkage by gluing a 3/8” wooden
dowel into the pilot hole.
TIP
We have left a space below for you to write your own notes:

www.rusticwoodworking.com
11
ADJUSTING TENON SIZE
For both the E-Z 45° and 90°Cutters, you can adjust the tenon
diameter from about 1" up to about 3" diameter. Although it is
possible to cut a tenon under an inch in diameter, the tenon will
not be as strong because of the pilot hole. If you are concerned
about the strength of a smaller diameter tenon, you can glue a
3/8" wood dowel into the pilot hole.
The easiest way to set up the correct size tenon is to center the
mortise bit directly on the cutter.
The tip of the cutting blades protrude slightly out from the
cutting arms and must
be taken into
consideration to obtain
the correct tenon size.
Loosen and adjust the
cutting arms so that the
tip of the blade is just
touching the mortise bit
or set-up block.
If you measure the
cutting arm instead of
the blade tip, your
tenon will turn out too small.
Tighten up the arms using the 3/16" Allen Wrench and make a
practice cut. Place the tenon into the mortise to check
diameter, and adjust if necessary. It is better to cut a tenon that
is too large rather than too small so that you can readjust the
cutter to shave off a little more wood until you get the correct
diameter for a tight joint.
Always be sure to tighten the screws on the arms before cutting
tenons. Then recheck the tightness after using the cutter for a while
just to make sure the screws have remained tight. Also check to be
sure that the blades are as tight as possible.

www.rusticwoodworking.com
12
CUTTING TENONS
For best results, use the highest
powered 1/2" variable speed drill
you have. We also recommend
using a drill that has a side
handle mounted to it for extra
wrist support.
Drill a mortise in a scrap log rst
so that you can test the tenon diameter and make any
necessary adjustments before cutting more tenons.
The E-Z Log Tenon Cutters will accept logs up to about 4.5"
in diameter. If your logs are slightly over 4.5" in diameter,
you can use a draw knife, shave, a hand or electric planer,
or any saw to shape the end of the log to t the E-Z Log
Tenon Cutter.
Be absolutely sure that your log is clamped down so that it
does not move, roll or twist. Unsecured logs can be
dangerous to you and to your equipment.
You must rst drill a pilot hole into the end of the log. Line
up your drill so that the pilot hole to be
drilled is at the center of the log, and as
level as possible, unless you desire an
angled tenon.
Keep in mind that the cutter will follow
the pilot hole exactly. If the pilot hole is
drilled at an angle, that is how the tenon
will turn out. If the pilot hole is drilled off-center, the tenon

www.rusticwoodworking.com
13
shoulders will not be equal. Most of the time this won't
matter, and in some circumstances you
may need to do this for angled joints. It is
easy to get off track when using the eye-
ball method. Level out the log, and then
use a level on your drill if necessary until
the pilot hole is started.
Adjust the tenon size by sliding the cutter arms on the
adjustment bar. Use the 3/16” Hex key to tighten the cutter
arms. Double check to be sure that the blades are tight also.
Insert the tenon cutter into your drill, tighten, and insert the
guide bar into the pilot hole. Start drilling slowly until the
edges of the log are cut, and gradually increase speed and
pressure to nish the cut.

www.rusticwoodworking.com
14
CUTTING MORTISES
You can use either a forstner or spade (at) bit to
drill mortises. I personally like using forstner bits
because there is less tear-out and a at bottom.
If you are planning on countersinking the
mortises later using the E-Z Log Sink, you will
need either a 1.5” or 2” bit.
Be sure that your bits are sharp. Using a sharp bit makes the
job a lot easier. Bit sharpening kits are available at most
woodworking stores and will save money over the long run
instead of buying a new bit when it gets dull.
It is important to hold your drill steady when drilling a mortise.
If your drill wobbles during the cut, it may enlarge the mortise and
make a lose joint.
If you have not already done so, cut a
test mortise and tenon out of a scrap
log to check the t before drilling lots
of mortises and tenons.
After your tenons are cut, lay out your
project and mark where you need to
drill the mortises.
Pay attention to the shape of the log and the tenon. If the rail is
curved, or if your tenon was cut at an angle, you may need to
drill the mortise at an angle as well. If so, put a pencil mark on
the front of the log to help you
remember what angle to hold
your drill when drilling the
mortise. You will also need
to place either a center mark
or outline the tenon onto the
log so you know where to
place your mortise bit.

www.rusticwoodworking.com
15
You want as much contact between the tenon and mortise as
possible for gluing purposes and strength.
To cut a mortise at an angle, place the bit straight onto the log
at rst, and then gradually tilt your drill to the angle you need.
Here is where you will depend on the pencil mark you made
for the angle. Be sure to look front-to-back, and side-to-side
to keep your drill at the correct angle, trying not to wobble too
much or the mortise might get enlarged.
Some woodworkers purposely use curved and odd shaped
logs to make interesting and unique works of art. There are
plenty of high production log furniture companies that run their
logs through a lath so that they are all the same size and
shape. Your projects will be much more interesting, and can
demand a higher selling price if you plan on selling your work.
The example below shows both a countersunk and regular
mortise. Also shown are cross-cut sections of both mortises,
which were drilled with a forstner bit..

www.rusticwoodworking.com
16
TIPS & TRICKS
SET-UP BLOCKS
If your project includes more than one
sized tenon, you can save time by
making set-up blocks.
Just cut off a portion of a tenon that has
been cut to the correct size to t your
mortise bit.
Mark what size it is and put it in a safe
place where it won’t get thrown away by
mistake.
When you need to set your cutter
up for that specic sized tenon
again, simply slide that set-up
block onto the guide bar of the
cutter. Slide the cutter arms in
until the blade(s) just touch the
block and tighten the arms.
STRENGTHEN SMALL DIAMETER TENONS
If you are concerned about the
strength of small diameter tenons,
or if the end of the tenon is visible,
you may want to plug the pilot
hole with a 3/8” wooden dowel.
Simply cut off a piece of 3/8” wood
dowel, add a little wood glue, and
insert into the pilot hole. Wipe off
any glue and let dry. This will also help when working with
green wood, as the glue and wood dowel may minimize any
potential shrinking or cracking of a green tenon while drying,
and will make small diameter tenons stronger.

www.rusticwoodworking.com
17
NUMBERING
To keep rails in the proper order for
assembly, number
the bottoms of each,
from left to right.
That way you’ll
always know what
rail goes where, and
what end is top and bottom.
WOOD PREPARATION & STORAGE
Peel the bark off of the logs to speed up drying time.
Leaving the bark on attracts beetles, ants, and other bugs.
Do not store logs directly on the ground. Store in an open
shed or canopy. If you must use a tarp, leave the sides
open so to allow for adequate airow.
RUST PREVENTION
The shaft and blades are made from steel and will eventually
rust if not protected. The arms are aluminum.
To keep the steel parts of the E-Z Log Tenon
Cutters and E-Z Log Sink from rusting, remove
any tree sap and wood particles from your cutter
using Pine Sol or any good cleaner and allow to
dry. Apply a light coat of oil, WD-40, or any type
of rust preventative to all of the steel parts,
including the blade. For long term storage, you
might even want to remove the set screws and put a dab of
oil on those as well.

www.rusticwoodworking.com
18
ASSEMBLY HELP:
If you do not have someone to help
hold the logs together during
assembly, consider using bungee
cords. We purchased a roll of
cording on eBay and cut it to
specic lengths for our projects.
When using bungee cords to help
hold your project together, you can
insert, remove, twist and reposition rails and posts without
the entire project falling apart. The cords will expand
enough to make adjustments to your logs, but will still hold
most of the other logs together.
TENON LENGTH ADJUSTMENT
Use the length of the log to correct for curved rails, instead
of using the tenon to compensate for the difference. For
example, if you are making a headboard that has a curve on
the top, all of your rails will not be the same length. The rails
toward the center of the headboard will be longer.
Remember that the longest
tenon that can be cut with the
E-Z Log Tenon Cutter is about
2” long.

www.rusticwoodworking.com
19
HOW TO FIX A LOSE TENON
If your tenons loosen over time, or if you just cut the tenon
too small, you can either add glue and clamp like regular
chair tenon repair, or you can use a screw to spread the
tenon to t tighter into the mortise.
To do this, simply drill a small hole into the post (from inside
the center of the mortise), and counter-sink the outside as
shown in the photo. Apply glue to the tenon and insert it into
the mortise as shown. This will expand the tenon and pull it
into the mortise. Glue a wood plug into to the hole you
countersunk on the outside of the post to hide the screw and
hole. Clamp together until glue dries. Sand down wood plug
if necessary.

Money Back Guarantee
• Websites:
• www.rusticwoodworking.com
• www.ezlogtools.com
• Email:
• Phone: (218-341-4766
• Address: 2793 County Road 144, Carlton, MN 55718
www.rusticwoodworking.com
20
Copyright © 2019
Rustic Woodworking, Carlton, MN 55718
All rights reserved.
No part of this publication may be reproduced, stored in a retrieval system, or transmitted, in any
form or by any means, without the prior written permission of Sandy Kronberger at Rustic
Woodworking, Carlton, MN.
We have a few YouTube videos available on-line.
Please visit our Channel at :
https://www.youtube.com/user/RusticWoodworkin
g/videos
CONTACT INFORMATION:
(Or just do a search for
RusticWoodworking YouTube videos)
If you are not completely satised with any of the E-Z Log Tools, simply return the product, in
good condition, at your expense, within 5 days of using the product. There are no
restocking fees or hassles. If you don’t like it, return it in good condition. Misuse, abuse,
or excessive wear may void this guarantee. You MUST call or send us an email prior to
returning any products so we know about the return.
Other manuals for E-Z Series
1
This manual suits for next models
4
Table of contents
Other Rustic Woodworking Cutter manuals