RVMedia RV300DVD User manual

6.2” RV DVD MULTI-MEDIA PLAYER & TUNER
RV300DVD
OWNER’S MANUAL
SD/SDHC
OUTPUT
4X50W
USB Host
RV300DVD
USB
DIMMER
AUX IN
QT

E - 2
Do not expose the product to water or excessive moisture. This could
Warnings
Washing/Cleaning the RV
to rain or moisture.
use only the recommended accessories.
Parking in direct sunlight can produce very high temperatures inside your
vehicle. Give the interior a chance to cool down before starting playback.
This product is designed to operate with a 12 volt DC battery and/or,
charging/solar system.
Avoid inserting any foreign objects into the slot of this player. Failure to
follow this may cause malfunction or permanent damage due to the
precise mechanism of this unit.
Hot Environments
Use the Proper Power Supply
Protect the Disc Mechanism
THIS MOBILE DVD PLAYER IS A CLASS I LASER PRODUCT. THIS
UNIT USES A VISIBLE/INVISIBLE LASER BEAM WHICH COULD
CAUSE HAZARDOUS RADIATION IF EXPOSED DIRECTLY. BE
SURE TO OPERATE THE MOBILE DVD PLAYER CORRECTLY AS
INSTRUCTED.
USE OF CONTROLS OR ADJUSTMENTS OR PERFORMANCE OR
PROCEDURES OTHER THAN THOSE SPECIFIED HEREIN MAY
RESULT IN HAZARDOUS RADIATION EXPOSURE.
DO NOT OPEN THIS UNIT OR ATTEMPT REPAIR. FOR SERVICE
CONTACT CAMEC ON 1300 654 936 (AUS) OR 09 225 1910 (NZ).
NOTE
CAUTION

make sure it is all connected up properly and the unit and system work
properly.
2. Use only the parts included with the unit to ensure proper installation.
The use of un-authorized parts can cause mal functions.
3. Consult with your nearest dealer if install-ation requires the drilling of
4. Install the unit where it does not get in the driver's way and cannot
injure the passenger if there is a sudden stop, like an emergency stop.
5. If installation angle exceeds 30° from horizontal, the unit may not
perform optimumly.
6. Avoid installing the unit where it would be subject to high temperature,
such as from direct sunlight, or from hot air, from heater, or where it
would be subject to dust dirt or excessive vibration.
After inserting the half sleeve into the dashboard, select the appropriate
tab according to the thickness of the dashboard material and bend them
inwards to secure the holder in place.
Installation
INSTALLATION CAUTION
E - 3
Resetting the unit.
Reset Button
Installation with the mounting cradle.
182
111
Mounting Area
Half Sleeve
Attach the trim ring
Trim ring

Connecting the System
AV-IN
REAR OUT
L
VIDEO OUT
VIDEO IN
CAMERA-IN
BATTERY(+)
A4 YELLOW
FUNCTION/LABEL
PIN
WIRE COLOR
A5 BLUE CONNECT TO SYSTEM CONTROL
OF THE POWER AMP OR AUTO ANTENNA
RELACONTROL TERMINAL (max 150mA 12VDC)
TERMINAL
GROUND
IGNITION (ACC)
BLACK
A8
A7 RED
RIGHT INSIDE SPEAKER (+)
LEFT INSIDE SPEAKER (+)
LEFT INSIDE SPEAKER (-)
RIGHT INSIDE SPEAKER (-)
LEFT OUTSIDE SPEAKER (-)
LEFT OUTSIDE SPEAKER (+)
B8
B6
B5
B4
B3
B7
GREEN/BLACK
WHITE/BLACK
GREEN
GREY/BLACK
WHITE
GREY
RIGHT OUTSIDE SPEAKER (+)
RIGHT OUTSIDE SPEAKER (-)
B1
B2
VIOLET
VIOLET/BLACK
ISO Male Connector
(not included)
FUSE
1
2
3
4
5
6
7
8
4
5 7
8
A
B
R
Security Camera In
Video In
Audio In L-CH
Audio In R-CH
Video Out*
Rear Line Out L-CH
Rear Line Out R-CH
JACK
ANTENNA
SOCKET
E - 4
Remote connection RF 109RV
(optional)
RF 009RV
RF Remote Port
(optional)
(Black)
L
R
* Video out can be connected to the RV’s TV using
a 75 Ohm RCA Video lead to view Video Playback
and Security Camera output through the TV.

5
8
6
7
Main Unit Overview
Press this button (volume knob) to mute the audio On / Off.
Press this button to eject the disc.
Rotate the Encoder Volume Knob to increase / decrease the
volume.
Press this button or any other button on the front panel to turn
the unit on. Press & hold this button to turn the unit off.
Press this button to go to the Home/main menu screen to select
the different Playback modes : Tuner/Disc/USB/SD Card/Aux
AV/Camera/Bluetooth Audio
Eject
Home/Dimmer
Encoder Volume Knob
E - 5
9
2
Disc Slot
USB slot (The USB slot is behind the front panel.)
Insert the disc into the slot. The disc will begin to play automatically.
This unit can support playback MP3 / WMA / JPEG / MPEG4 /
DIVX format which are stored on the USB memory stick.
4QT /(Quick Tune) Clock
Press and hold this button to view the clock. Press the button
again to return to the previous mode.
The six strongest stations of the selected band will be saved in preset
channels automatically: FM1,FM2,FM3(1-6),AM1,AM2.
In Tuner mode, press this button to access into the Auto Store function
3
Micro SD card slot
This unit can support playback MP3 / WMA / JPEG / MPEG4 /
DIVX formats which are stored on the Micro SD Card.
4 5 6
9
831 2
(The micro SD card slot is behind the front panel.)
Press & Hold this button to cycle the screen Dimmer (brightness)
DIMMER
QT
7
1AUX IN jack (The AUX in slot behind the front panel.)
Connect the external signal to AUX in jack behind the front
panel, then press Mode button to select Aux mode. Press the
Mode Button again to cancel Aux Mode and return to previous
mode.
from: High - Low - Off

EQ
XBS
OK
VOLUME
BAND
DIMMER
LIST FUNC
FUNCTION
DBSS
SETTING
DVD
TITLE
DVD
MENU
DVD
AUDIO
16
15
14
17
18
19
8
7
6
5
3
2
4
9
10
1
1
2
5
4
Remote Control Functions
MUTE
/POWER
FUNCTION
Press this button to mute the audio On / Off.
Select screen Dimmer (brightness): High - Low - Off.
Press to cycle through the Source options in the home menu.
In tuner mode, skip to the previous/next preset station.
In other modes use these button to move the cursor Up/Down.
In media playback mode, press this button to list the available
In DVD/MP4 mode, press this button to access the DVD root menu
Press this button to turn the unit on or off.
Press this button enter function mode.
DIMMER
LIST
HOME
/
10
11
12
14
15
16
17
18
19
In Tuner mode, press this button to change the radio band.
In DVD playback mode, press this button to select the DVD
audio language or audio channel.
In DVD mode, press this button access the DVD main menu.
In DVD/Media playback mode, press to Pause or Resume play.
DVD AUDIO
DVD MENU
OK
Increase/Decrease the volume.
Press this button to return to previous menu or exit.
Press this button access the Settings.
Press this button access equaliser menu.
Press this button to turn the iX-BASS booster function on or off.
Press this button to turn dynamic bass boost on or off.
In DVD mode, press this button to select the DVD subtitle
language.
/
SETTING
EQ
XBS
DBSS
DVD TITLE
In Tuner mode, press these buttons to search up/down for a
radio station.
In DVD/Media playback mode, press these buttons to skip to
previous / next track / chapter. Press & hold these buttons to
scan fast forward / backward.
/
E - 6
3
6
7
8
/ BAND
9
13
12
13
11

0122345678962142
7
!"#
!"$%
0&1'(1)7
*+7
,-. %"
/ ,0"1 23 4/45 4
6"471148"%
896278939701223456
89627:;701223456
"<
= >?
7@46391*A7B263917*79)7
7C7*A7D7*#E
FG7!#
$!"H2
IG"777777777777777! E"$%
J800*2K "L" $MNOKP NOK%
Q@RRS:*2.5$"L" $MNOKP NOK%
TU:JS:*2 !""L" $MNOKPNOK%
"
. %
7VJ800*2 %
7
RJ00*+7 WK
7
896270X621 701223456
= . %
Y141)'Z*2
!"[ "
#E""H$2
J11&2 !!
\Z9](7Q991+7
R'21AT31+#
$%
E MN^_ ^`_
,Ma
bcdcefg
hficjklmc
nopok
hqpp
rqspp
ptcfuce
vww
vww
xBT:+7y9)7'ZZ7'962142679472z36
2z367z1'97432{7X97]'47132z1)7
29]z72z176])1147297'(17'
61Z1]239479)7)92'2172z17|9Z 1
(49}7297z35zZ35z272z173]947'49
2z147&)166729761Z1]2G
%
!"$E
L"!H MN^P N^%
~K! EE%
! EE%
""

E - 8
System Setup
[Calibration]: Touch the icon on the Screen Settings
menu to start the Calibration setting.
Adjust Screen Setting
Touch the icon to access the
Screen menu. User can rotate the
Encoder Volume Knob to select the
[Dimmer]: Touch on to adjust the
View information
Adjust Bluetooth Settings
Touch the icon to view the
Touch the icon to select the
the Bluetooth menu.
Pin Code: Displays the PIN code
Device Name: Displays the Bluetooth
Phone Name: Displays the name of.
Phone Name
Pin Code
Device Name
Screen
OFF
screen to calibrate the touch-screen function.
system version information.
required to connect to the unit.
name for this RV unit.
the phone connected to the unit.
TFT backlight level between High,
Low or Off.
Follow the instructions on
Tuner Operation
Adjust Tuner Settings
[Area]: Selects the area of
operation for the Tuner. The default
[Local]: You can select whether
you wish to receive only strong
radio stations when searching for
Local On: Only stations with strong
Local Off: The Tuner will attempt
Touch the icon on the TFT
display in Tuner mode to enter the
Tuner Settings menu.
setting is Australia.
stations or all receivable stations.
signal can be received.
to tune in to all stations in range.
Tuning in To Radio Stations
Touch the (band) icon on the TFT display in Tuner mode to
change between FM bands and AM(MW).
Manual Seek. Touch and hold the or icons on the
TFT screen in Tuner Mode to enter manual station search mode.
FM1
FM1
Quick Tune. Automatically tune to the 6 strongest stations in the selected
Band by pressing the QT button above the Volume cotrol.
Auto Seek. Touch the or icons on the TFT screen in
Tuner Mode mode to Auto Search to the next station.

USB or Micro SD Card using the Media Player.
You can play commercially available audio CDs and these Discs:
Digital Versatile Discs (DVDs)
Video Cds (VCDs)
Digital Versatile Discs Recordable (DVD+/-R)
Digital Versatile Discs Rewritable (DVD+/-RW)
Compact Discs (CDs)
CD Recordable (CD-R)
CD Rewritable (CD-RW)
NOTE
Please ensure that the disc contains playable content.
1. Insert the disc into the Disc Slot with the label side facing up. The
unit will start playback automatically.
2. Press the button on front panel to eject the disc. When the disc
is ejected, the unit switches to the previous source, if available.
Otherwise the unit will switch to radio mode automatically.
Hold or to fast forward / rewind the disc/
song; touch to resume normal playback.
USB Device Operation
Memory Card Operation
Open the cover marked USB on the front
panel, insert the USB device into the
USB socket. The unit starts playing from
the USB device automatically.
Open the cover marked SD on the front panel, press the card until you
hear a click sound, the card is now disengaged. Then remove the card.
Open the cover below volume knob.
Insert the Micro SD card with music
content into the card slot in the correct
direction until a “CLICK” sound is
heard, then the unit will start playing
from the card automatically.
NOTE
Ensure that the USB device contains
Insert the USB Device
Insert the Memory Card
Remove the Memory Card
NOTE
Ensure that the memory card contains
E - 9
Media Player Operations (Disc/USB/Micro SD Card)
Disc Playback

Media Playback
Repeat
During media playback, touch the icon on TFT display to
the Random function on or off.
1. During media playback, touch the
icon to access the playlist
E - 10
For MP3/WMA/CD mode
During media playback, touch the button on the TFT display
access the Media Function menu to adjust the different Repeat modes.
[Repeat All]: plays all tracks repeatedly
[Repeat One]: plays the current track repeatedly
[Repeat Folder]: plays all tracks in the current folder repeatedly
Random
Skip/Search
menu and touch the icons below
: to display all available audio
2. Touch the or icons to select a folder / track, then press
to start playback.
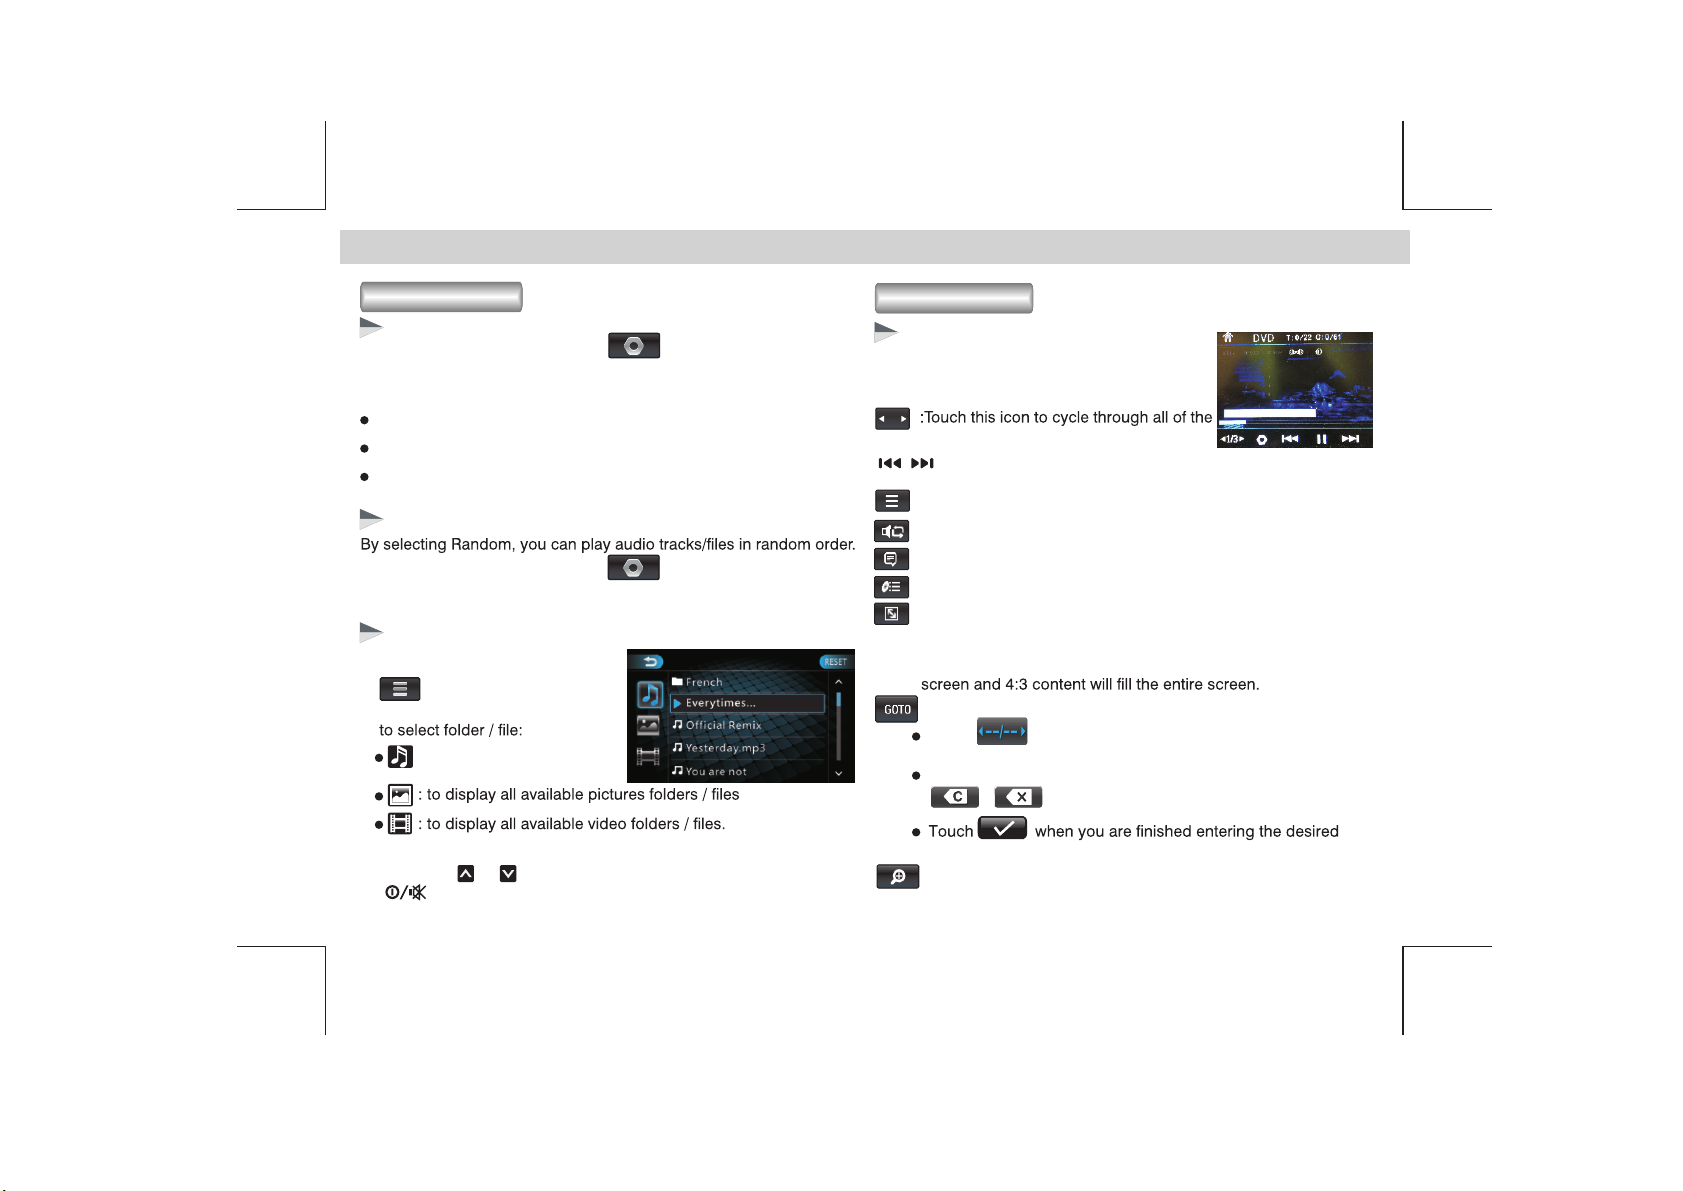
Media Player Operations (Disc/USB/ )Micro SD Card
DVD Playback
DVD Menu List
Touch repeatedly to choose search by chapter, title
or time. The search options available depends on the media.
Touch the numbers to enter chapter / title / time number, touch
/ to clear the previous input.
section and playback will start from there.
:Touch to zoom in to a picture.
/:During playback, touch these icons to skip to the previous/
next chapter/track.
1/3
:Touch to enter the DVD control list menu.
:Touch to change the audio language.
:Touch to change the subtitle language.
:Touch to display the Title Menu.
: Touch to access into the search mode (DVD only).
:Touch to select the aspect ratio of the screen (DVD and VCD
only). The following options are available:
4:3=Set the aspect ratio to 4:3 - for full display of older content.
16:9=To set the aspect ratio of the screen to 16:9. Both wide
folders / tracks.
During DVD playback, touch anywhere on the
screen to bring up the DVD playback menu and
a number of icons will be displayed.
available functions (rows 1/3, 2/3, 3/3)

E - 11
Media Player Operations cont’d
Angle
Video Setting
Touch Angle while playing a scene recorded with multiple angles to
change the playback angle (DVD only & only if supported by the disc).
During DVD/VCD playback, touch on the Video Setting mode access
the Setup menu below to adjust the following settings:
[Brightness]: change the Brightness
level between 0 and 8.
[Contrast]: change the Contrast
level between 0 and 8.
[Color]: change the Color level
level between 0 and 8.
[Reset]: reset to default settings.
DVD Functions
During DVD playback, touch the icon to access the DVD
Function menu to adjust the options below:
[Repeat Chapter]: repeat playback of the current chapter.
[Repeat Title]: repeat playback the current title.
[Repeat Off]: cancel all of the repeat functions.
Repeat
[Repeat All]: repeat playback of the entire disc.
Select the Aux Mode
You can connect up to 2 optional devices. Touch the icon
on the TFT screen to select the Source menu to select the AUX-IN mode.
AUX-IN = Front panel 3.5mm audio AUX-IN - eg iPod etc
AV-IN = Rear AV-IN for video cameras etc
Connect the external signal to AUX in
jack located behind the front of the panel
door then press the Mode button to
select the AUX-IN mode. Press the Mode
Button again to cancel Aux Mode and
return to the previous mode.
Connecting Front AUX-IN
Left Track
Right Track
Ground
Connect the external signal to the RCA line in jack located at the rear
of the unit, then touch the icon to select AV In.
AUX-IN/AV-IN/Camera Modes
AV-IN
CAMERA
(Security Camera). The RV Media Double Din DVD head unit features
an optional Security Camera input function. Touch the camera icon
on the source menu to select the camera input. The camera can
be viewed on the unit’s TFT screen plus the camera output can
be viewed on the RV’s TV.

Bluetooth Audio Operation
Pairing
Open your device and switch Bluetooth on and search for
Bluetooth devices.
If the Disconnection is successful,
the unit will switch back to the
previous mode.
Open your device and disconnect the Bluetooth connection with the
unit.
Bluetooth Pairing Between Mobile Phones/
Tablets and The Head Unit
Disconnecting Bluetooth
E - 12
If pairing is successful, the TFT
screen will display the image
pictured to the right then the
unit will switch back to the
previous source automatically.
“RV MEDIA” should appear in the pairing list on the device. Select
“RV MEDIA” and then enter the password “0000”.
Bluetooth A2DP Audio Streaming
If the connected Bluetooth device supports Advanced Audio Distribution
control to play music stored on the device.
1. Pair the device with the unit as per the previous page.
2. Touch the icon on the TFT screen to return to SOURCE menu.
3. Touch the icon to select the A2DP Bluetooth audio playback
03:28 PM
ONE357242
00:01:10 / 00:04:32
Ending Dream
Everytime We Touch.mp3
Cascade

E - 13
Power Supply
System
Screen Size
Display Resolution
Screen Type
Suitable Speaker
Impedance
Signal to Nosie Ratio
Pre-AMP output
voltage
Video signal format
Usable Sensitivity
Frequency Range
Aux-In level
Video Output
Power output
Channel Separation
Fuse
Frequency Response
12 V DC (11-14 V), Negative Ground
DVD/CD audio/MP3
6.2 inches
800 x 480 pixels
TFT Liquid Crystal Display active matrix
15A
20Hz to 20KHz +/-3dB
4 - 8
2.0 V(USB play mode; 1KHZ, 0dB,
10k load)
NTSC / PAL / SECAM
Better than 45dB
522 -1620KHz
50W x 4 channels
2 Channel(Stereo)>60dB@1KHz
300mV
1Vp-p +/- 0.2Vp-p
75dB
USB devices
Bluetooth
Output power
Frequency band
Range
Standard
-AM
USB 1.1, & 2.0 compatible
Class II
2.4000GHz-2.4835GHz ISM Band
3 meters (free space)
General
Disc Player
TFT Touch Screen
Frequency Range
Usable Sensitivity
Radio
87.5 - 108MHz (100KHz step in auto
search & 50KHz per step manual search)
Better than 15dB at S/N 30dB
-FM

RV MEDIA NOTE
Product information is subject to change without prior notice.
Supported Formats
MP3/WMA bit rate (data rate): 32-320 Kbps & VBR
WMA Version V9 or earlier
Directory nesting up to a maximum of 8 levels
Number of albums/ folders: maximum 99
Number of tracks/titles: maximum 999
ID3 tag V1.0/1.1/2.0/2.3 (Max 32 Byte)
File name in Unicode UTF8 (maximum length: 128 bytes)
Unsupported formats
Empty albums: an empty album is an
album that does not contain
d xtension.dlf are ignored and
not p layed.
skipped. For example, Word,
.m4a, .m4p, .mp4, .aac)
Supported MP3 disc format
ISO9660, Joliet
Maximum title number: 512 (depending
Maximum album number: 255
Supported sampling frequencies: 32 kHz, 44.1kHz, 48 kHz
Supported Bit-rates: 32-320 Kbps and variable bit rate
Supported video formats
DVD
Xvid
•
•
•
•
•
•
•
•
•
•
•
•
•
•
•
•
•
•
•
File Playback Information
E - 14

Troubleshooting
Before going through the check list, check the unit’s wiring. If any
problems persist after reviewing the check list, please consult your
nearest Camec dealer.
No power or no sound
Noise in radio broadcasts
Cannot play disc
12V system power not turned on.
Signal is too weak. Select other stations with stronger signals.
12V power not properly connected. Check wiring.
Check the connection of the RV antenna.
Fuse is blown. Check wiring then replace the fuse.
Change the (FM) broadcast from Stereo to mono.
Volume is in minimum. Adjust volume to a desired level.
If the above solutions do not help, press the RESET button (see E-3).
The CD Skips tracks
Preset stations lost
Display shows ERR-1
Display shows ERR-3
Display shows ERR-5
Disc cannot be ejected.
Ensure that the CD is not damaged or dirty.
Battery or power supply has been disconnected from the unit.
Press the QT button to store the 6 strongest stations.
The disc, USB or SD device cannot be read in two minutes.
USB/SD data error.
Communication error or a component is faulty. Please return
Disc is upside down. Ensure the printed side is facing up.
Press and hold the button.
Ensure that random mode is deactivated.
Disc may be upside down. Ensure the printed side is facing up.
Disc is dirty. Clean the disc with a
the disc outwards from the center.
clean, soft, lint-free cloth. Wipe
Disc is defective. Try another disc.
Incompatible disc is used. Try another disc.
Disc rating exceeds the restriction setting.
rating.
Change the parental
Disc region code is not compatible with
proper region code (Aus/NZ region code is 4).
the unit. Use a disc with
E - 15
to your dealer for service.
Table of contents
Popular Car Video System manuals by other brands

Clarion
Clarion CJ-981E Owner's manual & installation manual

Pyle
Pyle PLHR7T user guide

Pioneer
Pioneer AVH-285BT owner's manual

Jensen
Jensen VM9022HDN - Touch Screen Double Din MultiMedia... quick start guide

Audiovox
Audiovox VODEXL10 A owner's manual

Car-Interface.com
Car-Interface.com CI-CARPLAY-NAC instruction manual