RW RWTJ3.0 User manual


INSPECTION, MAINTENANCE &
CLEANING
1, Do not use the Jack if damaged, to pre-
vent serious accidents & injury. If abnormal
sounds or vibrations are detected during
operation, refer to the maintenance & trou-
bleshooting guide below.
2, Before each use carry out an inspection
of the jack, check for any deformation, loose
or missing parts & rectify before use.
3, Oil lling is required occasionally. Check
that the oil level is correct.
4,The top of the piston rod, horizontal axis,
rollers, casters & other rotating parts require
greasing. Make sure they are always well
greased.
5, Replace the hydraulic oil at least once
every 3 years. Procedure
A) lower the jack to the lowest level & loos-
en the oil hole screw
B) Pump the jack & discharge all the hydrau-
lic oil (Handle the hydraulic oil in accordance
with local regulations).
C) Place the jack upwards & slowly ll with
qualied hydraulic oil until 6mm from the top
of the oil lling hole.
D) Turn the handle counter-clockwise to
open the oil return valve.
E) Turn the handle clockwise to the end,
press the handle & repeatedly operate it up
and down quickly several times to drain the
air in the circuit.
F) Check it again, if you need to top up.
G) Tighten the oil hole screw.
H) Wipe of excess oil with a clean cloth.
FIVE COMMON FAULTS & SOLUTIONS
SAFETY WARNING
1, Before use be sure to read carefully & fully
understand all the contents of this instruction
manual. Improper operation may result in prod-
uct damage & personal injury.
2, Check the jack before each use. If there are
loose or damaged parts, it cannot be used.
3, Choose the appropriate tonnage jack Accord-
ing to the weight of the vehicle.
4, Do not overload the jack.
5, Do not move the vehicle when the jack is in
use.
6, Secure the vehicle & make sure engine is o
before operation.
7, Use only on at hard level oors.
8, Jack must only be used to raise the vehicle,
once raised it should be supported with appro-
priate axle stands.
9, The jack must be carefully aligned with the
vehicles jacking points at the beginning of the
jacking operation.
10, When jacking do not turn the handle as the
oil return valve will operate & the jack will drop.
11, To unload and remove the jack slowly turn
the handle counter-clockwise to make the vehi-
cle descend slowly.
12, Do not disassemble or ret the jack.
13, Do not adjust the safety valve.
14, Wear appropriate protective equipment
when operating the jack.
SYMP-
TOM’S
Jack does not lift rated load X X X X
The pallet drops automatically
under load
X
The tray never lifts X X
The handle feels soft & limp
Handle bends under load X
Oil leaks from lling hole X
PROBABLE
CAUSE
1. Check oil return
valve is complet-
ley closed.
2. There may be
air in the circuit
1. Oil line may be
blocked.
2. The oil return valve
is not fully closed.
Low on oil. Air in oil. Oil overlled
SUGGES-
TION
1 Turn the handle
clockwise to
ensure valve is
closed
2. Discharge air
from oil.
1. Replace oil
2. Turn handle
clockwise to close oil
return valve.
Top up oil. Replace
oil.
Drain oil so that
level is 6mm below
lling hole.

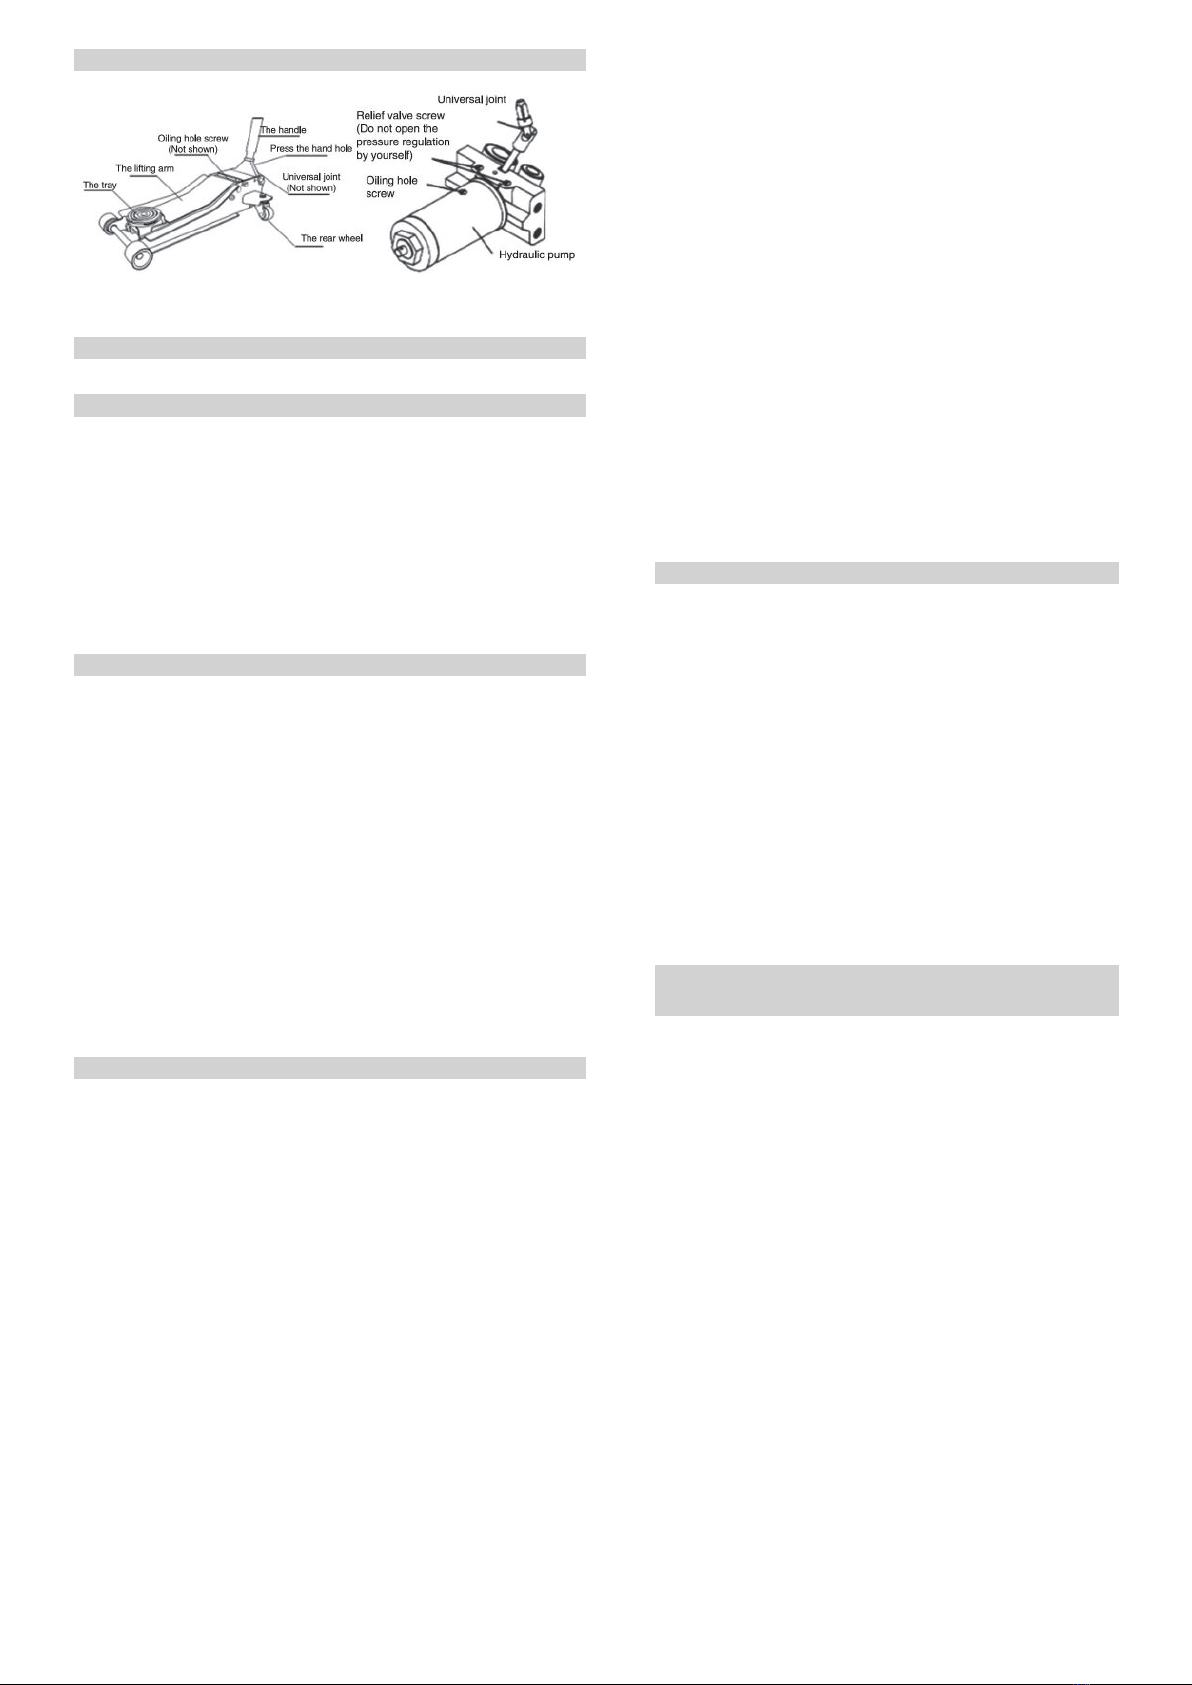
PRODUCT ILLUSTRATION
SAFETY & OPERATION
INSTALL THE HANDLE
1, Connect & install the upper & lower handles
with the fastening screws.
2, loosen the positioning screw on the handle &
insert the handle into the snap hole.
3, Tighten the positioning screw and complete
the installation of the handle.
CHANGE THE OIL
1, Loosen the oil hole screw, but do not remove
the screw (see gure 2)
2, Insert the handle into the snap hole (see
gure 1).
3, Insert the handle counter-clockwise (see g.
1) to open the oil return valve.
4, Clockwise turn the handle, press the handle
repeatedly up and down in rapid succession
several times to exhaust the air in the oil circuit.
5, Tighten the oil lling hole screw (Se Figure 2).
JACK LIFTING OPERATION
1, Choose a safe place, park the vehicle on a
at hard horizontal plane & turn o the engine.
2, Turn the handle counter-clockwise & lower
the jack. After the lift arm is placed in its lowest
position, turn the handle clockwise to close the
oil return valve.
3, Carefully align the jack pallet with the jack
point of the vehicle chassis (refer to the vehicles
operators manual)
4, Pump the handle until the jack tray contacts
the support point of the vehicles chassis (note
before jacking, make sure that the jack tray is
well seated with he vehicles jack point, else
reposition before lift).
5, Continue to pump the handle in a nice
smooth slow jacking action right to the bottom.
6, When the vehicle has been lifted to the
required height place matching axle stands
in appropriate positions to support the ve-
hicle. (Note the axle stands are required &
should always be used in pairs).
7, Slowly turn the handle counter-clockwise
to lower the jack until the support point
of the vehicle lands on the centre of the
paired axle stands. Finally turn the handle
clockwise to close the oil return valve.
Note: because the jack has a safety pres-
sure limiting device, the jack will protect
itself buy suddenly releasing the pressure
therefore never jack up a vehicle with a
weight above the pressure limiting tonnage.
LOWERING THE VEHICLE
1, Remove all tools from under the vehicle.
2, Locate the jack under the vehicles jack
point. Turn the handle clockwise & pump
the handle to lift the vehicle enough to re-
move the axle stands.
3, Slowly turn the handle counter-clockwise
(make sure each turn does not exceed half
a turn) to lower the vehicle to the ground.
4, Continue to turn the handle coun-
ter-clockwise until the jack reaches the
lowest position.
CARE SHOULD BE TAKEN IN THE USE
OF JACK SUPPORTS
1, The rated weight of the jack support
refers to the rated weight of a pair of sup-
ports. The supports must not be overload-
ed.
2, Before use it is necessary to ensure that
the support points on the vehicles chassis
locate into the centre of the paired jack
supports & the brackets are used on a hard
level surface.
3, The support brackets must always main-
tain identical height when used.
4, The wrong use of the support brackets
can lead to property damage & personal
injury.
Other RW Jack manuals