Ryobi RYAC802 User manual

Votre souffleuse à neige conçu et fabriqué conformément à
nos strictes normes de fiabilité, simplicité d’emploi et sécurité
d’utilisation. Correctement entretenu, cet outil vous donnera des
années de fonctionnement robuste et sans problème.
AVERTISSEMENT : Pour réduire les risques de
blessures, l’utilisateur doit lire et veiller à bien comprendre le
manuel d’utilisation avant d’employer ce produit.
Merci de votre achat.
Su equipo quitanieve ha sido diseñado y fabricado de conformidad
con nuestras estrictas normas para brindar fiabilidad, facilidad
de uso y seguridad para el operador. Con el debido cuidado, le
brindará muchos años de sólido funcionamiento y sin problemas.
ADVERTENCIA: Para reducir el riesgo de lesiones,
el usuario debe leer y comprender el manual del operador antes
de usar este producto.
Le agradecemos su compra.
CONSERVER CE MANUEL POUR
FUTURE RÉFÉRENCE GUARDE ESTE MANUAL PARA
FUTURAS CONSULTAS
SAVE THIS MANUAL FOR FUTURE REFERENCE
Your snow blower has been engineered and manufactured to our high standard for dependability, ease of operation, and
operator safety. When properly cared for, it will give you years of rugged, trouble-free performance.
WARNING: To reduce the risk of injury, the user must read and understand the operator’s manual before using
this product.
Thank you for your purchase.
OPERATOR’S MANUAL
MANUEL D’UTILISATION
MANUAL DEL OPERADOR
20 in. SNOW BLOWER
SOUFFLEUSE À NEIGE DE 508 mm (20 po)
EQUIPO QUITANIEVE DE 508 mm (20 pulg.)
RYAC802
ALL VERSIONS
TOUTES LES VERSIONS
TODAS LAS VERSIONES

ii
See this fold-out section for all of the figures
referenced in the operator’s manual.
Consulter l’encart à volets afin d’examiner toutes les figures
mentionnées dans le manuel d’utilisation.
Consulte esta sección desplegable para ver todas las figuras
a las que se hace referencia en el manual del operador.
Fig. 1
A - Cord retainer (retenue de cordon, retén para el cordón)
B - Handle knob (bouton de poignée, perilla del mango)
C - Start button (bouton « Start » [démarrer], botón de arranque)
D - Upper handle (poignée supérieure, mango superior)
E - Chute rotation lever (levier de rotation de goulotte, palanca de giro
del vertedor)
F - Chute deflector (déflecteur de goulotte, deflector del vertedor)
G - Impeller (tarière, impulsor)
H
- Intermediate handle (poignée intermédiaire, mango intermedio)
A
Fig. 2
A - Grounding pin (broche de terre, patilla de conexión a tierra)
B - 120 V grounded outlet (prise électrique 120 v mise à la terre,
toma de corriente de 120 volts con hilo a tierra)
B
Fig. 3
A
B
B
H
D
C
F
G
E

iii
Fig. 4
A - Lower handle (poignée inférieure, mango inferior)
B - Intermediate handle (poignée intermédiaire, mango intermedio)
C - Handle knob (bouton de poignée, perilla del mango)
D - Bolt (boulon, perno)
Fig. 5
A - Chute rotation lever (levier de rotation de goulotte, palanca de giro del
vertedor)
B - Mounting bracket (support de montage, soporte de montaje)
C - Washer (rondelle, arandela)
D - Cap nut (écrou à chapeau, tuerca de la tapa)
E - Upper end (extrémité supérieure, extremo superior)
F - Lower end (extrémité inférieure, extremo inferior)
G - Hitch pin (goupille d'attelage, pasador de enganche)
Fig. 6
A - Intermediate handle (poignée intermédiaire, mango intermedio)
B - Upper handle (poignée supérieure, mango superior)
C - Handle knob (bouton de poignée, perilla del mango)
D - Bolt (boulon, perno)
E - Cable clip (collier de fixation, sujetador de cable)
F - Starter cable (câble du démarreur, cable del arrancador)
B
D
D
B
G
CD
DE
A
B
D
C
C
F
E
C
A
B
A
EF
A
Fig. 7
A - Chute deflector (déflecteur de goulotte, deflector del vertedor)
B - Chute (goulotte, vertedor)
C - Carriage bolt (boulon de carrossier, perno de carruaje)
D - Washer (rondelle, arandela)
E - Nut ( écrou, tuerca)
C
D

iv
Fig. 9
Fig. 8
Fig. 11
A - Cord retainer (retenue de cordon, retén para el cordón)
B - Plug (fiche, clavija)
Fig. 10
A - Start lever (levier de commande de démarrage, palanca de arranque)
B - Lock-out lever (levier de verrouillage, palanca del seguro)
A - Chute deflector (déflecteur de goulotte, deflector del vertedor)
B - Bolt (boulon, perno)
C - Large washer (grande rondelle, arandela grande)
D - Tooth washer (rondelle dentée, arandela de diente)
E - Lock knob (bouton de verrouillage, perilla de fijación)
F - Chute (goulotte, vertedor)
A - Chute deflector (déflecteur de goulotte, deflector del vertedor)
A
E
D
C
F
B
A
A
A
A
B
C
B

v
Fig. 12
A - Chute rotation lever (levier de rotation de goulotte, palanca de giro del
vertedor)
A
Fig. 13
TO STORE THE MACHINE
POUR REMISER L’ÉQUIPEMENT
PARA GUARDAR LA MÁQUINA
A

2 — English
Introduction ...................................................................................................................................................................... 2
Introduction / Introducción
Important Safety Instructions ........................................................................................................................................3-4
Règles de sécurité générales / Reglas de seguridad generales
Symbols.........................................................................................................................................................................5-6
Symboles / Símbolos
Electrical........................................................................................................................................................................... 7
Caractéristiques électriques / Aspectos eléctricos
Features............................................................................................................................................................................ 8
Caractéristiques / Características
Assembly.......................................................................................................................................................................8-9
Assemblage / Armado
Operation...................................................................................................................................................................10-11
Utilisation / Funcionamiento
Maintenance................................................................................................................................................................... 12
Entretien / Mantenimiento
Troubleshooting.............................................................................................................................................................. 13
Dépannage / Solución de problemas
Warranty ......................................................................................................................................................................... 14
Garantie / Garantía
Parts Ordering and Service ...............................................................................................................................Back Page
Commande de pièces et réparation / Pedidos de piezas y servicio ......................................................... Page arrière / Pág. posterior
TABLE OF CONTENTS
TABLE DES MATIÈRES / ÍNDICE DE CONTENIDO
INTRODUCTION
INTRODUCTION / INTRODUCCIÓN
This product has many features for making its use more pleasant and enjoyable. Safety, performance, and dependability
have been given top priority in the design of this product making it easy to maintain and operate.
* * *
Ce produit offre de nombreuses fonctions destinées à rendre son utilisation plus plaisante et satisfaisante. Lors de la
conception de ce produit, l’accent a été mis sur la sécurité, les performances et la fiabilité, afin d’en faire un outil facile à
utiliser et à entretenir.
* * *
Este producto ofrece numerosas características para hacer más agradable y placentero su uso. En el diseño de este producto
se ha conferido prioridad a la seguridad, el desempeño y la fiabilidad, por lo cual se facilita su manejo y mantenimiento.

3 — English
WARNING:
READ AND UNDERSTAND ALL INSTRUCTIONS.
Failure to follow all instructions listed below and on the
machine may result in electric shock, fire, and/or serious
personal injury.
Know your snow blower. Read operator’s manual care-
fully. Learn its applications and limitations, as well as the
specific potential hazards related to this snow blower.
Following this rule will reduce the risk of electric shock,
fire, or serious injury.
Do not permit children to use snow blower. It is not a
toy.
Use only accessories that are recommended by the
manufacturer for your model described in this manual.
Accessories that may be suitable for one snow blower
may create a risk of injury when used on another snow
blower. Use only as described in this manual.
Do not put any object into openings. Do not use with any
opening blocked; keep free of dust, lint, hair, and anything
that may reduce air flow.
Keep hair, loose clothing, fingers, and all parts of body
away from openings and moving parts.
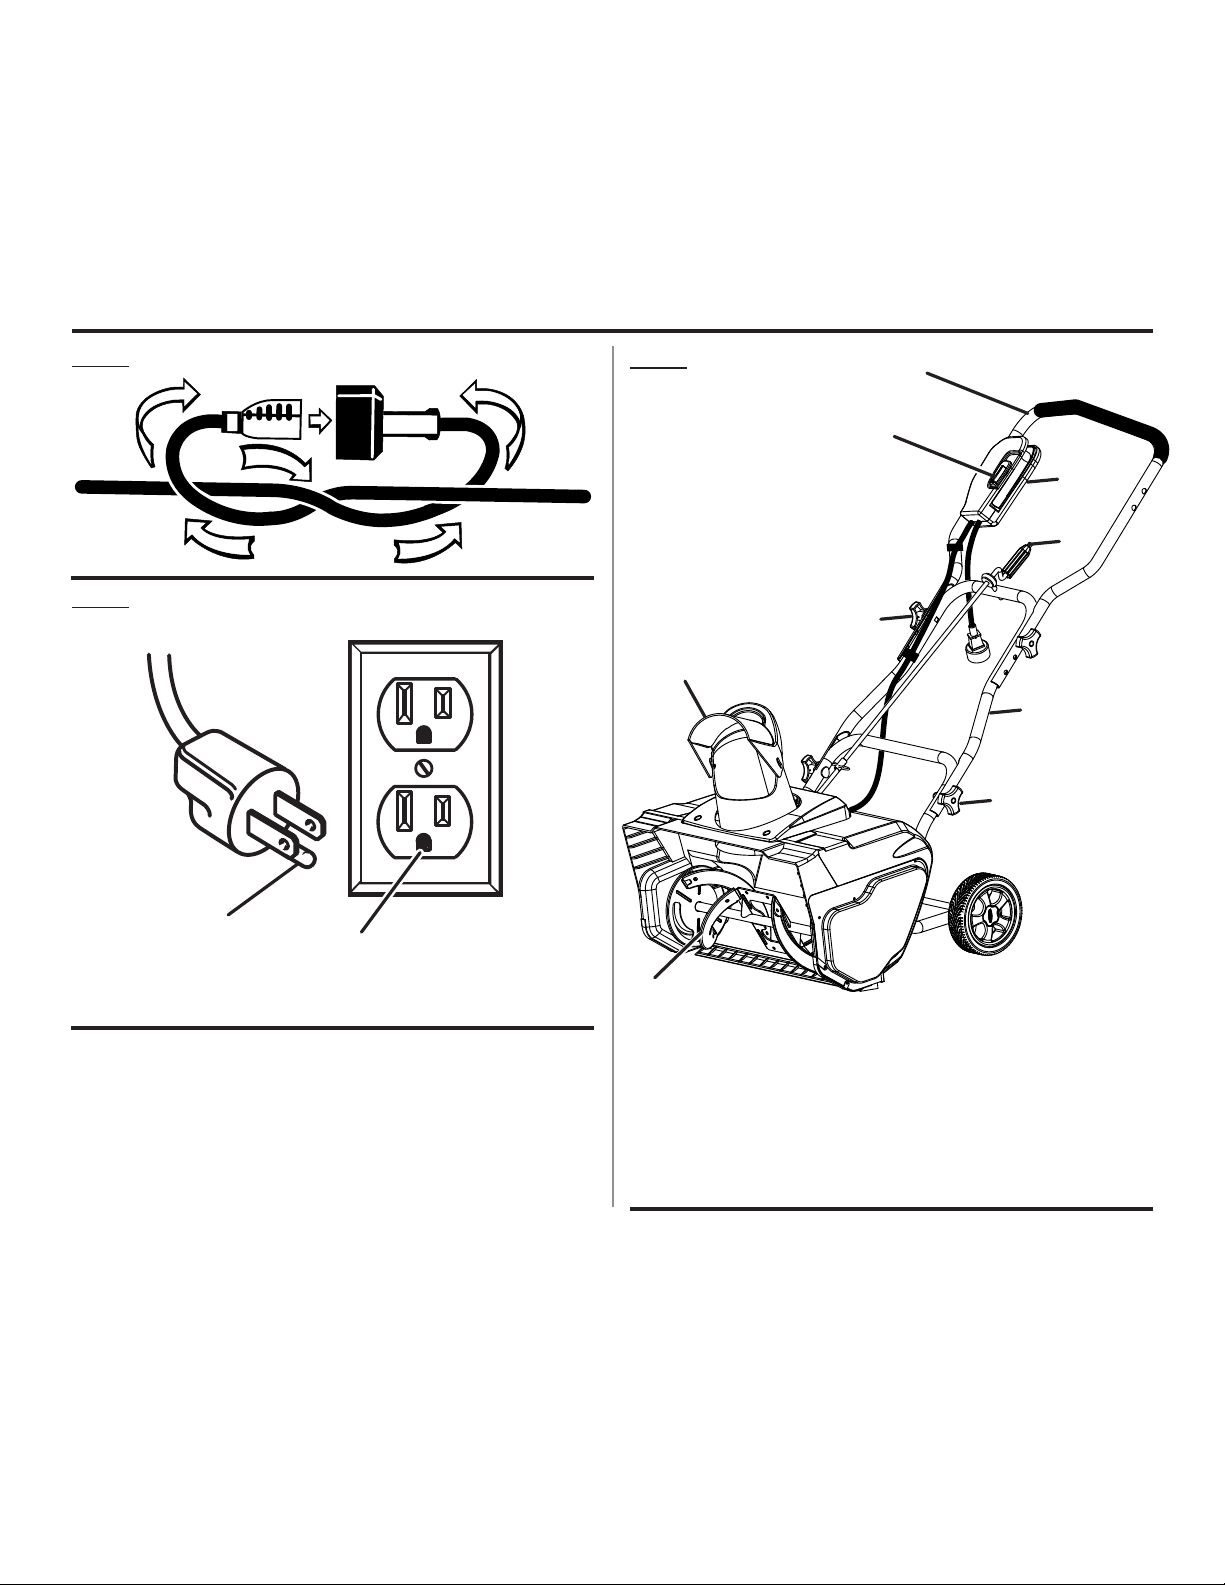
Make sure your extension cord is in good condition.
When using an extension cord, be sure to use one heavy
enough to carry the current your product will draw. A wire
gauge size (A.W.G.) of at least 14 is recommended for an
extension cord 50 feet or less in length. If in doubt, use
the next heavier gauge. The smaller the gauge number,
the heavier the cord. An undersized cord will cause a drop
in line voltage resulting in loss of power and overheating.
WARNING: Use outdoor extension cords marked SW-A,
SOW-A, STW-A, STOW-A, SJW-A, SJTW-A, or SJTOW-
A. These cords are rated for outdoor use and reduce the
risk of electric shock.
Ground Fault Circuit Interrupter (GFCI) protection should
be provided on the circuit(s) or outlet(s) to be used for the
product. Receptacles are available having built-in GFCI
protection and may be used for this measure of safety.
This snow blower should be grounded while in use to
protect the operator from electric shock. The snow blower
is equipped with an approved 3-conductor cord and
3-prong grounding-type plug to fit the proper grounding-
type receptacle. The green or green and yellow conductor
in the cord is the grounding wire. Never connect the green
or green and yellow wire to a live terminal. Your unit has
a plug that looks like the image shown in figure 2.
Use only 3-wire outdoor extension cords that have
3-prong grounding-type plugs and 3-pole receptacles
that accept the snow blower’s plug. Replace or repair
damaged cords.
This product is designed with a cord retainer that prevents
the extension cord from being pulled loose while using.
If cord is damaged in any manner while plugged in, pull
extension cord from wall receptacle.
Don’t Abuse Cord — Never carry snow blower by cord
or yank it to disconnect from receptacle. Keep cord from
heat, oil, and sharp edges.
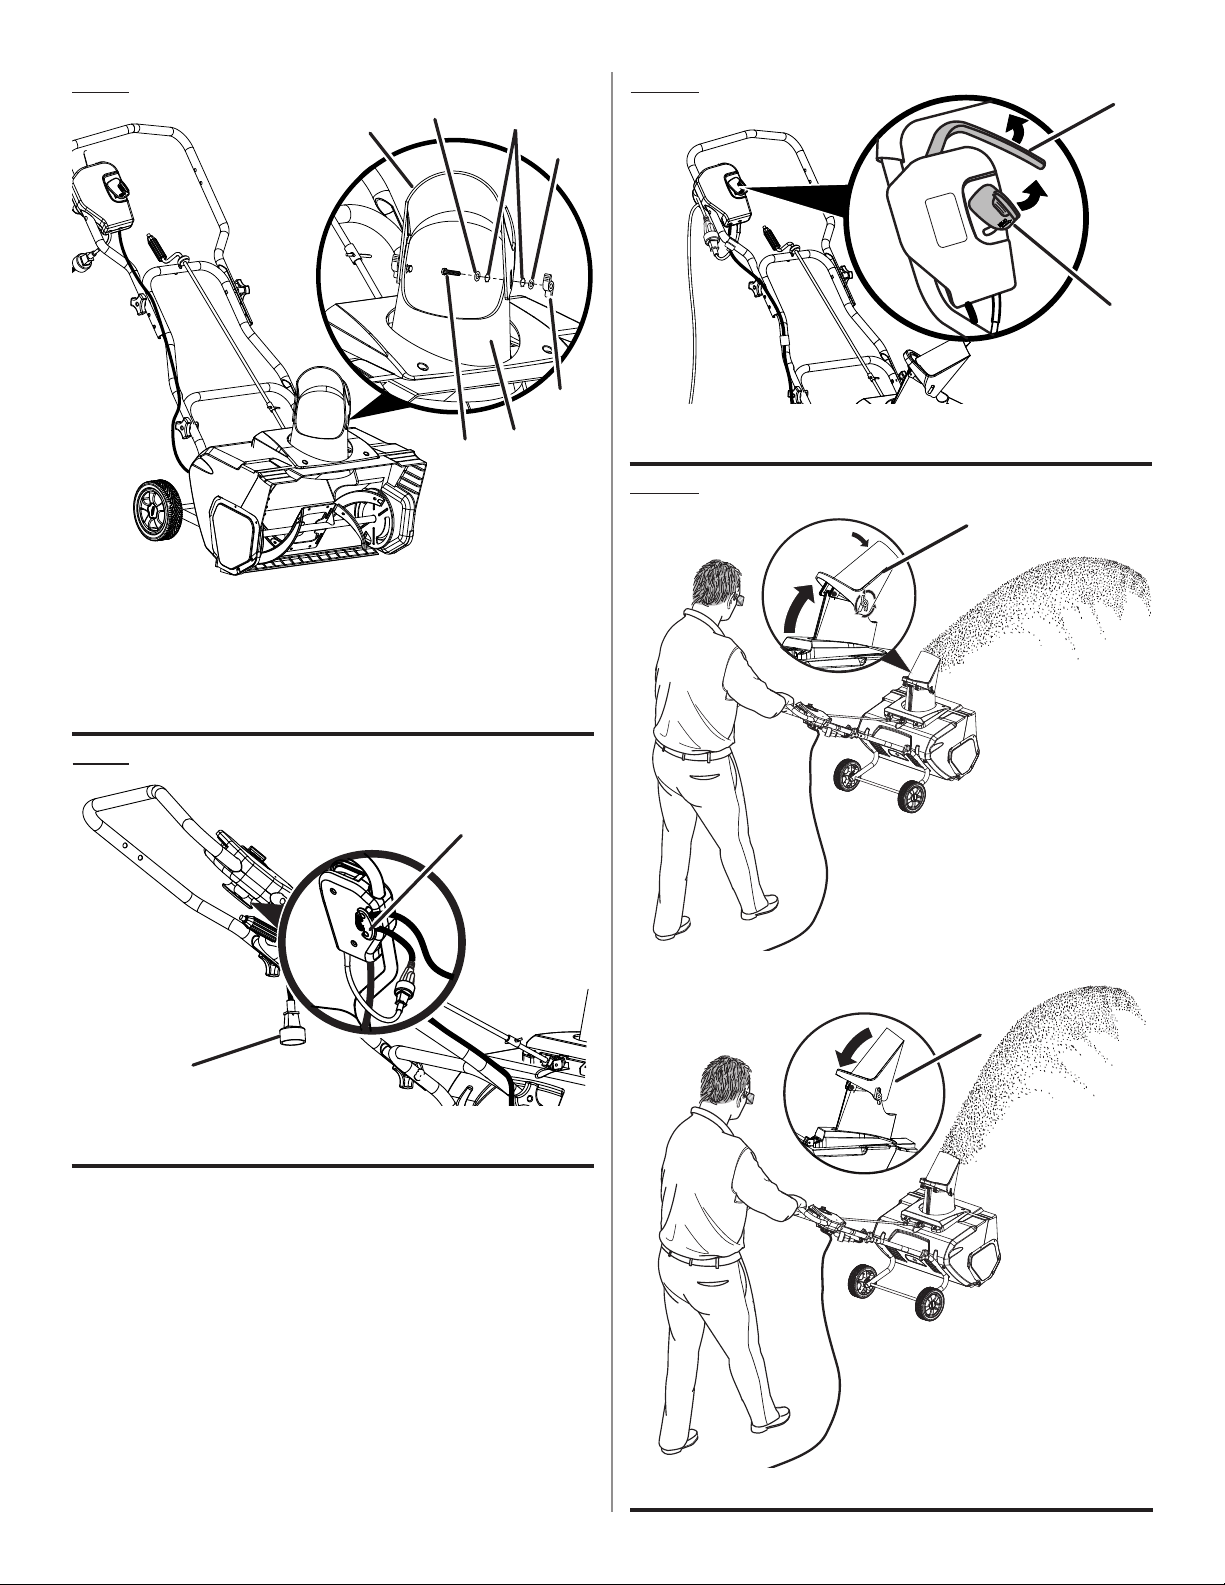
Keep hands away from moving parts.
Avoid Unintentional Starting – Do not carry plugged in
appliance with finger on trigger. Be sure the switch trigger
is not engaged before plugging in.
Do not use tool if switch trigger does not turn it on or off.
Any tool that cannot be controlled with the switch trigger
is dangerous and must be repaired.
Do not operate snow blowers in explosive atmospheres,
such as in the presence of flammable liquids, gases, or
dust. Snow blowers create sparks which may ignite the
dust or fumes.
Keep bystanders, children, and visitors at least 100 ft.
away while operating a snow blower. Distractions can
cause you to lose control.
If appliance is not working as it should, has been dropped,
damaged, left outdoors, or dropped into water, return it
to a service center.
Stay alert, watch what you are doing and use
common sense when operating a power snow blower.
Do not use snow blower while tired, upset, or under the
influence of drugs, alcohol, or medication. A moment of
inattention while operating snow blowers may result in
serious personal injury.
Use safety equipment. Always wear eye protection. Dust
mask, non-skid safety shoes, hard hat, or hearing protec-
tion must be used for appropriate conditions.
Dress properly — Do not wear loose clothing, scarves,
or jewelry. They can be caught in moving parts.
Check for misalignment or binding of moving parts,
breakage of parts, and any other condition that may af-
fect the snow blower’s operation. If damaged, have the
snow blower serviced before using. Many accidents are
caused by poorly maintained snow blowers.
Keep the snow blower and its handle dry, clean and free
from oil and grease. Always use a clean cloth when clean-
ing. Never use brake fluids, gasoline, petroleum-based
products, or any strong solvents to clean your snow
blower. Following this rule will reduce the risk of loss of
control and deterioration of the enclosure plastic.
Always wear safety glasses with side shields. Everyday
glasses have only impact resistant lenses. They are NOT
safety glasses. Following this rule will reduce the risk of
eye injury.
IMPORTANT SAFETY INSTRUCTIONS

4 — English
IMPORTANT SAFETY INSTRUCTIONS
Always wear eye protection with side shields marked to
comply with ANSI Z87.1 along with hearing protection
when operating this equipment.
Protect your hearing. Wear hearing protection during
extended periods of operation. Following this rule will
reduce the risk of serious personal injury.
Don’t expose snow blowers to rain. Water entering a snow
blower will increase the risk of electric shock.
Wear heavy long pants, long sleeves, boots, and gloves.
Avoid loose garments or jewelry that could get caught in
moving parts of the machine or its motor.
Wear rubber boots when operating the snow blower.
Protective footwear will protect your feet and improve
your footing on slippery surfaces. Do not go barefoot or
wear sandals.
Keep firm footing and balance. Do not overreach. Over-
reaching can result in loss of balance.
Do not operate the snow blower in a direction that will
cause snow to be thrown on people or pets. Thrown snow
or other objects can cause serious personal injuries.
Store Idle Snow Blowers Indoors — When not in use,
snow blower should be stored indoors in a dry, locked
up place — unplugged and out of the reach of children.
Keep all bystanders, children, and pets at least 100 ft.
away.
Snow blower service must be performed only by qualified
repair personnel. Service or maintenance performed by
unqualified personnel may result in a risk of injury.
When servicing a snow blower, use only identical replace-
ment parts. Replace or repair damaged cords. Follow
instructions in the Maintenance section of this manual.
Use of unauthorized parts or failure to follow Maintenance
Instructions may create a risk of shock or injury.
Never use snow blower near fires, fireplaces, hot ashes,
barbecue pits, etc. Use near fires or ashes can spread
fires and result in serious injury and/or property damage.
Never use snow blower to spread chemicals, fertilizers, or
any other toxic substances. Spreading these substances
could result in serious injury to the operator or bystanders.
Never place snow blower on any surface, except a hard,
clean surface when motor is running. Gravel, sand, and
other debris can be picked up by the air inlet and thrown
at the operator or bystanders, causing possible serious
injuries.
Check the work area before each use. Remove all objects
such as rocks, broken glass, nails, wire, or string which
can be thrown or become entangled in the machine.
Do not use snow blower on ice, which can cause the
operator to slip and fall, resulting in possible serious
personal injury.
Never use snow blower on frozen lakes, rivers, or similar
surfaces. Serious injury or death could occur if the ice
breaks.
Never use the snow blower on a rooftop or other unstable
surface, which can result in death or serious personal
injury.
For household use only.
Use the right appliance — Do not use the snow blower
for any job except that for which it is intended.
Do not force the snow blower - It will do the job better
and safer at the rate for which it was designed.
Never direct discharged material toward anyone. Avoid
discharging material against a wall or obstruction. Mate-
rial may ricochet back toward the operator. Stop the snow
blower when crossing gravel or rocky surfaces.
If the snow blower strikes a foreign object, follow these
steps:
• Release the switch trigger and wait until the unit comes
to a complete stop.
• Disconnect the snow blower from the power supply.
• Thoroughly inspect the snow blower for any damage.
• Repair any damage before restarting and continuing to
operate the snow blower.
Do not lift up or hold the snow blower above the ground
when operating, which can result in loss of control and
possible serious personal injury. Only operate the snow
blower in accordance with the operating instructions
provided in this operator’s manual.
Keep guards in place and in working order.
Disconnect the plug from power source when not in use,
before servicing, and when changing accessories.
Maintain Snow Blowers With Care — Follow instructions
for lubricating and changing accessories.
Save these instructions. Refer to them frequently and use
them to instruct others who may use this tool. If you loan
someone this tool, loan them these instructions also.-

5 — English
The following signal words and meanings are intended to explain the levels of risk associated with this product.
SYMBOL SIGNAL MEANING
DANGER: Indicates an imminently hazardous situation, which, if not avoided, will result
in death or serious injury.
WARNING: Indicates a potentially hazardous situation, which, if not avoided, could result
in death or serious injury.
CAUTION: Indicates a potentially hazardous situation, which, if not avoided, may result in
minor or moderate injury.
NOTICE: (Without Safety Alert Symbol) Indicates important information not related to an
injury hazard, such as a situation that may result in property damage.
SYMBOLS
Some of the following symbols may be used on this product. Please study them and learn their meaning. Proper
interpretation of these symbols will allow you to operate the product better and safer.
SYMBOL NAME DESIGNATION/EXPLANATION
Safety Alert Indicates a potential personal injury hazard.
Read Operator’s Manual To reduce the risk of injury, user must read and understand
operator’s manual before using this product.
Eye Protection Always wear eye protection with side shields marked to comply
with ANSI Z87.1.
Wet Conditions Alert Do not expose plug to water or rain.
Ricochet Thrown objects can ricochet and result in personal injury or
property damage.
Keep Hands Out of Impeller Keep hands away from rotating impeller.
Keep Feet Out of Impeller Keep feet away from rotating impeller.
Keep Hands and Feet Away Keep hands and feet away from impeller and discharge chute.
Keep Children and
Bystanders Away Keep all children and bystanders at least 100 ft. away.
Keep Hands and Feet Away Keep hands and feet away from rotating impeller.

6 — English
Some of the following symbols may be used on this product. Please study them and learn their meaning. Proper
interpretation of these symbols will allow you to operate the product better and safer.
SYMBOL NAME DESIGNATION/EXPLANATION
No Slope Do not operate on inclines greater than 15º. Walk across the face
of slopes, never up and down.
V Volts Voltage
A Amperes Current
Hz Hertz Frequency (cycles per second)
W Watt Power
hrs Hours Time
n
o
No Load Speed Rotational speed, at no load
.../min Per Minute Revolutions, strokes, surface speed, orbits etc., per minute
SYMBOLS

7 — English
ELECTRICAL
EXTENSION CORDS
See Figure 1.
When using a power tool at a considerable distance from
a power source, be sure to use an extension cord that has
the capacity to handle the current the product will draw. An
undersized cord will cause a drop in line voltage, resulting in
overheating and loss of power. Use the chart to determine
the minimum wire size required in an extension cord. Only
round jacketed cords listed by Underwriter’s Laboratories
(UL) should be used.
When working outdoors with a product, use an extension
cord that is designed for outside use. This type of cord is
designated with “WA” or “W” on the cord’s jacket.
Before using any extension cord, inspect it for loose or ex-
posed wires and cut or worn insulation.
It is possible to tie the extension cord and power cord in a
knot to prevent them from becoming disconnected during
use. Make the knot as shown in figure 1, then connect the
plug end of the power cord into the receptacle end of the
extension cord. This method can also be used to tie two
extension cords together.
**Ampere rating (on product data plate)
0-2.0 2.1-3.4 3.5-5.0 5.1-7.0 7.1-12.0 12.1-16.0
Cord Length Wire Size (A.W.G.)
25’16 16 16 16 14 14
50’16 16 16 14 14 12
100’16 16 14 12 10 —
**Used on 12 gauge - 20 amp circuit.
NOTE: AWG = American Wire Gauge
WARNING:
Keep the extension cord clear of the working area.Posi-
tion the cord so that it will not get caught on lumber, tools,
or other obstructions while you are working with a power
tool. Failure to do so can result in serious personal injury.
WARNING:
Check extension cords before each use. If damaged
replace immediately. Never use the product with a dam-
aged cord since touching the damaged area could cause
electrical shock resulting in serious injury.
ELECTRICAL CONNECTION
This product has a precision-built electric motor. It should
be connected to a power supply that is 120 volts, AC only
(normal household current), 60 Hz. Do not operate this
product on direct current (DC). A substantial voltage drop
will cause a loss of power and the motor will overheat. If
the product does not operate when plugged into an outlet,
double-check the power supply.
SPEED AND WIRING
The speed is not constant and decreases under a load
or with lower voltage. For voltage, the wiring in a shop
is as important as the motor’s horsepower rating. A line
intended only for lights cannot properly carry a power
tool motor. Wire that is heavy enough for a short distance
will be too light for a greater distance. A line that can
support one power tool may not be able to support two
or three tools.
GROUNDING INSTRUCTIONS
See Figure 2.
This product must be grounded. In the event of a malfunction
or breakdown, grounding provides a path of least resistance
for electric current to reduce the risk of electric shock.
This product is equipped with an electric cord having an
equipment-grounding conductor and a grounding plug. The
plug must be plugged into a matching outlet that is properly
installed and grounded in accordance with all local codes
and ordinances.
Do not modify the plug provided. If it will not fit the outlet,
have the proper outlet installed by a qualified electrician.
WARNING:
Improper installation of a grounded plug increase the
risk of electric shock. When repair or replacement of the
cord or plug is required, take the tool to an authorized
service center.
Check with a qualified electrician or service personnel if the
grounding instructions are not completely understood, or if
in doubt as to whether the product is properly grounded.
Repair or replace a damaged or worn cord immediately.
This product is for use on a nominal 120 V circuit and has a
grounding plug similar to the plug illustrated in figure 2. Only
connect the product to an outlet having the same configura-
tion as the plug. Do not use an adapter with this product.

8 — English
PRODUCT SPECIFICATIONS
Input .....................................................................................................................................120 V, AC Only, 60 Hz, 12 Amps
Clearing Width................................................................................................................................................................ 20 in.
Clearing Depth ............................................................................................................................................................... 10 in.
Impeller Size................................................................................................................................................................... 18 in.
FEATURES
KNOW YOUR SNOW BLOWER
See Figure 3.
The safe use of this product requires an understanding of the
information on the product and in this operator’s manual as
well as a knowledge of the project you are attempting. Before
use of this product, familiarize yourself with all operating
features and safety rules.
CORD RETAINER
The cord retainer helps prevent accidental unplugging of
the extension cord.
CHUTE ROTATION LEVER
The chute rotation lever allows you to choose the direction
that snow will discharge from the snow blower. The lever
allows the chute to rotate up to 180º.
ASSEMBLY
UNPACKING
This product requires assembly.
Carefully remove the product and any accessories from
the box. Make sure that all items listed in the packing list
are included.
WARNING:
Do not use this product if any parts on the Packing List
are already assembled to your product when you unpack
it. Parts on this list are not assembled to the product by
the manufacturer and require customer installation. Use
of a product that may have been improperly assembled
could result in serious personal injury.
Inspect the product carefully to make sure no breakage
or damage occurred during shipping.
Do not discard the packing material until you have
carefully inspected and satisfactorily operated the
product.
If any parts are damaged or missing, please call
1-800-860-4050 for assistance.
PACKING LIST
Snow Blower
Handle Mounting Hardware
Upper and Intermediate Handles
Chute Rotation Lever with Bracket and Mounting Hardware
Operator’s Manual
WARNING:
If any parts are damaged or missing, do not operate this
product until the parts are replaced. Use of this product
with damaged or missing parts could result in serious
personal injury.
WARNING:
Do not attempt to modify this product or create
accessories not recommended for use with this product.
Any such alteration or modification is misuse and could
result in a hazardous condition leading to possible serious
personal injury.
WARNING:
Do not connect to power supply until assembly is com-
plete. Failure to comply could result in accidental starting
and possible serious personal injury.

9 — English
INSTALLING INTERMEDIATE HANDLE
See Figure 4.
Align the holes on the intermediate handle with the holes
in the lower handle as shown.
Insert bolt through both handles with the threaded end
facing out.
Install the handle knob and tighten securely to secure the
bolt in place.
Repeat on the opposite side to secure the intermediate
handle in place.
INSTALLING CHUTE ROTATION LEVER
See Figure 5.
Insert the threaded end of the chute rotation lever mount-
ing bracket through the hole in the intermediate handle.
The threaded end should face forward.
Install the washer and cap nut; tighten securely.
Route the upper end of the lever between the intermedi-
ate and lower handles and install over the lower end of
the lever. Align the holes in the two parts of the lever and
insert the hitch pin through the holes as shown to secure.
Rotate the lever in both directions to verify the proper
functioning of the lever and the chute.
INSTALLING UPPER HANDLE
See Figure 6.
Align the holes on the upper handle with the holes in the
intermediate handle as shown.
NOTICE:
Do not allow the starter cable to become pinched or
trapped when aligning the handles.
Insert bolt through both handles with the threaded end
facing out.
Install the handle knob and tighten securely to secure the
bolt in place.
Repeat on the opposite side to secure the upper handle
in place.
Installthe cable clips if not already installed,thenroutethe
starter cable through the openings in the clips to secure.
ASSEMBLY
INSTALLING CHUTE DEFLECTOR
See Figures 7 - 8.
Position the chute deflector over the chute, aligning the
mounting holes at the rear of the deflector with the holes
in the ribs at the back of the chute.
Insert a small washer on the carriage bolt, then insert
the bolt through the deflector, the ribs on the back of the
chute, then through the other side of the deflector.
Install second small washer and nut. Tighten securely.
Position deflector to align holes on the sides of the de-
flector with holes in the sides of the chute.
Insert large washer and tooth washer on bolt, then slide
bolt through the chute and deflector. Install second tooth
washer, second large washer, then install lock knob and
tighten securely.
NOTE: The teeth on the tooth washer should face the
deflector, not the large washer.
Repeat on opposite side to secure the chute deflector in
place.

10 — English
WARNING:
Do not allow familiarity with products to make you
careless. Remember that a careless fraction of a second is
sufficient to inflict serious injury.
WARNING:
Always wear eye protection with side shields marked to
comply with ANSI Z87.1. Failure to do so could result in
objects being thrown into your eyes resulting in possible
serious injury.
WARNING:
Do not use any attachments or accessories not
recommended by the manufacturer of this product. The
use of attachments or accessories not recommended
can result in serious personal injury.
NOTICE:
Before each use, inspect the entire product for damaged,
missing, or loose parts such as screws, nuts, bolts, caps,
etc. Tighten securely all fasteners and caps and do not
operate this product until all missing or damaged parts
are replaced. Please call 1-800-860-4050 or contact an
authorized service center for assistance.
APPLICATIONS
You may use this product for the purpose listed below:
Removing snow from desired areas such as driveways
and sidewalks
WARNING:
Always disconnect snow blower from power supply when
you are assembling parts, making adjustments, cleaning,
or when not in use. This will prevent accidental starting
that could cause serious personal injury.
CONNECTING TO POWER SUPPLY
See Figure 9.
This product is designed with a cord retainer that prevents
the extension cord from being pulled loose while using.
Form a loop with the end of the extension cord.
Insert loop portion of extension cord through opening
behind starter panel and place over cord retainer.
Slowly pull loop against cord retainer until the slack is
removed.
Plug product into extension cord.
NOTE: Failure to remove all excess cord slack from extension
cord retainer could result in plug loosening from receptacle.
OPERATION
STARTING/STOPPING THE SNOW BLOWER
See Figure 10.
To start the motor:
Connect the snow blower to power supply.
NOTICE:
Always secure extension cord to unit by using cord
retainer. Failure to use cord retainer may result in damage
to the unit and/or extension cord.
Pull the lock-out lever to the left to expose the start lever.
Grab the start lever (while releasing the lock-out lever)
and pull toward the handle to start the snow blower.
To stop the motor:
Release the start lever.
ADJUSTING THE CHUTE
See Figures 11 - 12.
The chute can be adjusted to change both the direction and
the distance to assist you in moving snow away from one
area and placing it in another.
The direction of snow removal can be adjusted up to 180º.
Turn the chute rotation lever counterclockwise to rotate
the chute to the left.
Turn the chute rotation lever clockwise to rotate the chute
to the right.
The distance the snow is moved is adjusted using the chute
deflector. Loosen the lock knobs on either side of the chute
deflector, adjust the deflector as desired, then retighten the
lock knobs securely.
Move the chute deflector forward (up) to increase the
distance the snow will be thrown.
Move the chute deflector backward (down) to decrease
the distance the snow will be thrown.
OPERATING TIPS
WARNING:
Never use snow blower on frozen lakes, rivers, or similar
surfaces. Death or serious injury could occur if the ice
breaks.
WARNING:
Never use the snow blower on a rooftop or other unstable
surface, which can result in death or serious personal
injury.

11 — English
OPERATION
WARNING:
Do not use snow blower on ice, which can cause the
operator to slip and fall, resulting in possible serious
personal injury.
WARNING:
Do not wear loose clothing, scarves, or jewelry. They can
be caught in moving parts and cause death or serious
personal injury.
WARNING:
Keep all snow discharge pointed away from all electri-
cal devices to reduce the risk of electrocution or electric
shock.
WARNING:
Never point the snow blower or discharge chute in the
direction of people or pets. Thrown snow or other objects
can cause serious personal injuries.
WARNING:
Make sure the area to be cleared is free of stones, sticks,
wires, gravel, and other objects that could be accidentally
thrown by the snow blower in any direction and cause
serious personal injury to the operator and others.
Take notice of the direction of the wind before beginning.
When possible, discharge snow in the same direction as
the wind to prevent snow from being thrown back into
your face.
If the unit comes in contact with any type of obstruction
or debris during use, stop the snow blower, disconnect
from the power supply, remove the obstruction, and
inspect the unit carefully for damage before proceeding.
WARNING:
Never reach into the impeller or place any body part in
front of the snow blower when the unit is operating or
when the unit is plugged in. Always ensure all moving
parts have stopped and the snow blower has been un-
pugged before clearing any obstructions. Failure to follow
these instructions can result in serious personal injury.
Some parts of the snow blower can freeze under extreme
weather conditions. Do not attempt to operate the unit
with frozen parts.
When finished, allow the motor to run for an additional
few minutes, then turn the chute rotation lever back and
forth several times to remove any remaining snow from
the chute.

12 — English
WARNING:
When servicing, use only authorized replacement parts.
Use of any other parts can create a hazard or cause
product damage.
WARNING:
Always wear eye protection with side shields marked to
comply with ANSI Z87.1. Failure to do so could result in
objects being thrown into your eyes resulting in possible
serious injury.
WARNING:
Before inspecting, cleaning or servicing the unit, stop the
motor, wait for all moving parts to stop, and disconnect
from power supply. Failure to follow these instructions
can result in serious personal injury or property damage.
NOTICE:
Periodically inspect the entire product for damaged,
missing, or loose parts such as screws, nuts, bolts, caps,
etc. Tighten securely all fasteners and caps and do not
operate this product until all missing or damaged parts
are replaced. Please call 1-800-860-4050 or contact an
authorized service center for assistance.
MAINTENANCE
GENERAL MAINTENANCE
Avoid using solvents when cleaning plastic parts. Most
plastics are susceptible to damage from various types of
commercial solvents and may be damaged by their use. Use
clean cloths to remove dirt, dust, oil, grease, etc.
WARNING:
Do not at any time let brake fluids, gasoline, petroleum-
based products, penetrating oils, etc., come in contact
with plastic parts. Chemicals can damage, weaken, or
destroy plastic which can result in serious personal injury.
LUBRICATION
All of the bearings in this product are lubricated with a
sufficient amount of high grade lubricant for the life of the
unit under normal operating conditions. Therefore, no further
bearing lubrication is required.
STORING THE SNOW BLOWER
See Figure 13.
CAUTION:
Ensure all melted snow that may drip from the snow blow-
er is properly wiped up to prevent a slip and fall hazard.
Wipe the snow blower with a clean dry cloth.
Check all nuts, bolts, knobs, screws, fasteners, etc., for
tightness.
Inspect moving parts for damage, breakage, and wear.
Have repairs made on any damaged or missing parts.
Loosen the handle knobs and lower the upper handle
assembly as shown.
Store snow blower indoors in a clean, dry place out of
the reach of children.
Do not store near corrosive materials such as fertilizer or
rock salt.

13 — English
TROUBLESHOOTING
IF THESE SOLUTIONS DO NOT SOLVE THE PROBLEM CONTACT YOUR AUTHORIZED SERVICE DEALER.
PROBLEM POSSIBLE CAUSE SOLUTION
Snow blower not starting. Snow blower is unplugged.
The lock-out button was not depressed.
Connect snow blower to power supply.
Depress the lock-out button, then fully
depress the switch trigger.
The motor is on but the impeller does
not turn.
The drive belt is worn or broken. Have the drive belt replaced by an au-
thorized service center.
After passing, the snow blower leaves
a layer of snow on the ground.
The impeller/scraper mechanism is
worn.
Have the impeller/scraper mechanism
replaced by an authorized service
center.
MAKE THE MOST OF YOUR PURCHASE!
Go to http://register.ryobitools.com and register your new tool on-line.
Your product has been fully tested prior to shipment
to ensure your complete satisfaction.
For any questions about operating or maintaining
your product, call the Ryobi®Help Line!

14 — English
WARRANTY
LIMITED WARRANTY STATEMENT
Techtronic Industries North America, Inc., warrants to the
original retail purchaser that this RYOBI®brand outdoor
product is free from defect in material and workmanship
and agrees to repair or replace, at Techtronic Industries
North America, Inc.’s, discretion, any defective product
free of charge within these time periods from the date of
purchase.
Three years if the product is used for personal, family
or household use;
90 days, if used for any other purpose, such as
commercial or rental.
This warranty extends to the original retail purchaser
only and commences on the date of the original retail
purchase.
Any part of this product found in the reasonable judgment
of Techtronic Industries North America, Inc. to be defective
in material or workmanship will be repaired or replaced
without charge for parts and labor by an authorized service
center for RYOBI®brand outdoor products (Authorized
Ryobi Service Center).
Theproduct,includinganydefectivepart,mustbereturned
to an authorized Ryobi service center within the warranty
period.Theexpense of delivering the productto the service
center for warranty work and the expense of returning it
back to the owner after repair or replacement will be paid
by the owner. Techtronic Industries North America, Inc.’s,
responsibility in respect to claims is limited to making the
required repairs or replacements and no claim of breach of
warranty shall be cause for cancellation or rescission of the
contractofsaleofanyRYOBI®brand outdoorproduct.Proof
of purchase will be required by the dealer to substantiate
any warranty claim. All warranty work must be performed
by an authorized service dealer.
This warranty is limited to ninety (90) days from the date
of original retail purchase for any RYOBI®brand outdoor
product that is used for rental or commercial purposes, or
any other income-producing purpose.
This warranty does not cover any product that has been
subject to misuse, neglect, negligence, or accident, or that
has been operated in any way contrary to the operating
instructions as specified in this operator’s manual. This
warranty does not apply to any damage to the product that
is the result of improper maintenance or to any product
that has been altered or modified. The warranty does not
extend to repairs made necessary by normal wear or by the
use of parts or accessories which are either incompatible
with the RYOBI®brand outdoor product or adversely affect
its operation, performance, or durability. In addition, this
warranty does not cover:
A. Tune-ups – Spark Plugs, Carburetor, Carburetor
Adjustments, Ignition, Filters
B. Wear items – Bump Knobs, Outer Spools, Cutting
Lines, Inner Reels, Starter Pulleys, Starter Ropes, Drive
Belts, Tines, Felt Washers, Hitch Pins, Mulching Blades,
Blower Fans, Blower and Vacuum Tubes, Vacuum Bag
and Straps, Guide Bars, Saw Chains
C. This warranty does not cover the battery for more than
three years from date of purchase.
Techtronic Industries North America, Inc., reserves the
right to change or improve the design of any RYOBI®brand
outdoorproductwithout assuming any obligation to modify
any product previously manufactured.
ALL IMPLIED WARRANTIES ARE LIMITED IN DURATION
TO THE STATED WARRANTY PERIOD. ACCORDINGLY,
ANY SUCH IMPLIED WARRANTIES INCLUDING
MERCHANTABILITY, FITNESS FOR A PARTICULAR
PURPOSE, OR OTHERWISE, ARE DISCLAIMED
IN THEIR ENTIRETY AFTER THE EXPIRATION OF
THE APPROPRIATE THREE-YEAR OR NINETY-DAY
WARRANTY PERIOD. TECHTRONIC INDUSTRIES
NORTH AMERICA, INC.’S, OBLIGATION UNDER THIS
WARRANTYISSTRICTLY AND EXCLUSIVELY LIMITED TO
THE REPAIR OR REPLACEMENT OF DEFECTIVE PARTS
AND TECHTRONIC INDUSTRIES NORTH AMERICA,
INC., DOES NOT ASSUME OR AUTHORIZE ANYONE
TO ASSUME FOR THEM ANY OTHER OBLIGATION.
SOME STATES DO NOT ALLOW LIMITATIONS ON HOW
LONG AN IMPLIED WARRANTY LASTS, SO THE ABOVE
LIMITATION MAY NOT APPLY TO YOU. TECHTRONIC
INDUSTRIES NORTH AMERICA, INC., ASSUMES NO
RESPONSIBILITY FOR INCIDENTAL, CONSEQUENTIAL,
OR OTHER DAMAGES INCLUDING, BUT NOT LIMITED
TO, EXPENSE OF RETURNING THE PRODUCT TO AN
AUTHORIZED RYOBI SERVICE CENTER AND EXPENSE
OF DELIVERING IT BACK TO THE OWNER, MECHANIC’S
TRAVEL TIME, TELEPHONE OR TELEGRAM CHARGES,
RENTAL OF A LIKE PRODUCT DURING THE TIME
WARRANTY SERVICE IS BEING PERFORMED, TRAVEL,
LOSS OR DAMAGE TO PERSONAL PROPERTY, LOSS
OF REVENUE, LOSS OF USE OF THE PRODUCT, LOSS
OF TIME, OR INCONVENIENCE. SOME STATES DO NOT
ALLOWTHE EXCLUSION ORLIMITATIONOFINCIDENTAL
OR CONSEQUENTIAL DAMAGES, SO THE ABOVE
LIMITATION OR EXCLUSION MAY NOT APPLY TO YOU.
This warranty gives you specific legal rights, and you may
also have other rights which vary from state to state.
This warranty applies toall RYOBI®brand outdoor products
manufacturedbyor for TechtronicIndustries NorthAmerica,
Inc., and sold in the United States and Canada.
To locate your nearest Authorized Ryobi Service Center,
dial 1-800-860-4050.

3 — Français
AVERTISSEMENT :
LISEZ ET VEILLEZ À COMPRENDRE TOUTES LES
INSTRUCTIONS. Le non respect des instructions
énumérées ci-dessous et sur la machine pourrait résulter
en un choc électrique, un incendie, et/ou des blessures
sérieuses.
Apprendre à connaître l’outil. Lire attentivement le manuel
d’utilisation. Apprendre les applications et les limites de l’outil,
ainsi que les risques spécifiques relatifs à son utilisation. Le
respect de cette consigne réduira les risques d’incendie, de
choc électrique et de blessures graves.
Interdire l’utilisation du souffleuse à neige aux enfants. Ce
n’est pas un jouet.
Utiliser exclusivement les accessoires recommandés par
le fabricant pour le modèle d’outil concerné décrit dans ce
manuel. Des accessoires appropriés pour un outil peuvent
être dangereux s’ils sont utilisés avec un autre. Utiliser
exclusivement selon les instructions de ce manuel.
Ne pas insérer d’objet dans les ouvertures. Ne pas utiliser si
une ouverture est bloquée ; veiller à ce que les ouvertures ne
soient jamais obstruées par de la poussière, de la peluche,
des cheveux ou quoi que ce soit risquant de réduire le flux
d’air.
Garder les cheveux, les vêtements amples, les doigts et toute
autre partie du corps à l’écart des ouvertures et pièces en
mouvement.
Assurez-vous que le cordon d’extension est en bon état.
Quand vous utilisez le cordon d’extension, assurez-vous
d’utiliser un cordon de calibre approprié pour rapporter
le courant que votre produit soutirera. Pour un cordon
d’extension de 15 m (50 pi) ou moins, il est recommandé
d’utiliser un câble de calibre d’au moins 14 AWG. En cas de
doute, utilisez le calibre supérieur suivant. Plus le numéro de
jauge est petit, plus le calibre est élevé. Un cordon prolon-
gateur de calibre insuffisant causera une perte de tension
et provoquera ainsi une panne électrique et une surchauffe.
AVERTISSEMENT : Utilisez les cordons prolongateurs
pour extérieur marqués SW-A, SOW-A, STW-A, STOW-A,
SJW-A, SJTW-A, ou SJTOW-A. Ces cordons prolongateurs
sont homologués pour l’utilisation à l’extérieur et réduisent
le risque de choc électrique.
Les circuits utilisés avec le produit devraient être munis d’un
interrupteur de défaut à la terre. Des connecteurs avec un
interrupteur de défaut à la terre sont disponibles et peuvent
être utilisés pour satisfaire à cette mesure de sécurité.
Cette souffleuse à neige doit être mise à la terre pendant
l’utilisation afin de protéger l’opérateur contre les décharges
électriques. Si l’outil est équipé d’un cordon d’alimentation
homologué à 3 conducteurs et d’une fiche à 3 broches, il doit
être branché sur une prise secteur avec mise à la terre. Le
conducteur vert ou vert et jaune du cordon est le fil de mise
à la terre. Ne jamais raccorder le fil vert ou vert et jaune à
une borne sous tension. Cet appareil est équipé d’une fiche
ressemblant à celle illustrée à la Fig. 2.
Utiliser seulement des cordons prolongateurs à trois fils
équipés d’une fiche avec mise à la terre et une prise triphasée
compatible avec la fiche de la souffleuse à neige. Remplacer
ou réparer les cordons endommagés.
Ce produit comporte un dispositif de retenue pour cordon
pour empêcher le cordon prolongateur d’être dégagé de
l’outil lors de son utilisation.
Si un cordon branché s’endommage de quelque manière
que ce soit, débranchez-le de la prise de courant.
Ne pas maltraiter le cordon d’alimentation — Ne jamais
utiliser le cordon d’alimentation pour transporter la souffleuse
à neige et ne jamais débrancher ce dernier en tirant sur le
cordon. Garder le cordon à l’écart de la chaleur, de l’huile
et des objets tranchants.
Garder les mains à l’écart des pièces en mouvement.
Éviter une mise en marche accidentelle — Éviter les
démarrages accidentels. S’assurer que la gâchette du
commutateur n’est pas engagée avant de brancher l’outil.
Ne pas utiliser l’outil si le commutateur ne permet pas de le
mettre en marche et de l’arrêter. Tout outil qui ne peut pas
être contrôlé par son commutateur est dangereux et doit
être réparé.
Ne pas utiliser d’outils dans des atmosphères explosives, en
présence de liquides, de gaz ou de poussières inflammables
par exemple. Les outils motorisés produisent des étincelles
qui risquent d’enflammer les poussières ou les vapeurs.
Éloigner les badauds, enfants et visiteurs à une distance d’au
moins 30,5 m (100 pi) pendant l’utilisation d’un outil motorisé.
Les distractions peuvent causer une perte de contrôle.
Si l’appareil ne fonctionne pas correctement, s’il a été
échappé, s’il est endommagé, s’il a été laissé à l’extérieur
ou s’il est tombé dans l’eau, retourner le produit au centre
de réparations.
Rester attentif, prêter attention au travail et faire preuve de
bon sens lors de l’utilisation de tout outil motorisé. Ne pas
utiliser cet outil en état de fatigue, vexé ou sous l’influence
d’alcool, de drogues ou de médicaments. Un moment
d’inattention pendant l’utilisation d’un outil motorisé peut
causer des blessures graves.
Utiliser un équipement de sécurité. Toujours porter des
lunettes de protection. Suivant les conditions, le port d’un
masque filtrant, de chaussures de sécurité, d’un casque ou
d’une protection auditive est recommandé.
Porter une tenue appropriée — Ne porter ni vêtements
amples, foulards, ni bijoux. Ils peuvent être pris dans les
parties en mouvement.
Vérifier qu’aucune pièce mobile n’est mal alignée ou bloquée,
qu’aucune pièce n’est brisée et s’assurer qu’aucun autre
problème ne risque d’affecter le bon fonctionnement de
l’outil. En cas de dommages, faire réparer l’outil avant de
l’utiliser de nouveau. Beaucoup d’accidents sont causés
par des outils mal entretenus.
Garder l’outil et sa poignée secs, propres et exempts d’huile
ou de graisse. Toujours utiliser un chiffon propre pour le
nettoyage. Ne jamais nettoyer l’outil avec du liquide de frein,
de l’essence, des produits à base de pétrole ou des solvants
puissants. Le respect de cette règle réduira les risques de
perte du contrôle et de dommage du boîtier en plastique.
INSTRUCTIONS IMPORTANTES CONCERNANT LA SÉCURITÉ

4 — Français
INSTRUCTIONS IMPORTANTES CONCERNANT LA SÉCURITÉ
Toujours porter des lunettes de sécurité avec écrans latéraux.
Les lunettes de vue ordinaires sont munies seulement de
verres résistants aux impacts. Ce ne sont PAS des lunettes
de sécurité. Le respect de cette règle réduira les risques de
choc électrique.
Porter une protection oculaire avec écrans latéraux certifiée
conforme à la norme ANSI Z87.1 lors de l’utilisation de ce
produit.
Protection auditive. Porter une protection auditive lors de
l’utilisation prolongée. Le respect de cette règle réduira les
risques de blessures graves.
Ne pas exposer les outils motorisés à la pluie. La pénétration
d’eau dans ces outils accroît le risque de choc électrique.
Porter des pantalons longs, des bottes et des gants. Éviter
de porter des vêtements lâches ou des bijoux qui pourraient
être pris dans les pièces en mouvement de la machine ou
le moteur.
Porter des bottes de caoutchouc lors de l’utilisation de la
souffleuse à neige. Chaussures de protection aura pour
protéger vos pieds et améliorer l’équilibre sur des surfaces
glissantes.
Ne pas travailler pieds nus ou porter de sandales.
Se tenir bien campé et en équilibre. Ne pas travailler hors
de portée de l’outil. Cette façon de travailler pourrait vous
faire perdre l’équilibre.
Ne faites pas fonctionner la souffleuse à neige dans une
direction où la neige pourrait être éjectée vers des personnes
ou des animaux. La neige et d’autres objets éjectés
représentent un risque de blessures graves.
Entreposer les souffleuses à neige à l’intérieur — Lorsqu’il
n’est pas utilisé, l’outil doit être rangé à l’intérieur dans un
endroit sec et sous verrou, débranché et hors de la portée
des enfants.
Garder tous les badauds, enfants et animaux domestiques
à une distance d’au moins 30,5 m (100 pi).
Le service d’outil doit être seulement exécuté par le personnel
de réparation qualifié. Entretenir ou l’entretien exécuté par
le personnel incompétent peut avoir pour résultat un risque
de blessure.
En entretenant un outil, un usage un remplacement
seulement identique sépare. Remplacer ou réparera les
pièces endommagées. Suivre des instructions dans la
section d’Entretien de ce manuel. L’usage de parties ou
l’échec inautorisées pour suivre les Instructions d’Entretien
peuvent créer un risque de choc ou de blessure.
Ne jamais utiliser la souffleuse à neige à proximité de
flammes, d’un foyer, de cendres chaudes, d’un grill, etc.
Ne pas respecter cette directive peut faire en sorte que les
flammes se propagent, ce qui peut causer des blessures ou
des dommages à la propriété.
Ne jamais utiliser la souffleuse à neige pour répandre des
produits chimiques, des fertilisants ou toute autre substance
toxique. Le fait de répandre ces substances peut faire en
sorte d’infliger des blessures à l’utilisateur ou à des tierces
personnes.
Ne jamais placer la souffleuse à neige en marche sur une
surface, sauf si celle-ci est dure et propre. Le gravier, le sable
et les autres débris peuvent être aspirés dans l’entrée d’air
et projetés en direction de l’utilisateur ou des personnes à
proximité, ce qui peut entraîner des blessures graves.
Examiner la zone de travail avant chaque utilisation.
Débarrasser tous les objets tels que cailloux, verre brisé,
clous, fils métalliques, cordes, etc. risquant d’être éjectés
ou de se prendre dans la machine.
Ne pas utiliser la souffleuse à neige sur la glace pour éviter
de glisser et de chuter et éviter ainsi les blessures graves.
Ne jamais utiliser la souffleuse à neige sur les lacs et les
rivières gelées ou d’autres surfaces semblables. Les bris
de la glace représentent un risque de blessures graves ou
mortelles.
Ne jamais utiliser la souffleuse à neige sur un toit ou d’autres
surfaces instables pour éviter les blessures graves ou
mortelles.
Pour usage domestique seulement.
Utilisez l’outil approprié — N’utilisez pas la souffleuse à neige
pour aucune tâche sauf celle pour laquelle elle est conçue.
Ne forcez pas la souffleuse à neige — Elle exécutera le travail
mieux et de façon plus sécuritaire à la vitesse pour laquelle
elle fut conçue.
N’éjectez jamais du matériel en direction de quelqu’un.
Évitez d’éjecter le matériel sur un mur ou une obstruction.
Le matériel pourrait être projeté par ricochet en direction
de l’opérateur. Arrêtez la souffleuse à neige quand vous
traversez des surfaces recouvertes de gravier ou rocailleuses.
Si la souffleuse à neige frappe un objet étranger, suivez ces
étapes:
• Relâcher la gâchette et attendre que l’appareil s’arrête
complètement.
• Débrancher la fiche de souffleuse à neige de la prise de
courant.
• Inspectez attentivement la souffleuse à neige pour
desceller les dommages.
• Réparez tout dommage avant de démarrer et de continuer
à utiliser la souffleuse à neige.
Ne pas soulever ou tenir la souffleuse à neige au-dessus
du sol pendant qu’elle fonctionne pour éviter une perte de
contrôle et le risque de blessures graves. Faire uniquement
fonctionner la souffleuse à neige conformément aux
instructions d’utilisation dans ce manuel d’utilisation.
Garder tous les dispositifs de protection en bon état et
fonctionnels.
Débrancher le chargeur de la prise secteur lorsqu’il n’est
pas utilisé, avant de procéder à tout entretien, et lors du
remplacement d’accessoires.
Faire l’entretien de la souffleuse à neige avec soins —
Suivre les instructions de lubrification et de changement
d’accessoires.
Conserver ces instructions. Les consulter fréquemment et les
utiliser pour instruire les autres utilisateurs éventuels. Si cet
outil est prêté, il doit être accompagné de ces instructions.
Table of contents
Languages:
Other Ryobi Snow Blower manuals

Ryobi
Ryobi RY40802A User manual

Ryobi
Ryobi RY40806 User manual

Ryobi
Ryobi RY40805 User manual

Ryobi
Ryobi RST36X5140 User manual

Ryobi
Ryobi RST36B51 User manual

Ryobi
Ryobi RY40809 User manual

Ryobi
Ryobi RYSNW00 User manual

Ryobi
Ryobi RST36B51-0 User manual

Ryobi
Ryobi RYAC800 User manual

Ryobi
Ryobi RY40805 User manual

Ryobi
Ryobi RY408015 User manual

Ryobi
Ryobi RY40800 User manual

Ryobi
Ryobi RY40806 Installation and operating instructions

Ryobi
Ryobi RYAC803 User manual

Ryobi
Ryobi RY40890VNM User manual

Ryobi
Ryobi RY408010 User manual

Ryobi
Ryobi RY40806 User manual

Ryobi
Ryobi RY40801 User manual

Ryobi
Ryobi RY40803 User manual

Ryobi
Ryobi RY36STX61A User manual