S.R.Smith SLGC-66 Instruction manual

06-833 66” Sentry Lifeguard Chair Instruction SEPT2020
SLGC-66-S
SLGC-66
66” SENTRY LIFEGUARD CHAIR
ASSEMBLY AND INSTALLATION
INSTRUCTIONS
SRS AUSTRALIA, PTY LTD
12 Enterprise St
Richlands QLD 4077
Australia
Phone 07 3812 2283 • Fax 07 3812 1187
www.srsmith.com/au
S.R. SMITH, LLC
CORPORATE HEADQUARTERS
P.O. Box 400 • 1017 S.W. Berg Parkway
Canby, Oregon 97013
USA
Phone (503) 266 2231 • Fax (503) 266 4334
www.srsmith.com

66” Sentry Lifeguard Chair Instruction 2
CONTENTS
Introduction ........................................................................................................................................................................3
Installed Lifeguard Chair Structural & Installation Checklist...................................................................................3
Maintenance Instructions .................................................................................................................................................3
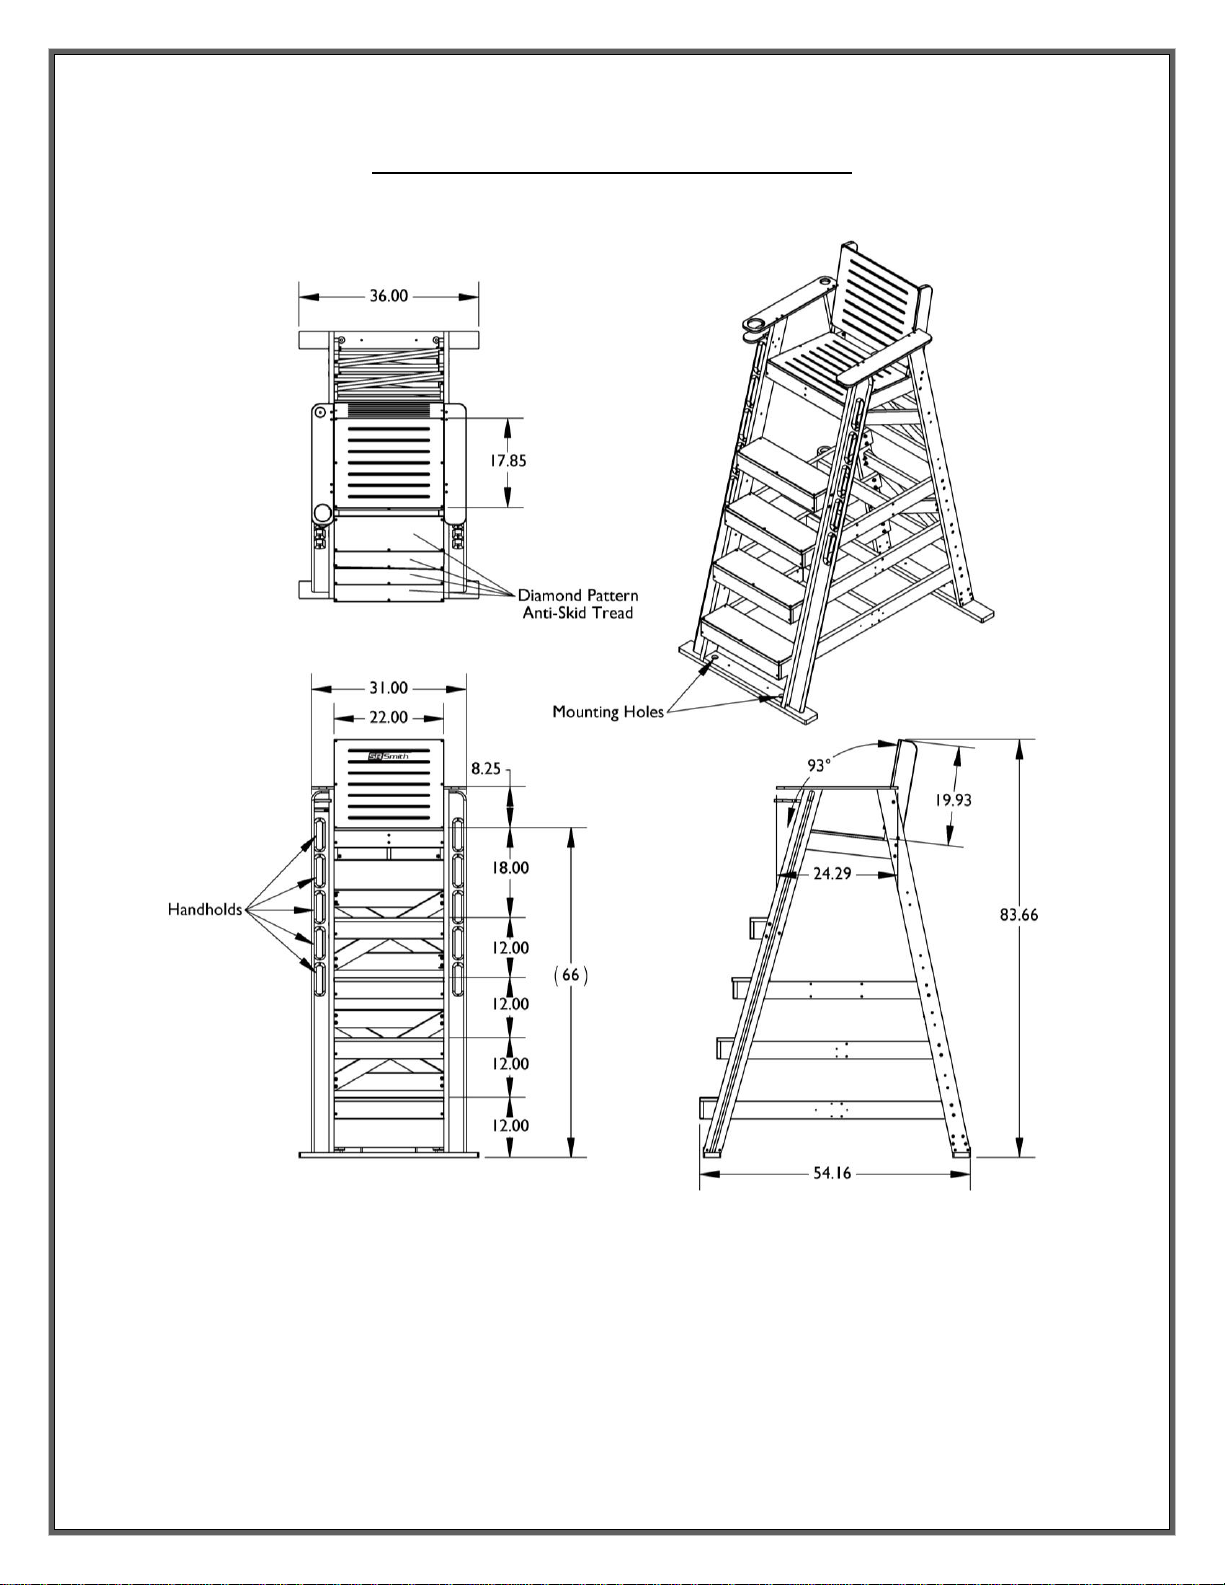
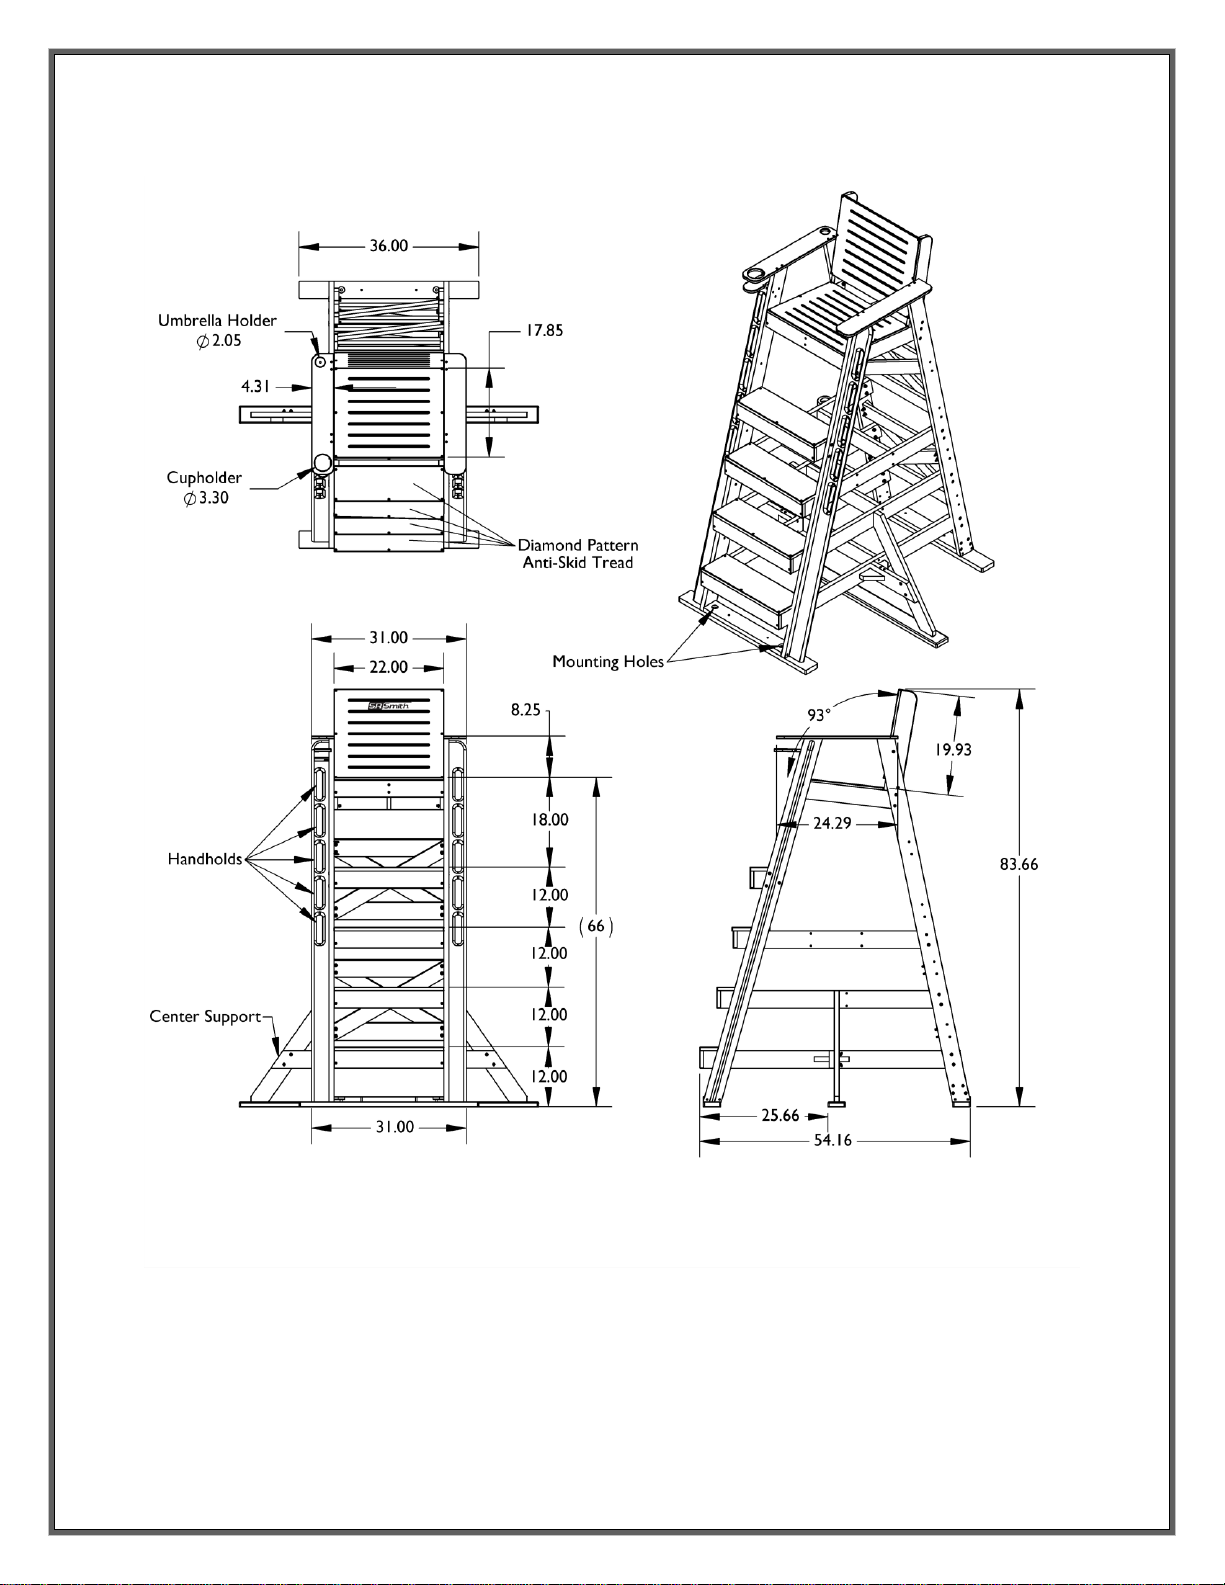
Assembled Lifeguard Chair Layout................................................................................................................................4
SLGC-66.......................................................................................................................................................................... 4
SLGC-66-S ......................................................................................................................................................................5
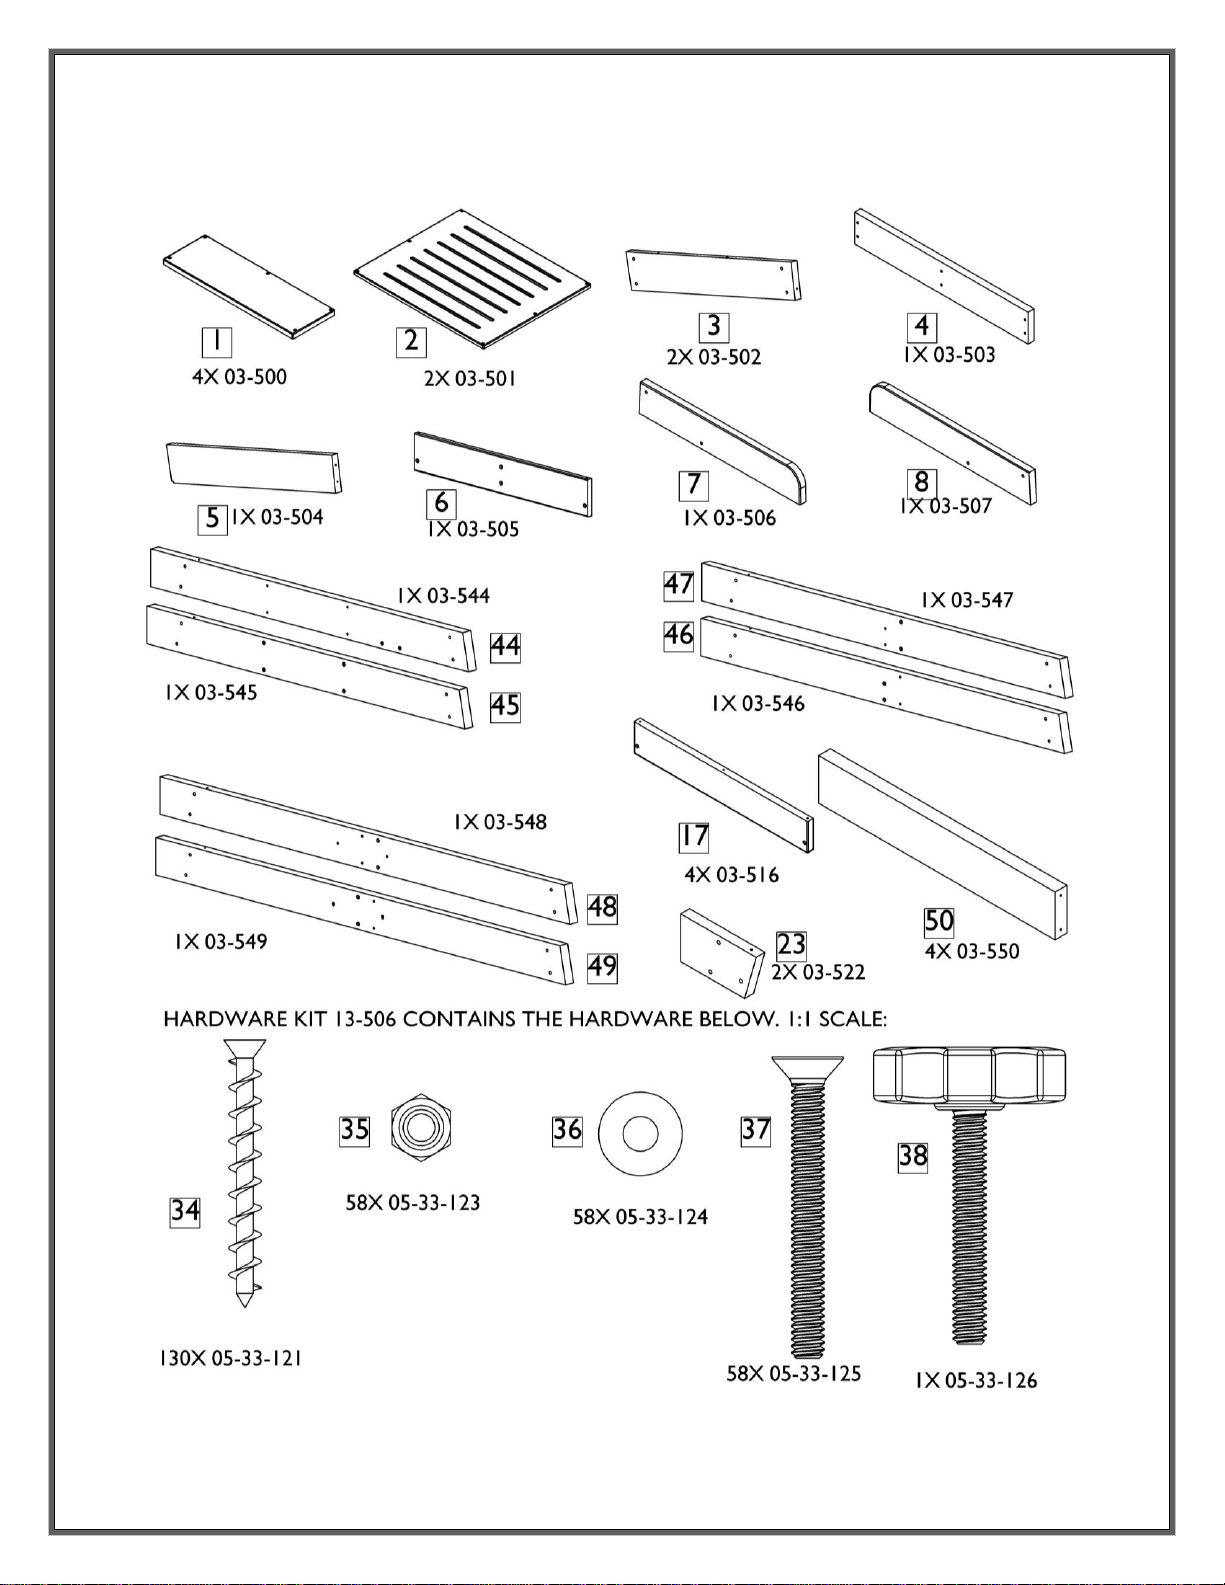
Parts List ..............................................................................................................................................................................6
Box A Part Images ........................................................................................................................................................7
Box B Part Images.........................................................................................................................................................8
Assembly Instructions.......................................................................................................................................................9
Tools Required ..............................................................................................................................................................9
1. Assemble Seat Bottom .......................................................................................................................................9
2. Assemble Seat Back...........................................................................................................................................10
3. Assemble Footrests...........................................................................................................................................11
4. Assemble Top Step............................................................................................................................................13
5. Assemble Left Legs ............................................................................................................................................14
6. Assemble Leg Spacers.......................................................................................................................................15
7. Attach Right Legs ...............................................................................................................................................16
8. Attach Bases and Handholds...........................................................................................................................17
9. Attach Armrests, Cupholder, Umbrella Mount, and Cross-Bracing. ....................................................18
Installing the 66” Sentry Lifeguard Chair ...................................................................................................................22
Concrete Wedge Anchor Mounting Instructions ...............................................................................................22
Wheel-Away Kit Instructions .................................................................................................................................22
Sentry Lifeguard Chair Center Support Installation................................................................................................23
Tools Required: ...........................................................................................................................................................23
Assembly Steps ............................................................................................................................................................23

66” Sentry Lifeguard Chair Instruction 3
INTRODUCTION
DANGER –Failure to follow these warnings and instructions may result in serious
injury. Proper assembly, installation, use, and supervision are essential for proper
operation and to reduce the risk of serious injury.
Check inside both boxes and packaging materials for parts. Before beginning assembly, read all
instructions and identify parts using the parts list. Chair parts are labeled with an Item #. It is
critical that all parts be carefully inspected by the installer prior to installation to ensure that no
cracking or warping occurred in transit and that a damaged part is not used. Proper installation
cannot be overstressed, improper installation voids S.R. smith’s warranty and may affect the safety
of the user.
INSTALLED LIFEGUARD CHAIR STRUCTURAL &INSTALLATION CHECKLIST
•Inspect material for visible cracks or damage.
•Inspect hardware for missing or damaged parts.
•Inspect all fasteners to make sure they are fully tightened.
•Inspect the Lifeguard Chair for rigidity (and attachment if using anchors).
MAINTENANCE INSTRUCTIONS
•When hosing down the deck, hose your Lifeguard Chair to wash away any dust, dirt or other debris which
may have accumulated. Wipe clean.
•To clean everyday dirt and stains, use a cleaner such as Soft Scrub ® and a nylon scrubby or stiff nylon brush.
Scrub lightly; excess force can mar the finish.
•Persistent stains will usually go away if you soak the area with bleach. Do not use 100% chlorine used to treat
swimming pools and do not use a pressure washer.
•Do not expose stainless steel hardware to chlorine.
•Be sure that all connections are secure. Tighten hardware if necessary and check for corroded fasteners.
Inspect for visible cracks or other damage.
•Inspect all parts for evidence of shear, bending yield, or fatigue. Yield is evidenced by discoloration or fine
cracking of the surface.

66” Sentry Lifeguard Chair Instruction 4
ASSEMBLED LIFEGUARD CHAIR LAYOUT
SLGC-66
All units are in inches. Layout is not to scale.

66” Sentry Lifeguard Chair Instruction 5
SLGC-66-S
All units are in inches. Layout is not to scale.

66” Sentry Lifeguard Chair Instruction 6
PARTS LIST
Check inside both boxes and packaging materials for parts. Before beginning assembly, read all
instructions and identify parts using the parts list below and on the next two pages. All chair parts
are labeled with an Item #. It is critical that all parts be carefully inspected by the installer prior to
installation to ensure that no cracking or warping occurred in transit and that a damaged part is not
used.
Visit srsmith.com for hardware kit and replacement part information.
Item #
Part #
Description
Qty.
1
03-500
FOOTREST & STEP, TOP
2
2
03-501
SEAT & BACK PLATE
2
3
03-502
SEAT SUPPORT, SIDE
2
4
03-503
SEAT SUPPORT, REAR
1
5
03-504
SEAT SUPPORT, CENTER
1
6
03-505
SEAT SUPPORT, FRONT
1
7
03-506
BACK SUPPORT, RIGHT
1
8
03-507
BACK SUPPORT, LEFT
1
17
03-516
FOOTREST, FRONT
4
23
03-522
66" STEP, SIDE
2
24
03-523
66" CROSSBRACE, STRAIGHT
4
25
03-524A
66" CROSSBRACE A, ANGLED
2
26
03-524B
66" CROSSBRACE B, ANGLED
2
27
03-525
CUP HOLDER
1
28
03-526
UMBRELLA MOUNT
1
31
03-529
ARM REST, LEFT
1
32
03-530
ARM REST, RIGHT
1
40
03-540
66" FRONT LEG, RIGHT
1
41
03-541
66" FRONT LEG, LEFT
1
42
03-542
66" REAR LEG, RIGHT
1
43
03-543
66" REAR LEG, LEFT
1
44
03-544
66” 3RD STEP FOOTREST SIDE, RIGHT
1
45
03-545
66" 3RD STEP FOOTREST SIDE, LEFT
1
46
03-546
66” 2ND STEP FOOTREST SIDE, RIGHT
1
47
03-547
66" 2ND STEP FOOTREST SIDE, LEFT
1
48
03-548
66" 1ST STEP FOOTREST SIDE, RIGHT
1
49
03-549
66” 1ST STEP FOOTREST SIDE, LEFT
1
50
03-550
66" CROSSBRACE SUPPORT
6
51
03-551
66" RIGHT HANDHOLD
1
52
03-552
66" LEFT HANDHOLD
1
53
03-553
66" LEG SPACER
2
54
03-554
66" BASE, FRONT
1
55
03-555
66" BASE, BACK
1
Hardware Kit (S.R. Smith Part Number 13-566)
34
05-33-121
#8 X 2" SCREW, #2 SQUARE DRIVE, 316SS
130
35
05-33-123
1/4-20 NYLON-INSERT LOCKNUT, 316SS
58
36
05-33-124
1/4 FLAT WASHER, 316SS
58
37
05-33-125
1/4-20 X 2.25” FLAT HEAD BOLT
58
38
05-33-126
1/4-20 X 1.75" PLASTIC ROSETTE HEAD THUMB SCREW
1
Accessories (Sold Separately)
13-503
42” Wheel Kit (kit must be purchased separately, not shown)
1
13-504
Sentry Life Ring Hook Kit
1

66” Sentry Lifeguard Chair Instruction 7
BOX 1PART IMAGES
Box 1 includes the below, used for Assembly Steps 1 through 4. Not to scale unless otherwise noted.

66” Sentry Lifeguard Chair Instruction 8
BOX 2PART IMAGES
Box 2 includes the parts below. These parts are used for Assembly Steps 5 to the finished
chair.

66” Sentry Lifeguard Chair Instruction 9
ASSEMBLY INSTRUCTIONS
TOOLS REQUIRED
•#2 Square Drive Bit
•5/32” Allen Wrench
•7/16” Ratchet or Wrench
1. ASSEMBLE SEAT BOTTOM
1A. Attach part (2) without S.R. Smith decal to
part (3) as shown using screws (34).
1B. Attach another part (3) to assembly
using screws (34).
1C. Attach part (4) to assembly with screws (34).
1D. Attach part (5) with notch in direction
shown to assembly using screws (34).
1E. Attach part (6) to assembly with screws (34).
QUALITY
Do not use power tools when assembling
the lifeguard chair. Driving screws (34) too
quickly may break them.

66” Sentry Lifeguard Chair Instruction 10
1F. Finished Seat Bottom should look like
shown.
2. ASSEMBLE SEAT BACK
2A. Attach part (2) with S.R. Smith decal to part
(8) using screws (34).
2B. Attach part (7) to assembly using screws (34).
2C. Seat Back Assembly should look like the pictures below when finished.

66” Sentry Lifeguard Chair Instruction 11
3. ASSEMBLE FOOTRESTS
3A. First, assemble the 3rd Step Subassembly.
Attach 2x part (50) to part (44) using screws
(34).
3B. Attach part (45) to 2x part (50) using
screws (34).
3C. Attach part (1) to assembly using 2x screws
(34)
3D. Attach part (17) to assembly using screws.
3E. Verify the 3rd Step Assembly looks like below:

66” Sentry Lifeguard Chair Instruction 12
3F. Repeat Steps 3A-3E for the second step assembly using parts (46) and (47) instead of (44) and (45)
3G. Repeat Steps 3A-3E for the first step assembly using parts (48) and (49) instead of (44) and (45).

66” Sentry Lifeguard Chair Instruction 13
4. ASSEMBLE TOP STEP
4A. Next attach Footrest (1), Footrest Front (17), and Step Side (23) using Screws (4) as shown
below.
4B. Finished Upper Footrest Assembly should look like the picture below. Next use the 4
assemblies to assemble the chair.

66” Sentry Lifeguard Chair Instruction 14
5. ASSEMBLE LEFT LEGS
5A. Attach Seat Back Assembly, Seat Bottom Assembly, and Footrest Assembly to leg (42) as shown
using nuts (35), washers (36), and bolts (37). Do Not Fully Tighten Nuts and Bolts Until
Chair is Completely Assembled.
5B. Attach leg (40) to assembly using nuts (35), washers (36), and screws (37). Do Not Fully
Tighten Nuts and Bolts Until Chair is Completely Assembled.

66” Sentry Lifeguard Chair Instruction 15
6. ASSEMBLE LEG SPACERS
Flip the chair on its back and attach leg spacers (53) to both legs to assembly using screws (34).
Do Not Fully Tighten Nuts and Bolts Until Chair is Completely Assembled.

66” Sentry Lifeguard Chair Instruction 16
7. ATTACH RIGHT LEGS
7A. Attach rear leg (43) to assembly using bolts (37), screws (34), nuts (36), and washers (35) as
shown.
7B. Attach front leg (41) to assembly using bolts (37), screws (34), nuts (36), and washers (35) as
shown.

66” Sentry Lifeguard Chair Instruction 17
8. ATTACH BASES AND HANDHOLDS
8A. Attach bases (54 with extra holes in front, 55=rear) to assembly using screws (34).
8B. Attach handholds to front base. Use pistol-grip clamps to hold to legs to align.

66” Sentry Lifeguard Chair Instruction 18
8C. Continue to attach handholds with screws (34) into front legs. Keep pistol-grip clamps in place.
9. ATTACH ARMRESTS,CUPHOLDER,UMBRELLA MOUNT,AND CROSS-BRACING.
9A. Attach arm rests (31 and 32) using screws (34).

66” Sentry Lifeguard Chair Instruction 19
9B. Attach braces (24) using screws (34).
9C. Attach cross braces (25) using nuts (35),
washers (36) and bolts (37) as shown.

66” Sentry Lifeguard Chair Instruction 20
9D. Attach cross braces (26) using nuts (35),
washers (36), and screws (37).
Do Not Fully Tighten Nuts and Bolts Until
Chair is Completely Assembled.
9E. Attach cup holder (27) using screws (34).
This manual suits for next models
1
Table of contents
Other S.R.Smith Outdoor Furnishing manuals