5124-37: 2 of 2; Rev. 2; 9/00
REPOSE-PIEDS AUTONOME
NUMÉRO
DE MODÈLE 5124
INSTRUCTIONS DE MONTAGE
LIRE CES INSTRUCTIONS AVANT DE COMMENCER. SUIVRELES
ÉTAPESDEMONTAGEAVECSOIN.
Ce produit est un repose-pieds de conception industrielle, qui offre
une gamme de hauteurs élevée pour le travail sur les hautes surfaces.
Il détend les pieds fatigués tout en assurant un plus grand confort et
un soulagement par la réduction des pressions sur les cuisses. Une
base large réduit les chances d'un renversement, et la surface
antidérapante empêche les pieds de glisser. On peut régler la hauteur
du repose-pieds sur une gamme de 24 cm (9.5 po).
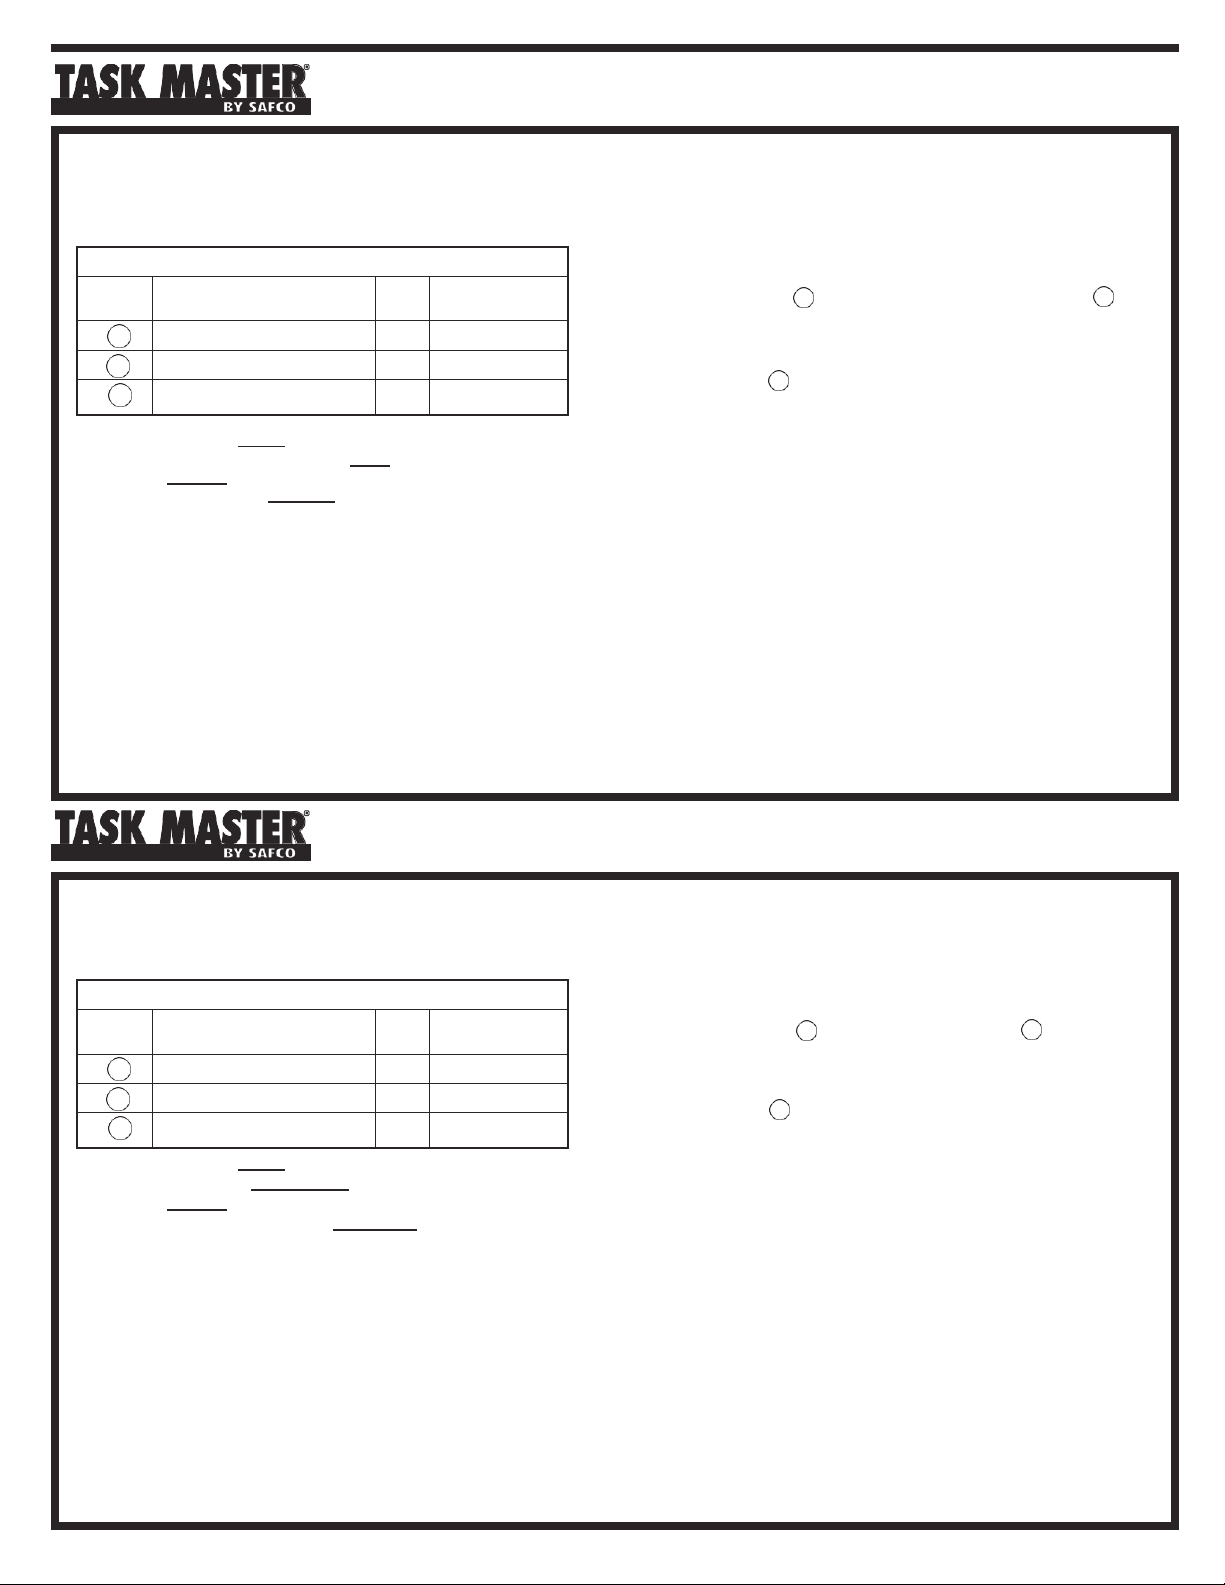
SNAP BUTTONS ON BACK OF LOOP =
BOUTONS-PRESSION AU DOS DE LA BOUCLE
HOLES ON FRONT OF LOOP =
TROUS SUR LE DEVANT DE LA BOUCLE
WIRE PRONGS = BROCHES MÉTALLIQUES
ASSEMBLED UNIT Model 5124 = ENSEMBLE MONTÉ Modèle 5124
Merci d'avoir acheté ce produit Safco.
Insérer la boucle arrière A dans les douilles de la boucle de base B , de
sorte que les boutons-pression de la boucle arrière soient tournés vers
l’extérieur. Pousser la boucle arrière vers le bas jusqu’à ce que les boutons-
pression rentrent dans les trous des douilles de la boucle de base.
Saisir la plate-forme C des deux côtés, avec les broches métalliques
tournées vers l’extérieur. Basculer le devant de la plate-forme vers le haut,
et aligner les broches qui se trouvent sur le dos de la plate-forme avec la
série de trous voulue dans la boucle arrière.
Insérer les broches dans les trous, puis basculer la plate-forme vers le bas
jusqu’à ce que toute sa surface arrière reste contre la boucle arrière. Pour
changer la hauteur du repose-pieds, soulever le devant de la plate-forme
jusqu’à ce que les broches soient dégagées, puis réinsérer la plate-forme
dans la nouvelle position voulue, selon la procédure décrite ci-dessus.
L'amélioration de nos produits se poursuit sans cesse, et il se peut donc
que les photographies ou les illustrations ne correspondent pas (dans
tous les détails) à l'apparence du produit.
CONSIGNES GÉNÉRALES DE SÉCURITÉ
●
Ce produit est conçu pour servir de repose-pieds et non pas de tabouret ni
de chaise. Ne pas s'asseoir ni se mettre debout sur la plate-forme.
●
Ce produit doit se trouver sur une surface plane, pour assurer une bonne
stabilité.
●
N'utiliserce produit que lorsqu'il est complètement monté.
●
Ne jamais utiliser ce produit s'il ne fonctionne pas selon les indications de
laprésentefeuille.
●
Rapporter tout problème à Safco immédiatement, en citant toujours le code
de date du fabricant, qui figure sur le carton.
APOYOPARALOSPIESINDEPENDIENTE
NÚMERO
DE MODELO
INSTRUCCIONESDEENSAMBLAJE
POR FAVOR LEA ESTAS INSTRUCCIONES ANTES DE EMPEZAR Y
SIGA CUIDADOSAMENTE EL PROCEDIMIENTO DE ENSAMBLAJE
Este es un apoyo para los pies muy resistente que cuenta con un
amplio rango de altura. Ayuda a relajar los pies cansados y propor-
ciona comodidad y descanso adicionales al disminuir la presión
sobre los muslos ya que se adapta a las superficies de trabajo
elevadas. El gran tamaño de su base reduce la posibilidad de que se
vuelque y su superficie antiderrapante evita que los pies se resbalen. La
altura se puede ajustar en un rango de más de 24 cm (9-1/2").
SNAP BUTTONS ON BACK OF LOOP = BOTONES DE RESORTE
EN LA CARA POSTERIOR DE LA PIEZA
HOLES ON FRONT OF LOOP =
ORIFICIOS EN LA CARA ANTERIOR DE LA PIEZA
WIRE PRONGS = PUNTAS METÁLICAS
ASSEMBLED UNIT Model 5124 = UNIDAD ENSAMBLADA Modelo
5124
Muchas gracias por comprar este producto Safco.
Debido a que continuamente actualizamos y mejoramos nuestros
Inserte la pieza vertical, A , en los orificios de la base, B (los botones de
resorte de la pieza vertical deben apuntar hacia afuera). Empuje la pieza
vertical hacia abajo hasta que los botones de resorte queden insertados
en los orificios de la base.
Tome la plataforma, C , por los costados de manera que las puntas
metálicas queden en el lado opuesto a usted. Incline hacia abajo el lado
que tiene las puntas metálicas y alinee las puntas metálicas con el par de
orificios deseados en la pieza vertical.
Inserte las puntas metálicas en los orificios e incline la plataforma hacia
abajo hasta que su lado posterior quede colocado completamente contra
la pieza vertical. Para ajustar la altura del apoyo para los pies, levante la
parte del frente de la plataforma hasta que las puntas metálicas se
desprendan de la pieza vertical. Insértelas en la posición deseada
siguiendo el mismo procedimiento.
INSTRUCCIONES GENERALES DE SEGURIDAD
●
Este producto sólo está diseñado para servir de apoyo para los pies, no de
productos, la apariencia real (exacta) del producto podría ser distinta a
lasfotografíasoilustraciones.
escalera ni silla; no se siente ni se pare en la plataforma.
●
Este producto debe estar sobre una superficie nivelada para proporcionar
laestabilidad adecuada.
●
Utilice este producto sólo cuando esté completamente ensamblado.
●
Nunca utilice este producto si no funciona de acuerdo con las indicaciones
contenidas en esta hoja.
●
Informe inmediatamente a Safco acerca de cualquier problema y siempre
proporcione la información del código de fecha del fabricante que se
encuentra en la etiqueta bajo elasiento.


