manuals.online logo
Brands
  1. Home
  2. •
  3. Brands
  4. •
  5. safgard
  6. •
  7. Controllers
  8. •
  9. safgard 1100M User manual

safgard 1100M User manual

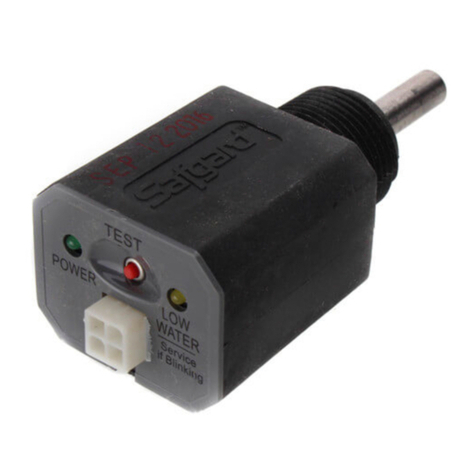
• TEST BUTTON FOR EASY DIAGNOSTICS
• MANUAL RESET LOCKOUT PROTECTION
MEETS CSD-1 REQUIREMENTS
• POWER AND LOW WATER INDICATORS
• MOLEX CONNECTOR FOR EASY WIRING
• COMPACT SIZE ALLOWS FOR MOUNTING IN TIGHT SPACES
Step Step 
Step 
Step 
Low Water Cut-Off
For Residentia
Hot Water Boi ers
24 VAC Operating Voltage
Model 1100M
Determine Mounting Location
The Safgard 1100M must be installed at or above the
minimum safe water level established by the boiler
manufacturer. The 1100M can be installed directly
into the boiler if a suitable tapping is available 훽.
The 1100M can also be installed in the boiler piping
using a standard 3/4" tee 훾.
Note: When installing in piping, select a location
close to the boiler to ensure the 4' wiring harness will
reach the 24-Volt transformer. The cut-off should be
installed on the boiler side of the circulator or shut-off
valves.
IMPOR AN : Check for adequate clearance
(minimum 1/4") from metal probe sensor to any
surface inside the boiler or pipe.
Do not install in a location that could hold or trap
water in the event of a low water condition.
Apply Teflon®tape to
the threads of the
Model 1100M. Do
not use pipe dope or
other pipe sealants.
Hand tighten the
control into boiler
tapping or pipe tee.
Be careful not to
cross thread.
Note: Do not use a
wrench. Hand tight-
en only.
lug wire harness
into connector on
face of control.
WARNING Electrical shock hazard. To prevent electrical shock, death or
equipment dama e, disconnect power supply before
installin or servicin control. Only qualified personnel may install or service this control in
accordance with local codes and ordinances. Read instructions completely before proceedin .
CAUTION To prevent serious
burns, boiler
should be thorou hly cooled before installin or
servicin control.
WARNING Frozen pipes/water damage. Central heatin systems are prone to shut down as a result of power or fuel outa es,
safety related fault conditions or equipment failure. Installation of freeze protection monitorin or other precautions
is recommended for unattended dwellin s in climates subject to sustain below-freezin temperatures.
1
126 Ba ley Road, North Haven, CT 06473 • Phone (203) 776-0473 • FAX (203) 764-1711 • www.hydrolevel.com
WIRING TO CONTROL CENTER
For boilers equipped with a Honeywell R8285 Control Center or equivalent
WIRING TO AN AQUASTAT
For boilers equipped with a Honeywell Model L8148E or L8124E Aquastat. Safgard Model 1100M is not to be used
with Model L8148C or L8124C. Safgard Model 550 should be used for oil-fired boilers.
YG W
CR
Connect the WHITE wire to Cand the RED wire to R
using the screw terminals on the control center.
Connect the GREEN wire to any suitable, unpainted
ground screw. Note: for operation of the control, the
green wire must be connected to a ground source
electrically common with boiler ground. 햲Unplug the factory-wired quick connect from ter-
minal Rand 햳plug into YELLOW wire with
male
connector. 햴lug YELLOW wire with
female
con-
nector into terminal R.
Connect the WHITE wire to V and the RED wire to Z. Connect the
GREEN wire to the ground screw on the bottom of the aquastat or any
other suitable, unpainted ground screw. Note: for operation of the con-
trol, the green wire must be connected to a ground source electrically
common with boiler ground.
햲Unplug the factory-wired quick
connect from terminal B1 and 햳plug
into YELLOW wire with
male
connec-
tor. 햴lug YELLOW wire with
female
connector into terminal B1.
UPON COMPLETION OF WIRING,
REPLACE COVER.
Step Step 
Step Step 
2
WIRING TO 24 VAC TRANSFORMER
For boilers using a standard 24 VAC transformer
Connect RED wire to
hot
side of 24 Volt boiler trans-
former (R). Connect WHITE wire to common side of
24 Volt boiler transformer (C). Connect the GREEN
wire to any suitable, unpainted ground screw.
Note: for operation of the control, the green wire
must be connected to a ground source electrically
common with boiler ground.
Cut-off the connectors and strip the ends of the two
yellow wires of the Model 1100M harness. Break into
the burner circuit between the
hot
side of the trans-
former (R) and other limit controls. Connect either
YELLOW wire to the
hot
side. Connect the other
YELLOW wire in series with other limit controls.
Important: The switch contacts of the low water cut-
off (yellow wires) must be wired in series with all
other limit and operating controls (as shown above).
Step Step 
3
LIMI ED MANUFAC URERʼS WARRAN Y
We warrant products manufactured by Hydrolevel Company to
be free from defects in material and workmanship for a period
of two years from the date of manufacture or one year from
the date of installation, whichever occurs first. In the event of
any claim under this warranty or otherwise with respect to our
products which is made within such period, we will, at our
option, repair or replace such products or refund the purchase
price paid to us by you for such products. In no event shall
Hydrolevel Company be liable for any other loss or dama e,
whether direct, indirect, incidental or consequential. This war-
ranty is your EXCLUSIVE remedy and shall be IN PLACE OF
any other warranty or uarantee, express or implied, includ-
in , without limitation, any warranty of MERCHANTABILITY or
fitness for a particular purpose. This warranty may not be
assi ned or transferred and any unauthorized transfer or
assi nment thereof shall be void and of no force or effect.
DIMENSIONS SPECIFICATIONS
VOL AGE 24 VAC
POWER CONSUMP ION 1 VA
SWI CHING CAPACI Y 50 VA
MAX LOAD 5 Amps
MAX PRESSURE 160 SI (11.25 kg/cm2)
MAX WA ER EMPERA URE 250°F (121°C)
MAX AMBIEN EMPERA URE 170°F (77°C)
OPERATIONAL TEST PROCEDURE
IMPOR AN : Do not run boiler unattended until the following procedure is completed
1. Before raisin the water level above the Model 1100M, turn on power to the boiler and set the thermostat to call for heat. Both the reen
“POWER” LED and amber “LOW WATER” LED should illuminate. The burner should not fire. IMPORTANT: If the burner fires with no water
at the probe, immediately shut down power to the boiler and refer to the Trouble Shootin instructions below.
2. After 30 seconds, the amber LED will be in to blink indicatin that the control is locked out.
3. Proceed to fill the boiler with water. When water reaches the LWCO position, the amber LED will continue to blink. Press the TEST/RESET
button to reset the control from lockout. The burner should fire. If the burner does not fire, refer to the Trouble Shootin instructions below.
4. Turn off the power to the boiler and finish fillin the system.
5. Before leavin the job, power up the system and push the TEST/RESET button on the Model 1100M to simulate a low water condition. The
amber “LOW WATER” LED should illuminate and the burner should shut down.
6.
To test the lockout feature, push and hold the TEST/SETTINGS button for 30 seconds. The “LOW WATER” (amber) LED will be in to blink, indi-
catin the control has locked out the burner circuit in a low water condition. After the LED be ins blinkin , release the button. The “LOW
WATER” LED should continue to blink and the burner should remain off. Press the TEST/SETTINGS button briefly to manually reset the control.
TROUBLE SHOOTING
IF HE BURNER DOES NO SHU DOWN
(when water is below the probe or when the TEST button is pressed)
1. Turn off boiler power immediately and re-check wirin .
2. Turn off boiler power and drain system. Remove low water cut-off
and check for adequate clearance – no metal should be in contact
with the control’s metal probe tip.
IF HE BURNER DOES NO FIRE
1. Make sure water has reached the level of the control.
2. Check reen wire for proper round. Make sure the wire is attached
to an unpainted surface that is electrically common to the boiler.
3. Check to ensure the control’s metal probe tip is not surrounded by
an air pocket. Shut down power to the boiler and slowly loosen,
but do not remove, the control. Allow any air to escape. When
water be ins to seep past threads, reti hten the control.
4. Re-check wirin and check for correct incomin volta e.
4 1100M-0913
SERVICE & MAINTENANCE
EVERY YEAR Check control operation annually by pressin the TEST/RESET button. The amber “LOW WATER” LED should illuminate and
the burner should shut down.
5 YEARS Remove the low water cut-off every five years and clean all surfaces in contact with water.
126 Ba ley Road, North Haven, CT 06473 • Phone (203) 776-0473 • FAX (203) 764-1711 • www.hydrolevel.com

Other safgard Controllers manuals

safgard 1100 User manual

safgard

safgard 1100 User manual

safgard 250 User manual

safgard

safgard 250 User manual

Popular Controllers manuals by other brands

Robus VEGAS RVACCT1-CRTL quick start guide

Robus

Robus VEGAS RVACCT1-CRTL quick start guide

Ryobi One+ Easy Starter Original instructions

Ryobi

Ryobi One+ Easy Starter Original instructions

Epson KB9000 quick start guide

Epson

Epson KB9000 quick start guide

fischertechnik ROBO TX Circuit diagrams

fischertechnik

fischertechnik ROBO TX Circuit diagrams

Omron NE1A-SCPU02 user manual

Omron

Omron NE1A-SCPU02 user manual

Eaton xComfort Bridge Quick installation card

Eaton

Eaton xComfort Bridge Quick installation card

cashco 8310HP Installation, operation & maintenance manual

cashco

cashco 8310HP Installation, operation & maintenance manual

Allen-Bradley PowerFlex 70 installation guide

Allen-Bradley

Allen-Bradley PowerFlex 70 installation guide

IMI NORGREN VM10 5 Series Operation & service manual

IMI NORGREN

IMI NORGREN VM10 5 Series Operation & service manual

RenewAire DN-Series Installation, operation and maintenance manual

RenewAire

RenewAire DN-Series Installation, operation and maintenance manual

Shimaden SR90 Series instruction manual

Shimaden

Shimaden SR90 Series instruction manual

SATA air regulator operating instructions

SATA

SATA air regulator operating instructions

Fluidwell F030-P manual

Fluidwell

Fluidwell F030-P manual

Feniex One Quick reference guide

Feniex

Feniex One Quick reference guide

Erreka ATLAS G 605 Installer manual

Erreka

Erreka ATLAS G 605 Installer manual

HEIDENHAIN ND 522 - 2-2011 user manual

HEIDENHAIN

HEIDENHAIN ND 522 - 2-2011 user manual

Timken ROLLON SC 100 Use and maintenance

Timken

Timken ROLLON SC 100 Use and maintenance

Aerotech Soloist MP Hardware manual

Aerotech

Aerotech Soloist MP Hardware manual

manuals.online logo
manuals.online logoBrands
  • About & Mission
  • Contact us
  • Privacy Policy
  • Terms and Conditions

Copyright 2025 Manuals.Online. All Rights Reserved.