Sagem D85C User manual

Livret utilisateur
User Guide
LU D85C UK.book Page 1 Jeudi, 16. décembre 2004 5:30 17

INTRODUCTION
Dear customer:
Thank you for purchasing a SAGEM DECT telephone; we appreciate your trust in us.
This product was manufactured with the upmost care, should you encounter any difficulties during its use,
we recommend that you refer to this user guide. You can also find information on the following site:
http://www.sagem.com/faq
For your comfort and safety, we ask that you read the following paragraph carefully:
Recommendations and safety instructions
Your DECT telephone must not be installed in a humid room (wash room, bathroom, laundry
room, kitchen, etc.) unless it is 1.50 m away from a water point, or outside. Your telephone
must be operated at temperatures ranging from 5°C to 45°C.
Only use the supplied power adapter, connect it to the base socket according to the
installation instructions provided in this booklet and the indications on the identification label
affixed to it (voltage, current, electric network frequency). As a safety measure, you can use
the power adaptors to cut off the 230V current in case of danger. They must be located near
to the device, and must be easily accessible.
This telephone was designed for use on the public switched telephone network (PSTN). In
case of a problem you must first contact your reseller. Only use the supplied telephone cord.
To avoid damaging your handset, only use certified rechargeable AAA batteries, never use
non rechargeable batteries. Insert the batteries in the handset battery compartment
respecting polarity.
For your personal safety, never place your handset on the base without the batteries, or
without the battery cover, you could get an electric shock.
At the end of their useful life, batteries must be disposed of according to the recycling
instructions presented in this booklet.
Your DECT telephone has an inside radio range of about 50 metres and up to 300 metres in
open space. The immediate presence of metal parts (of a television for example), or of any
electric appliance may result in range reduction.
Some sensitive medical equipment and safety equipment may be affected by the radio-
frequency transmissions of your telephone. In all cases, we ask that you respect the safety
recommendations.
In areas where storms are frequent, we recommend that you protect your telephone line using
a surge protection device.
This equipment does not function in the case of an electric network shutdown: For the
emergency calls, use a self-contained cord telephone.
The CE marking certifies that the product meets the essential requirements of Directive 1999/
5/CE of the European Parliament and of the Council pertaining to microwave radio equipment
and telecommunication terminal equipment, for the safety and health of users, for
electromagnetic interference. Furthermore, it efficiently uses the frequency spectrum
attributed to ground and spatial communication to prevent damaging interference.
The declaration of compliance can be consulted on the site www.sagem.com category
"support", or can be requested at the following address:
SAGEM SA - Customer relations department
4 rue du Petit Albi - 95800 Cergy Saint-Christophe - France
Préliminaire.fm Page i Mardi, 21. décembre 2004 2:15 14

I
Your telephone 1
Unpacking 1
Your base 1
Your handset 2
Connecting the base 5
Handset set-up 5
Turning the handset on and off 6
Replacing the batteries 6
Installing a SIM card 7
Getting started 8
Installation guide 8
Making a call 8
Receiving a call 8
During a call 9
Handsfree 9
Transfer or call from another handset 9
Receiving a second call whilst on line 10
Making a second call whilst on line 10
To alternate from one call to the other 11
To end one of the calls and continue
the other one 11
To set up 3 way-call (the two parties
and yourself) 11
Accessing the phonebook or call log 12
Secret mode 12
Ending a call 13
Entering a number in the phonebook 13
Communication between two handsets 15
Sending an SMS 15
Menu structure 17
Your phonebook 19
Creating an entry 19
Viewing the phonebook 21
Editing an entry 22
Deleting an entry 23
Searching for a contact 23
Performing a quick search 23
Import part or all of a SIM card directory 24
Transfer all or part of the phonebook 26
Transfer by intercommunication 26
Transferring a contact using IrDA 27
Using a phonebook entry to place a call 28
SMS service - text messages 29
Sending a text message 29
Writing a text message 29
Sending an SMS 32
Reading a message 33
Viewing the memory status 35
Emptying an SMS folder 36
Sending SMS text messages from mobile
phones 37
When replying to a telephone from
a mobile phone 37
When sending a new message to a
telephone from a mobile phone 37
SMS settings 39
Modifying the SMS centre number 39
Choose the SMS transmission centre 40
Terminal number 40
Modifying the terminal number 40
SMS boxes 41
Sub-Addressing 42
Creating a personal box 42
Viewing a message from a personal box 44
Modifying or removing a personal box 44
Call log 46
Viewing the received and dialled call log 46
Calling the last number dialled (Redial) 47
Calling a number listed in the dialled
and received call log 47
Viewing the events log 48
Viewing the new events 48
Activate/deactivate the new events
information screen 48
Accessories 50
Alarm clock 51
Setting the alarm clock 51
Activating or deactivating
the alarm clock 51
Modifying the alarm clock time 52
Changing the alarm clock ring tone 52
Timer 53
Changing the programmed time
of the timer 54
Changing the timer ring tone 54
Displaying or hiding the programmed
time of the timer 54
Birthday or organiser alarms 55
Adding a new birthday (organiser) alarm 55
Viewing a birthday (or organiser) alarm 56
Modifying or deleting a birthday (or
organiser) alarm 56
Monitoring a room 57
Games 59
Taquin 59
Fruit Mind 60
Customising the handset 62
Changing the ring tones 62
Modify the idle screen 63
CONTENTS
LU D85C UK.book Page I Jeudi, 16. décembre 2004 5:30 17

II
Modify the colour of the menu
backgrounds 64
Screensaver (Power-saver mode) 64
Activate or deactivate the Eco mode 65
Activating or deactivating the beeps 65
Activating/deactivating the silent mode 66
Record a personal ring tone 66
IrDA 68
Security 69
Locking/unlocking the keypad 69
Programming an emergency number 70
Modifying the base code 71
Defining the call time limit 72
Defining forbidden prefixes - Call barring 73
Creating, modifying or deleting
a forbidden prefix 74
Authorising listening in 74
Settings 76
Accessing the Settings menu 76
Programming a key 77
Modifying the date and time 78
Adjusting the contrast 79
Using the auto hang up and pick up
features 79
Installation guide 80
Voice box number 81
Modifying the country code 82
Modifying the language 82
Advanced settings /
Handset settings 83
Registering a new handset to a base 83
Modifying the base preference 84
Resetting the handset 85
Personal registering 86
Renaming the handset 87
Advanced settings /
Base settings 88
Using a handset to put the base in
registration mode 88
Resetting the base 89
De-registering a handset 90
Renaming the base 91
Advanced settings /
Line settings 92
Modifying the network type 92
Modifying the dialling mode 93
Modifying the flash duration (R key) 93
Setting a PABX prefix 94
Appendix 96
Care and Maintenance 96
Problems 96
Features 97
Environment 98
Warranty 99
CONTENTS
LU D85C UK.book Page II Jeudi, 16. décembre 2004 5:30 17

1
YOUR TELEPHONE
Unpacking
Place the box in front of you, open it and make sure it contains the following items:
•onebase,
• one handset,
• one battery compartment cover,
• one equipped power adapter,
• one telephone line cord,
• three rechargeable batteries,
• this user guide.
In the case of purchasing a pack duo or trio, you will find in addition for each
additional handset :
• a handset charger,
• an additional battery flap,
• three additional rechargeable batteries.
Your base
It fits well into your family environment.
Handset location
Power indicator light
Fixed green indicator: Powered
Flashing green indicator:
- handset in use
- handset searching,
- handset registering.
Base button
Pressed briefly:
- handset search.
Held down:
- handset registering.
LU D85C UK.book Page 1 Jeudi, 16. décembre 2004 5:30 17

2
YOUR TELEPHONE
Your handset
With its user-friendly design, you will appreciate how easy it is to hold and its quality during
conversations.
Colour graphics
display
Program keys
Phonebook key
Hang up
Turn off the handset
Alphanumeric
keypad
Pick up
Handsfree
Redial (long press)
Turn on the handset
Direct SMS
access
Speaker
Microphone
Navigator
Message received
indicator
R key
Intercommunication
key (handset
intercom)
Infrared port (IrDA)
Key 1:
hold down for quick
access to voice
messaging service
LU D85C UK.book Page 2 Jeudi, 16. décembre 2004 5:30 17

3
YOUR TELEPHONE
The navigator key, a rapid selection tool.
The visual display of your handset
To cancel, delete or go to the
previous menu
Navigating To confirm or to access a sub-menu
Icons showing
the programmed functions
Name of the base and
handset (press OK)
Status icons
N
u
m
ber
Silent mode
Redial
Tim
er
Keypad loc
k
Alarm clock
A
g
end
a
Battery indicator
Silent mode on Keypad lock
Alarm clock on
Timer on
SMS Reception
Network indicator In use
LU D85C UK.book Page 3 Jeudi, 16. décembre 2004 5:30 17

4
YOUR TELEPHONE
Other icons
Accessories Birthday Fax
Alarm clock Call log Home
Mobile Number 1 Number 2
Number 3 Work Personalisation
Settings Phonebook Security
SMS Backlighting low Missing calls
When the battery charge icon is at minimum, your screen will not be lit and the volume
level of the hands-free function will be decreased until the battery is recharged.
LU D85C UK.book Page 4 Jeudi, 16. décembre 2004 5:30 17

5
YOUR TELEPHONE
Connecting the base
Place the base where it should be located.
Plug the telephone line connector (as shown
in the illustration) into the telephone socket
on the underside of the base and connect the
other end to the telephone wall socket.
Connect the power connector on the
underside of the base and the other end of
the cord to the power socket. The power
supply indicator located on the base is green.
Place the base in its final location.
Handset set-up
Insert the batteries making sure to respect
the polarity. Place the cover back on the
handset by pushing upwards until it is
completely closed.
Remove the protective film on the screen,
place the handset on the base to fully charge
the batteries.
The charging icon appears on the screen, it
indicates the charging status. Once the icon
is full, your batteries are charged.
Before making any connections, please refer to the safety instructions presented at
the beginning of this user guide.
Only use certified rechargeable batteries. For optimal battery charge, leave the
handset on the base for at least 6 hours during initial use. During charging, the
batteries may heat up, this is quite normal and without risk.
Power socket Telephone socket
LU D85C UK.book Page 5 Jeudi, 16. décembre 2004 5:30 17

6
YOUR TELEPHONE
Turning the handset on and off
To turn the handset off, hold down the red key and the message "Thank You Goodbye"
is displayed briefly on the screen. Your handset is now off.
To turn your handset back on, hold down the green key .
Information is displayed on the screen, including the name and number of the handset (for
instance HANDSET -2 -), the date and the time. If the message "Please Register" is
displayed, refer to page 83 to register your handset to the base.
Replacing the batteries
Turn off the handset, and then turn it over to
access the battery compartment cover
Insert a sharp object (pen, paper clip...)
perpendicularly in hole 1 as shown in the
illustration and lift it upwards, the battery
cover opens, slide it downwards as shown in
2.
Remove the old batteries, and insert the new
batteries in the battery compartment, with the
polarity of each of them aligned as depicted
on the handset label. Replace the handset
battery compartment cover by pushing it
upward until fully closed.
At the end of their useful life, batteries must
be disposed of according to the recycling
instructions presented in this booklet.
To avoid damaging your handset, only use certified rechargeable AAA batteries,
never use non rechargeable batteries.
1
2
LU D85C UK.book Page 6 Jeudi, 16. décembre 2004 5:30 17

7
YOUR TELEPHONE
Installing a SIM card
Take your base, remove the SIM card
compartment (nr 2) from your base unit. It is
located on the right-hand side.
Take your SIM card (nr 3) and slide it into the
compartment making sure it's the right way
up (printed circuit visible and notch to the
right).
Insert the compartment and SIM card into the
space in the base unit (nr 1)
Safety recommendation
Your DECT telephone has a small plastic part that can be swallowed (SIM card
compartment). For security reasons, please make sure that the SIM card
compartment is out of reach of children.
2
3
1
LU D85C UK.book Page 7 Jeudi, 16. décembre 2004 5:30 17

8
GETTING STARTED
Installation guide
Once the handset has been turned on, press OK and select your
language. Set up assistance is automatically provided. It helps you set
certain parameters for your telephone.
The parameters are:
• date and time,
• name of the handset,
• external ringer,
Making a call
Enter the number of your contact using the keypad keys.
If you enter an invalid digit, press Con the navigator key to erase the
incorrect digit. Press the green key on your handset to make the call.
During communication, you can increase or decrease the audio volume of
your handset by pressing the or key on the navigator.
Receiving a call
When you receive a call your telephone rings. If you have subscribed to a
"Caller display" service, the caller's information appears on the screen
(unless your caller has enabled the anonymous mode), otherwise the
"Secret number" screen is displayed.
Pick up by pressing the green key or . To turn off the ringer, press
the silence key .
At the end of the conversation, press the red key .
Contact your service provider to find out which services are
available (caller display service, SMS, etc.) and the charges
involved.
You can also make a call by:
- Pressing the green key to access the line.
- Dialling your contact's number.
GETTING STARTED
LU D85C UK.book Page 8 Jeudi, 16. décembre 2004 5:30 17
9
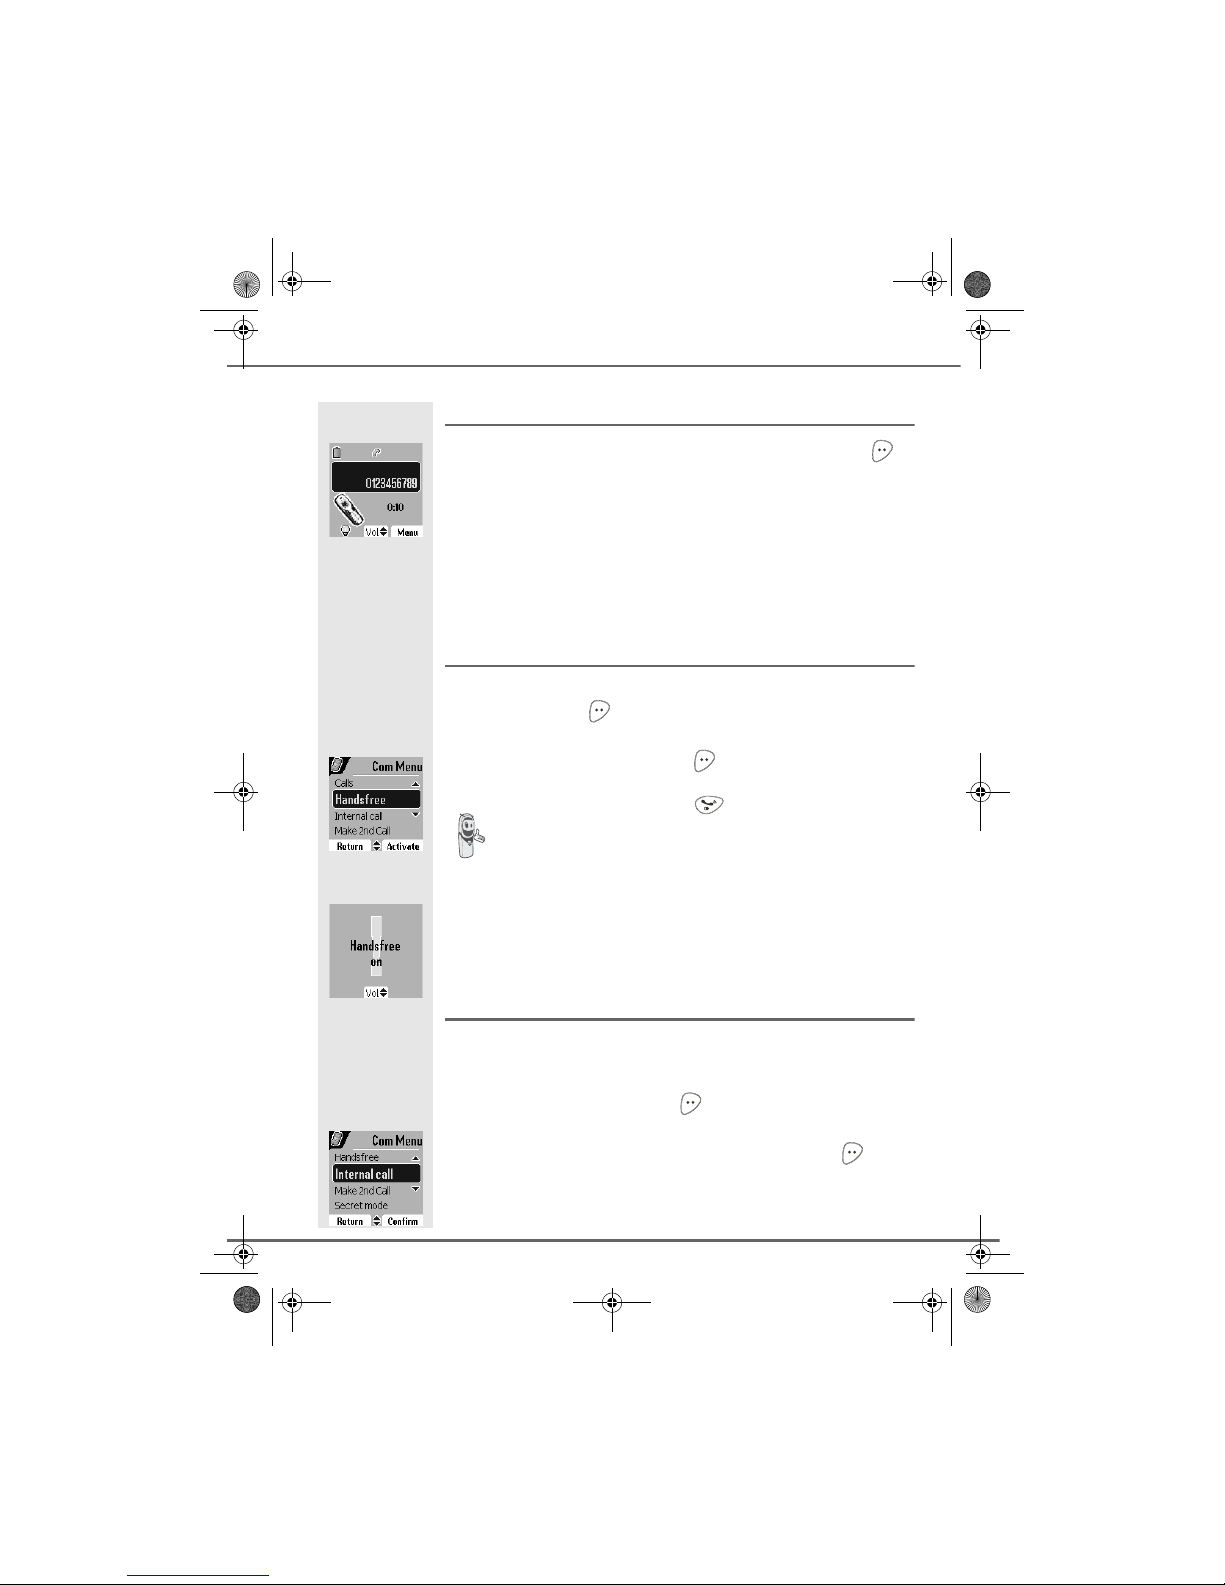
During a call
During a call, numerous options are accessible by pressing Menu .
Select the desired option in the following list:
- Handsfree: to activate the handset speaker.
- Internal call: to transfer the call to another handset.
- Make 2nd Call: to make a second call.
-Secret mode: to mute the handset microphone.
- Phonebook: to access the phonebook.
- Calls: to access the call log.
Handsfree
While having a conversation with your contact, you can enable the
handset. Press Menu .
Select Handsfree and press Activate .
The message Handsfree on appears on the screen. Increase or decrease
the audio volume using or .
Transfer or call from another handset
This function is only accessible when two handsets or more are registered
to the same base. During communication, you can transfer the call to
another handset.
During communication, press Menu .
Using the or arrow, select Internal call. Press Confirm .
When pressing the green key while engaged in a
conversation you automatically activate the handsfree mode of
the handset, by pressing it again you deactivate the handsfree
mode.
GETTING STARTED
LU D85C UK.book Page 9 Jeudi, 16. décembre 2004 5:30 17
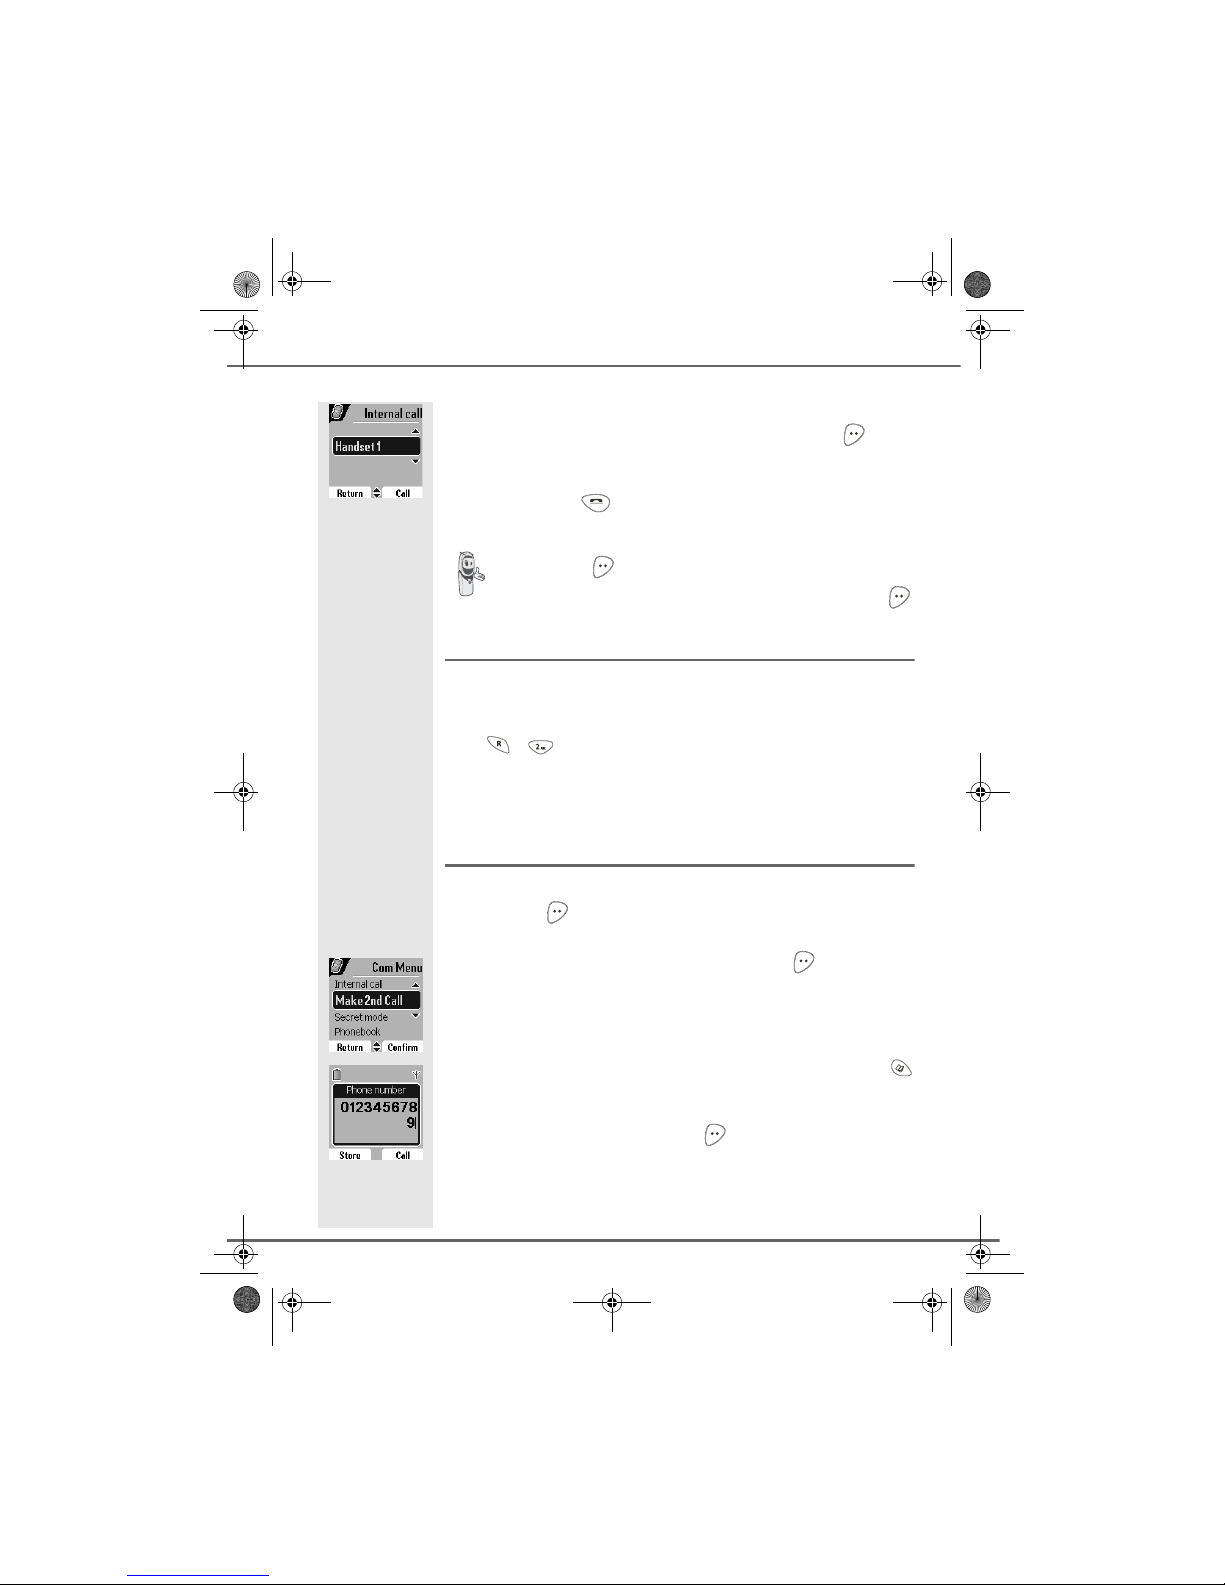
10
The list of handsets registered to the base appears.
Select the handset you want to call using or . Press Call .
The handset called rings, once someone picks up transfer the call by
pressing the red key .
Receiving a second call whilst on line
During the call, you will hear a beep to tell you that there is a second call
waiting.
Press + to take this new call.
Your other caller is then put on hold and you can talk with your second
caller.
Making a second call whilst on line
During a call, you can put your contact on hold and call a second one by
pressing Menu .
Select Make 2nd Call using or . Press Confirm
Select your contact's telephone number in the phonebook by pressing
or dial the number using the keypad.
Once the number is entered, press Call .
To retake the call before it is picked up by the handset called,
press Option .
Using the
or
arrow, select Hanging up. Press Activate .
GETTING STARTED
LU D85C UK.book Page 10 Jeudi, 16. décembre 2004 5:30 17

11
The second call is then launched, with the first call still on hold.
To alternate from one call to the other
Press Menu .
Select Switch using or . Press Activate .
The call in progress is put on hold, and you can then take the second call.
To end one of the calls and continue the other one
Press Menu .
Select Hanging up using or . Press Activate .
The call in progress is definitely terminated, and you can then take the
second call.
To set up 3 way-call (the two parties and yourself)
Press Menu .
Select 3-party conf. using or . Press Activate .
Three-way calling is only possible when the second call is made
from your telephone.
GETTING STARTED
LU D85C UK.book Page 11 Jeudi, 16. décembre 2004 5:30 17

12
GETTING STARTED
You can then talk to both parties simultaneously.
To end the 3 way-call, press the red key .
Dual incoming call management can also be done via the R key .
- Accepting a second incoming call: + .
- Making a second call during communication: + recipient number.
- Alternating from one call to the other: + .
- Ending a call and switching to the call on hold: + .
-Setting up a 3 way-call: + .
Accessing the phonebook or call log
During a call, you can access your phonebook to look up a telephone
number, a name contained in an entry or information on calls stored in
your call log.
During a call, press Menu .
Using or , select Phonebook or Calls and press Confirm .
Return to the communication menu using .
Secret mode
You can switch to secret mode at any time during your conversation. Your
handset microphone will be switched off and the other person will not be
able to hear you.
To activate secret mode:
During communication, press Menu .
LU D85C UK.book Page 12 Jeudi, 16. décembre 2004 5:30 17

13
GETTING STARTED
Using or , select Secret mode and press Activate .
The Microphone muted message will appear on the screen and the
flashing icon will be displayed on the communication screen.
To deactivate secret mode:
Press Menu
Using or , select Secret mode and press Deactivat .
The Microphone activated message will appear on the screen and the
flashing icon will disappear.
Your correspondent will be able to hear you again.
Ending a call
At the end of the conversation, press the red key .
Entering a number in the phonebook
Dial the number you want to enter in the phonebook.
If you make an error while entering the number, press Cto delete the error.
Press Store .
The name input screen appears.
Using the keypad keys, enter the name of your contact by pressing
successively on the keypad keys (see page 19 for further details).
Example "Smith": .
You can also choose to activate or deactivate the secret mode by
continuously pressing the Ckey on the navigator.
LU D85C UK.book Page 13 Jeudi, 16. décembre 2004 5:30 17

14
GETTING STARTED
To correct any mistakes made in entering the name, use:
• the Ckey to clear a letter,
• the , keys to move to a specific location in the name in order to
add or delete a letter.
Once the name is entered. Press Confirm .
The number is displayed on the screen. Press Confirm .
Select the icon according to the type of number entered using the or
arrow:
- For a home telephone number .
- For a work telephone number .
- For a mobile telephone number .
- For a FAX number .
You can also use a number icon (1, 2, 3) to identify the entry.
Once the icon is selected, press Confirm .
All of the information that you entered appears on the screen in the form
of an entry.
• To change the information in the entry, press Edit . You can now
modify the name, number and/or icon type.
• If the information is accurate, press Confirm .
Your entry is created and is now in the phonebook list. You can see the
beginning of your contact's name which is preceded by a number type
icon.
The various phonebook functionalities are described in the menu
Your phonebook, page 19.
LU D85C UK.book Page 14 Jeudi, 16. décembre 2004 5:30 17

15
GETTING STARTED
Communication between two handsets
To call another handset, press the key.
Select with the desired handset with the or keys. Press Call .
The handset rings. Pick up on the second handset using the green
key .
To end the call, press the red key .
Sending an SMS
To subscribe to the SMS service you must send an SMS from your phone.
Press the SMS key, a screen appears with the Edit SMS option
highlighted. Press Confirm .
Use the , keys to select either Common box or a personal box if one
has been created. Press Confirm .
The SMS will be sent to the box selected.
To communicate between handsets, both handsets must be
matched to a single base, and must be within range of the base.
You can also easily call another handset if you know its number.
From the idle screen, enter the number of the handset. Then
press the green key .
We recommend that you consult the SMS chapter before sending
a message.
LU D85C UK.book Page 15 Jeudi, 16. décembre 2004 5:30 17

16
GETTING STARTED
Enter the text of your SMS using the keypad.
Press several times on a key to scroll through the letters. Once you have
written your message, press Option .
Use the , keys to select Send. Press Confirm .
Enter your recipient's number.
• If the number is listed in your phonebook, you can access it by
pressing . Then select your contact's number using or , and
press Confirm .
• Otherwise, enter the number using the numeric keypad. Once the
number is entered, press Confirm .
A confirmation screen appears. It indicates the type of transmission and
the number to which your message will be sent.
• If the information is accurate. Press Confirm . A message
appears on the screen indicating that the transmission of your SMS is
in progress.
• To change the phone number or modify the text message press
Edit . A screen allows you to choose the items you want to modify.
Once you are done making your changes, press Confirm .
Once the message has been sent, you can save a copy of your message.
It will be stored in the Sent SMS box.
Press Yes to save a copy of the message.
If no personal box has been created, only the shared box is
displayed on the screen.
To create a personal box, select PersoBox Menu and press
Confirm . Follow the instructions displayed on the screen. For
further details, refer to the paragraph Creating a personal box,
page 42.
LU D85C UK.book Page 16 Jeudi, 16. décembre 2004 5:30 17
Table of contents
Other Sagem Cordless Telephone manuals


