Sagem D23XL User manual

INTRODUCTION
Dear customer:
Thank you for purchasing a SAGEM DECT telephone; we appreciate your trust in us.
This product was manufactured with the utmost care, should you encounter any difficulties during its use, we
recommend that you refer to this user guide. You can also find information on the following site:
http://www.sagemcom.com
For your comfort and safety, we ask that you read the following paragraph carefully:
Recommendations and safety instructions
Your DECT telephone must not be installed in a humid room (wash room, bathroom, laundry room,
kitchen, etc.) unless it is 1.50 m away from a water point, or outside. Your telephone must be
operated at temperatures ranging from 5°C to 45°C.
Only use the supplied power adapter, connect it to the base socket according to the installation
instructions provided in this booklet and the indications on the identification label affixed to it
(voltage, current, electric network frequency). As a safety measure, you can use the power adaptors
to cut off the 240V current in case of danger. They must be located near to the device, and must be
easily accessible.
This telephone was designed for use on the public switched telephone network (PSTN). In case of
a problem you must first contact your reseller. Only use the supplied telephone cord.
For your personal safety, never place your handset on the base without the batteries, or without the
battery cover, you could get an electric shock.
To avoid damaging your handset, only use certified rechargeable AAA batteries NiMH 1.2 V
600 mAH, never use non rechargeable batteries. Insert the batteries in the handset battery
compartment respecting polarity.
At the end of their useful life, batteries must be disposed of according to the recycling instructions
presented in this booklet.
Your DECT telephone has an inside radio range of about 50 metres and up to 300 metres in open
space. The immediate presence of metal parts (of a television for example), or of any electric
appliance may result in range reduction.
Some sensitive medical equipment and safety equipment may be affected by the radio-frequency
transmissions of your telephone. In all cases, we ask that you respect the safety recommendations.
In areas where storms are frequent, we recommend that you protect your telephone line using a
surge protection device.
This equipment does not function in the case of an electric network shutdown: For the
emergency calls, use a self-contained cord telephone.
The CE marking certifies that the product meets the essential requirements of Directive 1999/5/CE
of the European Parliament and of the Council pertaining to microwave radio equipment and
telecommunication terminal equipment, for the safety and health of users, for electromagnetic
interference. Furthermore, it efficiently uses the frequency spectrum attributed to ground and spatial
communication to prevent damaging interference.
The declaration of compliance may be looked up on the www.sagemcom.com site, section
"support" or can be obtained from the following address:
SAGEMCOM SAS
250, route de l'Empereur - 92500 Rueil-Malmaison - France

i
Your telephone 1
Unpacking 1
Your base D23XL 1
Your base D23XP 2
Your handset 3
Connecting the base 4
Handset set-up 5
Telephone set turning on and off 5
Replacing the batteries 6
Getting started 7
Making a call 7
Direct dialling 7
Using the Redial key 7
From the directory 7
Receiving a call 7
During a call 7
Ear volume 7
Handsfree 7
Mute mode 8
Call transfer 8
Ending a call 8
Intercommunication between two handsets 8
Locking / unlocking the keypad 8
Call log 9
Viewing the dialled calls 9
Viewing the received calls 9
Calling the voice box 9
Paging handset 9
Managing the speed dial numbers (D23XP) 10
Calling a speed dial number 10
Saving your speed dial numbers 10
Menu structure 11
Your directory 12
Viewing the directory 12
Creating an entry 12
Editing an entry 13
Deleting an entry 13
Call log 14
Viewing the dialled calls 14
Viewing the received calls 14
Adding a contact in the directory from
the list of received calls 14
Deleting a number from the call log 15
Viewing a missing call 15
Handset settings 16
Activating or deactivating the beeps 16
Modifying the default handset melody
volume 16
Modifying the handset ringtone 16
Setting the ear volume 17
Using the auto answer features 17
Change the name of the handset 17
Modifying the language 17
Modifying the date and time 18
Modifying the voice box number 18
Base settings 19
Modifying the default base ring volume 19
Modifying the base ringtone 19
Modifying the flash duration (R key) 19
Modifying the pause duration 20
Modifying the base code 20
Changing the dialling mode 21
Re-initialise the base 21
Registration 22
Registering a second handset to a base 22
Modifying the base preference 22
De-registering a handset 23
Appendix 24
Care and Maintenance 24
Problems 24
Features 26
Environment 27
Packaging 27
Batteries 27
The product 27
Warranty 28
Terms and Conditions for United Kingdom
only 28
Terms and Conditions for other countries 30
CONTENTS

1
YOUR TELEPHONE
Unpacking
Place the box in front of you, make sure it contains the following items:
• one base,
• one handset,
• one battery compartment cover,
• one equipped power adapter,
• one telephone line cord,
• three rechargeable batteries (type NiMH 1.2 V 600 mAh),
• this user guide.
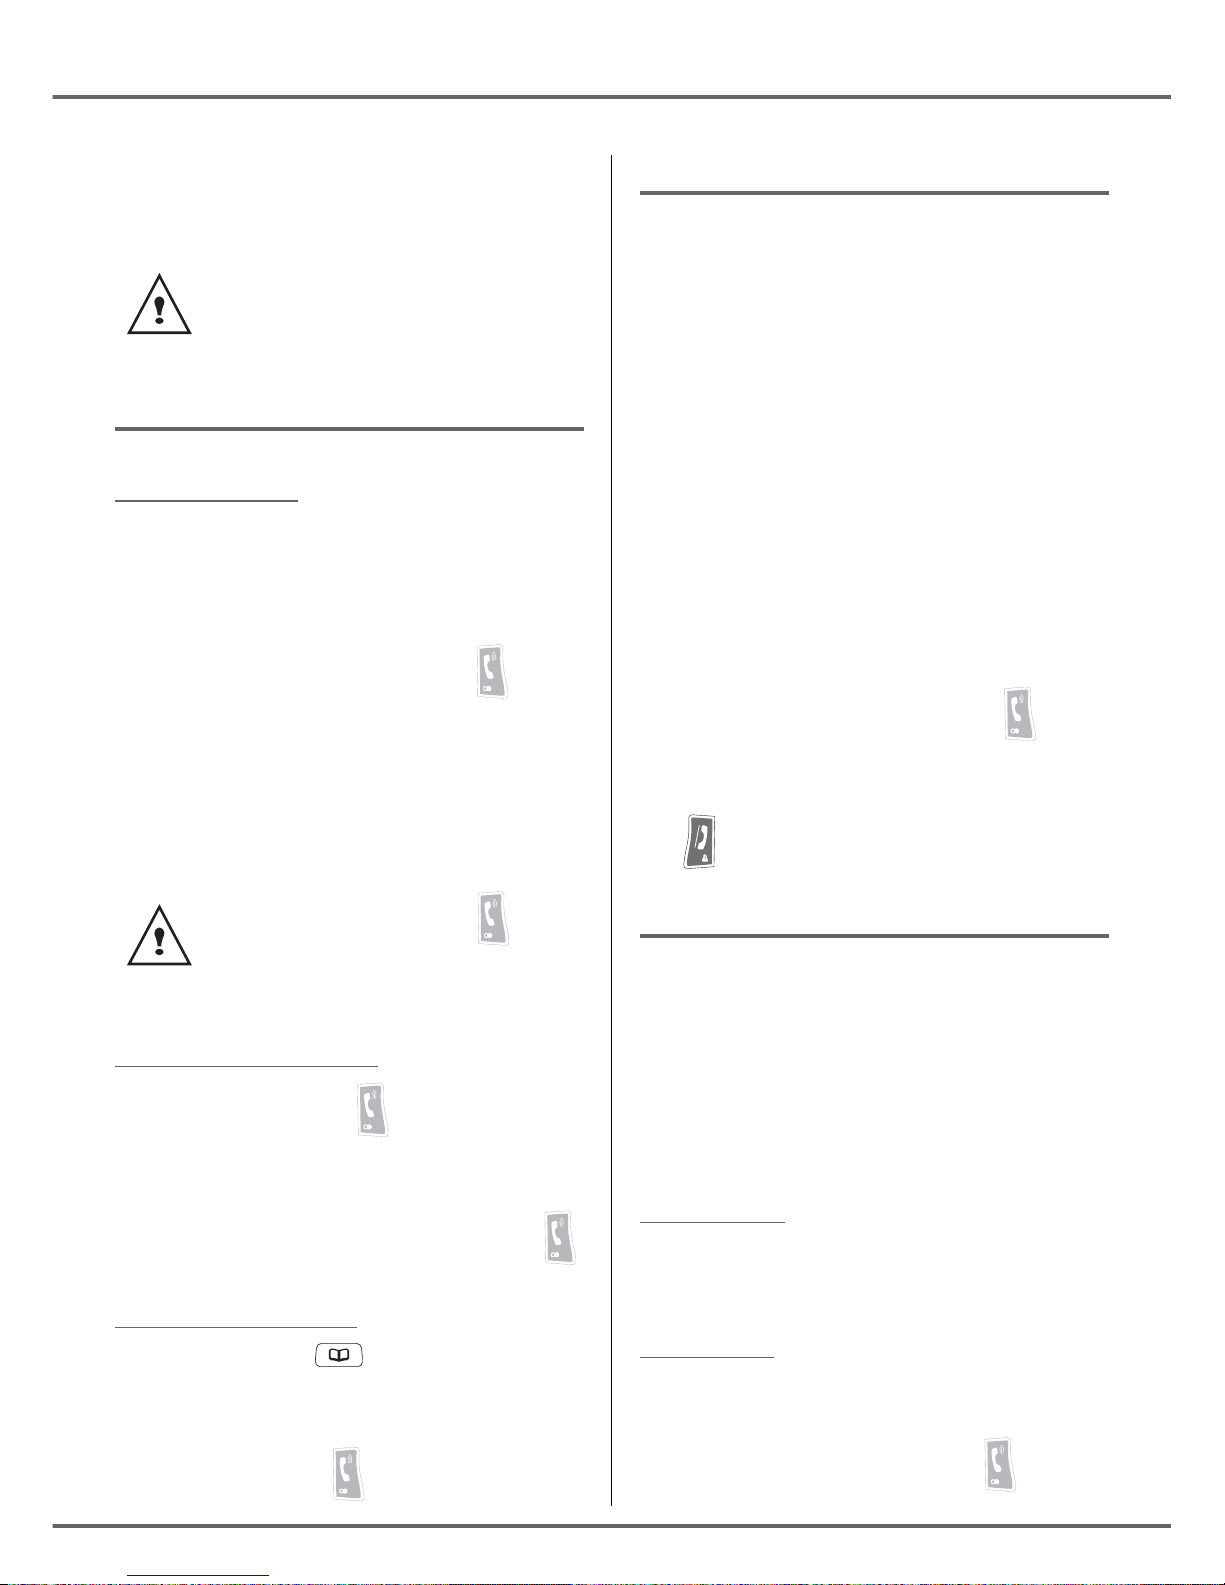
Your base D23XL
Handset location
Power indicator light
Fixed green indicator:
Powered
Flashing green indicator:
- telephone set on line
(slowly flashing),
- message in the network
mailbox (rapidly
flashing)
- call during absence
(intermittently
flashing).
Base button
Pressed briefly:
- telephone set paging.
Held down (4 seconds
minimum):
- telephone set registration.

2
YOUR TELEPHONE
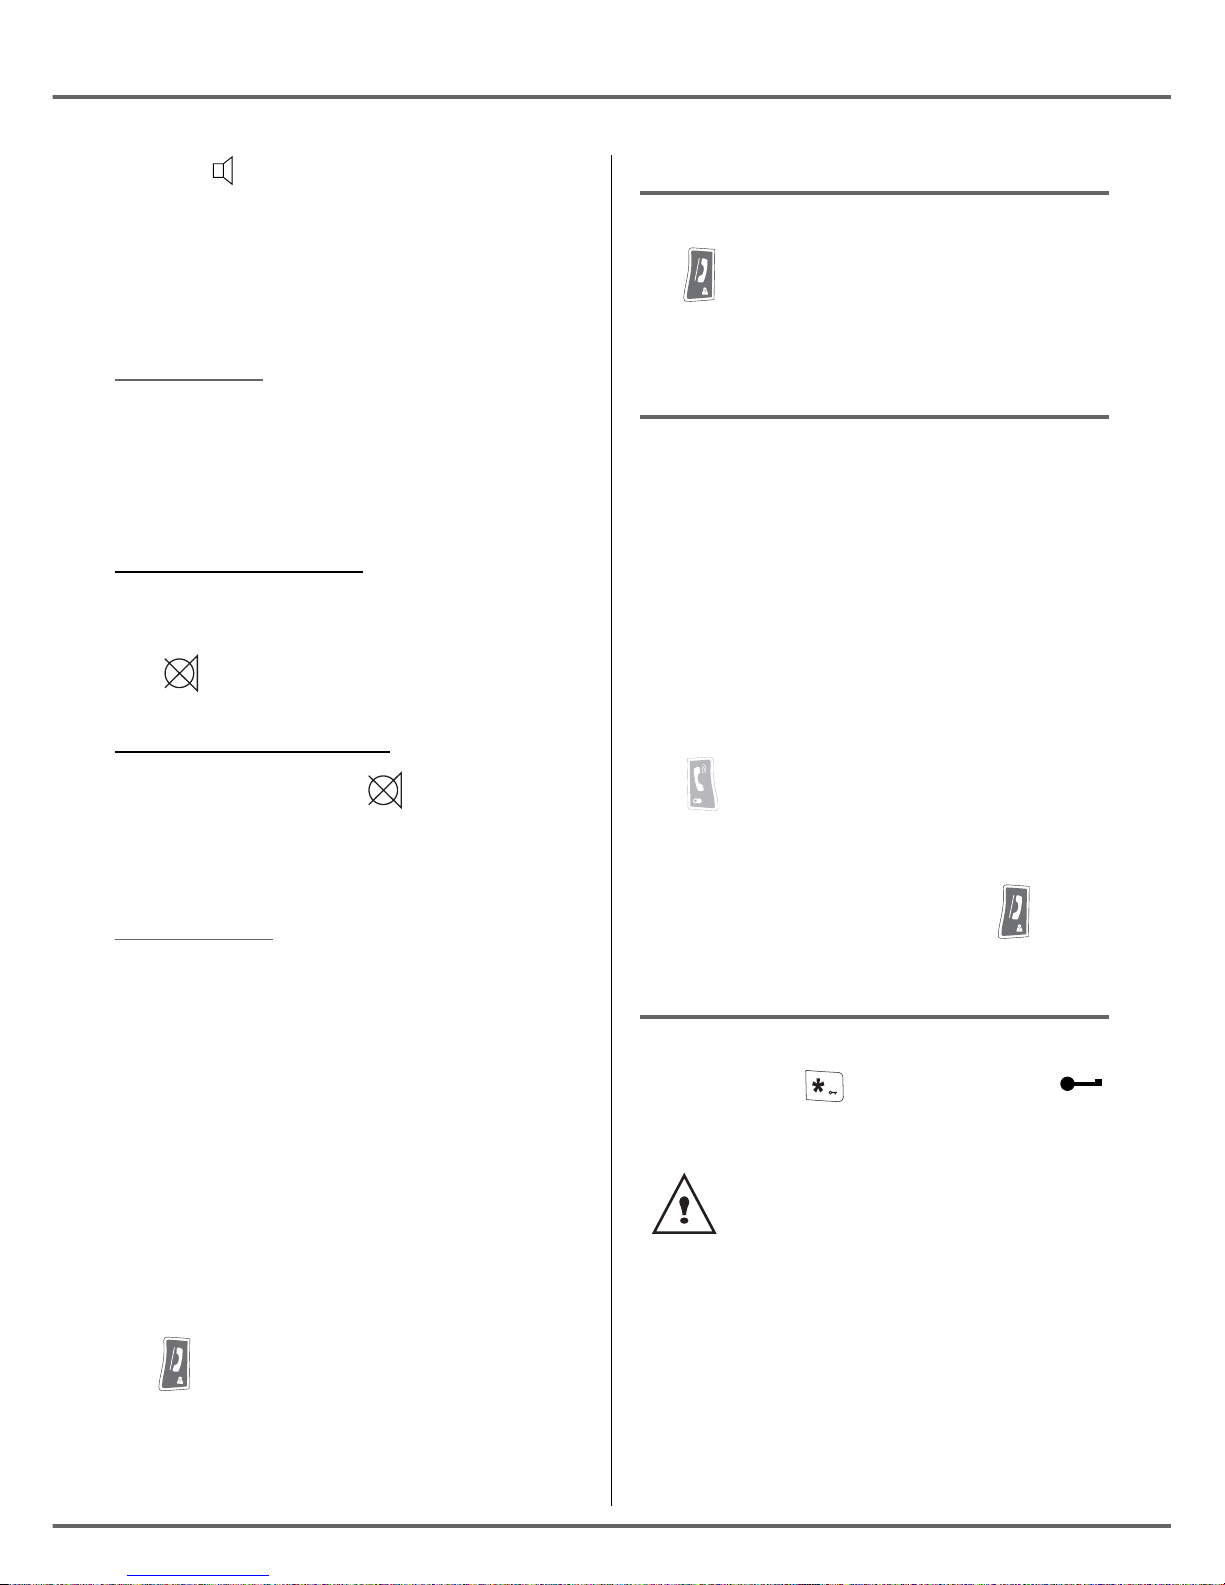
Your base D23XP
Handset location
Power indicator light
Fixed green indicator: Powered
Flashing green indicator:
- telephone set on line (slowly flashing),
- message in the network mailbox (rapidly
f
lashing)
- call during absence (intermittently
f
lashing).
Base button
Pressed briefly:
- telephone set paging.
Held down (4 seconds minimum):
- telephone set registration.
5
Speed dial keys
(0 to 9)
Memory button
(programme the speed dial
keys
3
YOUR TELEPHONE
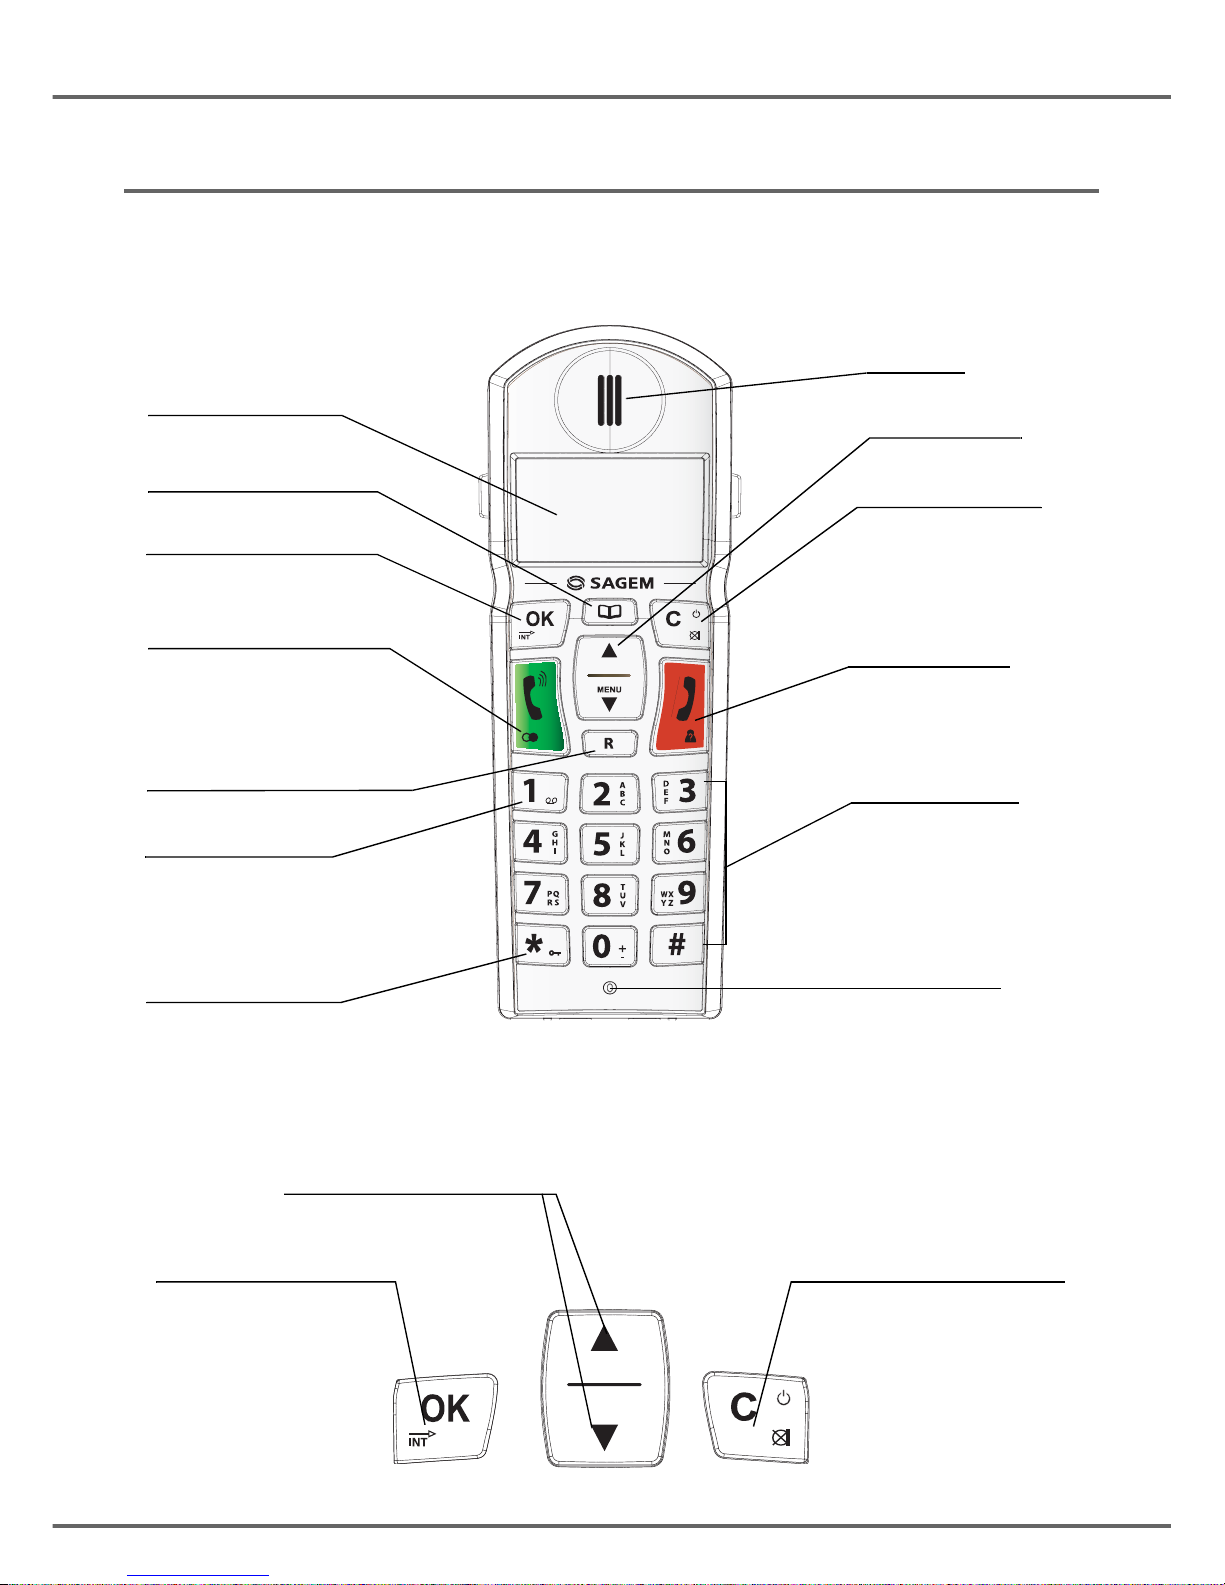
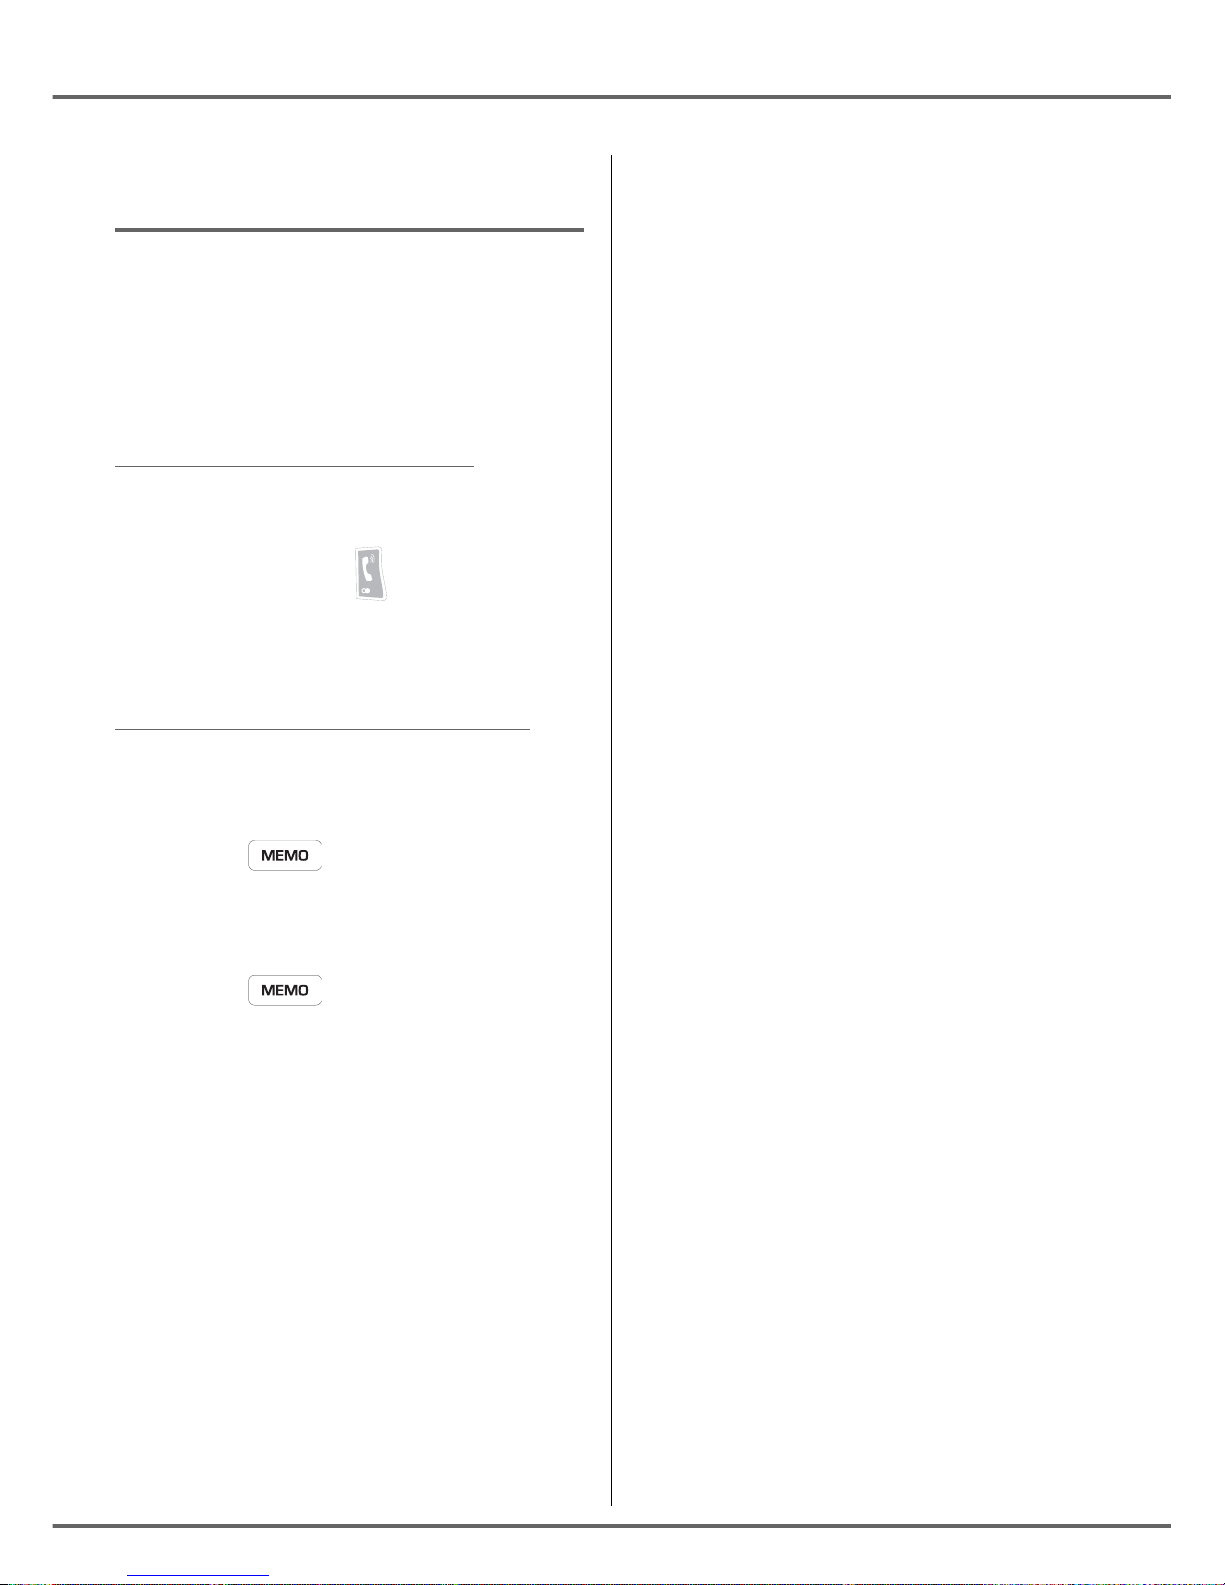
Your handset
With its user-friendly design, you will appreciate how easy it is to hold and its quality during
conversations.
The navigator key and keys : a rapid selection tool.
Display
Phonebook key
OK
Internal call
Alphanumeric
keypad
Access to network
answer machine
messaging
(long press)
Hang up
CID Review
Speaker
Microphone
Navigator key
R key
(service provider)
Power ON/OFF
Cancel key
Mute key
Pick up
Redial (long press)
Key lock or unlock
(long press)
Navigating in the menus
To cancel or return the
previous menu
To confirm or to
access a sub-menu

4
YOUR TELEPHONE
The visual display of your handset on standby mode
Connecting the base
On the bottom part of the base, click in the
telephone jack in its socket (as shown on the
drawing) and connect the other end of the
lead to the wall telephone socket.
Connect one end of the power-supply unit
cord to the back of the base station and
connect up the power-supply unit to the
mains. You will hear a beep and the
operating status indicator on the base station
will light up green.
Before making any connections, please refer to the safety instructions presented at
the beginning of this user guide.
1 SAGEM 12:00
EXT
INT
MENU
?
Battery indicator
Number of handset
Name of handset
Calls indicator
Menu indicator
Range
Mute
Handsfree
Absence calls indicator
Directory indicator
Message indicator in voice box
(service provider)
Key lock indicator
Number scrolling
Indicators
Time
Power socket Telephone socket
5
YOUR TELEPHONE
Handset set-up
Insert the batteries one after the other in
compliance with the battery polarity, as
shown on the label in the telephone set.
Place the cover back on the handset by
pushing upwards until it is completely closed.
Remove the protective film on the screen,
place the handset on the base to fully charge
the batteries.
A beep is transmitted by the handset and the
charging icon appears on the screen, it
indicates the charging status. When icon is
completely shaded (4 bars), your batteries
are charged.
Telephone set turning on and off
To turn off the telephone set, hold down the Ckey. Your telephone set is now switched off.
To turn on your telephone set, hold down the Ckey. Information is displayed on the screen.
The battery charging indicator icon, the telephone set number (1 or 2), the name of handset,
the time and the range indicator.
Only use certified rechargeable batteries. For optimal battery charge, leave
the handset on the base for at least 6 hours during initial use. During
charging, the batteries may heat up, this is quite normal and without risk.
Never put the handset without its batteries on the base when the latter is
powered on.
Do not leave the handset off with its inserted batteries more than a few days
to avoid damaging them.
6
YOUR TELEPHONE
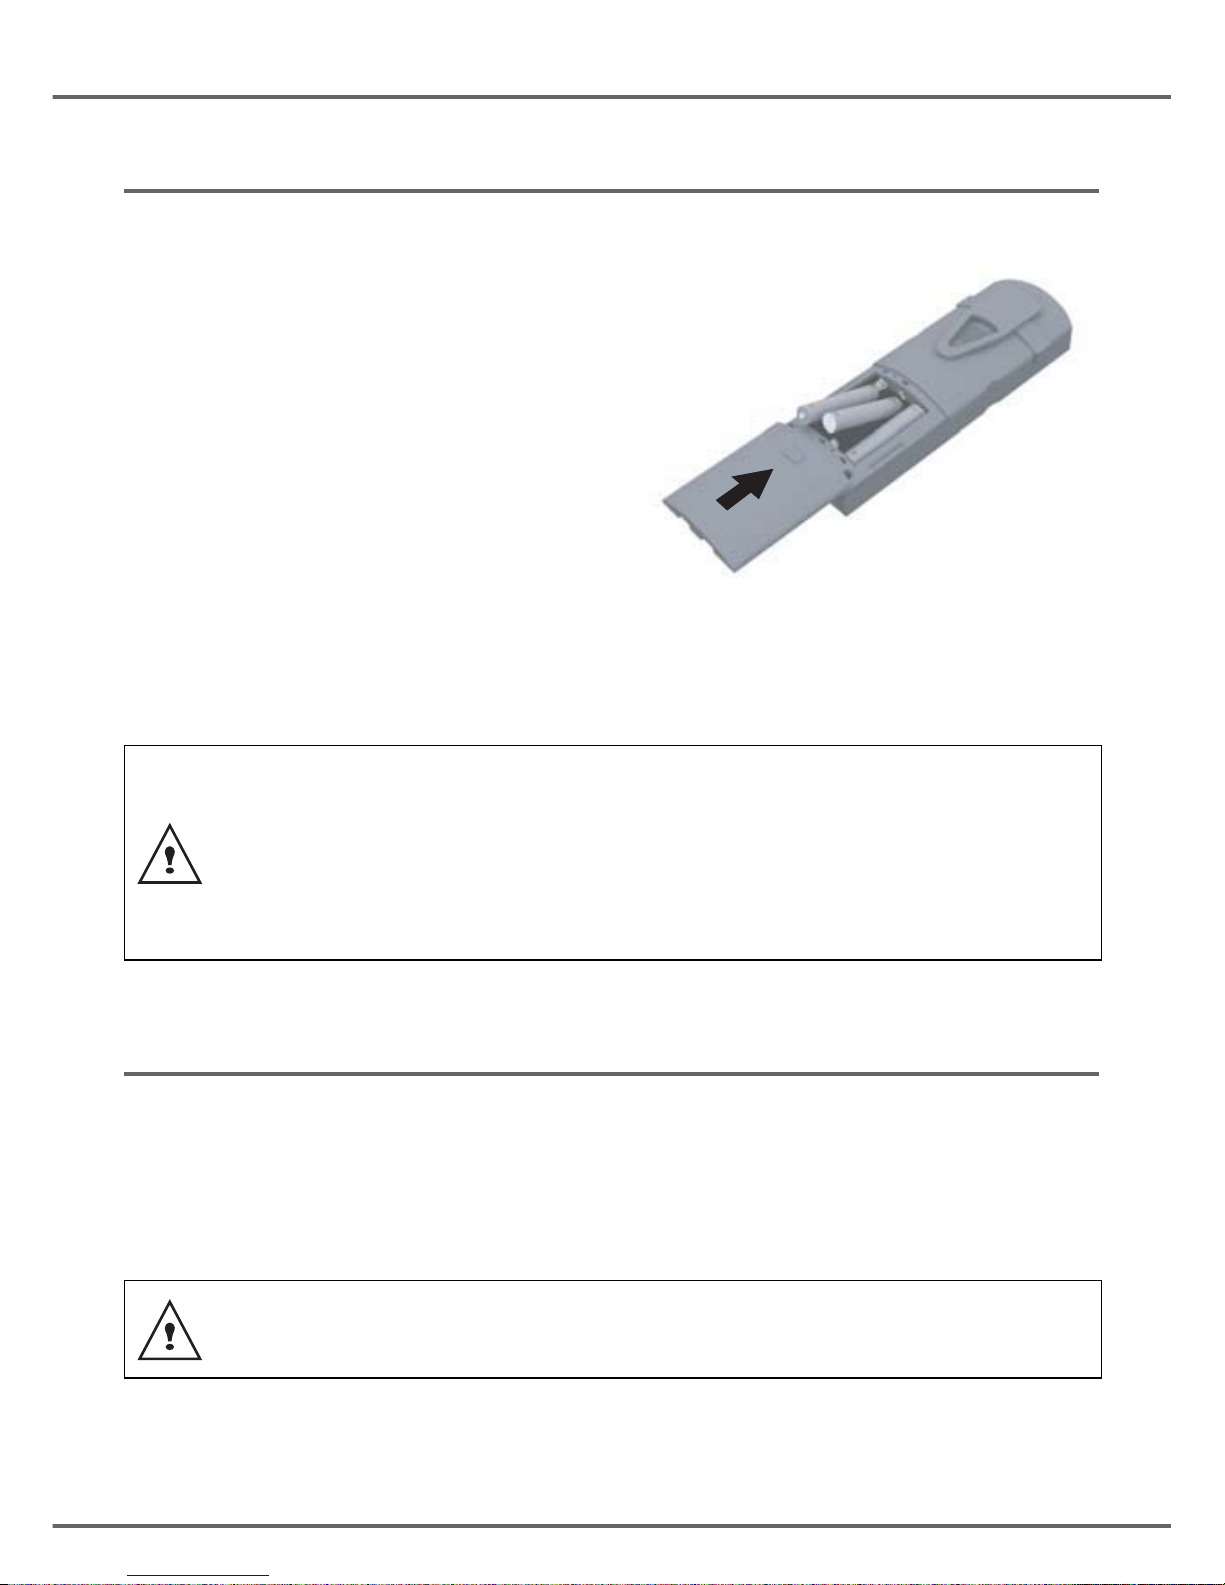
Replacing the batteries
Hold down the Ckey to turn off the telephone set. Turn it around so that the battery
compartment is accessible.
Take the handset, key side on your palm and on the battery cover make a pressure
downwards.
Remove the old batteries, insert the new batteries one by one in compliance with the polarity
of the batteries as shown on the label fixed in the telephone set.
Place the cover back on the handset by pushing upwards until it is completely closed.
At the end of their useful life, batteries must be disposed of according to the recycling
instructions presented in this booklet.
If the rechargeable batteries are absolutely empty, it may take several minutes before
the handset display can be seen again.
To avoid damaging your handset, only use certified rechargeable AAA batteries NiMH
1.2 V 600 mAH, never use non rechargeable batteries.
7
GETTING STARTED
Making a call
Direct dialling
Enter the number of your contact using the
keypad keys.
If you enter an invalid digit, press Cto erase
the incorrect digit. Press the green key on
your handset to make the call.
To enter the pause mode during dialling,
press the key until letter Pappears.
Using the Redial key
Press the green key and hold it down
until the last dialled number appears. Press
the ,keys of the navigator to scroll the
last numbers called. Press the green key .
From the directory
Press the directory key, the list appears.
Select the contact by pressing the or
key.
Press the green key .
Contact your service provider to find
out which services are available
(caller display service, etc.) and the
charges involved.
You can also make a call by:
- Pressing the green key to
access the line.
- Dialling your contact's number.
Receiving a call
When you receive a call your telephone
rings. If you have subscribed to a "Caller ID
name and number" service, the caller's
information appears on the screen (unless
your caller has enabled the anonymous
mode), otherwise the "PRIVATE" screen is
displayed.
The auto answer mode is activated as the
default mode and the call is activated as soon
as you remove the handset from the base.
If the auto answer mode is deactivated, the
call is activated as follows:
Answer by pressing the green key .
At the end of the conversation, press the red
key .
During a call
During a call, you can access the following
functions :
• increase the loudspeaker volume,
• activate the handsfree,
• activate the mute mode,
• transfer the call in progress to another
handset registered on the same base.
Ear volume
During communication, you can increase or
decrease the audio volume of your handset
by pressing the or key on the navigator.
Handsfree
While having a conversation with your
contact, you can enable or disable the
handset loudspeaker. Press key .
GETTING STARTED
8
The icon appears.
During communication, you can increase or
decrease the audio volume of your handset
by pressing the or key on the navigator.
Mute mode
You can switch to mute mode at any time
during your conversation. Your handset
microphone will be switched off and the other
person will not be able to hear you.
To activate mute mode:
During communication, press Ckey.
The icon will appear on the screen.
To deactivate mute mode:
Press Ckey again. The icon disappears.
Your caller will be able to hear you again.
Call transfer
This function is accessible if two handsets
are registered to the same base.
You can now transfer the call in progress to
another handset.
During communication, press OK key.
Enter the handset number «1» or «2» you
want to call. Press OK.
The handset called rings, once someone
picks up, transfer the call by pressing the red
key .
To retake the call before it is picked up by the
handset called, press OK.
Ending a call
At the end of the conversation, press the red
key .
Intercommunication between
two handsets
To be able to communicate with each other,
the two handsets must be registered to the
same base and be within the base range.
To call another handset:
Press OK key, enter the handset number «1»
or «2» you want to call.
The handset called rings. Press the green
key to answer the call with the second
handset.
To end the call, press the red key .
Locking / unlocking the keypad
To lock/unlock the keypad, press and hold
the keypad key for some time, the
icon appears on the screen.
When the keypad is locked, you
cannot dial any number.
GETTING STARTED

9
GETTING STARTED
Call log
This menu enables you to view the received
and the dialled calls list.
Viewing the dialled calls
From the idle screen, press and hold the
keypad key until the last dialled number
appears.
You can view the 10 last dialled calls by
pressing key.
You can recall one of the last dialled number.
Select the number and press the green
key .
Viewing the received calls
From the idle screen, press and hold the red
key until the last received call appears.
You can view the 24 last received calls by
pressing or key.
Calling the voice box
This function enables you to receive calls,
during your absence, in your voice box on the
Public Switched Telephone Network.
First, contact your service provider
who will give you all useful
information concerning the voice
box operation.
To indicate you the presence of a new
message:
• on the base, the green indicator light
flashes.
• on the handset, the message icon
appears.
You can call your voice box according to two
methods:
• Either in dialling directly the voice box
number as when dialling a number.
• Or by pressing for a long time the
key. This method is available if the voice
box number is already registered.
Paging handset
This feature is very useful if you can’t
remember where you put your handset, you
can make the handset to ring (as long as the
handset is in the standby mode) by pressing
the button on your base.
All registered handsets will ring. You can stop
each handset by pressing any key on the
handset keypad or press again the button
in the base.
The number can be modified, refer
to paragraph Modifying the voice
box number, page 18.
When the messages in the voice box
have been consulted, the message
presence indicators are turned off by
the service provider. You may hear
a short beep indicating this function.
10
GETTING STARTED
Managing the speed dial
numbers (D23XP)
The keypad of your D23XP base can be used
to save the telephone numbers you call
regularly which you want to access quickly.
You can save 9 numbers. Each one is
assigned to one of the keys on the numeric
keypad on the base (1 to 0).
Calling a speed dial number
To call a speed dial number you have saved
beforehand:
- Press the green key .
- Press the key on the base (0 to 9) where
the number has been programmed. The
number is then dialled automatically.
Saving your speed dial numbers
You can associate a number with each key
on the numeric keypad on your base.
- Make sure the handset is on standby.
- Press key .
- Dial the number using the speed dial key (0
to 9) on the base (refer to paragraph Your
base D23XP, page 2).
- Press key .
- On the base select the speed dial key (0 to
9) to which you assigned the number
entered.
The number is programmed on the selected
key.
Perform these steps whenever you want to
associate a number to a speed dial key (0 to
9) on the base.
11
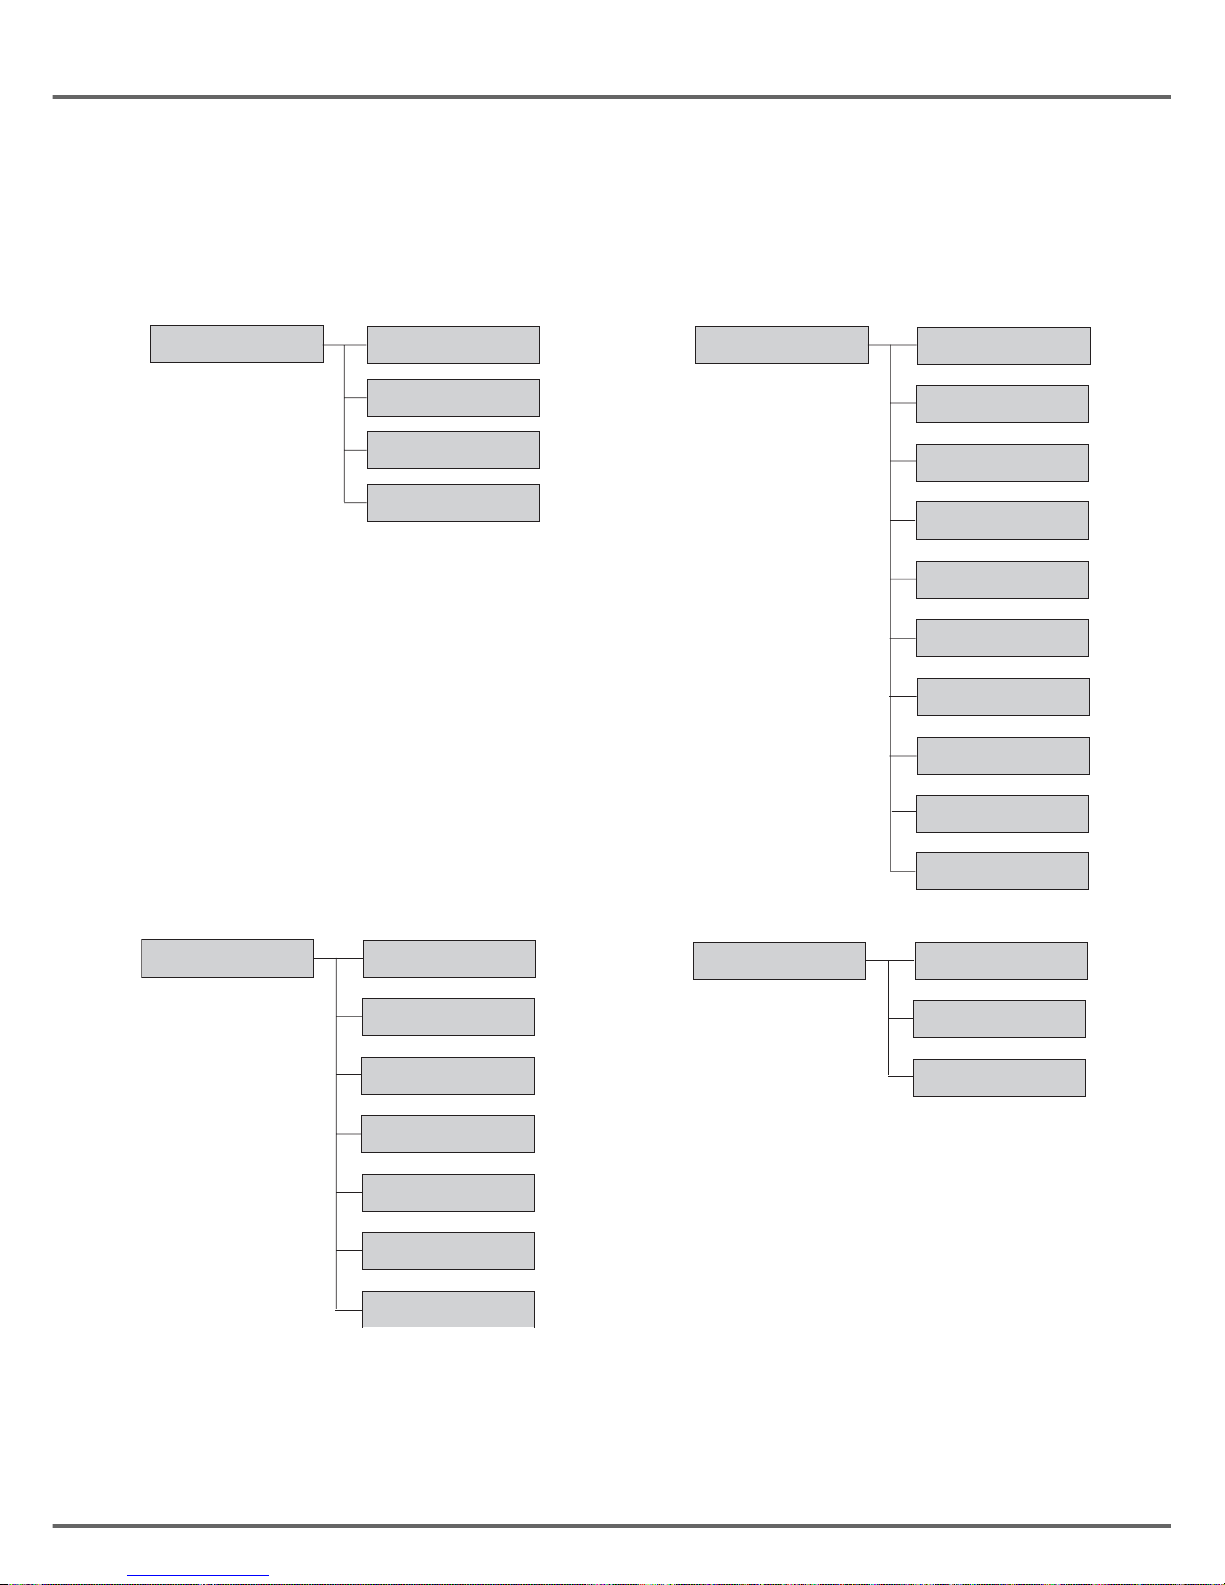
MENU STRUCTURE
You can navigate through the menus using the and keys. Press the OK key to access a
higher menu. Press the Ckey to return to the previous menu.
DIRECTORY NEW
EDIT
DELETE
FIND
DATE-TIME
CHANGE NAME
EXTERN CALL
INTERN CALL
HS SET
VOICE BOX NO
LANGUAGE
MELODY VOL
EAR VOLUME
BEEPS
AUTO ANSWER
FLASH DURA
PAUSE DURA
BASE SET
RINGTONE
CHANGE CODE
RING VOLUME
REINIT BASE
DEREGIST HS
REGISTRATION
SELECT BASE
REGISTER HS
DIAL MODE

12
YOUR DIRECTORY
You can store 25 numbers entries in your
directory.
Each directory entry can contain the name of
your contact which can be a maximum of 12
characters long (spaces included), your
contact's telephone number up to 25 digits.
Viewing the directory
On the navigator key , press or until
the DIRECTORY screen is displayed, press
OK to confirm (you can also use to
directly consult your directory list).
Select FIND by pressing the or key.
Press OK.
The list of directory entries organised in
alphabetical order appears.
Select the entry you want to view using or
. Once you have selected it, press OK.
You can call the number that is associated to
the entry directly by pressing the green
key .
To exit the menu, press the red key .
You can also view the directory
simply by pressing the key.
You can then select the entry by
pressing the key corresponding to
the first letter of the name.
Creating an entry
On the navigator key , press or until
the DIRECTORY screen is displayed, press
OK to confirm.
Select NEW by pressing the or key.
Press OK.
The name input screen appears.
Using the keypad keys, enter the name of
your contact by pressing successively on the
corresponding keys (see the following table).
To enter text, press successively on the
desired key until the letter is displayed on the
screen.
Key Action
1
A, B, C, 2
D, E, F, 3
G, H, I, 4
J, K, L, 5
M, N, O, 6
P, Q, R, S, 7
T, U, V, 8
W, X, Y, Z, 9
space, --, 0
YOUR DIRECTORY
13
In case of a mistake, press Cto erase one
character at a time.
Once you are done making your changes,
press OK.
The number input screen appears.
Now, enter the name of your contact using
the keypad keys.
To enter the pause mode during dialling,
press the key until letter P appears.
In case of a mistake, press Cto delete the
last digit.
Once you are done making your changes,
press OK.
A new entry is created. It appears in the
directory list.
Editing an entry
On the navigator key , press or until
the DIRECTORY screen is displayed, press
OK to confirm.
Select EDIT using or . Press OK.
Select the entry you want to edit using or
. Press OK.
You enter the name input screen. The cursor
is at the end of the name.
• The information is accurate. Press OK.
• To correct the name, press Ckey to
delete characters. Make your corrections
using the keypad keys by pressing
successively on the corresponding keys.
Once you are finished, press OK.
You enter the number input screen. The
cursor is at the end of the number.
• The information is accurate. Press OK.
• To correct the number, press Ckey to
delete the numbers. Enter the new
number and press OK.
To exit the menu, press the red key .
Deleting an entry
On the navigator key , press or until
the DIRECTORY screen is displayed, press
OK to confirm.
Select DELETE using or . Press OK.
Select the entry you want to delete using
or . Once you have selected it, press OK to
confirm.
A confirmation screen asks you if you wish to
delete the entry.
• If you do not wish to delete the entry,
press Ckey.
• To delete the entry, press OK. The entry
is deleted from the directory.
To exit the menu, press the red key .
YOUR DIRECTORY
14
CALL LOG
This menu enables you to view the received
and the dialled calls list.
Viewing the dialled calls
From the idle screen, press and hold the
green key until the last dialled number
appears.
You can view the 10 last dialled calls by
pressing key.
You can recall one of the last dialled number.
Select the number and press the green
key .
Viewing the received calls
From the idle screen, press the red key
until the last received call appears.
You can view the 24 last received calls by
pressing or key.
The presentation screen for the last call
received appears.
This screen presents the following
information (depending on the service
provider and subscription):
The «"Caller ID name and
number"» function must be activated
to perform this operation, contact
your service provider for the list of
functions available.
• the name of the subscriber (if the name
is in the telephone book or the CLIP
function has been activated),
or
• the telephone number.
To view the previous calls, use or . The
calls are organized in chronological order,
from the most recent call to the oldest call.
To exit the menu, press the red key .
Adding a contact in the directory
from the list of received calls
Press and hold the key to access to the
list of received calls.
Use or to select the number you wish
to add to the directory. Press OK.
The number of calls from the specified
telephone number appears.
Press OK.NEW is displayed on the screen,
press OK.
The field where the name can be entered
appears. Depending on your service provider
and the service you applied for, the name can
be transmitted over the network and
displayed.
You can change it by pressing the Ckey.
Press OK, the number of calls from
the specified telephone number
appears.
Press OK, the date and time of the
received call are displayed.
CALL LOG
15
Enter the name of the caller with the
keyboard and press OK.
The number specified appears to the screen,
press OK.
Deleting a number from the call
log
Press the key to access to the list of
received calls.
Use or to select the number you wish
to add to the directory. Press OK.
the number of calls from the specified
telephone number appears, press OK.
The date and time of the received call are
displayed, press OK.
Use or to select DELETE ?, press
OK.
CONFIRM ? appears on the screen , press
OK to validate.
Viewing a missing call
IIf there were one or more calls for you in your
absence, a symbol will be displayed and
the base green light will continually flash.
It informs you as to the calls received during
your absence.
If a number appears under the
PRIVATE display or if it is exists in
your directory, you will not be able to
delete this number from the call log.
?
In order to check the calls during your
absence, please refer to paragraph Viewing
the received calls, page 14.
CALL LOG

16
HANDSET SETTINGS
Activating or deactivating the
beeps
On the navigator key , press or until
the HS SET screen is displayed, press OK to
confirm.
Select BEEPS using or . Press OK.
Select the beep type using
or
. Press
OK
.
KEYPAD PRESS: the handset beeps when a
key is pressed.
BATTERY LOW: the handset beeps when
the battery is too low.
OUT OF RANGE: When the base station is
out of range, the handset will warn you
acoustically.
An information screen displays the beep
status (ON or OFF) for the selected item.
• To change the status, press or .
Press OK.
• To keep the status, press C.
To exit the menu, press the red key .
Modifying the default handset
melody volume
On the navigator key , press or until
the HS SET screen is displayed, press OK to
confirm.
Select MELODY VOL using or .
Press OK.
There are seven alternatives in succession to
choose from:
•VOL OFF: No ringing tone.
•VOLUME X: From 1 to 5.
•CRESCENDO: The volume of the ring
tone increases with every ringing
sequence.
Press or to increase or decrease the
default volume. Once the volume is set,
press
OK
.
To exit the menu, press the red key .
Modifying the handset ringtone
This menu enables you to associate a
ringtone to incoming calls or internal calls
(intercom).
On the navigator key , press or until
the HS SET screen is displayed, press OK to
confirm.
Select EXTERNAL CALL or INTERNAL
CALL using or . Press OK.
Select the desired ringtone using or .
Press OK.
To exit the menu, press the red key .
HANDSET SETTINGS

17
HANDSET SETTINGS
Setting the ear volume
On the navigator key , press or until
the HS SET screen is displayed, press OK to
confirm.
Select EAR VOLUME using or .
Press OK.
Press or to increase or decrease the
default volume. Once the volume is set,
press
OK
.
To exit the menu, press the red key .
Using the auto answer features
When active, the auto answer feature
enables you to automatically answer as soon
as you remove the handset from its base.
On the navigator key , press or until
the HS SET screen is displayed, press OK to
confirm.
Select AUTO ANSWER using or . Press
OK.
A screen displays the current status (ON or
OFF).
• To change the status, press or .
Press OK.
• To keep the status, press C.
To exit the menu, press the red key .
During communication, you can
increase or decrease the audio
volume of your handset by pressing
the
or
key on the navigator.
Change the name of the handset
On the navigator key , press or until
the HS SET screen is displayed, press OK to
confirm.
Select CHANGE NAME using or .
Press OK.
The current name will be displayed. Delete
the current name using the Ckey then enter
the new name using the keypad. Press OK.
To exit the menu, press the red key .
Modifying the language
This function enables you to change the
screen display language.
On the navigator key , press or until
the HS SET screen is displayed, press OK to
confirm.
Select LANGUAGE using or .
Press OK.
An information screen presents the current
language used.
• To change the setting, press or to
select the language. Press OK.
• To keep the setting, press .
To exit the menu, press the red key .
One can put that 5 characters for the
name of handset.
This manual suits for next models
1
Table of contents
Other Sagem Cordless Telephone manuals


