SAGEMCOM D530 User manual

D530/D530P
USER GUIDE

2
Dear customer,
You have just acquired a new generation Sagemcom telephone and thank you for placing your
confidence in us.
This product follows a strategy of continuous development. We reserve the right to make
changes without notice, modifications and improvements to the products described in this
user manual.
To operate the device safely and easily, please read carefully the paragraph
“Recommendations and safety instructions”, page 4.
The CE label confirms that the product complies with the 1999/5/EC regulations of
the European Union Parliament regarding wireless systems and telecommunications.
The declaration of compliance may be looked up on the www.sagemcom.com
website section «Support», or can be obtained from the following address :
Sagemcom Broadband SAS
250, route de l'Empereur 92848 Rueil-Malmaison Cedex - France
Copyright © Sagemcom Broadband SAS
All rights reserved
Sagemcom is a registered trademark.

3
Recommendations and safety
instructions ................................ 4
Discover... .................................. 6
Your phone ......................................................6
The handset screen .....................................9
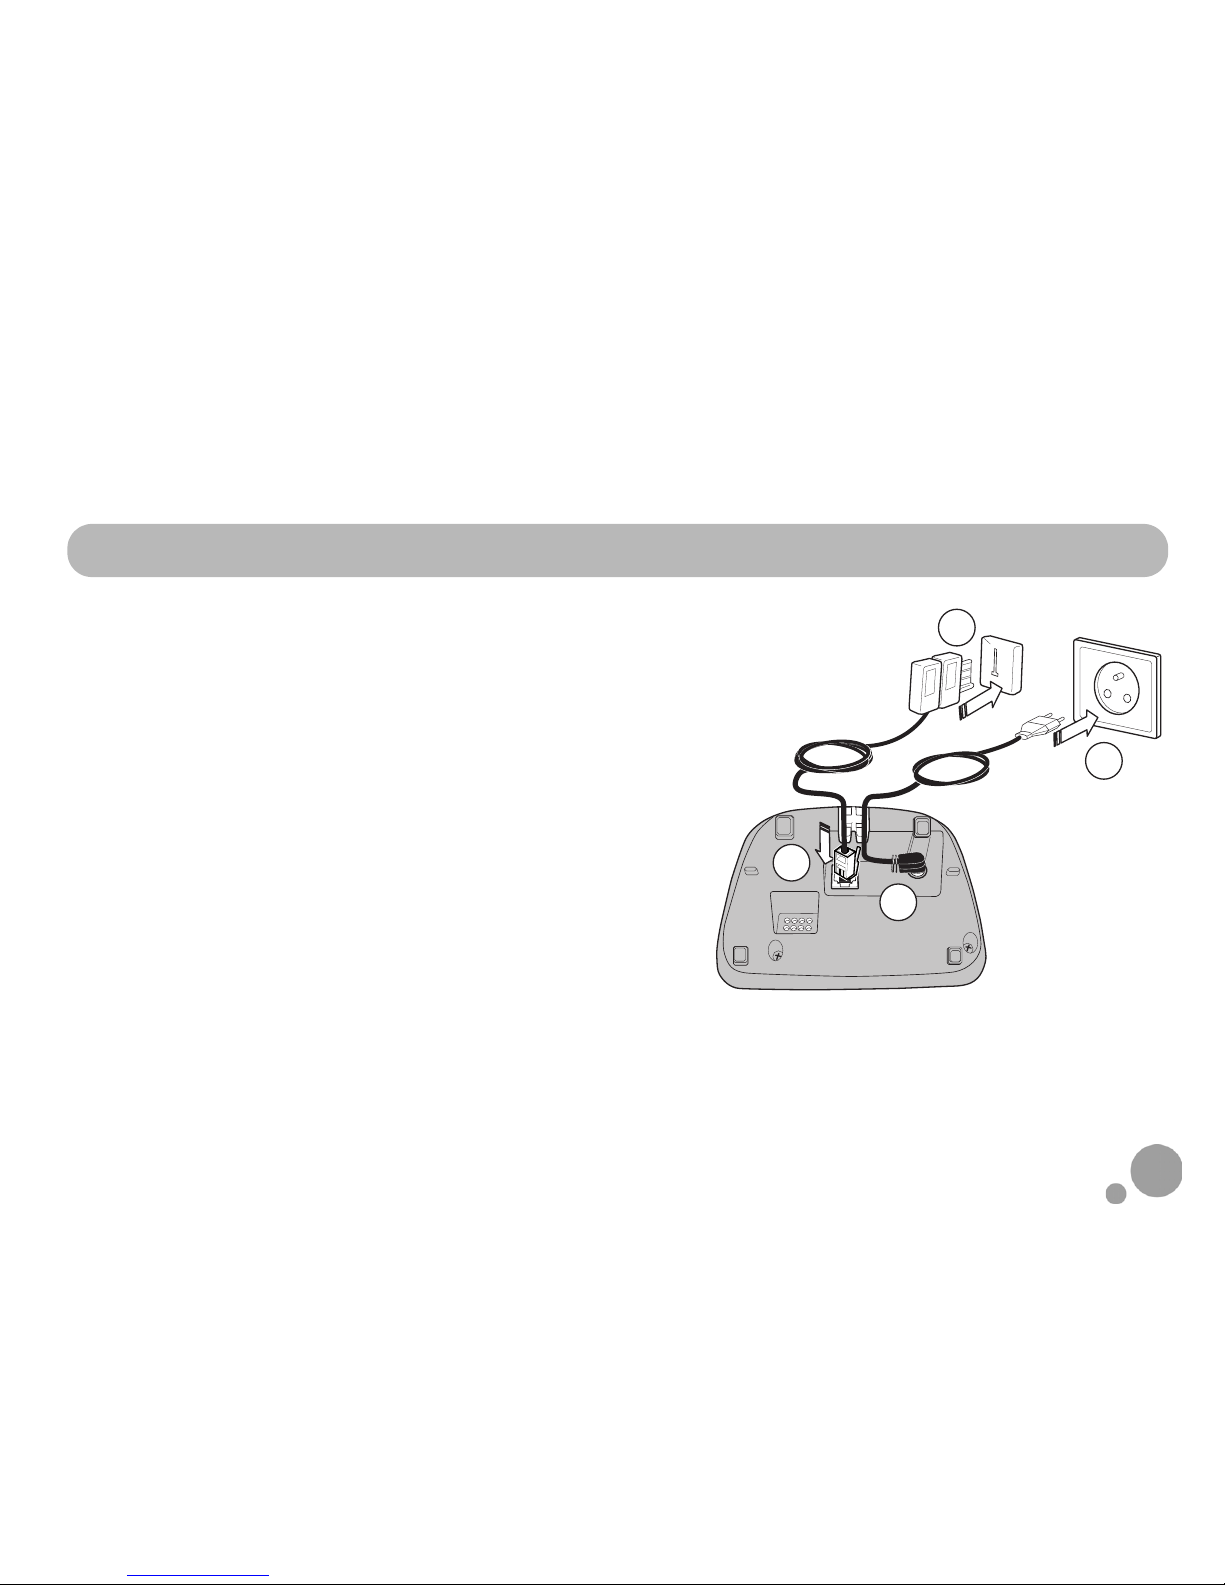
Setting up................................. 10
Connecting the base ................................. 10
Handset set-up ........................................... 11
Switching the handset on / off ............... 11
Charging ...................................................... 12
Personalising the D530P base ............ 13
Browsing through the menus ................. 13
Menu tree structure .................. 17
Making and receiving calls........ 18
Managing a call .......................................... 18
Options during a call ................................ 19
Managing several calls ............................. 21
Managing calls with
the base D530P ......................................... 22
Using additional handsets .......................24
Using the phonebook ................................26
Locating your handset ..............................29
Listening to your messages .....................30
Locking / Unlocking the keypad .............30
Setting up... .............................. 31
The phone .....................................................31
The handset .................................................33
The base .......................................................35
The line ..........................................................38
Alarm........................................ 39
The alarm ......................................................39
Tracing your calls...................... 41
Call logs ........................................................41
The events log .............................................42
Environment ............................. 43
Guarantee ................................ 44

4
Recommendations and safety instructions
For safety reasons, never put the handset in the base station without the battery
inserted or without the lid on the battery compartment as this could cause an electric
shock.
To avoid damaging your handset/base, only use certified rechargeable batteries
NiMH 1.2 V 600 mAh, never use non-rechargeable batteries. Insert the batteries in
the handset/base battery compartment respecting polarity.
Only use the power unit supplied and connect it to the electricity mains in
accordance with the installation instructions in this user manual and the details on
the sticker regarding voltage, electrical current and frequency. As a precaution if
there is a risk of danger, the power plug can be pulled out to disconnect the 230 volt
power supply. Therefore the sockets should be near the device and easily
accessible.
Do not install your DECT telephone in a damp environment, such as a bathroom,
washroom, kitchen etc, and not within 1.50 metres of a source of water or outside.
This device is designed for use in temperatures of between 5 °C and 40 °C.
Your DECT telephone has a range of approx. 50 metres indoors and up to 300 metres
outdoors. The range can be affected by the proximity of metal objects, such as a
television and electrical devices.
Zones without reception may appear owing to elements in the building. This can
cause brief interruptions in the conversation, caused by faulty transmission.

5
Certain medical equipment and highly-sensitive machines or security systems may
be affected by the transmission power of the telephone. In these cases we
recommend adhering to the safety information.
In regions greatly affected by electrical storms we recommend that you protect your
telephone circuit with a special fixture for excess voltage.
Your D530 has anti-skid pads that should leave no traces on your furniture and
ensure stability.
However, given the wide variety of finishes used by furniture manufacturers, traces
may appear on surfaces in contact with the parts of your D530. Sagemcom
Broadband SAS decline all responsibility in any such cases of damage.
Do not attempt to remove screws or open the appliance. It does not contain any
user-replaceable parts
Worn out batteries must be disposed of in line with the recycling regulations in this
user manual.
This device is designed to be used for connecting to the public telephone network. If
problems should arise, contact your nearest specialist dealer. Only use the telephone
cable supplied.

6
Discover...
Your phone
The pack
Check that you have the following items in your pack:
aD530 or D530P base according to model,
two rechargeable batteries (type NiMH 1.2 V 600 mAh),
a telephone connection cord,
a mains power supply with connection cord,
a belt clip,
this user guide.
If you have purchased a Duo or Trio pack, you will also find for each extra handset:
a charger,
a mains power supply with connection cord,
two rechargeable batteries (type NiMH 1.2 V 600 mAh),
a belt clip.

7
The base
1Handset location.
2Handset(s) Search / Pairing key
•
Long press
: pairing of handsets.
•
Short press
: paging of handsets.
3Display:
•Displays the current time.
•P: indicates PM if the time format is 12 Hour.
4Volume keys:
•VOL -: To reduce the volume.
•VOL +: To increase the volume.
5Hands-free key:
•
Standby screen/During a call from the handset
to
(de)activate the hands-free mode
•
On receiving a call
: to answer in hands-free mode;
press again to hang up.
•
During a call from the base
: to end the call.
6To call My favourite numbers (direct call keys -
see page 37).
2
1
M1
M2
M3
M4
2
31
5
6
4
Model D530
Model D530P

8
The handset
1Indicator light - incoming call.
2Loudspeaker.
3Graphic screen.
4Upper and lower side keys :
•To Increase / Decrease the volume.
•Browsing through the menus.
5Phonebook access key.
6Menu access / validation key.
7Mute button: cuts off the microphone.
8"Hang up" button
•
Short press
: return to main menu.
•
Long press
: switch handset on / off.
9Alphanumeric keypad.
10 "Hash" key
•
Long press
: (un)lock the keypad.
11 Microphone.
12 Charging terminals.
13 "Star" key
•
Long press
: to (de)activate the silent mode.
14 "Open line" key
•
During a call
: to (de)activate the hands-free
mode. 11
10
16
4
15
8
18
17
1
2
3
5
6
12
13
7
9
14

9
15 Browsing through the menus / Upper and lower keys:
•To increase / Decrease the volume.
•Browsing through the menus.
•: See the list of calls received.
•: See the list of outgoing calls.
16 R key (flashing, to manage several calls).
17 Cancel / Intercom / Delete character key.
18 Side key : (de)activate the amplifier.
The handset screen
THE ICONS DISPLAYED
In standby mode or during use, your phone screen informs you of your phone’s current state
through icons, and in particular:
1Status icons: Indicates your phone’s current state.
2Information field: in the normal state, displays the name of the handset and the current time.
When the 12-hour time format is set, AM or PM is displayed after the time.
Speakerphone
enabled Battery charge condition
Silent mode
activated
There are messages on your online
message recorder
Alarm on Keypad locked
1
2
Handset.1
12:30

10
Setting up...
Connecting the base
1Turn the base over.
2Take the telephone connection cord, click it
into its socket and connect the other end of
the cord to the telephone socket.
3Take the mains power supply. Connect the
jack plug of the power supply underneath the
base and connect the power supply to the
mains.
D530P - the display lights up.
4Pass the cords through the cord grips
provided.
5Place the base where you want it located.
Before making connections, please see the safety instructions at the start of the booklet.
4
3
2
1

11
Handset set-up
1Take the batteries provided in the packaging.
2Turn over your handset and press the top of the hatch to
release it.
3Insert the batteries one by one according to their polarities as
indicated in the illustration opposite.
4Fit the hatch to the handset by pushing it up until it is
completely closed.
5The screen turns on. Place your handset on its base and fully
charge the batteries.
6A beep sounds when you place the handset on the base.
The battery charging icon moves to inform you that
charging is in progress. The icon display stops moving when the
batteries are charged.
Switching the handset on / off
To switch on the handset, give a long press on the key .
To switch off the handset, give a long press on the key .
The message Switch off HS? is displayed.
Press the key to confirm.

12
Charging
To charge your phone, place the handset on the base, making sure that the base is connected
to an AC outlet.
Battery replacement
1Turn off the handset. Turn it over to access the battery compartment hatch.
2Remove the battery compartment hatch.
3Remove the old batteries, insert the new batteries one by one the right way as indicated by
their polarities.
4Refit the battery compartment hatch.
To ensure optimum charging, leave the handset on the base for at least 15 hours when
using the phone for the first time. During charging, the batteries may heat up. This is quite
normal and perfectly safe. If you do not obtain radio contact with your base, check the
electrical connections to your base.
Worn out batteries should be discarded in accordance with the recycling instructions
given in chapter “Environment”, page 43.
To prevent damage to your handset, only use approved AAA format NiMH 1.2 V 600 mAh
rechargeable type batteries. Never use non-rechargeable batteries.

13
Personalising the D530P base
The "M" keys on the base can be personalised with a photo of the user
associated with the key. Place a pointed tool in one of the two dimples
on the "M" key. Lift off the plastic cover. Use the cover as a template to
cut the photo to size. Insert the photo and replace the plastic cover.
Browsing through the menus
Browser
This browser allows you to quickly access menus and change your settings easily.
It points in two directions. To access the phone menu, press .
When choosing menus, press the top or the bottom of the browser to access
the previous or next menu.
During a call, press the top of the browser to increase the volume or the bottom
to decrease it.

14
The multifunction keys
Your telephone has two and "multifunction" keys which you can use in several ways:
Illustration
To browse-through menus, use the browser [or right side keys] and two multifunction buttons:
1Press the key .
The main menu is displayed on the screen.
2Press the top or bottom of the browser key to scroll through the menus and
access the desired function.
3Confirm your choice/Enter the displayed menu by pressing the key .
4Cancel your choice/Exit the displayed menu:
•either by pressing the key .
•or by pressing the : key; the home screen is displayed.
From the standby screen In a menu
To access the telephone menu. To enter a menu, to validate an action in a menu.
To make an Intercom call
(call to another handset).
To return to the previous menu. To delete characters. With
each press, the character preceding the cursor is deleted.

15
DETAILED BROWSER EXAMPLE: ADJUST THE DATE AND TIME
To access the date and time setting menu:
1Press the key . The main menu is displayed on the screen.
2Scroll through the menus to the Settings menu by pressing the top or bottom of the
browser key .
3Enter the Settings menu by pressing the key .
4Scroll through the menus to the Date/Time/Alarm menu by pressing the top or bottom
of the browser key .
5Enter the Date/Time/Alarm menu by pressing the key .
6Enter the Date & Time menu by pressing the key .
7Scroll through the menus to the Enter time menu by pressing the top or bottom of the
browser key .
8Enter the Enter time menu by pressing the key .
9Enter the time: using the numeric keypad (hours then minutes).
10 Confirm your entry by pressing the key . The home screen displays the message Saved.
It is recommended to set the date and time accurately to allow you to keep track of the
timings of your calls and messages.
If you have the Display number option, the date and time will, depending on your operator,
be set automatically when you receive a call.

16
11 Scroll through the menus to the Enter date menu by pressing the top or bottom of the
browser key .
12 Enter the Enter date menu by pressing the key .
13 Enter the date using the numeric keypad (day, month and year) in the form DD/MM/YY.
14 Confirm your entry by pressing the key . The home screen displays the message Saved.
You have just set your phone’s current date and time. You can also set the date and time
display format (see “Setting the date and the time”, page 32).
Refer to the “Menu tree structure”, page 17 section to find out about your phone’s functions.
Procedures in your booklet
The procedures in your booklet are presented in the form of sheets.
To facilitate their implementation, each of them includes the following as appropriate :
•the keys associated to directly access the function described, and/or
•the path for accessing the function described in the menu.
EXAMPLE : TO (DE)ACTIVATE THE SILENT MODE
(Long press): means you can use the key(s) offered to access the function.
>Sound > Ringer >
Ringer volume > Off
means you can access this function by displaying the menu,
then going down the menus displayed to the function Ringer
volume and selecting the state Off.

17
Menu tree structure
Call log
Empty
Call log
All Calls
Missed calls
Ringer
External
Internal
Ringer volume
Tones
Key beep
Confirmation
Battery low
No coverage
Sound
Settings
Handset settings
Select base
Display
Contrast
Handset name
Language
Auto Answer
Register handset
De-Register
Handset Reset
Base settings
Ringer*
Tone
Pulse
Flash time
100 ms
250 ms
300 ms
600 ms
System PIN
Base reset
Memory keys*
M1
M2
M3
M4
Date/Time/Alarm
Date & Time
Time format
Date format
Enter time
Enter date
Alarm
Alarm On/Off
Enter time
Ringtone
Dial Mode
Ringtone
Ringer volume
* Only for D530P

18
Making and receiving calls...
Managing a call
Making a call
FROM THE HANDSET - METHOD 1
1Dial your contact’s number.
If you make a mistake, press the key to delete the last character entered.
2Press the key .
FROM THE HANDSET - METHOD 2
1Press the key .
2Dial your contact's number. A beep sounds.
At the end of the call, press the handset key and replace the handset on its base.
FROM THE BASE
Press one of the "M" keys, the Hands-free key lights up and the call is started.
To do this, the keys M1 to M4 must be programmed. For more details, see the section
“Defining the memory keys (M1 to M4) - D530P only”, page 37.

19
Receiving a call
1Press the key to take the call.
2At the end of the call, press the handset key and replace the handset on its base.
A beep sounds.
Options during a call
You can use the following options during a call:
Enable/Disable loudspeaker (speakerphone mode)
The icon appears on the handset screen when the hands-free mode is active.
HANDSET LOUDSPEAKER (during a call)
BASE LOUDSPEAKER (D530P ONLY)(during a call)
Your handset includes an Auto Answer. function. For further details, refer to the
“Answering automatically”, page 34.
When the battery charge icon is at minimum, the hands-free function is not available until
the next charging cycle.

20
Adjusting the volume
•To increase the volume, press in the browser or on the key on the right side of the
handset.
•To decrease the volume, press in the browser or on the key on the right side of the
handset.
•To increase the volume during a call, press the key on the left side of the handset. To
return to normal volume, press this key again.
The secret mode allows you to temporarily mute the line so that you are not heard by the caller.
Once enabled, the Mute On message flashes on the screen.
FROM THE HANDSET , and ,
(during a call)
FROM THE (D530P BASE ONLY)and
(communication in progress from the
base)
Enabling/Disabling the secret mode (during a call)
This manual suits for next models
1
Table of contents
Other SAGEMCOM Cordless Telephone manuals

SAGEMCOM
SAGEMCOM D680C Solo User manual

SAGEMCOM
SAGEMCOM D350 User manual

SAGEMCOM
SAGEMCOM D680C Solo User manual

SAGEMCOM
SAGEMCOM D16V User manual

SAGEMCOM
SAGEMCOM Seen User manual

SAGEMCOM
SAGEMCOM D380 User manual

SAGEMCOM
SAGEMCOM D380 User manual

SAGEMCOM
SAGEMCOM SIXTY User manual

SAGEMCOM
SAGEMCOM SIXTY 2 User manual

SAGEMCOM
SAGEMCOM D77T-V User manual