Sambo SB-V Series User manual

Operating instructions for SAMBO Bevel V1.00-2021.03.22
SEC-DS-ENGLISH-GETRIEBE-SAMBO-Kegelrad-V1.00-2021.03.22
Operating instructions for SAMBO SB-V series bevel gear operator
1 Introduction
This installation and maintenance manual explains, how to install and maintain the Sambo SB-V operator.
Information on installation, disassembly, reassembly, lubrication and spare parts is provided.
Figure 1: V Exploded View
Figure 2: VH Exploded View
WARNING: Do not manually operate the SB-V(H) gearbox (see figures 1 and 2) with devices
other than the installed handwheel or wrench nut. Using additive force devices (cheater bars,
wheel wrenches, pipe wrenches, or other devices of this nature) on the gearbox handwheel,
wrench or wrench nut may cause serious personal injury and/or damage to the gearbox or valve.
2 Safety instructions
NOTE: Read this Installation, Operation and Maintenance manual carefully and completely before attempting
to install, operate or troubleshoot the SAMBO gearbox.
CAUTION: Work undertaken must be carried out in accordance with the instructions in this and any
other relevant manuals. The user and those persons working on this equipment should be familiar
with their responsibilities under any statutory provisions relating to the Health and Safety of their
workplace. Due consideration of additional hazards should be taken when using the gearbox with other equip-
ment. Should further information and guidance relating to the safe use of the SAMBO products be required, it
will be provided on request.
NOTE: The mechanical installation should be carried out as outlined in this manual and also in accordance
with relevant standards. No inspection or repair should be undertaken unless it conforms to the specific haz-
ardous area certification requirements. For maintenance of the actuator, refer to the actuator installation and
maintenance manual.
1

V1.00-2021.03.22 Operating instructions for SAMBO Bevel
WARNING: Potential HIGH-PRESSURE vessel — be aware of high-pressure hazards associ-
ated with the attached valve or other actuated device when installing or performing mainte-
nance on the gearbox. Do not remove the gearbox mounting bolts from the valve or actuated
device unless the valve or device stem is secured or there is no pressure in the line.
CAUTION: For maintenance and/or disassembly of the gearbox while installed on the valve, ensure
that the gearbox is not under thrust or torque load. If the valve must be left in service, the valve stem
must be locked in such a way as to prevent any movement of the valve stem.
WARNING: Do not manually operate the gearbox with devices other than the installed hand-
wheel. Using force beyond the ratings of the gearbox and/or using additive force devices
such as cheater bars, wheel wrenches, pipe wrenches, or other devices on the gearbox hand-
wheel may cause serious personal injury and/or damage to the gearbox and valve.
CAUTION: Do not exceed any design limitations or make modifications to this equipment without
first consulting SAMBO.
CAUTION: Use of this product must be suspended any time it fails to operate properly.
CAUTION: Damage to protective coatings should be correctly rectified and may invalidate war-
ranty.
CAUTION: If a motor actuator is driving the gearbox, do not operate the valve under motor operation
without first checking and setting the limit switch and checking for correct motor rotation.
WARNING: Do not use replacement parts that are not genuine SAMBO parts, as serious
personal injury and/or damage to the gearbox and valve may result.
2

Operating instructions for SAMBO Bevel V1.00-2021.03.22
3 Storage
WARNING: Read this installation and maintenance manual carefully and completely before
attempting to store the operator. If an electric actuator is attached to the SB-V(H) operator,
be aware of the electrical hazards. Consult the electric actuator installation and maintenance
manual for guidance.
NOTE: The following is the recommended storage procedure to retain maximum product integrity during stor-
age. Failure to comply with recommended procedure will void the warranty.
Storage (less than one year)
Store the gearboxes on wooden skids to protect the machined mounting flange. Place the wooden skids
containing the gearboxes in a clean, dry, protected warehouse. If the gearboxes must be stored outside, they
must be covered in polyethylene protection with silica gel crystals to absorb moisture.
If an electric actuator is attached to the SB-V gearbox, refer to the storage procedures in its respective manual
for appropriate storage procedures. Rotate input shafts every three months to mix the lubricant.
Recommended storage temperature range: 0°C to 40°C (32°F – 104°F).
4 Unpacking
Gearboxes are packed in a variety of configurations depending on size, type and quantity of the consignment.
It is the responsibility of the individual unpacking and handling the combination to carry out a risk assessment
for the supplied arrangement to ensure safe working.
Packaging material used may include wood, cardboard, polyethylene and steel. Packaging should be recycled
according to local regulations.
5 Handling
Individual weights for gearboxes are recorded on their respective nameplates.
CAUTION: Only trained and experienced personnel should carry out handling. At all times, safe
handling must be ensured.
Each combination must be assessed to identify all risks associated with handling.
The gearboxes must be fully supported until full valve shaft/stem engagement is achieved and the gearbox
is secured to the valve flange.
Once connected to the valve, each assembly must be assessed on an individual basis for safe handling/lifting.
Never lift the complete combination-valve assembly via the gearbox.
If it is necessary to lift the gearbox using lifting equipment, certified soft slings are recommended. Damage to
protective coatings should be correctly rectified and may invalidate warranty.
6 General Mounting Instructions
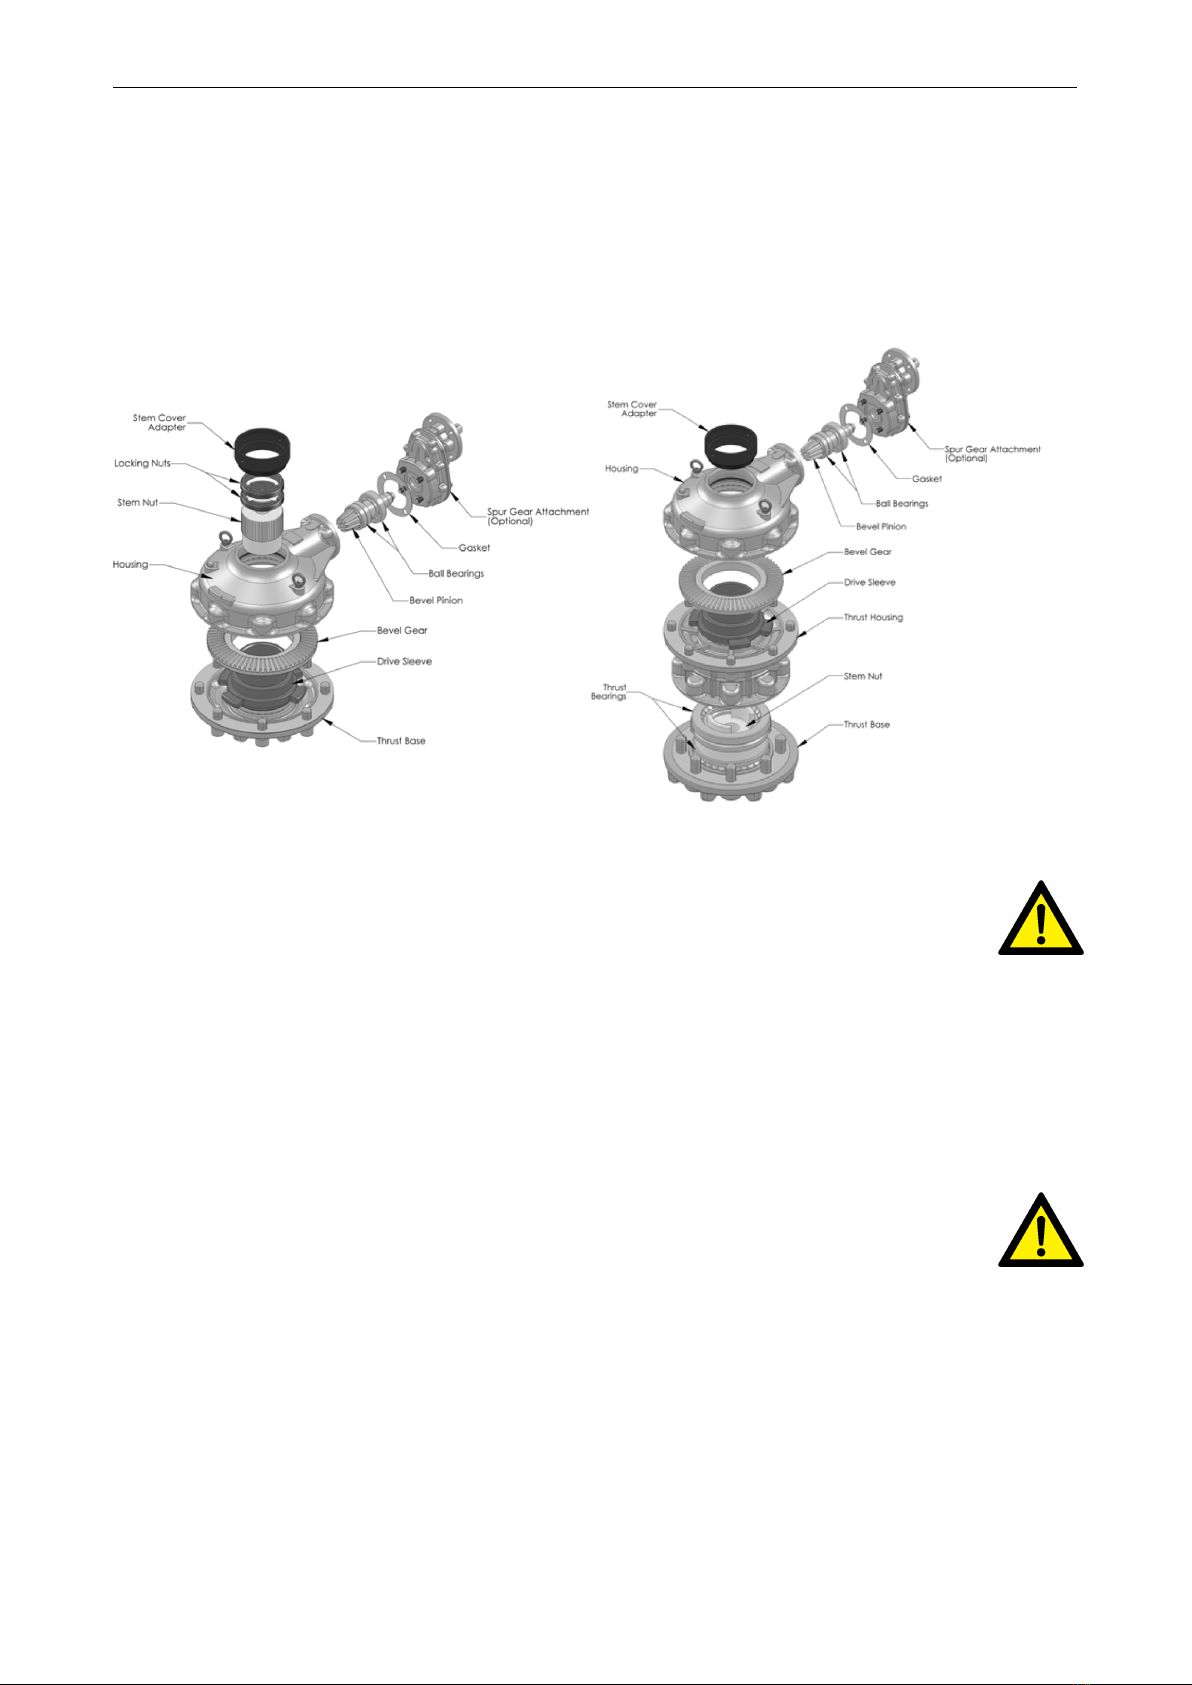
The mounting instructions for the SB-V bevel gearboxes are outlined below. The V0 through V9 gearboxes are
designed with a splined top-entry Stem Nut which is retained in the Drive Sleeve by two Lock Nuts.
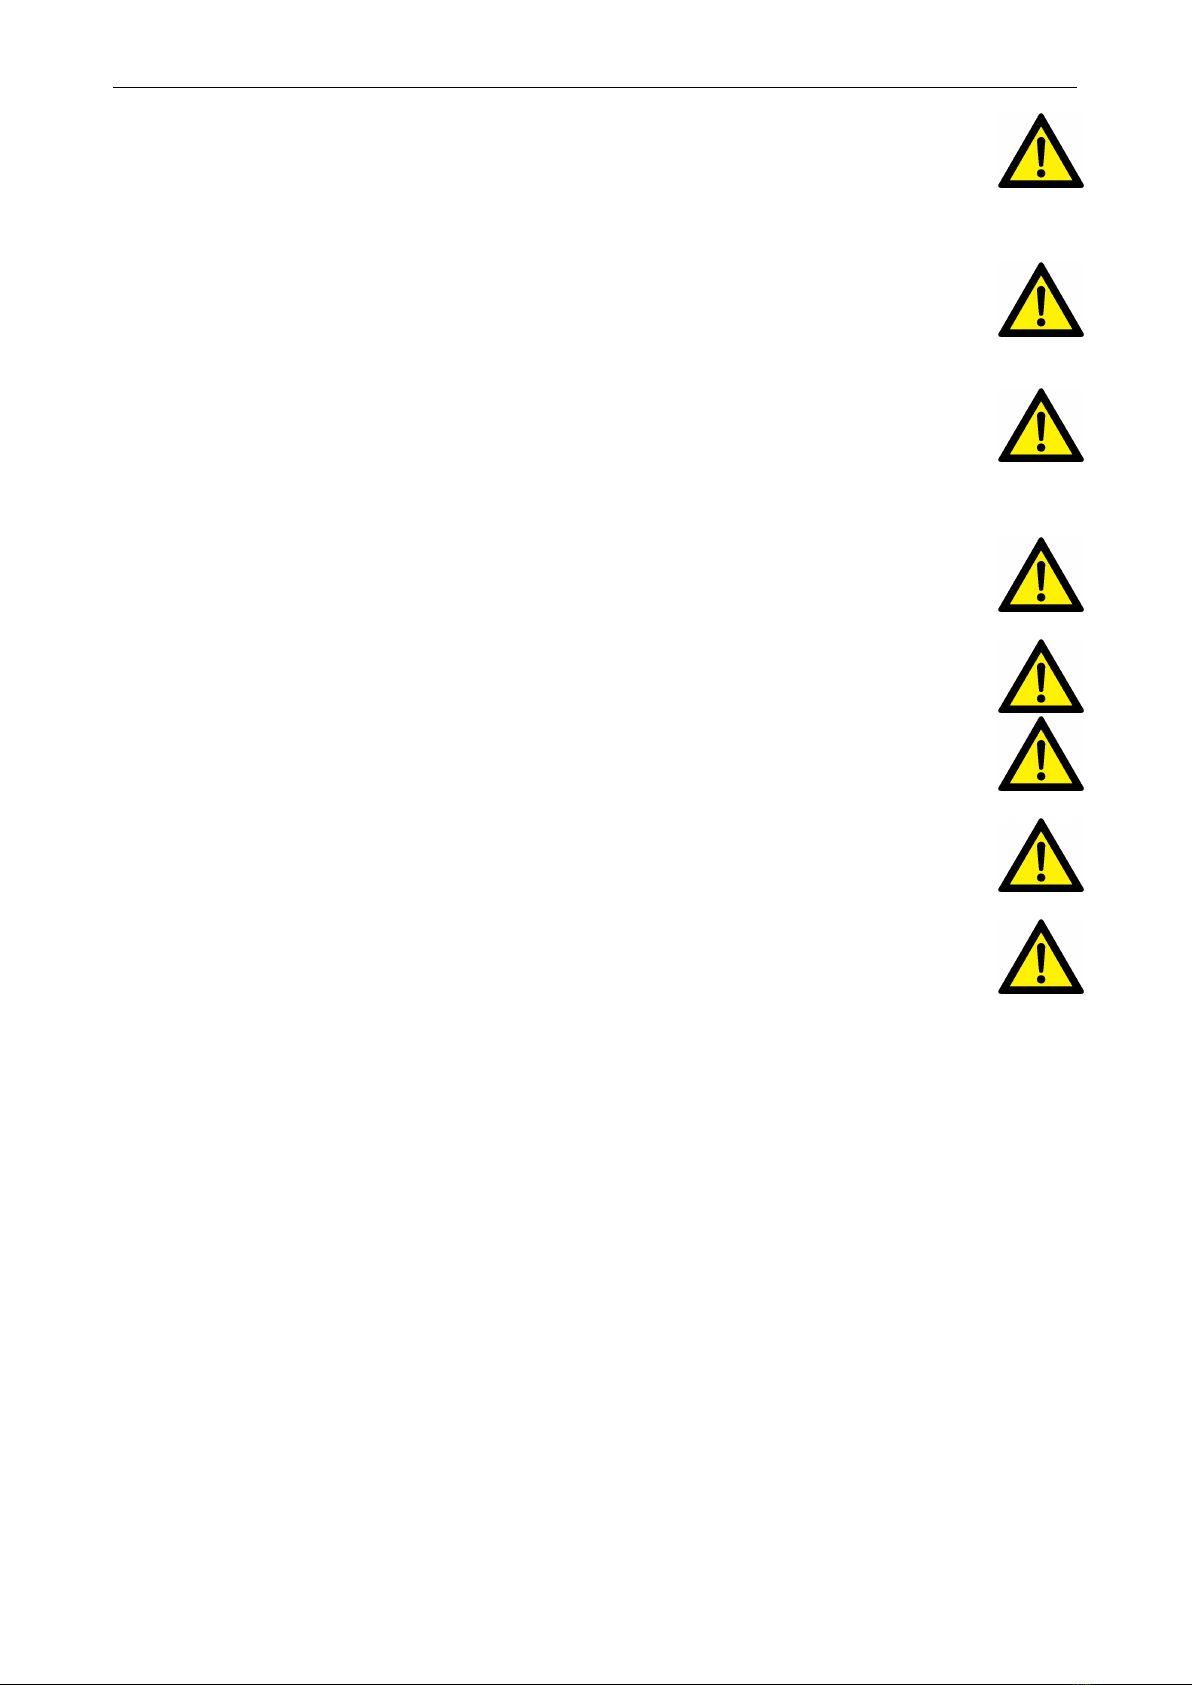
The V35H through V9H gearboxes are designed with a Stem Nut which is retained by two Thrust Roller
Bearings within the Thrust Housing and Thrust Base. Partial disassembly of the Thrust Base is required for
Stem Nut removal and/or installation.
6.1 Installing a Gearbox with a Threaded Stem Nut – V0 through V9 and V35H through
V9H
1. Position the gearbox above the valve stem.
3

V1.00-2021.03.22 Operating instructions for SAMBO Bevel
2. Rotate the gearbox handwheel or wrench nut several turns until there is positive engagement between
the valve stem and the gearbox Stem Nut.
3. Rotate the handwheel to lower the gearbox onto the valve until contact has been made with the valve
flange.
4. Bolt the gearbox securely to the valve mounting flange.
6.2 Installing a Gearbox with a Blank Stem Nut – V0 through V9
1. Remove the two threaded Lock Nuts (item no. 7) from the Drive Sleeve (item no. 6), accessed through
the top of the Housing (item no. 1).
2. Remove the Stem Nut (item no. 5) from the Drive Sleeve (item no. 6) through the top of the Housing
(item no. 1).
3. Machine the Stem Nut (item no. 5) to suit the valve stem.
CAUTION: Care must be taken to ensure that the clamping devices used during machining do not
damage splined surfaces of the Stem Nut.
4. Reinstall the Stem Nut (item no. 5) into the Drive Sleeve (item no. 6), ensuring the splines are properly
engaged.
5. Reinstall the two threaded Lock Nuts (item no. 7) into the Drive Sleeve (item no. 6).
6. Mount the gearbox on the valve.
6.3 Installing a Gearbox with a Blank Stem Nut – V35H through V9H
1. Place the gearbox upside down to access the mounting base.
2. Remove the Socket Head Cap Screws (item no. 34) which mount the Thrust Base (item no. 31) to the
Thrust Housing (item no. 2).
3. Remove the Thrust Base (item no. 31) and Gasket (item no. 32) from the Thrust Housing (item no. 2).
CAUTION: Care must be taken to ensure that the O-ring (item no. 15) located in the Thrust Base
(item no. 31) is not damaged during disassembly.
4. Remove the Stem Nut (item no. 5) and lower Thrust Roller Bearing (item no. 33).
5. Remove the upper Thrust Roller Bearing (item no. 33). Place all bearings in a clean, dry area until
reassembly.
6. Machine the Stem Nut (item no. 5) to suit the valve stem.
CAUTION: Care must be taken to ensure that the clamping devices used during machining do not
damage splined surfaces of the Stem Nut (item no. 5).
7. Remove the Stem Nut (item no. 5) and lower Thrust Roller Bearing (item no. 33).
8. Remove the upper Thrust Roller Bearing (item no. 33). Place all bearings in a clean, dry area until
reassembly.
9. Machine the Stem Nut (item no. 5) to suit the valve stem.
10. Place the Gasket (item no. 32) onto the Thrust Housing (item no. 2).
11. Separately, install the O-Ring (item no. 15) in the Thrust Base (item no. 31).
12. Install the Thrust Base (item no. 31) with O-Ring (item no. 15) onto the Thrust Housing (item no. 2) and
Stem Nut (item no. 5), using Socket Head Cap Screws (item no. 34).
4

Operating instructions for SAMBO Bevel V1.00-2021.03.22
CAUTION: Care must be taken to ensure that the O-ring (item no. 15) located in the Thrust Base
(item no. 31) is not damaged during installation.
13. Mount the gearbox on the valve.
7 Stem Cover Mounting Instructions
The gearbox is supplied with a Stem Cover Adapter (item no. 28) which accepts unthreaded Stem Covers
of standard NPS pipe sizes. Optionally, the adapter may be removed to access PF (BSPP) pipe threads, if
required.
7.1 Installing an unthreaded Stem Cover using the supplied Stem Cover Adapter
CAUTION: Care must be taken to ensure the Stem Cover does not damage the O-ring during in-
stallation.
NOTE: Lubricate the O-ring (item no. 27) before installing the Stem Cover.
1. Remove the Stem Nut (item no. 5) and lower Thrust Roller Bearing (item no. 33).Loosen the quantity (4)
set screws (item no. 30) in the Stem Cover Adapter (item no. 28).
2. Install the Stem Cover into the Stem Cover Adapter (item no. 28) and secure using the quantity (4) set
screws.
7.2 Installing a threaded Stem Cover using the optional PF (BSPP) pipe threads
CAUTION: Care must be taken to ensure the Stem Cover does not damage the O-ring during in-
stallation.
NOTE: Apply thread sealant to external threads on Stem Cover before installing.
1. Loosen the set screw (item no. 20) in the Housing (item no. 1).
2. Remove the Stem Cover Adapter (item no. 28) with O-ring (item no. 27) by unthreading it from the
Housing (item no. 1).
3. Remove and discard the O-ring (item no. 26).
4. Install the threaded Stem Cover into the Housing (item no. 1) and tighten.
8 Lubrication
SAMBO SB-V gearboxes are shipped with the following lubricants:
Product Lubricant Soap/Base Temperature range
V0 Through V9 Zenith EPSB-2 Calcium -20 °C to 200 °C
V35H through V9H Zenith EPSB-2 Calcium -20 °C to 200 °C
NOTE: The lubricant should be checked every 18 months for gearboxes.
CAUTION: Do not add a different lubricant to a SAMBO gearbox unless it is of the same soap base
as the existing lubricant, or you have received the approval of the lubricant manufacturer.
5

V1.00-2021.03.22 Operating instructions for SAMBO Bevel
Quantity
SAMBO gearboxes are built to operate on the partial immersion principle. The primary concern
regarding the amount of lubricant is whether the bevel gear assembly is totally immersed in grease. This can
be verified by the use of one or more of the “fill” and “drain” plugs provided on the gearbox housing in most
sizes.
Quality
When removing a “fill” or “drain” plug to inspect the lubricant level, remove a small amount and ensure that it
is clean and free of any contaminant, including water. Should dirt, water or other foreign matter be found, the
gearboxs should be flushed with a commercial degreaser/cleaner which is non-corrosive and does not affect
seal materials such as Buna-N or Viton. Repack the gearbox with fresh lubricant.
Consistency
The main gearbox lubricant should be slightly fluid, approximating a standard NLGI-2 grade consistency or
less.
Alternate lubricants may be used in place of the standard lubricants supplied by Flowserve, provided they are
of a formulation similar to those listed above for the respective product.
6

Operating instructions for SAMBO Bevel V1.00-2021.03.22
9 Product Weights
SB-V Gearbox Weights
Type
V Gearbox Weights
Basic Gearbox With Single Reduction
Spur Set
With Double Reduction
Spur Set
[Lbs] [Kg] [Lbs] [Kg] [Lbs] [Kg]
SB-V0 35 16 55 25 57 26
SB-V1 49 22 71 32 73 33
SB-V2 75 34 99 45 108 49
SB-V3 99 45 126 57 134 61
SB-V35 172 78 209 95 225 102
SB-V4 227 103 265 120 280 127
SB-V5 348 158 386 175 401 182
SB-V6 522 237 578 262 611 277
SB-V7 705 320 761 345 794 360
SB-V8 1,014 460 1,102 500 1,133 514
SB-V9 1,622 736 1,711 776 1,742 790
SB-VH Gearbox Weights
Type
VH Gearbox Weights
Basic Gearbox With Single Reduction
Spur Set
With Double Reduction
Spur Set
[Lbs] [Kg] [Lbs] [Kg] [Lbs] [Kg]
SB-V35H 265 120 300 136 315 143
SB-V4H 393 178 428 194 476 216
SB-V2 600 272 635 288 650 295
SB-V3 948 430 1,179 535 1,213 550
SB-V35 1,312 595 1,367 620 1,400 635
SB-V4 2,062 935 2,293 1,040 2,337 1,060
SB-V5 4,211 1,910 4,356 1,976 4,440 2,014
7

V1.00-2021.03.22 Operating instructions for SAMBO Bevel
10 Disassembly and Reassembly Instructions
CAUTION: See "Operating instructions" before undertaking the steps below.
10.1 Disassembly and Reassembly of V0 through V9
Disassembly Instructions
Refer to Figure 3 and 4
1. Remove the two threaded Lock Nuts (item no. 7) from the Drive Sleeve (item no. 6), accessed through
the top of the Housing (item no. 1).
2. Remove the Stem Nut (item no. 5) from the Drive Sleeve through the top of the Housing (item no. 1).
3. Remove the Stem Cover Adapter (item no. 28) and O-Rings (item no. 26 and item no. 27).
4. Remove the Input Flange (item no. 8) with Oil Seal (item no. 25) and Gasket (item no. 21), or remove
the Spur Gear Attachment.
5. Remove the Bevel Pinion subassembly from the Housing (item no. 1).
6. Separately, for V0 – V4, remove the Retaining Ring (item no. 29), or, for V5 – V9, remove the Bearing
Washer (item no. 18) and Bearing Nut (item no. 17).
7. Remove Collar (item no. 16) and Bearings (item no. 11 and item no. 12) from the Bevel Pinion (item no.
4).
8. Place the gearbox upside down to access the mounting base.
9. Remove the Thrust Base (item no. 2) with O-Ring (item no. 15) and Gasket (item no. 22) by removing
Socket Head Cap Screws (item no. 9).
10. Remove the lower Thrust Ball Bearing (item no. 13).
11. Remove the assembled Drive Sleeve (item no. 6) and Bevel Gear (item no. 3).
12. Separately, remove the Bevel Gear (item no. 3) from the Drive Sleeve (item no. 6).
13. Remove the upper Thrust Ball Bearing (item no. 13) from the Housing (item no. 1).
14. Remove the O-Ring (item no. 15) from the Housing (item no. 1).
8

Operating instructions for SAMBO Bevel V1.00-2021.03.22
Reassembly Instructions
Refer to Figure 3 and 4
1. Place the Housing (item no. 1) upside down for internal access.
2. Install the O-Ring (item no. 15) in the Housing (item no. 1).
NOTE: Lubricate all O-Rings before installation.
3. Install the upper Thrust Bearing (item no. 13) in the Housing (item no. 1).
4. Separately, install the Bevel Gear (item no. 3) onto the Drive Sleeve (item no. 6), engaging the Bevel
Gear and Drive Sleeve lugs.
5. Install the assembled Bevel Gear (item no. 3) and Drive Sleeve (item no. 6) into the Housing (item no. 1)
and Thrust Bearing (item no. 13).
6. Install the lower Thrust Bearing (item no. 13) onto the Drive Sleeve (item no. 6).
7. Place the Gasket (item no. 22) onto the Housing (item no. 1).
8. Separately, install the O-Ring (item no. 15) in the Thrust Base (item no. 2).
NOTE: Lubricate all O-Rings before installation.
9. Install the Thrust Base (item no. 2) with O-Ring (item no. 15) onto the Housing (item no. 1) and Drive
Sleeve (item no. 6) using Socket Head Cap Screws (item no. 9).
CAUTION: Care must be taken to ensure that the O-ring located in the Thrust Base is not damaged
during installation.
10. Place the gearbox in the upright position.
11. Install the Stem Cover Adapter (item no. 28) and O-Rings (item no. 26 and item no. 27) on the Housing
(item no. 1).
12. Separately, install the Bearings (item no. 11), Collar (item no. 16), Bearing (item no. 12), and additionally
for V0–V4 only, the Retaining Ring (item no. 29). For V5–V9, install the Bearing Washer (item no. 18)
and Bearing Nut (item no. 17) onto the Bevel Pinion (item no. 4).
13. Install the Bevel Pinion subassembly into the Housing (item no. 1).
14. Replace the Oil Seal (item no. 25) in the Input Flange (item no. 8), if required.
15. Place the Gasket (item no. 21) onto the Housing (item no. 1) and install the Input Flange (item no. 8) or
the Spur Gear Attachment.
CAUTION: For proper backlash of the bevel gear set, ensure supplied gaskets and shims (if appli-
cable) are placed between the Input Flange (or Spur Gear Attachment) and Housing.
NOTE: Ensure binding does not occur between the Bevel Pinion and Bevel Gear.
NOTE: Lubricate all Oil Seals before installation.
9

V1.00-2021.03.22 Operating instructions for SAMBO Bevel
10.2 Disassembly and Reassembly of V35H through V9H
Disassembly Instructions
Refer to Figure 3 and 4
1. Remove the Stem Cover Adapter (item no. 28) and O-Rings (item no. 26 and item no. 27).
2. Remove the Input Flange (item no. 8) with Oil Seal (item no. 25) and Gasket (item no. 21), or remove
the Spur Gear Attachment.
3. Remove the Bevel Pinion subassembly from the Housing (item no. 1).
4. Separately, for V35H and V4H, remove the Retaining Ring (item no. 29), or for V5H–V9H, remove the
Bearing Washer (item no. 18) and Bearing Nut (item no. 17).
5. Remove Collar (item no. 16) and Bearings (item no. 11 and item no. 12) from the Bevel Pinion (item no.
4).
6. Place the gearbox upside down to access the mounting base.
7. Remove the Socket Head Cap Screws (item no. 34), Thrust Base (item no. 31) and Gasket (item no. 32)
from the Thrust Housing (item no. 2).
8. Remove the Stem Nut (item no. 5) with upper and lower Thrust Roller Bearings (item no. 33).
9. Remove the Thrust Housing (item no. 2) with O-Ring (item no. 15) and Gasket (item no. 22) by removing
Socket Head Cap Screws (item no. 9).
10. Remove the lower Thrust Ball Bearing (item no. 13-B).
11. Remove the assembled Drive Sleeve (item no. 6) and Bevel Gear (item no. 3).
12. Separately, remove the Bevel Gear (item no. 3) from the Drive Sleeve (item no. 6).
13. Remove the upper Thrust Ball Bearing (item no. 13-A) from the Housing (item no. 1).
14. Remove the O-Ring (item no. 15) from the Housing (item no. 1).
10

Operating instructions for SAMBO Bevel V1.00-2021.03.22
Figure 3: SB-V0 through SB-V9 Explosion View
Figure 4: SB-V0 through SB-V9 Assembly View
Table 1: SB-V0 through SBW-V9
Parts List
Parts List
Item Description Qty
1 Housing 1
2 Thrust Base 1
3 Bevel Gear 1
4 Bevel Pinion 1
5 Stem Nut 1
6 Drive Sleeve 1
7 Lock Nut 2
8 Input Flange 1
9 Socket Head Cap Screw 8
10 Socket Head Cap Screw 4
11 Ball Bearing 2
12 Spherical Roller Bearing 1
13 Thrust Bearing 2
14 Pipe Plug 1
15 O-Ring 2
16 Collar 1
17 Bearing Nut Varies
18 Bearing Washer Varies
19 Grease Fitting 1
20 Set Screw 1
21 End Cap Gasket 1
22 Base Gasket 1
23 Eye Bolt 2
24 Key 1
25 Oil Seal 1
26 O-Ring 1
27 O-Ring 1
28 Stem Cover Adapter 1
29 Retaining Ring Varies
30 Set Screw 4
11

V1.00-2021.03.22 Operating instructions for SAMBO Bevel
Reassembly Instructions
Refer to Figure 5 and 6
1. Place the Housing (item no. 1) upside down for internal access.
2. Install the O-Ring (item no. 15) in the Housing (item no. 1).
NOTE: Lubricate all O-Rings before installation.
3. Install the upper Thrust Ball Bearing (item no. 13-A) in the Housing (item no. 1).
4. Separately, install the Bevel Gear (item no. 3) onto the Drive Sleeve (item no. 6), engaging the Bevel
Gear and Drive Sleeve lugs.
5. Install the assembled Bevel Gear (item no. 3) and Drive Sleeve (item no. 6) into the Housing (item no. 1)
and upper Thrust Ball Bearing (item no. 13-A).
6. Install the lower Thrust Ball Bearing (item no. 13-B) onto the Drive Sleeve (item no. 6).
7. Place the Gasket (item no. 22) onto the Housing (item no. 1).
8. Separately, install the O-Ring (item no. 15) in the Thrust Housing (item no. 2).
NOTE: Lubricate all O-Rings before installation.
9. Install the Thrust Housing (item no. 2) with O-Ring (item no. 15) onto the Housing (item no. 1) and Drive
Sleeve (item no. 6) using Socket Head Cap Screws (item no. 9).
CAUTION: Care must be taken to ensure that the O-ring located in the Thrust Base is not damaged
during installation.
10. Install the upper Thrust Roller Bearing (item no. 33) into the Thrust Housing (item no. 2).
11. Install the Stem Nut (item no. 5) into the Thrust Housing (item no. 2) and upper Thrust Roller Bearing
(item no. 33).
12. Install the lower Thrust Roller Bearing (item no. 33) onto the Stem Nut (item no. 5).
13. Place the Gasket (item no. 32) onto the Thrust Housing (item no. 2).
14. Separately, install the O-Ring (item no. 15) into the Thrust Base (item no. 31).
15. Install the Thrust Base (item no. 31) with O-Ring (item no. 15) onto the Thrust Housing (item no. 2) and
Stem Nut (item no. 5) using Socket Head Cap Screws (item no. 34).
CAUTION: Care must be taken to ensure that the O-ring located in the Thrust Base is not damaged
during installation.
16. Place the gearbox in the upright position
17. Place the gearbox in the upright position
18. Separately, install the Bearings (item no. 11), Collar (item no. 16), Bearing (item no. 12), and additionally
for V35H and V4H only, the Retaining Ring (item no. 29). For V5H–V9H, install the Bearing Washer (item
no. 18) and Bearing Nut (item no. 17) onto the Bevel Pinion (item no. 4).
19. Install the Bevel Pinion subassembly into the Housing (item no. 1).
20. Replace the Oil Seal (item no. 25) in the Input Flange (item no. 8), if required.
21. Place the Gasket (item no. 21) onto the Housing (item no. 1) and install the Input Flange (item no. 8) or
the Spur Gear Attachment.
CAUTION: For proper backlash of the bevel gear set, ensure supplied gaskets and shims (if appli-
cable) are placed between the Input Flange (or Spur Gear Attachment) and Housing.
NOTE: Ensure binding does not occur between the Bevel Pinion and Bevel Gear.
NOTE: Lubricate all Oil Seals before installation.
12

Operating instructions for SAMBO Bevel V1.00-2021.03.22
Figure 5: SB-V35H through SB-V9H Explosion View
Figure 6: SB-V35H through SB-V9H Assembly View
Table 2: SB-V35H through SBW-V9H Parts
List
Parts List
Item Description Qty
1 Housing 1
2 Thrust Housing 1
3 Bevel Gear 1
4 Bevel Pinion 1
5 Stem Nut 1
6 Drive Sleeve 1
7 N/A
8 Input Flange 1
9 Socket Head Cap Screw 8
10 Socket Head Cap Screw 4
11 Ball Bearing 2
12 Spherical Roller Bearing 1
13-A Thrust Ball Bearing 1
13-B Thrust Ball Bearing 1
14 Pipe Plug 1
15 O-Ring 3
16 Collar 1
17 Bearing Nut Varies
18 Bearing Washer Varies
19 Grease Fitting 1
20 Set Screw 1
21 Gasket 1
22 Gasket 1
23 Eye Bolt 2
24 Key 1
25 Oil Seal 1
26 O-Ring 1
27 O-Ring 1
28 Steam Cover Adapter 1
29 Retaining Ring Varies
30 Set Screw 4
31 Thrust Base 1
32 Gasket 1
33 Thrust Roller Bearing 2
34 Socket Head Cap Screw 8
35 Pipe Plug 1
13

V1.00-2021.03.22 Operating instructions for SAMBO Bevel
10.3 Disassembly and Reassembly of Single Reduction Spur Gear Attachment (1S)
Disassembly Instructions
Refer to Figure 7
1. Remove the Cap Screws (item no. 17) and Input Flange (item no. 15) with Oil Seal (item no. 16) from
the Cover (item no. 5).
2. Remove the Hex Head Cap Screws (item no. 13) and Cover (item no. 5) with Oil Seal (item no. 14).
3. Remove all traces of the Cover Gasket (item no. 12).
4. Remove the Input Shaft/Pinion (item no. 4) and Ball Bearings (item no. 10) from the Cover (item no. 5).
5. Remove the Ball Bearing (item no. 7) and Retaining Ring (item no. 6) from the gearbox Bevel Pinion.
6. Remove the Gear (item no. 2) and Keys (item no. 11) from the gearbox Bevel Pinion.
7. Remove the two Idler Gears (item no. 3) and Bearings (item no. 8).
8. Remove the Cap Screws (item no. 19) which mount the Spur Gear Attachment to the gearbox and
remove the Spur Gear Housing (item no. 1).
9. If disassembly of the bevel gearbox is required.
Reassembly Instructions
Refer to Figure 7
1. Install the Spur Gear Housing (item no. 1) on the bevel gearbox, ensuring proper gasket is installed
between the gearbox and spur gear housing.
2. Install the Gear (item no. 2) onto the gearbox Bevel Pinion with Keys (item no. 11). Fasten with Retaining
Ring (item no. 6).
3. Install the Ball Bearing (item no. 7) onto the gearbox Bevel Pinion.
4. Install the Ball Bearings (item no. 8) and (item no. 9) into the Spur Gear Housing (item no. 1).
5. Install the Idler Gears (item no. 3).
6. Install the Input Shaft/Pinion (item no. 4).
7. Install the Ball Bearings (item no. 8) on the Idler Gears (item no. 3).
8. Install the Ball Bearings (item no. 10) on the Input Shaft/Pinion (item no. 4).
9. Replace the Cover Gasket (item no. 12).
10. Replace the Oil Seal (item no. 14) in the Cover (item no. 5).
NOTE: Lubricate the Spur Gearing.
11. Install the Cover (item no. 5), mounting with Hex Head Cap Screws (item no. 13).
12. Install the Input Flange (item no. 15) with Oil Seal (item no. 16) onto the Cover (item no. 5) using Cap
Screws (item no. 17).
NOTE: Replace any worn or damaged O-Rings or gaskets to ensure proper sealing and operation.
14

Operating instructions for SAMBO Bevel V1.00-2021.03.22
Figure 7: SB-V0 through SB-V9, and SB-V35H through SB-V9H Spur Gear Attachment (1S) Exploded View
Table 3: Spur Gear Attachment (1S) Parts List
Parts List
Item Description Qty Item Description Qty
1 Housing 1 12 Cover Gasket 1
2 Helical Gear 1 13 Hex Head Cap Screw 8
3 Idler Gear 2 14 Oil Seal 1
4 Helical Pinion 2 15 Input Flange 1
5 Cover 1 16 Oil Seal 1
6 Retaining Ring 1 17 Cap Screw Varies
7 Ball Bearing 1 18 Key 1
8 Ball Bearing 4 19 Cap Screw Varies
9 Ball Bearing 1
10 Ball Bearing 3
11 Key 2
15

V1.00-2021.03.22 Operating instructions for SAMBO Bevel
10.4 Disassembly and Reassembly of Double Reduction Spur Gear Attachment (1SD)
Disassembly Instructions
Refer to Figure 8
1. Remove the Cap Screws (item no. 19) and Input Flange (item no. 18) with Oil Seal (item no. 15) from
the Cover (item no. 12).
2. Remove the Hex Head Cap Screws (item no. 14) and Cover (item no. 12) with Oil Seal (item no. 15).
3. Remove the Helical Gear/2nd Set Pinion subassembly.
4. Remove all traces of the Cover Gasket (item no. 13).
5. Remove the Input Shaft/Pinion subassembly from the Cover (item no. 12) by removing the Retaining
Ring (item no. 16).
6. Separately, remove the Retaining Ring (item no. 4) and Ball Bearings (item no. 11) from the Input
Shaft/Pinion (item no. 9).
7. Remove the Ball Bearing (item no. 8) from the 2nd Set Pinion (item no. 5).
8. Remove the Retaining Ring (item no. 4) and the Helical Gear (item no. 2) from the 2nd Set Pinion (item
no. 5).
9. Remove the Retaining Ring (item no. 4) and the Helical Gear (item no. 2) from the gearbox Bevel Pinion.
10. Remove the Cap Screws (item no. 20) which mount the Spur Gear Attachment to the gearbox and
remove the Spur Gear Housing (item no. 1).
11. If disassembly of the bevel gearbox is required.
16

Operating instructions for SAMBO Bevel V1.00-2021.03.22
Reassembly Instructions
Refer to Figure 8
1. Install the Spur Gear Housing (item no. 1) on the bevel gearbox, ensuring proper gasket is installed
between the gearbox and spur gear housing
2. Install the Helical Gear (item no. 2) on the gearbox Bevel Pinion with Keys (item no. 3). Fasten with
Retaining Ring (item no. 4).
3. Insert the Bushing (item no. 10) into the end of the Input Shaft/Pinion (item no. 9).
4. Install the Ball Bearings (item no. 11) and Retaining Ring (item no. 4) onto the Input Shaft/Pinion (item
no. 9).
5. Install the Input Shaft/Pinion subassembly in the Cover (item no. 12) using Retaining Ring (item no. 16).
6. Install the Ball Bearing (item no. 6) in the Spur Gear Housing (item no. 1).
7. Assemble the Helical Gear (item no. 2) on the 2nd Set Pinion (item no. 5) with Keys (item no. 7). Fasten
with Retaining Ring (item no. 4).
8. Install the Ball Bearing (item no. 8) on the 2nd Set Pinion (item no. 5).
9. Install the Helical Gear/2nd Set Pinion subassembly in the Ball Bearing (item no. 6).
NOTE: Lubricate the Spur Gearing.
10. Replace the Gasket Cover (item no. 13).
11. Install the Cover (item no. 12) with Input Shaft/Pinion subassembly onto the Spur Gear Housing (item no.
1), ensuring proper mesh of Input Shaft/Pin- ion (item no. 9) and Helical Gear (item no. 2), and alignment
of Ball Bearing (item no. 8) with Cover (item no. 12).
12. Replace the Oil Seal (item no. 15) in the Cover (item no. 12).
13. Install the Input Flange (item no. 18) with Oil Seal (item no. 15) onto the Cover (item no. 12) using Cap
Screws (item no. 19).
NOTE: Replace any worn or damaged O-Rings or Gaskets to ensure proper sealing and operation.
17

V1.00-2021.03.22 Operating instructions for SAMBO Bevel
Figure 8: SB-V0 through SB-V9, and SB-V35H through SB–V9H Spur Gear Attachment (1SD) Exploded
View
Table 4: Spur Gear Attachment (1SD) Parts List
Parts List
Item Description Qty Item Description Qty
1 Housing 1 12 Cover 1
2 Helical Gear 1 13 Cover Gasket 1
3 Key 2 14 Hex Head Cap screw 10
4 Retaining Ring 3 15 Oil Seal 1
5 2nd Set Pinion 1 16 Retaining Ring 1
6 Ball Bearing 1 17 Lock Washer 10
7 Key 1 18 Input Flange 1
8 Ball Bearing 1 19 Cap Screw Varies
9 Helical Pinion 1 20 Cap Screw Varies
10 Oil Seal 1 21 Key 1
11 Ball Bearing 3
18
This manual suits for next models
13
Table of contents
Other Sambo Industrial Equipment manuals