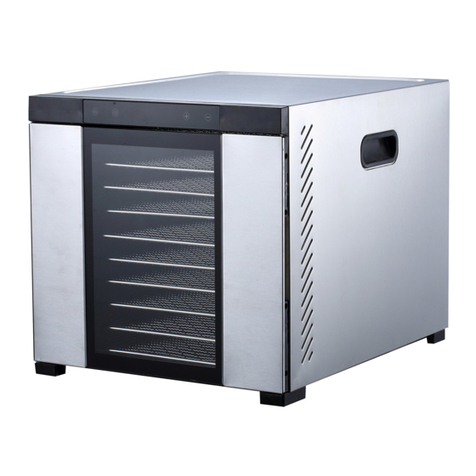
Samson Silent User manual

-1-
INSTRUCTION MANUAL
Samson Stainless Steel “Silent”
Dehydrator
PLEASE READ THESE INSTRUCTIONS CAREFULLY BEFORE USING THE PRODUCT
95 Golden Hill Rd. Danbury, CT 06811

-2-
Thank you for your purchase of the Samson Silent Dehydrator!
Technical specification
Normal Voltage: 120V, 60Hz
Normal Power: 600W
Thermostat: 95°F-167°F; In 9°F increments
Timer: Up to 24 Hours in 30 minute increments
Drying Trays: 6 Stainless Steel Trays - 13" x 12"
Mesh Tray:
Use for smaller items such as herbs and berries; and sticky items such as banana & tomatoes.
Non-stick sheet (Fruit Roll Tray):
Make delicious fruit rolls naturally. When not using as a Fruit Roll Tray, store at the bottom of the unit as a
crumb tray.
Getting started
Remove all the packaging materials from the product.
Place the packing inside the box and either store or dispose of responsibly.

-3-
Safety Instruction
The following basic precautions should always be followed when using the electrical appliance.
PLEASE READ THIS INSTRUCTION CAREFULLY BEFORE USE AND RETAIN FOR FUTURE
REFERENCE
1. Keep the appliance and its cord out of reach of children less than 8 years.
This appliance can be used by children 8 years of age or older with proper adult supervision.
2. This food dehydrator is designed for DOMESTIC USE ONLY and is not suitable for commercial use.
Do not use it outdoors.
3. When using the food dehydrator ensure that it is on a sturdy, flat, level surface.
4. Failure to follow all the instructions listed may result in electric shock, fire or serious personal
injury .The warnings, cautions and instructions discussed in this instruction manual cannot cover all
possible conditions and situations that may occur while the product is in use.
5. Do not leave the food dehydrator unattended during use.
6. Make sure that the food dehydrator is switched off and unplugged when it is not in use and before it
is cleaned.
7. Under no circumstances should the food dehydrator or plug be immersed in water or any other liquid.
Do not use the appliance with wet hands.
8. Check the food dehydrator and power cord regularly for damage. Do not use the food dehydrator
should there be damage to the plug or cord.
9. Repairs to the food dehydrator should only be performed by Samson Brands. Improper repairs may
place the user at risk.
10. None of the product’s parts are dishwasher safe, unless explicitly specified otherwise.
11. Avoid contact with moving parts. Keep hands, hair, clothing, spatulas and other utensils away during
operation to reduce the risk of injury to persons and or damage to the machine.
Caution:
ATTENTION! Do not run the appliance for more than 24 hours in one single use. After 24 hours. Unplug
and let it cool down for at least 2 hours before operating again.
Do not operate near gas spray cans.
•Incorrect operation and improper handling can lead to malfunction of the appliance and injuries to
the user.
•To reduce the risk of electric shock, do not immerse or expose the product, flexible cord or
plug to moisture or any liquid.
•Do not use the product near baths, basins or other vessels containing water or other liquids,
or when standing in or on damp or wet surfaces.
•Keep the device away from extremely high temperatures.
•Don’t operate the device with wet hands.
•In the event the appliance is dropped into liquid, turn off the power at the power outlet and
remove the plug immediately. DO NOT REACH INTO THE WATER TO RETRIEVE IT. If this
happens it is important to note that the appliance will have to be inspected by a qualified
technician before using it again.
•The surface of the dehydrator may be HOT when the appliance is operating.

-4-
Features of the Dehydrator
This unit features an automatic fan, which evenly circulates warm air, producing a consistently dried
product. Dried foods are great and hold almost all of their nutritional value and flavor. It is a perfect way
to preserve fruit, snacks, vegetables, bread, flowers and more.
· Stainless steel construction and advanced electronics provide a lifetime of reliable dehydrating.
· Six stainless steel trays, each holding over 1 lb. food.
· Removable trays allow you to dehydrate larger items.
· Non-stick sheet can be used to collect residue during the drying cycle or to make fruit leathers.
· Glass window allows you to observe the drying process.
Before Use:
Before placing any food in the dehydrator, run the unit on high for 30 minutes. Any smoke or
smells produced during this break-in procedure are normal. Please ensure sufficient ventilation.
This is only necessary for the first time.
Cleaning:
Before using the first time, wipe clean all parts of the appliance with a lightly moistened cloth. Wash all
the trays in warm soapy water and thoroughly let dry.
Do not put the dehydrator body into water or other liquids!
Always unplug the dehydrator from the power supply and let it cool down before cleaning. Use a soft
brush to remove stuck food. Dry all parts before storing the dehydrator.
Do not clean the appliance with aggressive chemicals or abrasives.
Assembling the appliance:
Make sure the dehydrator sits on a solid level surface. Stock the drying trays, close the door and connect
the plug it in. The dehydrator is now ready for use.

-5-
Using Your Dehydrator
1. Load your produce onto the trays and close the door. -Do not overload the trays or overlap the food.
2. Plug dehydrator into wall outlet. The screen and buttons will light up and the display will show
“00:00”.
3. Press the “ON/OFF” button and the LED screen will show the default time setting “10:00” and temp
setting “158°F”. The motor and fan start first, the heating element will start working 5 seconds later
and time automatically begins to count down.
4. Press the “TEMP/TIME” button and the LED screen shows the time value.According to actual needs,
press the “+" or "-" button to change the drying time between "0:30” and “24:00". Press the "+" or "-"
button once, and the time increases or decreases by 30 minutes. Holding the "+" or "-" button will
increase or decrease the time setting rapidly.After setting the drying time, the system automatically
gets into operating mode and dehydrating will begin.
5. Press the “TEMP/TIME” button and the LED screen shows the temperature value. According to
actual needs, press the "+" or "-" button to change the drying temperature between "95” and “167°F".
Press the "+" or "-" button once, and the temperature increases or decrease 9°F. Holding the "+" or
"-" button will increase or decrease the temperature setting rapidly. After setting the temperature, the
system automatically gets into operating mode and dehydrating will begin.
6. During drying process, you can change or check the drying time. Press the “TEMP/TIME” button first,
then press the "+" or "-" button.
7. During drying process, press the “ON/OFF” button, and all functions will be paused after 10 seconds.
Screen no display.
8. When the set time counts down to "0:00”, the heating element will stop and fan will continue running
for an additional 10 seconds. The machine will beep 20 times and the drying cycle is complete.
10. Unplug the unit.
Note:
·This dehydrator utilizes overheat protection and will shut off automatically if it gets
too hot as a safety precaution.
DRYING TIPS:
·Humidity, temperature, number of trays being used and the type and thickness of produce affect
the drying of your food. Keeping records of these variables can be helpful in improving your
drying techniques for the future. See the guide below, but remember that the finished product
will vary due to many factors.
· Fruit and vegetables dried in your food dehydrator will be different in appearance from those
sold in health food stores and supermarkets. This is because your food dehydrator uses no
preservatives, artificial coloring and only natural additives.

-6-
Temperature Settings Uses
95°F Herbs, Flowers, Dough
104°F Yogurt
113°F Soft Vegetables
122°F Hard Vegetables
131°F Citrus Peel
140°F Fruit
149°F Fish
158-167°F Meat Jerky, Fruit Rolls
Name
Preparation
Dryness
test
Time,
hours
(approx.)
Apples
Peel, core and cut slices or rings
Pliable
5-6
Apricots
Cut in halves or in slices, remove pit
Pliable
12-38
Bananas
Peel and cut into 1/8” slices
Crisp
8-38
Cherries
Pitting is optional, or pit when 50% dry
Leathery
8-34
Cranberries
Chop or leave whole
Pliable
6-26
Red Dates
Pit and slice
Leathery
6-26
Figs
Slice
Leathery
6-26

-7-
Grapes
Leave whole
Pliable
8-38
Nectarines
Cut in half, dry with skin side down. Pit
when 50% dry
Pliable
8-26
Orange rind
Peel in long strips
Brittle
8-16
Peaches
Pit when 50% dry. Halve or quarter
with cut side up
Pliable
10-34
Pears
Peel and slice
Pliable
8-30
Strawberries
Cut into 3/8”slices, or leave berries
whole
Pliable
8-26
Artichokes
Cut into 1/3”strips. Boil about 10
minutes
Brittle
6-14
Asparagus
Cut into 1”pieces
Brittle
6-14
Beans
Cut and steam blanch until translucent
Brittle
8-26
Beets
Blanch, cool, remove tops and roots,
slice
Brittle
8-26

-8-
Brussels
sprouts
Cut sprouts from stalk, cut in half
length-wise
Crispy
8-30
Broccoli
Trim and cut. Steam tender, about 3-5
minutes.
Brittle
6-20
Cabbage
Core, trim and cut into 1/4”strips.
Leathery
6-14
Carrots
Steam until tender. Shred or cut into
slices
Leathery
6-12
Cauliflower
Steam blanch until tender. Trim and
cut.
Leathery
6-16
Celery
Cut stalks into 1/4”slices
Brittle
6-14
Chives
Chop or leave whole
Brittle
6-10
Cucumber
Cut into 1/2”slices
Leathery
6-18
Eggplant/
Squash
Trim and slice 1/4" to 1/2" thick
Brittle
6-18
Garlic
Remove skin from clove and slice
Brittle
6-16
Hot peppers
Dry whole
Leathery
8-14

-9-
Mushrooms
Slice, chop, or dry whole
Leathery
6-14
Onions
Slice thinly or chop
Brittle
8-14
Peas
Blanch for 3-5 min.
Brittle
8-14
Peppers
Cut into 1/4" strips or rings. Remove
seeds.
Brittle
4-14
Potatoes
Slice, dice or cut. Steam blanch 8-10
min.
Brittle
6-8
Rhubarb
Remove outer skin and cut into 1/8”
lengths
Pliable
8-38
Spinach
Steam blanch until wilted
Brittle
6-16
Tomatoes
Remove skin. Cut in halves or slices.
Leathery
8-24
Zucchini
Slice into 1/4” pieces
Brittle
6-18
Mangos
Remove skin; slice 3/8" thick. Space
generously on dehydrator tray
Leathery
6-16
Note: Time and methods shown in the table above should be
used as a guide only. Results may vary.

-10-
Fruit leather:
Strawberry Fruit Rolls
Preparation: 5 minutes
Drying time: 6-9 hrs
Ingredients:
1 lb. fresh strawberries, hulled, halved
1/3 Cup Honey
1 Tablespoon of lemon juice
1. Set dehydrator to 158°F.
2. Process ingredients until smooth in a blender or food processor.
3. Spoon puree evenly onto transparent tray or for best results, genuine Samson silicone or Teflon
sheets, which can be purchased on our website.
4. Dry in dehydrator for 6-9 hours or until pliable. Roll up the fruit leather in wax paper and cut to desired
size.
TIPS
• The prepared fruit must be evenly spread over the trays to ensure even drying times.
• The fruit should be spread to an even thickness of about 0.2 in. The fruit, once pureed, needs to be a
viscous consistency and should not be too runny.
• Make sure the fruit rolls are dried continuously at the recommended temperature and time.
• Once dried, the fruit rolls should be pliable and without any soft or sticky patches on top or bottom.
• Remove fruit rolls from trays when still warm and roll up to form logs.
• Wrap in non-stick baking paper and store in an airtight container in a cool, dark place for up to 1 week,
no need for refrigeration.
• Suitable fruits for rolls include: Apple, apricot, berries, cherries, mango, peaches, pears, and plums.

-11-
Jerky:
Beef jerky
Preparation: 10 minutes (+ 12 hours marinating time)
Drying time: 5 hrs
Ingredients:
1 lb beef, top or bottom round
1/2 cup soy sauce
1/2 cup Worcestershire sauce
1 teaspoon salt
1. Slice the meat across the grain thinly and uniformly. Each slice should be of equal thickness and as
thin as possible. Partially freezing the meat first makes slicing much easier and is recommended.
2. Place the sliced beef in a dish and combine the remaining ingredients. Cover with plastic wrap and
place in the fridge, turning occasionally, for 12 hours to marinade. Drain. Discard marinade.
3. Arrange beef on drying racks. Dry on 158°F for 5 hours, rotating racks halfway through the drying
process.
TIPS
• Choose lean meat without much fat distributed throughout.
• Store the marinated meat in the fridge for up to 12 hours. Drain well.
• Always slice the meat across the grain. Meat sliced with the grain falls apart and can have a chewy
texture.
• Dehydrated meat needs to be stored in an airtight container in the fridge for up to
3-4 weeks. For a longer storage, label, date and freeze for up to 3 months. Thaw in fridge overnight.
IMPORTANT: Meat must be stored in the fridge or freezer only. Storing meat at room temperature could
promote the growth of bacteria if not dried thoroughly.

-12-
STORAGE
⚫Store food only after it has cooled down.
⚫Food can be kept longer if stored in a cool, dry and dark place.
⚫Remove all the air you possibly can from the storage container and close tightly.
⚫Optimal storage temperature is 59°F or lower.
⚫Never store food directly in a metal container.
⚫Avoid containers that “breathe” or have a weak seal.
⚫Check the contents of your dried food for moisture during the weeks following
dehydration. If there is moisture inside, you should dehydrate the contents for a longer
time to avoid spoiling.
⚫For best quality, dried fruit, vegetables, herbs, nuts, and bread should not be kept for
more than 1 year, in the refrigerator or freezer.
⚫Dried meats, poultry and fish should be stored for no more than 3 months in the
refrigerator, or 1 year in the freezer.
Maintenance/Cleaning Method
•After using, unplug the dehydrator from the power supply and let it cool down before
cleaning.
•Use a soft brush to remove food stuck on the trays.
•Dry all parts with a cloth before storing the dehydrator.
•Clean the surface of body with damp cloth.
•Use paper towels to remove any excess marinade.
•Do not clean the appliance with aggressive chemicals or abrasives in order not to
damage the surface and provide an eco-friendly environment.
•Protect the appliance from dust and dirt when not in use for a prolonged
length of time (wrap it in a plastic bag if possible). Store it in a dry place
MOST IMPORTANT: HAVE FUN USING YOUR NEW SAMSON SILENT DEHYDRATOR!
SAVE THESE INSTRUCTIONS!

-13-
Table of contents
Other Samson Kitchen Appliance manuals
Popular Kitchen Appliance manuals by other brands

American Originals
American Originals EK1545 instruction manual

Proctor-Silex
Proctor-Silex Electric Skillet 840116300 use & care

HURAKAN
HURAKAN IP10F Operation and maintenance manual

Homeright
Homeright STEAMMACHINE instruction manual

Star
Star G12-Y Specification sheet

Optimum
Optimum THERMOCOOK PRO M user manual