Samsung AARD7NSDOUS User manual

Stand Dock
User Guide
www.samsung.com
2 3
Contents
한국어 ............................................................................................3
English...........................................................................................6
Français .........................................................................................9
Deutsch........................................................................................12
Español........................................................................................15
Italiano ........................................................................................18
Русский .......................................................................................21
简体中文 ......................................................................................25
繁體中文 ......................................................................................29
العربية......................................................................................36
한국어
2 3
Stand Dock을 지원하는 전용 삼성 컴퓨터에 연결하여 컴퓨터를 편리하게 사용
할 수 있습니다. Stand Dock에서 지원하는 다양한 포트도 사용할 수도 있습니다.
컴퓨터 구입시 제공된 어댑터를 사용하세요. 또한 어댑터는 별도로
구매 가능합니다.
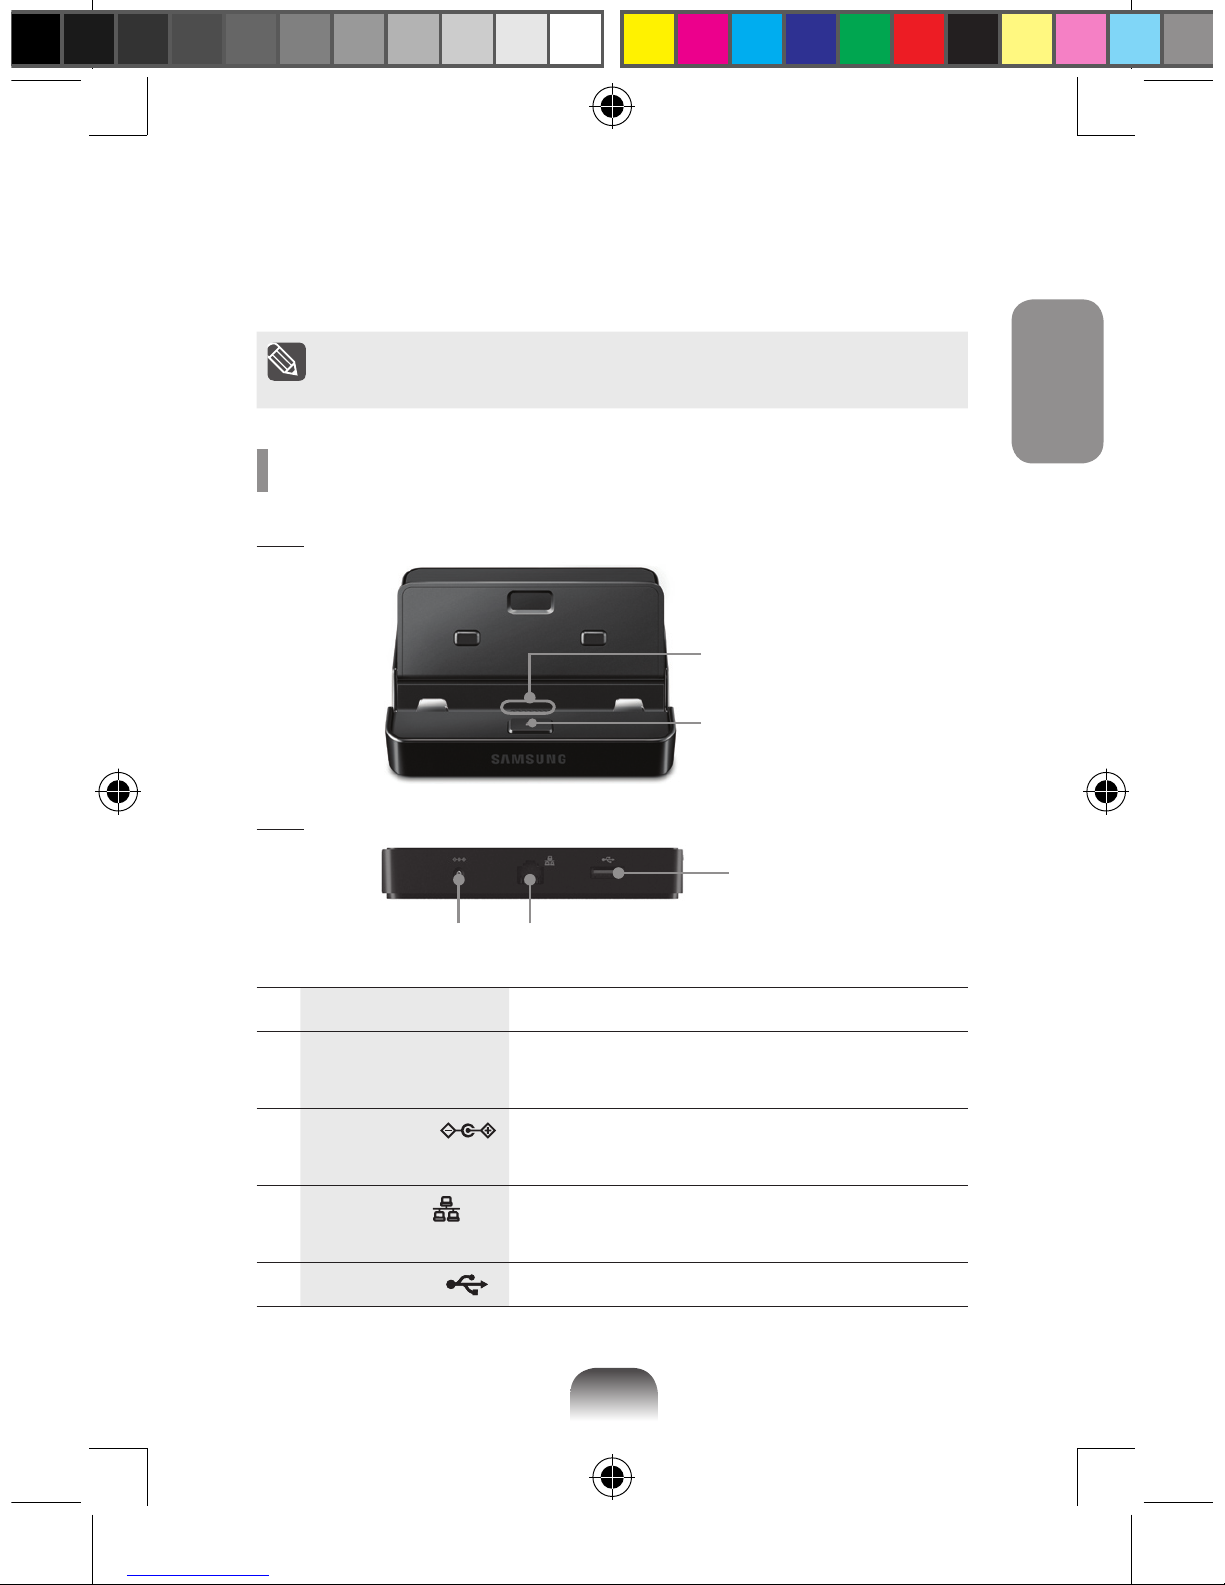
각 부분의 명칭
앞면
분리버튼
컴퓨터 연결 커넥터
뒷면
전원 입력 잭 유선랜 포트
USB 2.0 포트
1컴퓨터 연결 커넥터 컴퓨터와 stand dock을 연결하는 커넥터입니다.
2분리 버튼 컴퓨터를 stand dock에서 분리할 때 누르는 버
튼입니다.
3전원 입력 잭 컴퓨터에 전원을 공급하는 AC 어댑터를 연결하
는 잭입니다.
4유선랜 포트 유선랜으로 인터넷에 연결할 때 유선랜 케이블
을 연결하는 포트입니다.
5USB 2.0 포트 USB 장치를 연결하는 포트입니다.

한국어
4 5
4 5
컴퓨터 연결하기
컴퓨터를 연결하기 전에 반드시 컴퓨터에 연결된 케이블을 모두 •
분리하십시오.
컴퓨터를 끄고 Stand Dock을 연결/분리할 것을 권장합니다.•
1
Stand Dock 옆면의 홀에 손을 넣어 Stand Dock 윗면의 덮개를 엽니다.
2
컴퓨터 연결 커넥터와 컴퓨터 밑면의 Stand Dock 포트를 맞추어 끼웁
니다.
3
컴퓨터의 전원 어댑터를 Stand Dock에 연결합니다.
반드시 2.5 Pi(Φ) ATIV Smart PC와 ATIV Smart PC Pro 전용 •
어댑터를 사용해야 합니다.
Stand Dock은 컴퓨터의 배터리만으로도 이용 가능합니다.•
컴퓨터 연결 후 동작이 안 될 경우 연결 부위의 이물질이 •
원인일 수 있습니다. 이물질을 확인 및 제거한 후 사용하세요.
4 5
한국어
4 5
컴퓨터 분리하기
한 손으로 Stand Dock의 분리버튼을 누르고, 다른 손으로 컴퓨터를 위로
잡아 당겨 분리합니다.
본 내용은 Windows 8을 기준으로 설명하므로, 운영체제와 •
기기에 따라 일부 내용이 다를 수 있습니다.
본 설명서의 내용이나 화면 이미지는 제품의 기능 향상 등을 •
이유로 예고 없이 변경될 수 있습니다.
제품 규격
구분 명칭 및 규격
사용환경 온도 (보관 시): -5℃~40℃, (동작 시): 10℃~32℃
습도 (보관 시): 5%~90%, (동작 시): 20%~80%
작동전압 100~240VAC
주파수 50~60Hz
입력 전력 40W
입력 전압 12.0VDC
저작권과 등록 상표
삼성전자 주식회사가 이 사용 설명서의 저작권을 소유합니다. 이 설명서의
어떤 부분도 삼성전자 주식회사의 서면 동의 없이 어떤 수단이나 형태로든
재 가공 되거나 발행될 수 없습니다.
설명서의 내용은 예고 없이 변경될 수 있습니다. 여기에 있는 모든 제품명
또는 회사명은 각 회사의 재산입니다.
전자파 적합 등록 안내(Class B)
이 기기는 가정용(B급) 전자파적합기기로서 주로 가정에서 사용하는 것을
목적으로 하며,모든 지역에서 사용할 수 있습니다.

English
6 7
6 7
You can stand your Samsung computer by connecting the stand dock.You can
also use various types of ports by connecting the stand dock to a compatible
Samsung computer.
Use the adapter supplied with the computer.
Alternatively, you can purchase a separate adapter.
Overview
Front
Release button
Computer connector
Rear
DC jack Wired LAN port
USB 2.0 port
1Computer connector You can connect the computer and the
stand dock with this connector.
2Release button Press this button to release the computer
from the stand dock.
3DC jack A jack to connect the AC adapter that
supplies power to the computer.
4Wired LAN port Connect the Ethernet cable to this port.
5USB 2.0 port You can connect USB devices to the USB
port such as a keyboard/mouse, digital
camera, etc.

6 7
English
6 7
Installing the computer
Before installing a computer to the docking station, make sure•
to disconnect all the cables connected to the computer.
Installing and separating the stand dock after turning the•
computer o is recommended.
1Insert your nger into the groove on the side of the stand dock to
open the top cover of the stand dock.
2Align the computer connector and the stand dock port at the bottom
of the computer and connect them.
3Connect the computer’s AC adapter to the stand dock.
Make sure that you should use the 2.5 Pi(Φ) ATIV Smart PC or•
ATIV Smart PC Pro adapter.
You can also use the stand dock using only the battery power•
of the computer.
If the computer doesn't work after being connected with the•
docking station, this may be due to poor contact caused by a
foreign substance. Check and remove any substance on the
connection.
English
8PB
Separating the computer
With pressing the release button, pull the computer upward with the
other hand.
Since the descriptions in this manual are based on Windows•
8, some of the descriptions may dier depending on the
operating system or the device.
The content and images in this manual are subject to change•
for the purpose of performance enhancement.
Specication
Items Specications
Operating
Environment
Temperature: (Waiting) -5°~40°, (Operation) 10°~32°
Humidity: (Waiting) 5%~90%, (Operation) 20%~80%
Operating
Voltage
100~240VAC
Frequency 50~60Hz
Input Power 40W
Input Voltage 12.0VDC
WEEE SYMBOL INFORMATION
Correct disposal of this product (Waste Electrical & Electronic Equipment)
(Applicable in the European Union and other European countries with separate
collection systems.)
This marking on the product, accessories or literature indicates that the product and its
electronic accessories (e.g. charger, headset, USB cable) should not be disposed of with
other household waste at the end of their working life. To prevent possible harm to
the environment or human health from uncontrolled waste disposal, please separate
these items from other types of waste and recycle them responsibly to promote the
sustainable reuse of material resources.
Household users should contact either the retailer where they purchased this product, or their local
government oce, for details of where and how they can take these items for environmentally safe recycling.
Business users should contact their supplier and check the terms and conditions of the purchase contract. This
product and its electronic accessories should not be mixed with other commercial wastes for disposal.

Français
PB 9
Vous pouvez poser votre ordinateur Samsung à la verticale en le connectant
au support d'accueil.Vous pouvez également utiliser divers types de ports en
connectant le support d'accueil à un ordinateur Samsung compatible.
Utilisez l'adaptateur fourni avec l'ordinateur.
Vous pouvez également acheter un adaptateur séparé.
Aperçu
Face
Bouton de
libération
Connecteur pour
ordinateur
Arrière
Prise DC Port LAN câblé
Port USB 2.0
1Connecteur pour
ordinateur
Vous pouvez connecter l'ordinateur et le
support d'accueil grâce à ce connecteur.
2Bouton de libération Appuyez sur ce bouton pour libérer
l'ordinateur du support d'accueil.
3Prise DC Prise utilisée pour connecter l’adaptateur
secteur fournissant le courant à
l’ordinateur.
4Port LAN câblé Branchez le câble Ethernet à ce port.
5Port USB 2.0 Vous pouvez brancher des périphériques
USB aux ports USB (un clavier/une souris,
un appareil photo numérique, etc.).

Français
10 11
10 11
Fixation de l’ordinateur
Avant d'associer un ordinateur à la station d'accueil, assurez-•
vous de déconnecter tous les câbles de l'ordinateur.
Associez et séparez la station d'accueil pour clavier après avoir•
éteint l'ordinateur.
1Introduisez votre doigt dans la rainure située sur le côté du support
d'accueil pour ouvrir le couvercle supérieur du support.
2Alignez le connecteur pour ordinateur et le port d'accueil du support
avec la partie inférieure de l'ordinateur et connectez-les.
3Connectez l'adaptateur secteur de l'ordinateur au support d'accueil.
Assurez-vous d'utiliser l'adaptateur ATIV Smart PC ou ATIV•
Smart PC Pro 2,5 Pi (Φ).
Vous pouvez également employer le support d'accueil en•
n'utilisant que l'alimentation sur batterie de l'ordinateur.
Si l'ordinateur ne fonctionne pas après avoir été connecté à la•
station d'accueil, ceci peut s'expliquer par un mauvais contact
engendré par un corps étranger. Vériez et enlevez toute
substance empêchant une bonne connexion.
Table of contents
Languages:
Other Samsung Docking Station manuals

Samsung
Samsung AA-RD4NDOC User manual

Samsung
Samsung DA-E651 User manual

Samsung
Samsung DeX Pad User manual

Samsung
Samsung DA-E651 User manual

Samsung
Samsung DA-E650 User manual

Samsung
Samsung da-f560 User manual

Samsung
Samsung DA-F680 User manual

Samsung
Samsung DA-E560 User manual

Samsung
Samsung HT-WDC10 User manual

Samsung
Samsung DeX Station EE-MG950 User manual


