SAN/BAR SB6620B Operating and installation instructions

SANIBAR CORPORATION
Ckcuit Description
Installation Series
Section 6620B-000
June 1979
Printed in U.S.A.
SB6620B 3-LINE KEY SYSTEM
lssue
1
CONTENTS PAGE
1.0 GENERAL 1
2.0 SPECIFICATIONS 2
3.0 INSPECTION 3
4.0 MOUNTING 3
5.0 INSTALLERCONNECTIONS 3
6.0 CIRCUITDESCRIPTION 6
7.0 TESTING 6
1.0 GENERAL
1.1 This section provides general description and
installation instructions for the SANlBAR
SB6620B 3-Line Key System lssue 1.
The SB6620B KTS consists of a basic pre-wired
mounting fixture (for wall mounting) which will
mount a variety of plug-in circuit cards, and a
power supply assembly. The system is design-
ed to provide a means of connection to a max-
imum of three central office lines and also has
one mountingslot for severalspecial functions.
The basic SB6620B may be modifiedto a max-
imumof five centraloffice linesandone special
position by field addition of the model
SB6620B-210 Expansion Kit (shown in figure
1
A.)
1.2
The SB6620B may be equipped to providesuch
features as music-on-hold,PA coupler, Manual
Intercom, Off-Premises extension, FM Music
Source, and Dial Intercom.
The SB6620B is provided with two quick con-
nect distribution blocks as shown in.Figure 1
for all wiring interfacing to the central office
and local distribution.
SB6620B KEY TELEPHONE SYSTEM
FIGURE 1
1.3 The power supply assembly (shown in Figure 2)
mountsat the top of the SB6620Band is held in
place with snap fasteners for quick installation
or replacement. All distribution wiring between
the power supply andthe rest of the SB6620B is
by a keyed locking connector assembly assur-
ing proper interconnect wiring. The power sup-
ply assembly may be provided with interrupter
andlor ringing generator as options. The power
supply and ringing generator are U.L. recogniz-
ed assemblies.
SB6620B-210EXPANSION KIT
Figure 1A

1.4
The SB6620B is wall mounted; mounting is
easily accomplished by one installer. A keyhole
is
locatedat the top center of the assembly to
initially mount the unit, and mountingholesare
located on each side of the center terminal
block at the bottom to secure the assembly to
the wall. Each unit is providedwith a cover.
2.0 SPECIFICATIONS
2.1 List of Applicable Drawings
a. Assembly Drawings
Chassis: ED-6620-200(fig. 6)
Power Supply: ED-6610-3011306(fig.
7)
Ringing Generator: ED-6610-401(fig. 8)
b. Bill of Materials
Chassis: BM-6620-200
Power Supply: BM-6610-3011306
Ringing Generator: BM-6610-401
c. Schematic Diagrams
System: WD-6620-200(fig. 4)
Power Supply: SD-6610-301(fig. 5)
Ringing Generator: SD-6610-401(fig. 5)
Expansion Kit: WD-6620-210 (fig. 9)
2.2 Electrical Characteristics
a. 3 CO or PBX Lines expandable to 5 max.
b. One special feature connector is provided
for options such as the SB6609B Dial Inter-
com, SB423A Manual Intercom, or SB4201
FM Receiver.
c. lnput Power: 90 to 130 VAC, 60 Hz.
d. Available Voltage: 24 VDC:
A-Battery (AC Ripple suitable for Talk Bat-
tery) 0.7A 18VAC: (Buzzers) 1 amp con-
tinuous, 4 amps, intermittent. 105 VAC: 30
Hz: (Ringers)50 ma nominal.
e. Fuses: 110 VAC lnput
-
2A. 10118 VAC Out-
put
-
5A. 24 VDC Output, 105 VAC ringing
are self limiting and are not fused.
f. Operating Environment: 0" to 50°C,
Humidity to 90%.
g. Lamp Flash: Flashing visual signal on in-
coming calls.
h. Station Audible or Common
Audible: 18VACfor buzzers or optional 105
VAC, 30 Hz for ringers.
i.
Line Busy Indication: Steady lamp signal
during line busy conditions.
Hold Function: Individual holding of ,calls
on any line.
Lamp Wink: Winking visual signal during
hold condition.
s66610B-301Basic Supply
SB6610B-306Supply with Interrupter
Figure 2. Power Supply Options
~ysicalCharacteristics
Overall Dimensions(includingcover)9.8"W
x 15"H x 7"D.
Wall Mounting Holds: 3mounting holesare
provided with
1h
inch clearance holes for
the mounting hardware. The maximumO.D.
for washers used should be
3h"
or less.
Rear Access: Rear access is normally not
required. The power supply is mounted
from the front and all normal wiring is
available from the front.
Weight: Approximately 13 Ibs. with power
supply. (Not including Circuit cards.)
Component Connectors (power units): A
quick-connect connector is provided for
ease of installation of the power unit, with
prewired harness.
lnterrupter Mounting: Plug-in connector is
prewired for installation of the mechanical
interrupter provided by SANIBAR as part
number POR-3010-000A.

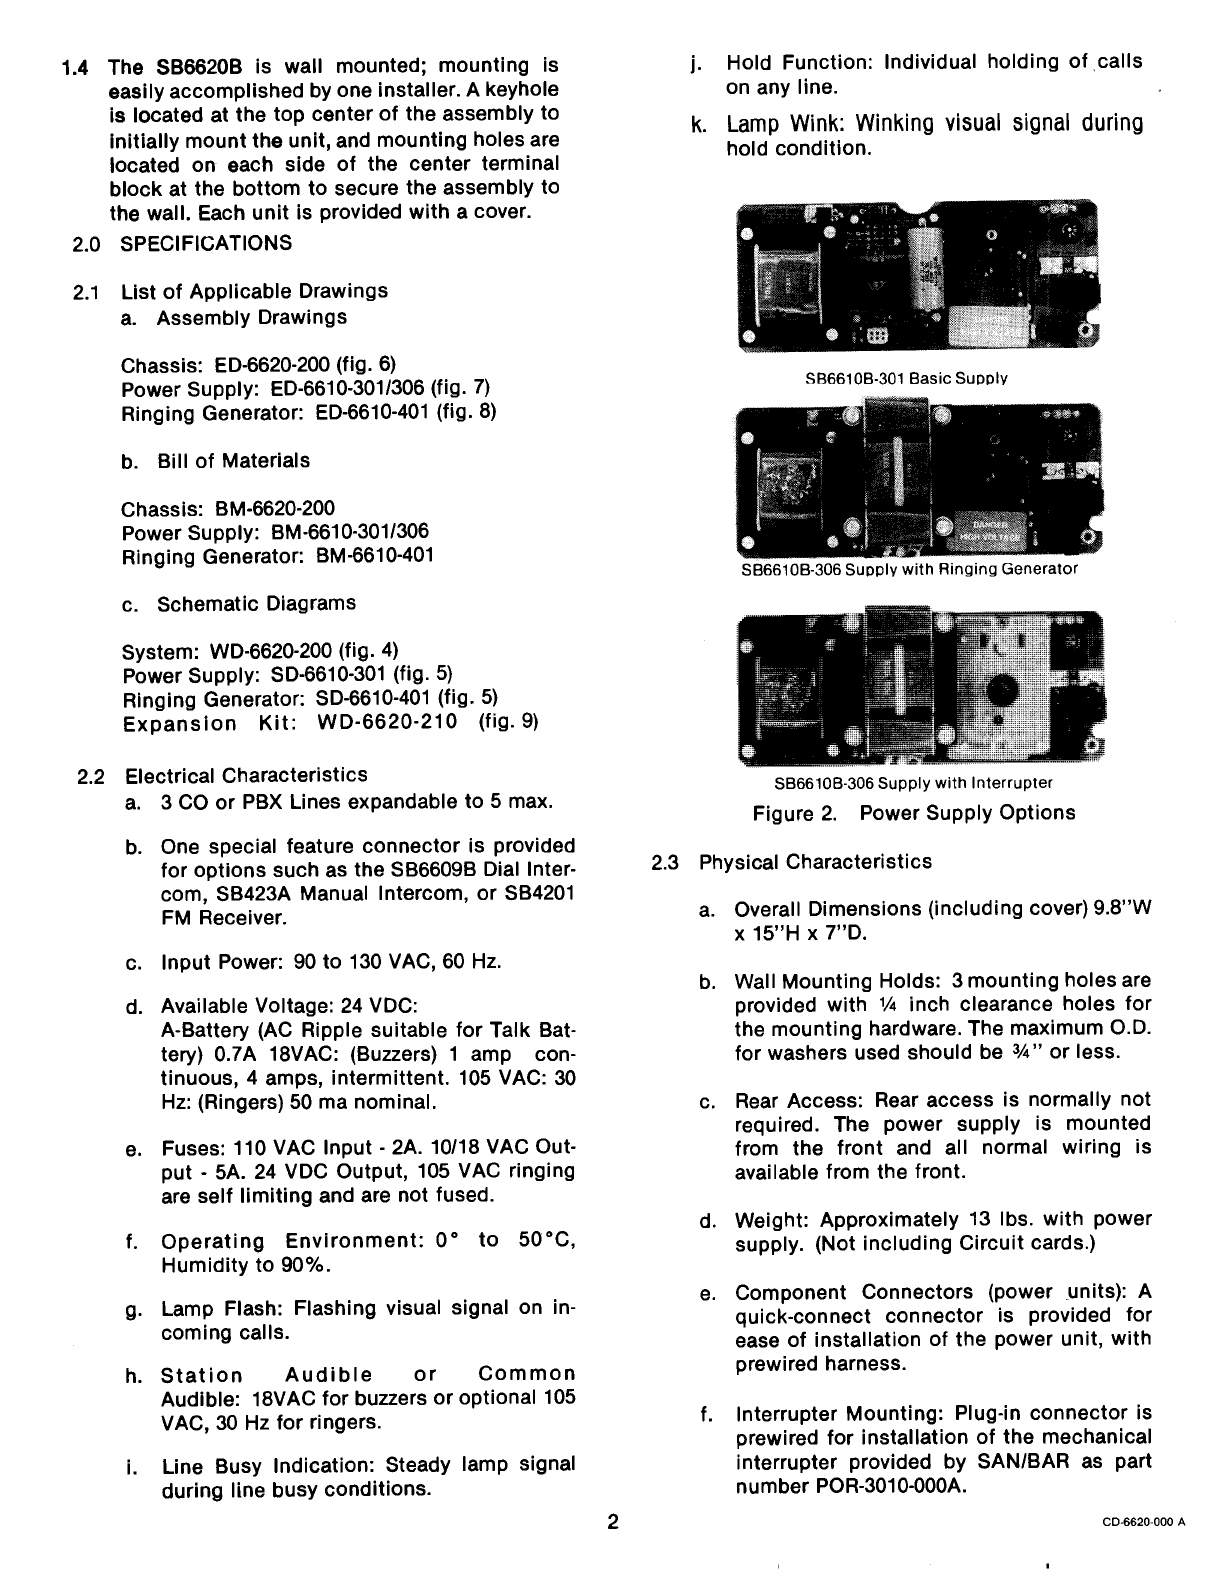
2.4 KTS Circuit Cards e. SB423A Manual Intercom-
a. SB4000F KTU Line Card-
Specially designed circuitry and solid state
components eliminate high voltage transient
failures and prevent false ring-inthrough line in-
duced AC voltages or remote two-wire
telephone instrument dialing. Design
guarantees that 200 milliseconds of ringing
signal will trigger the ring-incircuitry, and also
provides protection against drop-out of hold
during battery reversal.
Equippedwith a lightemitting diode to indicate
busy or idle line condition. Also available with
circuitry that protects against false "Dial-1
transfer" with astrap option for 500 ms Delayed
Hold Release.
b.
SB4100A KTU Line Card for Off-Premises
Extensions
-
A complete KTU line circuit with the additional
circuitry required to permit duplication of key-
set features and supervision at remote loca-
tions to provide off-premises extension service
with one control pair. Provides means for twoor
more connected stationsto completely control
a telephone circuit. One unit required at each
location. Loop limits 1800 ohms.
c. SB4200A Music-On-HoldCard-
Provides KTU Line Card, Music-On-Hold and
Bell System Interconnect interface (MOH),
(STC) function all on one 18-pin circuit card.
With these built-in features, installation con-
sists only on connecting of two leads from the
music source to two points on the KTU moun-
ting shelf. No other auxiliary devices or wiring
is required. The built-in MOH specification cir-
cuitry provides DC isolation, amplitude limiting
at -12 dbm and at least
85
dbm cross-talk at-
tenuation. Equipped with LED to indicate busy
or idle condition.
d. SB4201 FM Receiver for Music-On-Hold-
A complete music source designed to be used
in conjunction with SB4200A KTU line cards to
provide music-on-holdservice. One SB4201A is
normally sufficient to provide service for an en-
tire installation. Receiver is mounted on a
18-pin KTU line card-sized circuit board which
inserts in any KTU line card position. Music is
transmitted from the SB4201A to SB4200A line
cards on pins
3
and 18via common straps inthe
KSU.
Standard KTS Manual Intercom similar to
WECO 401. Manufacturedto SANIBAR's strict
quality control for long, trouble-free service.
f. SB6609B Single Link Intercom-
Single link intercomproviding intercommunica-
tions between 10 stations of a key telephone
system. The basic unit SB6609B is rotary dial
and the model SB6609B-100 contains a tone
converter so that both rotary dial and touch-
tone phones may be intermixed withinthe inter-
com system. The basic SB6609B intercom is
field expansable to include the touchtone con-
verter by ordering the SB6609B-101assembly.
3.0 INSPECTION
Inspectthe unit thoroughly as soon as possible
after delivery. Visually inspect for broken and
loose wires, or chassis damage. If any part of
the unit has been damaged intransit, report the
extent of damage to the transportation com-
pany immediately.
4.0 MOUNTING
The SB6620B KTS is designed for wall moun-
tingand should be mounted firmly to
a
suitable
backboard as required. Three mounting holes
are provided for use with
'A"
lag boltsor wood
screws. Clearance isprovided for upto
3h"
O.D.
washers. Locate the desired position for the
KTS and mark the top center keyhole location.
NOTE: The KTS may be mounted as close as
desired to adjacent equipment or ceiling. No
clearance for the hinging of the cover is re-
quired. Screw the KTS to the wall with the one
top mounting hole, then locate the two lower
mounting holes.
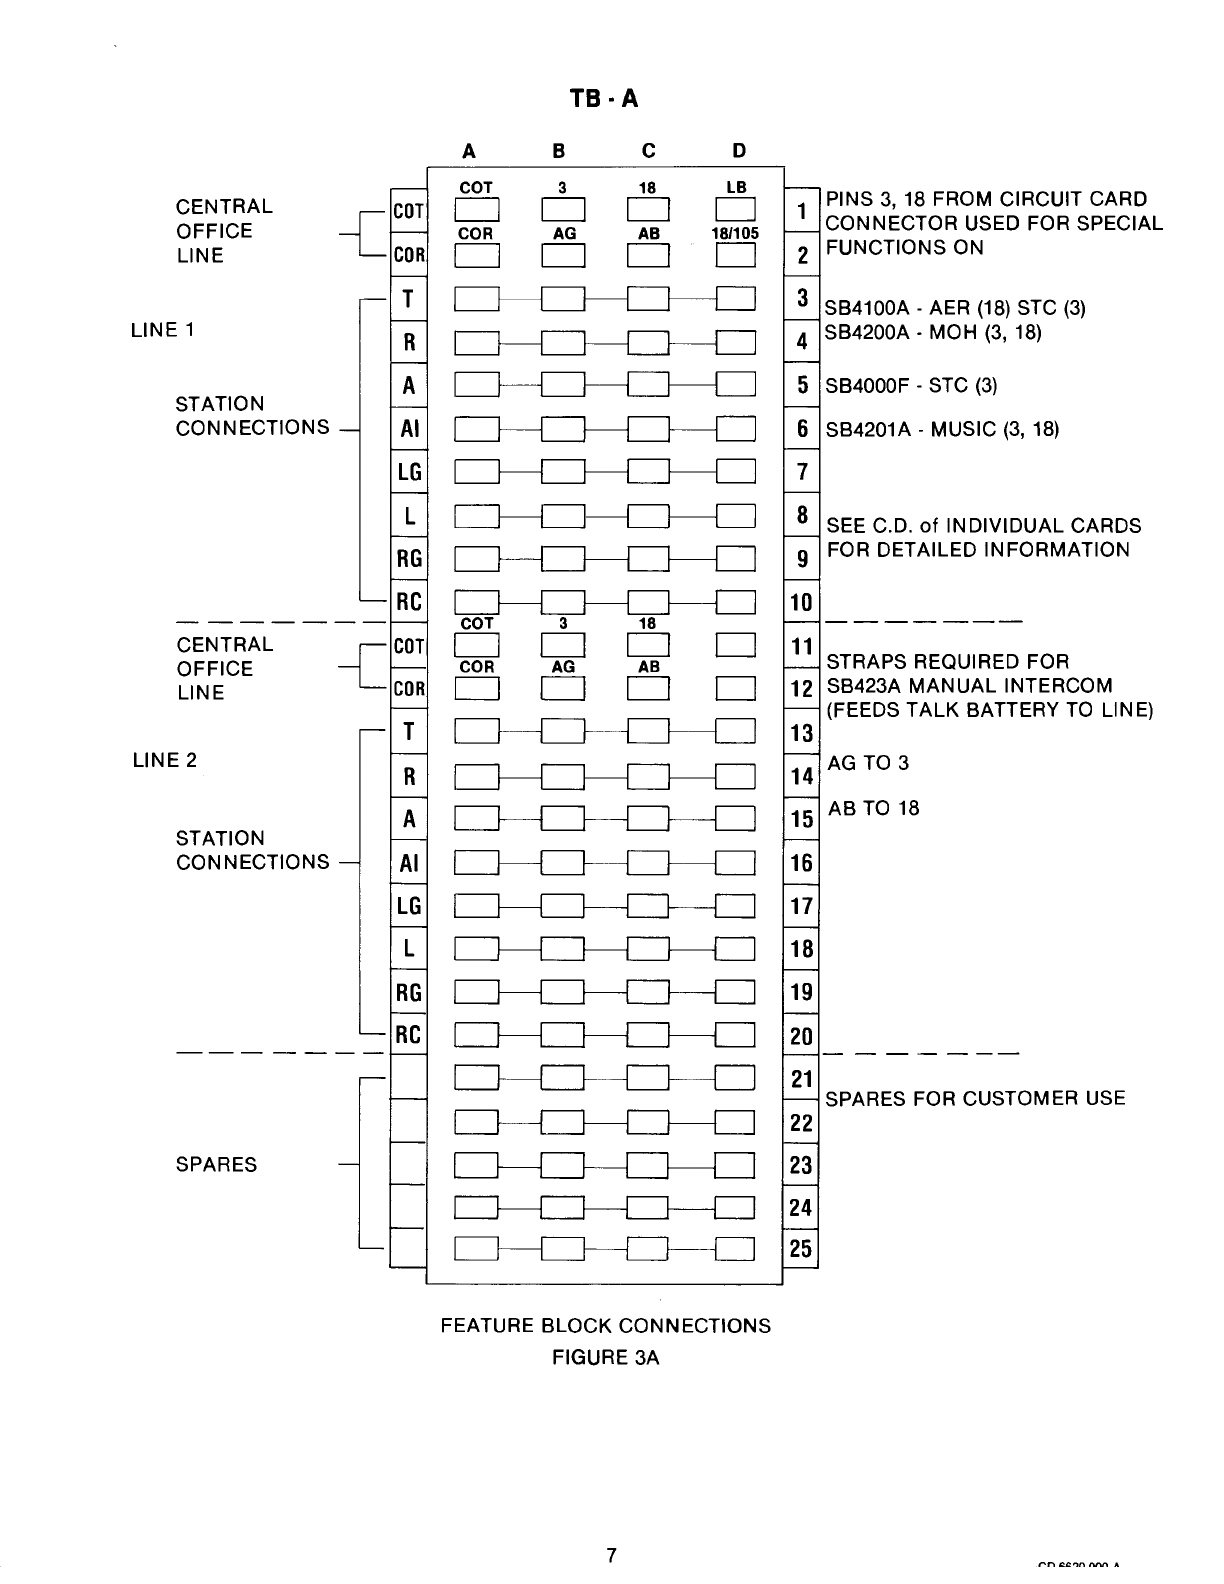
5.0 INSTALLER CONNECTIONS
The SB6620B KTS is factory wired and requires
only minimal amount of installer wiring for
most installations. A prewiredconnector allows
the power supply to be quickly installed. All
normal user functions appear at the two feature
blocks located on the chassis. Figures 4
&
5
show the basic wiring for the systemand power
unit.
5.1 FEATURE BLOCK CONNECTIONS
Line cards and special feature
cards
plug
into
the 4 standard 18-pinconnectors. The required
functions appear for distribution at the ap-
propriate locations of the feature blocks.

Card positions 1,2, and5are wired for standard
line cards (such as the SB4000F or WECO
400D). Position 6 is wired primarily for the
SB6609B Intercom,but may be adapted toother
special features.
a. For card positions 1, 2, and 5 all wiring is
per conventional practice with the following ex-
ceptions. Pins
3
and 18 appear individually at
the feature blocks (rather than bussed) for use
on special function cards. Pin 10iswired for in-
terrupted 18VAC for buzzers.Pin 11 iswired for
interrupted 105 VAC for ringers. Therefore
either interrupted buzzer or ringing can be
chosen for common audible by strap option on
the line card. For buzzers, option-T, for ringers,
option-W.
b. Each of the two feature blocks iswired for
two circuit card connections as shown below.
Figure
3
gives thefunction as they appearat the
blocks.
TB-A(upper)
TB-A(lower)
TB-C(upper)
TB-C(lower)
Pos.1
Pos.2
Pos.5
Pos.6
c. Table 1below defines the possible usageof
each of the card positions for the most com-
mon usage functions. Follow the circuit
descriptionsof the individual cards for detailed
installation instructions.
TABLE 1: SANIBAR SB6620B
Card Type Card Slot
Card Function Number Assignment
1. Line Card SB4000F 1,
2,
&
5
2.
Off Premises
Extension Line
Card SB4100A 1, 2,
&
5
5.2 POWER SUPPLY INSTALLATION
a. SB6610B-3011306 Power Supply
The power supply is installed in the upper part
of the chassis, and heldin place bysnapping in
the two locking plungers. Connection is made
to the system through a keyed female connec-
tor
J7
on the power supply and mating male
connector P7. Route the power supply cord
through either the leftor right cut-outsprovided
in the cover. (Using the left cut-out may require
that the cord lay over the top of the ring
generator.) The line cord is then plugged into
the 117V, 60Hz AC supply.
NOTE: Although the chassis and positive bat-
tery are grounded through the AC line cord,
there isthe possibility of lightning damage due
to avoltage difference totrue earth ground. It is
therefore recommended that connection be
made to a good ground, such as a main cold
water pipe, to binding post El.The largest wire
that Elwill accept is 12 AWG.
b. SB6610B-401 Ringing Generator
This sectiononly applies for field installationof
a ringing generator in the SB6610-301 power
supply. (TheSB6610-306power supply isequip-
ped with the ringing generator mounted in
place).
Disconnect the line cord from the AC supply
and remove power supply from the chassis.
Mount the ringing generator assembly on the
front side of the supply, using the four unused
holes on the mounting plate. Orient the
generator assembly so that the connector is
positioned over J10 of the power supply. Use
the four screws provided.
c. Interrupter
3. Music On Hold SB4200A 1, 2,
&
5
4.
Music Source
(FM Tuner) SB4201A 1, 2, 5,
&
6
5. Manual
Intercom SB423A 1, 2, 5,
&
6
6. Single Link
Dial Intercom SB6609B 6 only
d. Cable routing to the feature blocks is up
through two cut-outs in the bottom of the KTS
cover. Cut-outs in the chassis for securing the
cable with "ty-wraps" have been provided. Do
not route any wires along the outer edge of the
chassis that will interfere with the KTS cover.
To installthe interrupter the power supply does
not haveto be removed from the chassis. Simp-
ly plug the interrupter into J8, and secure it by
tightening the captive screw.
d. BelllBuzzer Option for lntercom
A U-link strap option is provided on the power
supply so that either 105 VAC (bell)or 18 VAC
(buzzer) will appear at J6, the intercom card
position. Set U-linkas follows:
18 VAC- Option A (factory set)
105 VAC- Option B
The 181105 VAC option also appears at TBA for
external use (see fig.
3).

INTERCOM INSTALLATION
a. SB6609B 10 Station lntercom
Installthe SB6609B in position 6of the KTSon-
ly. Select the audible signaling (18 VAC1105
VAC) as specified in section 5.2d. Refer to Fig.
3 for function assignment at the feature block.
NOTE: Audible common RG is the same as
lamp ground (LG). Terminate the buzzer or bell
returnstospare RG or LG terminals as required.
Refer to the SB6609B Circuit Description for
more details.
b. SB423A Manual lntercom
May be installed inany line card position 1,2, 5
or 6. Talk battery to the card must be jumpered
at the feature blocks.(see following section c.).
Jumper (at the appropriate line position) AG to
3, AB to 18, as shown in Fig. 3. 18VAC appears
at TBA as described in section 5.2e., if required
for buzzer signaling. Refer to CD-0423-000for
more details.
c. lntercom Feature Block Straps
-
TBC
The strap for SB6609A or SB6609B 10station in-
tercom is factory strapped. Remove this strap
and restrap if SB423 Manual lntercom or other
feature is used.
ASSEMBLY FROM TO
MUSIC-ON-HOLDINSTALLATION
a. SB4200A Line Cards
The SB4200A cards may be installedinposition
1, 2, and 5. The music source isdistributed via
pins3and 18. Jumper togetherall pin 3's andall
pin 18's at the appropriate feature block posi-
tions involved.Connect the music source (if ex-
ternally provided)toany of the pins3and 18ter-
minals. Refer to CD-4200-000for more details.
b. SB4201 FM Receiver
If using the SB4201A, install in any spare posi-
tion 1, 2,
5
or 6. Jumper (at the feature block)
pins
3
and
18
to the rest of the music distribu-
tion
as
described above. If using position 6 for
the SB4201A, and pins 3 and 18 are labeled
Sig-1and2 respectively(refer to fig.
3.)
External
antenna connections are brought into the
feature blocktoCOT, COR, (sig-0and 5position
6)-
NOTE: If usingAE linecards for music-on-hold,
connect togetherallthepin3's of each position
including the SB4201A. Leave pin 18 open at
each line position. Jumper AG to 18 at the
SB4201A position.
5.5
COVER MOUNTING
The cover for the KTS secures tothe chassis by
snap-intabs. The cover does not requireany ad-
ditional clearance from the ceiling or adjacent
equipment. To mount the cover, first insert the
two top mounting tabs. Secure the cover by in-
serting the two lower (outside) tabs and then
snapping the locking tab (lower-middle) into
place. To remove, press up on the locking tab
and the cover will come off easily.
5.6 SB6620-210EXPANSION KIT INSTALLATION
Ascertain the following parts are contained in
the SB6620B-210package.
QTY ITEM
1 SB6620B-210Prewired Terminal
block and J3-J4connectors
4 Screw, 6-32
x
318
4 Screw, 4-40x
1/2
4 Flat Washer 4-40
Remove SB6620B Key Telephone System from
wall mounting surface so that access is
available to rear of the SB6620B.
Position J3-J4 connectors over center opening
of the SB6620BTBB location. Pass connectors
and wire harness through the SB6620B and
rotate add-on assembly so that the terminal
block is flat against the mounting surface.
Secure the terminal block with four 6-32 x 318
screws.
Position J3-J4 in their proper location and
secure using four 4-40 x
1/2
screws and flat
washers.

Terminate wire from J3, J4, and TBB as follows: 6.3 INTERRUPTER
FROM COLOR TO When AC common is applied to the interrupter
J3-4 Yel TBA-1D on the ST lead, the motor will run. 10 VAC, 18
J3-5 Grn J1-5 VAC and 105 VAC are interrupted by cam
J3-10 Blue J1-10 -driven contacts to provide Lamp Wink, Lamp
J3-11 Org J1-11 Flash, Interrupted Buzzerand Ringing voltages.
J4-2 YellBrn J5-2 7.0 TESTING
J4-7 YellWht J5-7 Key Telephone System
TBB-12C Red TBA-12C
TBB-16 Blk TBA-16 If trouble isencountered with the SB6620B Key
TBB-17 Brn TBA-17 Telephone System, check that all installercon-
TBB-19 Slt TBA-19 nections or strap options have been made pro-
perly. Refer to the individual circuit card
descriptions for test of the units. The KTS fix-
Inspect busswires betweenJ3 and J4 toassure
no wires touch causing a short circuit.
Remount SB6620B and reconnect Key System.
6.0 CIRCUIT DESCRIPTION
Please refer to the schematic drawings Figures
4
&
5 for the following descriptions.
6.1 SB6610B-301Power Supply
117VAC isapplied to the primary winding (Blk-
Blk) of transformerTI. The transformer has two
secondary windings. One winding is tapped to
provide 10and 18VAC which provides the lamp
and buzzer output voltages. The other winding
has an output of 32 VAC which isfull-wave rec-
tified by diode bridge CR1-CR4 to produce
40VDC acrosscapacitor C1. Transistors Q1and
Q2, together with Zener diode CR5, form a pre-
regulatorwhich keepsaconstant 3OVDC across
the input of VR1. VRI is an integrated voltage
regulatorwhich maintains a constant 24VDC at
its output. VR1 is internally current limited, so
no output fusing is necessary.
6.2 SB6610B-401Ringing Generator
AC linevoltage appears acrossthe split primary
windings and associated network of T2.
Because of the diode CR1, much more current
flows in one direction than the other, causing
the secondary voltage to have a heavy 30 Hz
component. Capacitor C1 and the secondary
winding are resonant at 30 Hz, so that the out-
put voltage across T2-4and T2-3will be an ap-
proximate sine wave, with
a
fundamental fre-
quency of 30 Hz.
ture contains noelectricalcomponents that are
normally considered subject to failure.
However, possible wire breakage or poor wire
terminations may beverified using normal con-
tinuity checking procedures with a standard
multimeter (Simpson 263 or equivalent).
7.2 Power Supply Assembly
If the system difficulties is determined to be
related to the power unit, make sure that the
system power requirements have not exceeded
the powersupply ratingspecified insection 2.0.
Make sure that the installer connections are
made properly. Verify that the connector is
mating properly. If trouble persists, verify that
all powersupply voltage outputs are present us-
ing a standard multimeter. Refer to the
schematic diagrams for locatingwhere the out-
puts appear.
(NOTE: It may be necessary to remove the power
supply from the KTS to verify the problem if it isdue
to shorts in the system.)
7.3 If it has been determined that there has been a
card, chassis, or power failure; do not attempt
to make field replacement of electrical parts.
The SB6620B is warranted for a period of 2
years from date of purchase.
Return unit to:
SANIBAR CORPORATION
17422 Pullman St.
P.O. Box 11787
Santa Ana, CA 92711
For Technical assistance call:
(714) 546-6500

CENTRAL
OFFICE
LlNE
LlNE 1
STATION
CONNECTIONS
-----
CENTRAL
OFFICE
LlNE
LlNE 2
STATION
CONNECTIONS
SPARES
PINS 3, 18 FROM CIRCUIT CARD
CONNECTOR USED FOR SPECIAL
FUNCTIONS ON
SB4100A
-
AER (18) STC (3)
SB4200A
-
MOH (3, 18)
SB4000F
-
STC (3)
SB4201A
-
MUSIC (3, 18)
SEE C.D.
of
INDIVIDUALCARDS
FOR DETAILED INFORMATION
STRAPS REQUIRED FOR
SB423A MANUAL INTERCOM
(FEEDSTALK BATTERY TO LINE)
14
AG TO 3
-
15
ABTO 18
-
16
-
17
-
18
-
19
-
2
0
--
-
--
---
2
1
-
SPARES FOR CUSTOMER
2
2
-
2
3
-
2
4
-
2
5
USE
FEATURE BLOCK CONNECTIONS
FIGURE 3A

8
7
6
5
+
4
3
2
I
1
REVISIONS
POSITION
Z
POSITION
5
POSITION
b
Y(I
I~EILTR]
POSITION
1
DODIRIm
IIIlEi-
1
A
IREL
PER
0-
Pl.-ld
a
INTERCOM
LINE1
LINE
2
LINE
3
(SPECIRL
POSITION)
MOTE
s
J
1
JZ
J5
J
b
PART
OF
POWER
SUPPLY
SB-bb1OB-301
TB-A

FIGURE
5
9
CD-6620-000
A


iUT,UluL.TE
4
T8E
Mi%
5
,orvrFI
W1TM
..ST
NO
9EV
LTI
4
ISRIAL
NO
,
TLII
.LI
PT"-b.lO-lol
A
_%*
RE
DER
*.8-t
ill7
UL-b6IO
308
1
IILFLrLIUCC
IL*CUITIC
,0~..10-,00
I
.&'.
O#,i*CTL
COY.O*L*T,
t
L3IYTCTOPI
.l)
.c
,*I,.ilfD
.*D
FLOW
5OLDIILO
P.10L
10
I",TLLL*TIO"
OF
.*"
*..DW.SL.
NOTES UYLEIS
O7HEl*l!lt
SPICIIICD
Figure
7
Figure
8
11
RIVISIO~
LTI
m~nwrto*
ME
-0
1
,RILCASEC
?E&
MN
0721
I
SETTlOhl
A-A
A;PEEI,
P,
SF
SL.PF.
5:
6
-ri
-7.
SAN
'
BAR CORP
t
PEF
iCrEM4T,C
CVG
SO-66,O-401.
r,
TOCt..StS
.'I
.no,
'RINGING
GENEQATOQ,~O&Z
-
A~~SCHB~Y
SUPFLIED
n
-H
XI
:
m
MOUYTIYC.
-IE>NAQE
XXX
f
om
*IES
:OF
OSCN
'#EL
'MODEL
66/08
-
2
hlSE
PC4
N'<C
LIST
VL
66 0
-401
(6"
4
I<*
GIN
,'
I-
SIZE
CWE
~n*r
a
_
L..
I
IMUTICI
WliY
PART
VO
(Gi
LIR,
0-
I
I
EX
USEOON lltIl
ALL
%A".
_ED-6610-401
-
A
WTtS J*CfBOl*tRYISf SPICITIED
]*O
1
MLlOIlOU ly.ttl
106
f

TEE-TB
TBB-
IA
188-
4
iae-
3
TBB-
2A
TBB-
8
TB0-
7
TBB-
18
TBB-
10
FIGURE
9
12
CD-6620-000
A
-
.+
--
$!
0
2
a

TB-C
.
COR
0
WHEN USING SB6607A-800
TOUCH-TONE-CONVERTERWITH
SB6609A INTERCOM, STRAP
COT TO OPT 2
CORTO OPT 1
CENTRAL
OFFICE
LlNE
OPT
1
0
M
T (LINE
5)
TO R (LINE
6)
LlNE
5
STATION
CONNECTIONS
"
WHEN USING THE SB4201A
FM RECEIVER IN POSITION
6,
STRAP
1
TO 3 (OF SB4200)
13
2
TO 18 (OF SB4200)
STATION
AUDIBLE
MUSIC OUTPUT IS SIG
1
AND SIG 2
EXT. ANTENNA INPUT IS
SIG 8 AND R
STATION
LlN
E
CONNECTIONS
STATION
LAMP
CONNECTIONS
c
NOTE: THE STATION AUDIBLE FOR
SIGNALLING ON THE INTERCOM
REQUIRES THAT THE B1 LEADS BE
TERMINATED ON SPARE RG OR LG
FEATURE BLOCK CONNECTIONS
FIGURE 3B
This manual suits for next models
2
Table of contents
Other SAN/BAR Telephone System manuals