S&C SpeedNet User manual

S&C SpeedNet™Radio
Instruction Sheet 1072-530
August 14, 2017© S&C Electric Company
© S&C Electric Company 2012-2017, all rights reserved
Setup
Table of Contents
Section Page Section Page
Introduction
Qualified Persons . . . . . . . . . . . . . . . . . . . . . . . . . . . . . . 2
Read this Instruction Sheet . . . . . . . . . . . . . . . . . . . . . . 2
Retain this Instruction Sheet. . . . . . . . . . . . . . . . . . . . . . 2
Regulatory Information . . . . . . . . . . . . . . . . . . . . . . . . . . 3
Warranty . . . . . . . . . . . . . . . . . . . . . . . . . . . . . . . . . . . . . 4
Warranty Qualifications. . . . . . . . . . . . . . . . . . . . . . . . . . 4
Safety Information
Understanding Safety-Alert Messages . . . . . . . . . . . . . . 5
Following Safety Instructions . . . . . . . . . . . . . . . . . . . . . 5
Replacement Instructions and Labels. . . . . . . . . . . . . . . 5
Safety Precautions . . . . . . . . . . . . . . . . . . . . . . . . . . 6
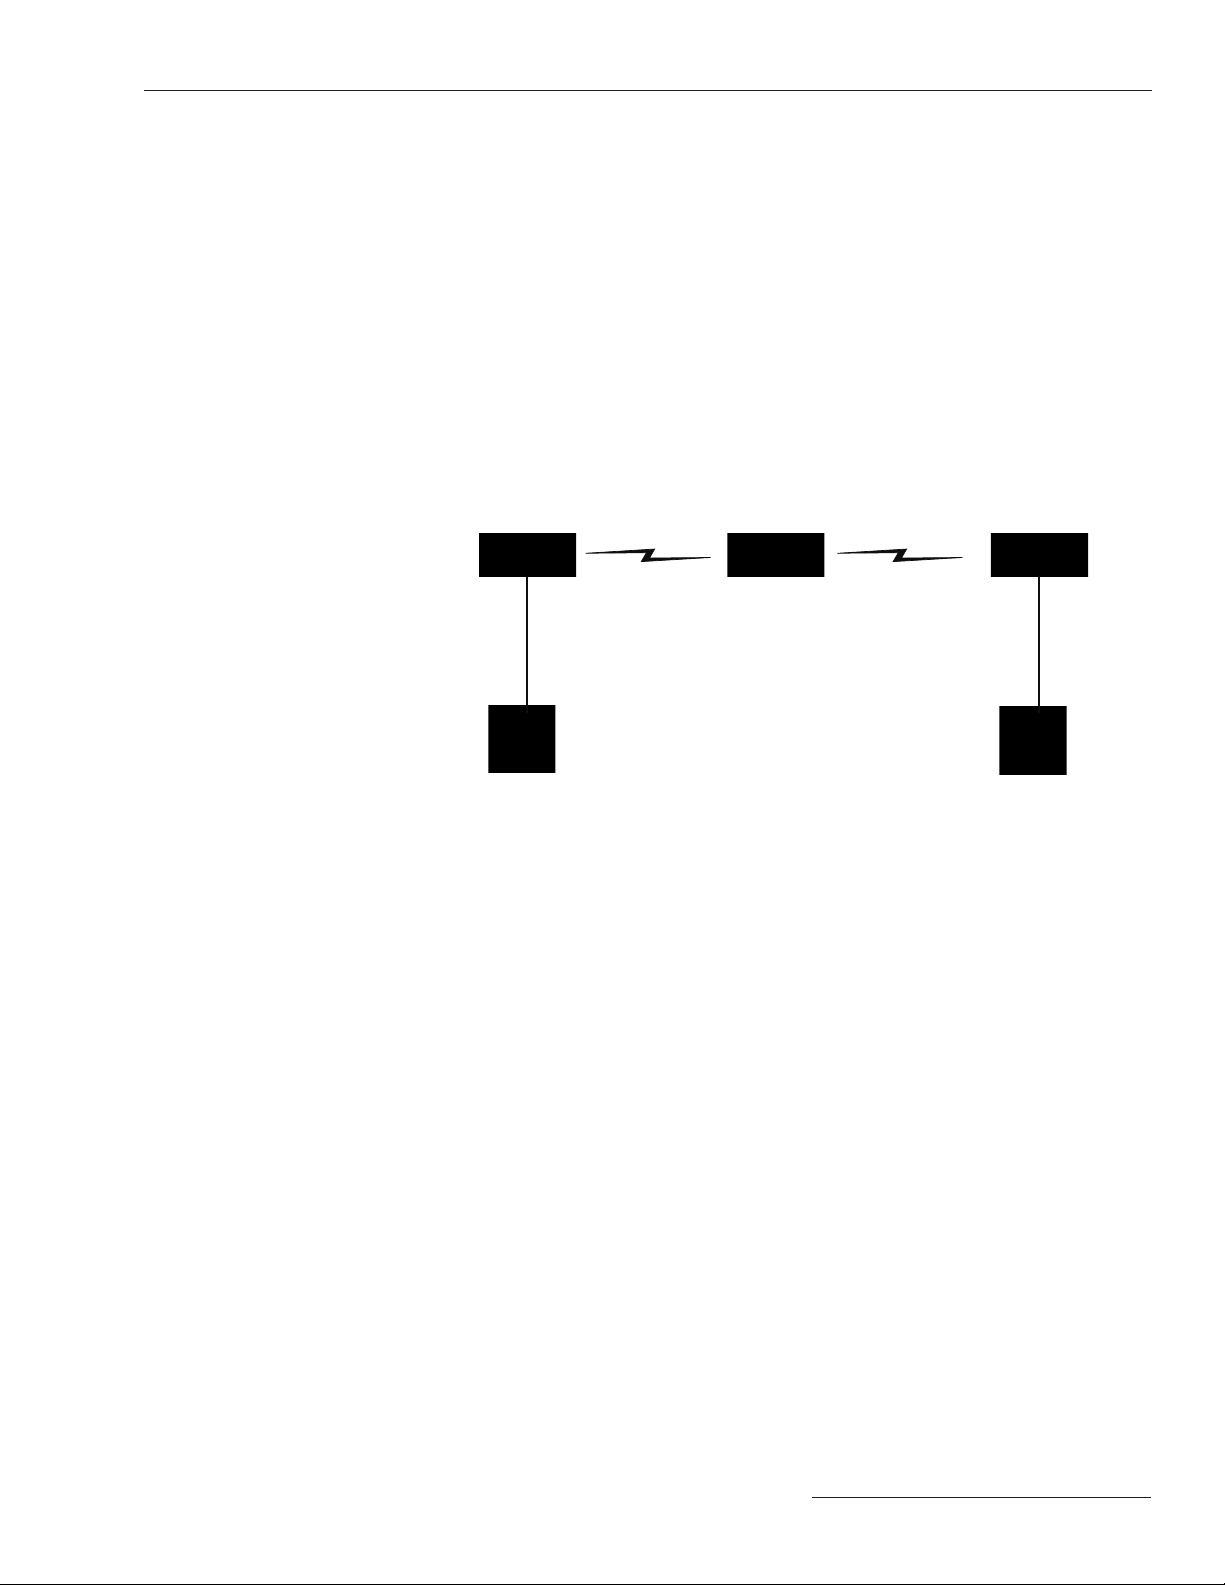
Network Setup
Overview . . . . . . . . . . . . . . . . . . . . . . . . . . . . . . . . . . .7
SpeedNet Security Administration
SpeedNet Security Information . . . . . . . . . . . . . . . . . 9
KeyGen Utility . . . . . . . . . . . . . . . . . . . . . . . . . . . . . . .9
Creating a Security Association Database . . . . . . . . 9
User Management Window. . . . . . . . . . . . . . . . . . . 10
Adding a User . . . . . . . . . . . . . . . . . . . . . . . . . . . . . 11
Deleting a User . . . . . . . . . . . . . . . . . . . . . . . . . . . . 12
Modifying a User . . . . . . . . . . . . . . . . . . . . . . . . . . . 12
Clearing All Users . . . . . . . . . . . . . . . . . . . . . . . . . . 13
Adding a MAC Address to the Revocation List . . . . 13
Deleting a MAC Address from the Revocation List . 14
Clearing the Revocation List . . . . . . . . . . . . . . . . . . 14
Key Generation . . . . . . . . . . . . . . . . . . . . . . . . . . . . 15
Adding a Keyset . . . . . . . . . . . . . . . . . . . . . . . . . . . 15
Deleting a Keyset . . . . . . . . . . . . . . . . . . . . . . . . . . 16
Generating a Security File . . . . . . . . . . . . . . . . . . . 17
Saving a Security Association Database. . . . . . . . . 19
Creating Another Security Association Database . . 20
Opening a Security Association Database . . . . . . . 20
Network Configuration . . . . . . . . . . . . . . . . . . . . . . 22
Key Updater Tool. . . . . . . . . . . . . . . . . . . . . . . . . . . 29
SpeedNet Client Tool
Overview . . . . . . . . . . . . . . . . . . . . . . . . . . . . . . . . . 33
Logging In . . . . . . . . . . . . . . . . . . . . . . . . . . . . . . . . 33
Main Window. . . . . . . . . . . . . . . . . . . . . . . . . . . . . . 34
Interfaces Window, Ethernet Tab. . . . . . . . . . . . . . . 35
Interfaces Window, Wireless Tab . . . . . . . . . . . . . . . 37
Interfaces Window, Serial Mode Tab . . . . . . . . . . . . 39
Multiple SCADA Masters. . . . . . . . . . . . . . . . . . . . . 41
Repeater/SpeedGate Serial Gate Mode . . . . . . . . . 41
Interfaces Window, Serial Port Tab . . . . . . . . . . . . . 42
Serial Pass-Through . . . . . . . . . . . . . . . . . . . . . . . . 43
IP Routing Window, Ad Hoc Routing Tab. . . . . . . . . 44
IP Routing Window, Routes Tab . . . . . . . . . . . . . . . 48
IP Routing Window, ARP Tab . . . . . . . . . . . . . . . . . 49
IP Routing Window, Blacklist Tab . . . . . . . . . . . . . . 50
Security Window, Encryption Tab . . . . . . . . . . . . . . 51
Security Window, MAC Filter Tab . . . . . . . . . . . . . . 52
Admin Window, System Tab . . . . . . . . . . . . . . . . . . 53
Admin Window, Firmware Tab . . . . . . . . . . . . . . . . . 54
Admin Window, Shell Tab . . . . . . . . . . . . . . . . . . . . 54
Statistics Window, Ethernet Tab . . . . . . . . . . . . . . . 56
Statistics Window, ICMP Tab. . . . . . . . . . . . . . . . . . 57
Statistics Window, UDP Tab . . . . . . . . . . . . . . . . . . 58
Statistics Window, IP Tab . . . . . . . . . . . . . . . . . . . . 58
Statistics Window, Wireless Tab . . . . . . . . . . . . . . . 60
Statistics Window, Battery Status Tab . . . . . . . . . . . 60
Statistics Window, AODV Tab . . . . . . . . . . . . . . . . . 62
Statistics Window, RSSI Tab . . . . . . . . . . . . . . . . . . 62
NOTICE
SpeedNet Radio software and instruction sheets can be downloaded at
sandc.com/support/automation-customer-support-portal.asp If you need

2 S&C Instruction Sheet 1072-530
Qualified Persons WARNING
The equipment covered by this publication must be installed, operated, and maintained by
qualified persons who are knowledgeable in the installation, operation, and maintenance
of radios in electric power distribution equipment, along with the associated hazards. A
qualified person is a radio technician who is qualified to install transmission-power-limited
radio equipment per FCC Part 15 and who is trained and competent in:
• The skills and techniques necessary to distinguish exposed live parts from nonlive
parts of electrical equipment
• The skills and techniques necessary to determine the proper approach distances
corresponding to the voltages to which the qualified person will be exposed
• The proper use of the special precautionary techniques, personal protective equip-
ment, insulating and shielding materials, and insulated tools for working on or near
exposed energized parts of electrical equipment
These instructions are intended only for such qualified persons. They are not intended
to be a substitute for adequate training and experience in safety procedures for this
type of equipment.
Read this
Instruction Sheet NOTICE
Thoroughly and carefully read this instruction sheet before programming, operating, or
maintaining your S&C SpeedNet Radios. Familiarize yourself with the Safety Informa-
tion and Safety Precautions on pages 5 and 6. The latest version is available online in
PDF format at sandc.com/Support/Product-Literature.asp
These instructions apply to SpeedNet Radio Firmware Version v2.5.3. The version
number can be found on the Admin>System window of the SpeedNet Client Tool version
2.5.3, as shown in Figure 1.
Retain this
Instruction Sheet
This instruction sheet should be available for reference wherever SpeedNet Radio is to
be used. Retain this instruction sheet in a location where you can easily retrieve and
refer to it.
Introduction
Figure 1. Admin>System window in the SpeedNet Client Tool

S&C Instruction Sheet 1072-530 3
Introduction
Regulatory
Information
This device complies with part 15 of the FCC rules and regulations regarding unlicensed
transmissions. Operation is subject to the following two conditions: (1) This device may
not cause harmful interference, and (2) this device must accept any interference.
This device complies with Industry Canada license exempt RSS standard(s). Operation
is subject to the following two conditions: (1) This device may not cause interference,
and (2) this device must accept any interference, including interference that may cause
undesired operation of the device.
Cet appareil est conforme avec Industrie Canada exempts de licence(s) standard RSS.
Son fonctionnement est soumis aux deux conditions suivantes: (1) ce dispositif ne doit
pas causer d’interférences, et (2) cet appareil doit accepter toute interférence, y compris
celles pouvant causer un mauvais fonctionnement de l’appareil.
FCC Warning
This device must be professionally installed. It is the responsibility of the installer to
ensure that proper antenna and cable combinations are used in order to remain within
FCC Part 15 limits.
The SpeedNet Radio is specifically designed to close the longest possible links. This
goal is accomplished in part by delivering the highest permissible RF output power to
the antenna per the FCC Part 15 Rules. In August 1996, the FCC adopted RF exposure
guidelines that established safety levels for various categories of wireless transceivers
Those limits are consistent with safety standards previously published by the National
Council on Radiation Protection (NCRP) Report 86, §17.4.1, §17.4.1.1, §17.4.2, and §17.4.3
as well as the American National Standards Institute (ANSI) in §4.1 of “IEEE Standard
for Safety Levels with Respect to Human Exposure to Radio Frequency Electromagnetic
Fields, 3 kHz to 30 GHz,” ANSI/IEEE C95.1-1992.
The SpeedNet Radio complies with these FCC exposure guidelines when the
following precautions are obeyed:
• One of the exact antennas recommended in this instruction sheet is installed
• The cable run for the selected antenna exceeds the minimum length quoted in this
instruction sheet
• All persons maintain a minimum separation of 12 inches (30.48 cm) from the
SpeedNet antenna
Disconnect the ac/dc input power source from the SpeedNet Radio whenever
repositioning the antenna. You are responsible for taking the necessary steps to ensure
that these guidelines are communicated to all persons that may come near the SpeedNet
Radio antenna.
NOTICE
This equipment has been tested and found to comply with the limits for a Class B digital
device, pursuant to part 15 of the FCC Rules.These limits are designed to provide reason-
able protection against harmful interference in a residential installation. This equipment
generates, uses, and can radiate radio frequency energy and, if not installed and used
in accordance with the instructions, may cause harmful interference to radio communica-
tions. However, there is no guarantee that interference will not occur in a particular instal-
lation. If this equipment does cause harmful interference to radio or television reception,
which can be determined by turning the equipment off and on, the user is encouraged
to try to correct the interference by using one or more of the following measures:
• Reorient or relocate the receiving antenna
• Increase the separation between the equipment and receiver
• Connect the equipment into an outlet on a circuit different from that to which the
receiver is connected
• Consult the dealer or an experienced radio/TV technician for help
CAN ICES-3 (B)/NMB-3(B)

4 S&C Instruction Sheet 1072-530
Introduction
NOTICE
Changes or modifications not expressly approved by S&C Electric Company could void
the user’s authority to operate the equipment.
Warranty The standard warranty contained in S&C’s standard conditions of sale, as set forth in
Price Sheet 150, applies to S&C SpeedNet Radios.
Warranty
Qualifications
Warranty of the SpeedNet Radio is contingent upon the installation, conguration, and
use of the SpeedNet Radio and software in accordance with S&C’s applicable instruction
sheets. This warranty does not apply to major components not of S&C manufacture, such
as batteries, and other communication devices not of S&C manufacture. However, S&C
will assign to the immediate purchaser or end user all manufacturers’ warranties that
apply to such major components.

S&C Instruction Sheet 1072-530 5
Understanding
Safety-Alert Messages
Several types of safety-alert messages may appear throughout this instruction sheet as
well as on labels attached to the SpeedNet Radio. Familiarize yourself with these types
of messages and the importance of these various signal words:
DANGER
“DANGER” identifies the most serious and immediate hazards that will likely result in
serious personal injury or death if instructions, including recommended precautions, are
not followed.
WARNING
“WARNING” identifies hazards or unsafe practices that can result in serious personal
injury or death if instructions, including recommended precautions, are not followed.
CAUTION
“CAUTION” identifies hazards or unsafe practices that can result in minor personal
injury if instructions, including recommended precautions, are not followed.
NOTICE
“NOTICE”identifies important procedures or requirements that can result in product or
property damage if instructions are not followed.
Following Safety
Instructions
If you do not understand any portion of this instruction sheet and need assistance,
contact your nearest S&C Sales Ofce or S&C Authorized Distributor. Their telephone
numbers are listed on S&C’s website sandc.com. Or call S&C Headquarters at
(773) 338-1000; in Canada, call S&C Electric Canada Ltd. at (416) 249-9171.
NOTICE
Read this instruction sheet thoroughly and
carefully before installing or operating your
S&C SpeedNet Radio.
Replacement
Instructions and
Labels
If you need additional copies of this instruction sheet, contact your nearest S&C Sales
Ofce, S&C Authorized Distributor, S&C Headquarters, or S&C Electric Canada Ltd.
It is important that any missing, damaged, or faded labels on the equipment be replaced
immediately. Replacement labels are available by contacting your nearest S&C Sales
Office, S&C Authorized Distributor, S&C Headquarters, or S&C Electric Canada Ltd.
Safety Information

6 S&C Instruction Sheet 1072-530
DANGER
SpeedNet Radios operate between +9 and +36 Vdc. Failure to observe the
precautions below will result in serious personal injury or death.
Some of these precautions may differ from your company’s operating procedures and
rules. Where a discrepancy exists, follow your company’s operating procedures and rules.
1. QUALIFIED PERSONS. Access to an SpeedNet Radio
must be restricted only to qualified persons. See “Qualified
Persons” on page 2.
2. SAFETY PROCEDURES. Always follow safe operating
procedures and rules.
3. PERSONAL PROTECTIVE EQUIPMENT. Always use
suitable protective equipment such as rubber gloves,
rubber mats, hard hats, safety glasses, and flash
clothing, in accordance with safe operating procedures
and rules.
4. SAFETY LABELS. Do not remove or obscure any of
the “DANGER,” “WARNING,” “CAUTION,” or “NOTICE”
labels.
5. SAFE DISTANCE.
• All persons should maintain a minimum separation of
12 inches (30.48 cm) for the SpeedNet antenna.
• Disconnect the ac/dc input power source from the
SpeedNet Radio whenever configuring or reposition-
ing the antenna.
9. MAINTAINING PROPER CLEARANCE. Always maintain
proper clearance from energized components.
Safety Precautions

S&C Instruction Sheet 1072-530 7
Network Setup
Overview SpeedNet Radios are versatile, smart grid-enabled wireless devices
designed specifically
for power distribution automation, SCADA, and AMI Backhaul
communications. SpeedNet
Radios provide wireless connections between two or more Internet Protocol (IP) or
serial devices. Application devices, such as the S&C IntelliRupter®PulseCloser®Fault
Interrupter, can be connected to a SpeedNet Radio. As routers, SpeedNet Radios route
IP data between separate Ethernet subnets. Data are routed between the Ethernet subnets
over a common IP-based wireless network. Route information can be entered manually,
or it can be handled automatically by the SpeedNet Radio’s proprietary enhanced version
of the Ad hoc On demand Distance Vector (AODV) routing protocol.
AODV is a routing protocol for mobile ad hoc networks and other wireless ad hoc
net
works. SpeedNet Radios use a proprietary AODV routing system that works dynamically
to maintain message routing. It generates fewer transmissions and conserves network
capacity.
Ethernet Interface: 192.168.1.2
Subnet Mask: 255.255.255.0
Default gateway: 192.168.1.1
E
thernet Interface: 192.168.1.1
S
ubnet Mask: 255.255.255.0
Wireless Interface: 192.168.202.1
Subnet Mask: 255.255.255.0
Ethernet Interface: 192.168.3.2
Subnet Mask: 255.255.255.
0
Default gateway: 192.168.3.1
Ethernet Interface: 192.168.3.1
Subnet Mask: 255.255.255.0
Wireless Interface: 192.168.202.3
Subnet Mask: 255.255.255.0
Source Node Destination Node
Ethernet Interface: 192.168.2.1
Subnet Mask: 255.255.255.0
Wireless Interface: 192.168.202.2
Subnet Mask: 255.255.255.0
Repeater Node
Figure 2. A multi-node SpeedNet network.

8 S&C Instruction Sheet 1072-530
Network Setup
The SpeedNet Radio network depicted in Figure 2 on page 7 contains three Ethernet
segments. The first segment uses the 192.168.1.0 Class C subnet that encompasses a range
of addresses from 192.168.1.1 to 192.168.1.254. The second segment uses the 192.168.2.0
Class C subnet that encompasses a range of addresses from 192.168.2.1 to 192.168.2.254. The
third segment uses the 192.168.3.0 Class C subnet that encompasses a range of addresses
from 192.168.3.1 to 192.168.3.254.
The wireless network shown in Figure 2 uses the 192.168.202.0 Class C subnet. This
subnet is different from the subnets used for the Ethernet segments. The wireless interface
of the SpeedNet Radio from the Source Node 1 is assigned an address of 192.168.202.1. The
wireless interface of the SpeedNet Radio from the repeater node is assigned an address
of 192.168.202.2. The wireless interface of the SpeedNet Radio from Destination Node 2
is assigned an address of 192.168.202.3.
In Figure 2, each SpeedNet Radio host ID is 1 (as in 192.168.3.1), while the connected
application device uses a host ID of 2 (as in 192.168.3.2). Following a numbering scheme
such as this will make it easier to keep track of which IP addresses are assigned to each
device.
NOTE: All SpeedNet Radios, regardless of their role within the network, must use
unique IP addresses for their Ethernet and wireless interfaces. All the SpeedNet Radios
on the same mesh should have wireless IP addresses in the same subnet. All the SpeedNet
Radios on the same mesh should have different Ethernet subnets.
Refer to S&C Instruction Sheet 1072-510 for additional information about network
planning.

S&C Instruction Sheet 1072-530 9
SpeedNet Security Administration
SpeedNet Security
Information
SpeedNet Radios use a comprehensive security suite to prevent unauthorized network
access and to protect sensitive data. The security features include user access controls,
network data encryption, node access revocation, and anti-spoong measures. These
security features should be incorporated as part of a complete security policy, which
should include application-level user authentication and stringent password policies. One
example would be a security policy requiring user-password changes at a dened interval.
KeyGen Utility Administrative control of SpeedNet Radio security conguration is provided by the
SpeedNet KeyGen Utility, an application that generates security keys, updates user access
and radio revocation lists, and saves updated security proles within a Security Association
Database (SAD). The KeyGen Utility also allows generation of a common conguration
le to load into multiple radios, easing conguration overhead.
Creating a Security
Association Database
Use the following procedure to create a security association database:
STEP 1. Launch the KeyGen application. The Launch window will open. See Figure 3.
Figure 3. The KeyGen application launch window.
STEP 2. Click the Create button to create a Security Association Database (SAD). The
SAD dialog box will open. See Figure 4.
Figure 4. The Security Association Database dialog box.
NOTICE
The Security Association Database, stored in a .sad file, is encrypted and protected
by the network name and pass phrase combination specified at the creation of the
database. Loss of the network name and pass phrase combination means the Secu-
rity Association Database becomes unusable. This may imply a new database would
need to be created. Also, all radios would need to be reset to factory settings and re-
programmed with security files derived from a new database. As such, it is vital to keep
track of the network name and pass phrase credentials associated with the database.

10 S&C Instruction Sheet 1072-530
SpeedNet Security Administration
STEP 3. Enter a network name that is 4 to 64 characters in length. Use the Tab key on your
keyboard to proceed to the next eld.
STEP 4. Enter a pass phrase that is 8 to 64 characters in length. Use the Tab key on your
keyboard to proceed to the next eld.
STEP 5. Retype the pass phrase to conrm the previously entered pass phrase.
STEP 6. Select a region from the drop down list. Then click the OK button.
STEP 7. Save the Security Association Database le as a .sad le. See Figure 5. The User
Management window will open. See Figure 6.
Figure 5. The Security Association Database save dialog box.
User Management
Window
Figure 6. The KeyGen User Management window.
The User Management window allows the administrator to add up to six users to the
system. Any users with a check mark entered in the Admin column will have full
security
access. Users created without this checkmark entered have limited, read-only privileges when
accessing the radios. Admin-level access is required to congure the radios.
Adding a User Follow this process to manage users:
STEP 8. Click the Add button on the User Management window. The User File dialog box
will open. See Figure 7.

S&C Instruction Sheet 1072-530 11
SpeedNet Security Administration
Figure 7. The KeyGen User File dialog box.
STEP 9. Enter a user name that is 8 to 16 characters in length. Valid case-sensitive characters
are a-z, A-Z, and 0-9. Use the Tab key on your keyboard to proceed to the next eld.
STEP 10. Enter a password that is 8 to 16 characters in length. Valid case-sensitive characters
are a-z, A-Z, and 0-9. Use the Tab key on your keyboard to proceed to the next eld.
STEP 11. Retype the password to conrm the previously entered password. Click to check the
Administrator checkbox if the user will be an administrator. Click the OK button.
See Figure 7.
The newly added user will appear in the KeyGen User Management window.
See Figure 8.
Figure 8. Adding a KeyGen user.
Deleting a User STEP 12. To delete a user from the users list, highlight that user’s name. Then click the Delete
button. See Figure 9.

12 S&C Instruction Sheet 1072-530
SpeedNet Security Administration
Figure 9. The KeyGen User Management window Delete button.
The User Management dialog box will open. See Figure 10.
Figure 10. The User Management dialog box.
STEP 13. Click the Yes button to delete the selected user from the user list.
Modifying a User STEP 14. To modify a user name and/or password, rst select the user from the User
Management list. Then click the Modify button. See Figure 11.
Figure 11. The KeyGen User Management window.
The User File dialog box will open that includes user details. See Figure 12.

S&C Instruction Sheet 1072-530 13
SpeedNet Security Administration
Figure 12. The KegGen User File dialog box.
Clearing All Users STEP 15. To clear all users click the Clear button on the User Management window. The
User Management conrmation dialog box will be displayed. See Figure 13.
STEP 16. Make the appropriate changes. Then click the OK button.
Figure 13. User Management dialog box.
STEP 17. Click the Yes button to delete all users from the User Management list. Further radio
manage
ment will require at least one admin account and a person possessing that
account’s login credentials (username and password).
Adding a MAC
Address to the
Revocation List
The Mac Revocation Management window is used to update the revocation list for the
Media Access Control (MAC) address lter. See Figure 14. The MAC address is factory-
programmed into SpeedNet Radios. As such, revoking a MAC address is a means to exclude
radios. For example, if a SpeedNet Radio were stolen, it would be wise to exclude that
radio’s MAC address as one means to prevent the radio from joining a mesh and breaching
SpeedNet Radio network security.
Figure 14. The MAC Revocation Management window.
To add a new MAC address to the revocation list, switch to the MAC Revocation
Management window. Enter the MAC address of the SpeedNet Radio to be excluded from
communicating with the radio being configured. The valid hexadecimal characters are a-f
and 0-9. Click the Add button.

14 S&C Instruction Sheet 1072-530
SpeedNet Security Administration
Deleting a MAC
Address from the
Revocation List
To delete a MAC address from the revocation list, highlight the address on the MAC
Revocation Managementwindow. Clickthe Delete button.SeeFigure15.
Figure 15. The MAC Revocation Management window.
The Mac Management dialog box will be displayed. See Figure 16.
Figure 16. The Mac Management dialog box.
Click the Yes button to delete the MAC address.
Clearing the
Revocation List
To clear all addresses, click the Clear button on the MAC Revocation Management
window. See Figure 17.
Figure 17. The MAC Revocation Management window.
The MAC Management dialog box will open. See Figure 18.

S&C Instruction Sheet 1072-530 15
SpeedNet Security Administration
Figure 18. The Clear all MAC entries dialog box.
Click the Yes button to clear the Mac Revocation list.
Key Generation The keyset is a common credential all radios use when optionally encrypting UDP/IP and
TCP/IP data over a SpeedNet network. Keysets are thus used when AES 128-bit encryption
is enabled (SpeedNet Client tools’ Security>Encryption tab using the Enable Encryption
check box). Keysets must be installed on all participating radios to be available for use; it
is not sufcient to merely generate them in the KeyGen tool. The KeyGen tool generates
keysets randomly without user input; the user does not provide seeds or other data. The
Key Generation window is used to update keysets. For a network or security conguration
to be applied to the radio, the conguration le must be encrypted and authenticated with
a current keyset. Up to six keysets can be loaded into a radio at a given time. At most one
keyset is active at any given time. Radios can “roll forward” to new keysets upon prompting
by users or when data of a newer keyset is received from another radio. Radios do not
“roll backward” to previous keysets.
Adding a Keyset To add a new keyset, open the Key Generation tab and click the Add Keyset button.
See Figure 19.
Figure 19. The Key Generation window.
Each time the Add Keyset button is clicked, the next consecutive keyset number will
be automatically added to the Install Keyset list as shown in Figure 20 on page 16.

16 S&C Instruction Sheet 1072-530
SpeedNet Security Administration
Figure 20. New keyset number is available on the Install Keyset list.
Deleting a Keyset To delete a keyset, open the Key Generation tab and highlight the keyset. Then click the
Delete button. See Figure 21.
Figure 21. The Key Generation window.
The conrmation dialog will open. See Figure 22. Click the Yes button to delete the
keyset.
Figure 22. The Delete keyset(s) confirmation dialog box.

S&C Instruction Sheet 1072-530 17
SpeedNet Security Administration
NOTICE
The current keyset list will not be updated until a new security file is generated. Security
configuration files can still be encrypted to a recently deleted keyset because the old
keyset is still stored in the current keyset list. If, after deleting a keyset, you add a
keyset with the same tag as the deleted keyset, the keyset in the Install Keyset list will
contain a different key than the keyset with the same tag in the current keyset list. Care
must be taken to avoid this because all radios must have the same keyset installed to
communicate UDP/IP and TCP/IP data. ICMP data used for pings is not encrypted in
SpeedNet radios, so pings may work even in the case of mismatched keysets on radios
with encryption enabled. SpeedNet Client Tool logins use SNMPv3, which is transported
over UDP/IP, so logins will not work over wireless links in the case of mismatched keysets
on radios with encryption enabled.
Generating a
Security File
Follow this process to generate a security le:
STEP 18. Select up to six keysets from the installed Keyset list.
STEP 19. Click the Generate Security File button on the Key Generation window. The
Security File window will open with all selections listed. See Figure 23.
Figure 23. The Security File window.
STEP 20. Verify all the data to be included and select a current keyset to encrypt the le.
Click the Continue button. If a MAC-specic key is used to encrypt the le, the
dialog box shown in Figure 24 will be displayed.
Figure 24. The Enter Mac Address dialog box.
STEP 21. Enter the MAC address of the radio for which this le is intended and then click
the OK button.
STEP 22. Enter a le name for the security le. See Figure 25 on page 18. Then click the
Save button. It’s good practice to use the MAC address of the target radio as the
lename or as part of the lename for the security le.

18 S&C Instruction Sheet 1072-530
SpeedNet Security Administration
Figure 25. The Save Radio Security File dialog box.
After the security file is generated, the current keyset list will be updated with all of
the installed keysets, as shown in Figure 26.
Figure 26. Updated Current Keyset list in the dialog box.
The maximum number of keyset tags allowed is 63. If you attempt to add another keyset
after 63 keyset tags have been entered, the dialog box shown in Figure 27 will be displayed
requesting permission to overwrite an existing keyset.
Figure 27. Dialog box requesting permission to overwrite an existing keyset.
STEP 23. Click the Yes button to overwrite Keyset 1.
To delete a specific keyset, highlight the keyset (the example in Figure 28 on page 19
is Keyset 59). Click the Delete button.

S&C Instruction Sheet 1072-530 19
SpeedNet Security Administration
Figure 28. Dialog box requesting permission to delete a keyset.
STEP 24. Click the Yes button to delete Keyset 59.
The deleted keyset will not be deleted from the Current Keyset list until a new security
file is generated.
Saving a Security
Association Database
Follow this process to save an SAD le:
STEP 25. Open the File menu in the upper-left corner of the SpeedNet KeyGen Utility
window. Scroll down and select Save. See Figure 29.
Figure 29. The SpeedNet KeyGen Utility window save SAD.
STEP 26. The Save Security Database window will open. See Figure 30. Enter a le name
for the database, and click the Save button.
Figure 30. The Save Security Database window.
The database will be encrypted with the pass phrase that was provided when the SAD
was created. It is important to retain the pass phrase and network name to preserve access
to the security information for the radios.

20 S&C Instruction Sheet 1072-530
SpeedNet Security Administration
Creating Another
Security Association
Database
Open the File menu in the upper-left corner of the SpeedNet KeyGen Utility window.
Scroll down and select New. See Figure 31.
Figure 31. SpeedNet KeyGen Utility window for selecting a new SAD.
The new SAD window will open with all entries cleared.
Opening a Security
Association Database
Follow this process to open an SAD le:
STEP 27. Open the File menu in the upper-left corner of the SpeedNet KeyGen Utility
window. Scroll down and select Open. See Figure 32.
Figure 32. SpeedNet KeyGen Utility window to open a SAD.
STEP 28. The Open Security Database window will open. See Figure 33 on page 21. Enter
the le name of the SAD database, and click the Open button.
Other manuals for SpeedNet
5
Table of contents