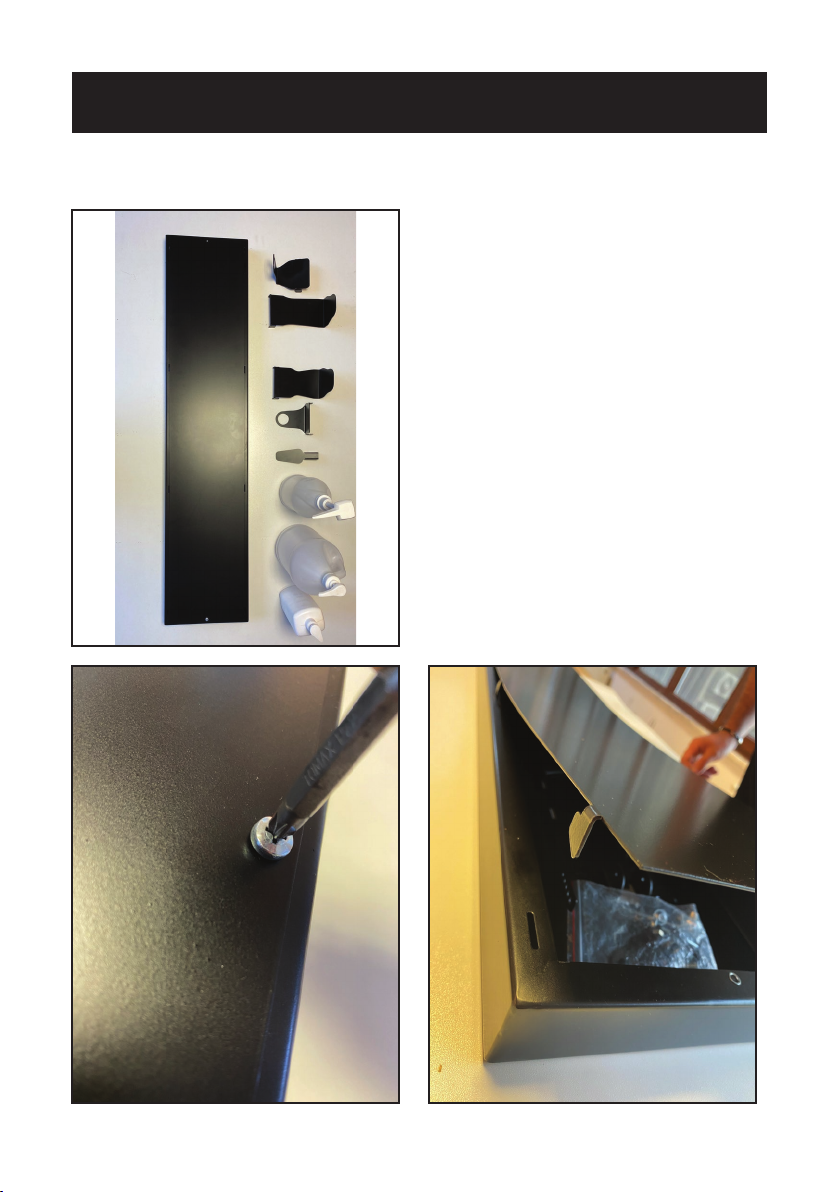
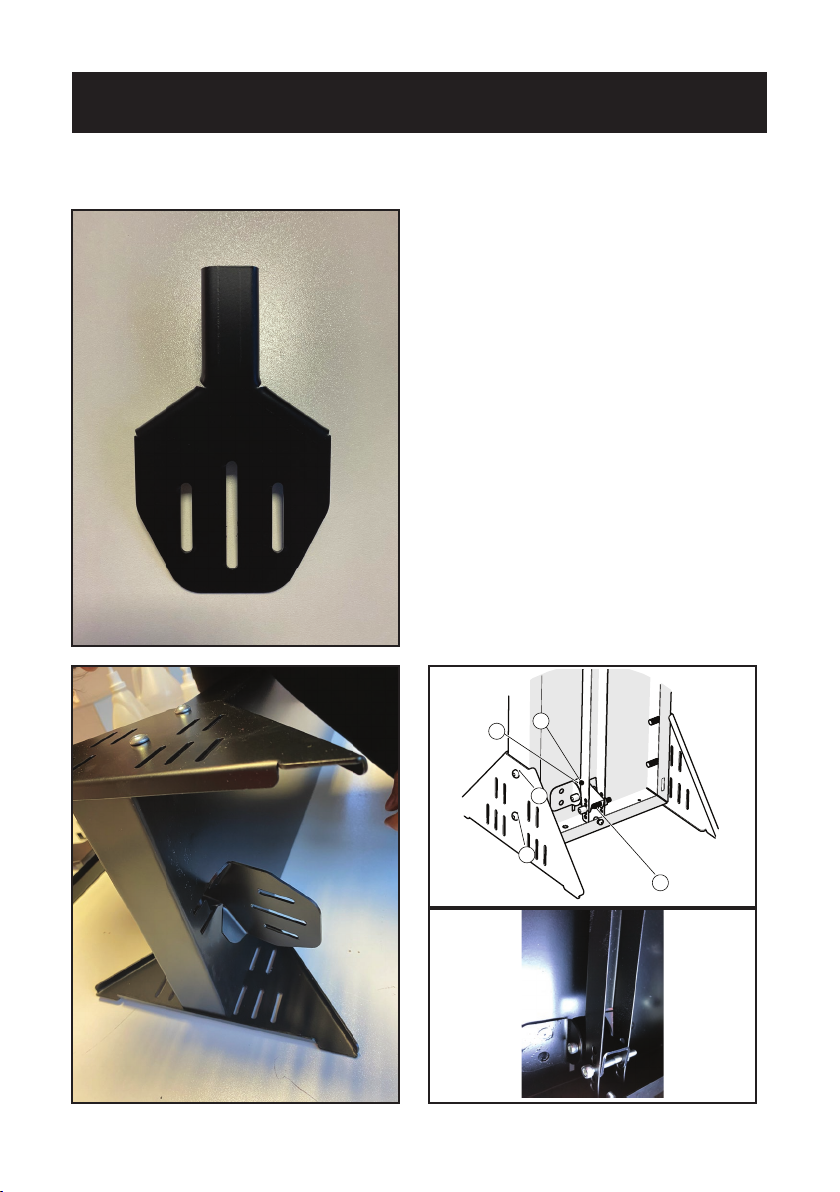
Sanitame MKC-HSS-P-2020-WB-003 User manual

COMMERCIAL GRADE
HAND SANITIZER DISPENSER STATION
FOOT PEDAL OPERATED
MODEL NUMBERS:
MKC-HSS-P-2020-WB-003
MKC-HSS-P-2020-BL-004
MKC-HSS-P-2020-RR-002
MKC-HSS-P-2020-WB-001
ASSEMBLY
INSTRUCTIONS
Thank you for choosing SANITAME!
PLEASE READ BEFORE RETURNING THIS PRODUCT FOR ANY
REASON.
If you have question or experience a problem with your SANITAME Hand
Sanitizer Station purchase, go to sanitame.com
If you can’t nd the answer or do not have access to the Internet, call
800-999-4521 from 10:30am to 6:30pm, EST Mon-Fri to speak with an agent.
Please have the model number available when you call.
SAVE THIS MANUAL FOR FUTURE REFERENCE.

ASSEMBLY & SET UP
Page 2
IMPORTANT:
THE UNIT COMES 3 DIFFERENT HOLDER TYPES
TO ACCOMODATE:
- 1 LITER 32OZ. CONTAINERS
- HALF GALLON CONTAINERS
- ONE GALLON CONTAINERS
PLEASE USE THE CORRECT ACTUATOR TAB AND
CONTAINER HOLDERS FOR YOUR PREFERRED CONTAINER CHOICE

ASSEMBLY & SET UP
Page 3
DIAGRAM (FRONT VIEW)
32 OZ. - 1 LITER BOTTLE USAGE
3
8
11
2
9
7
4
12
5
6
ID QTY DESCRIPTION
22Base Legs
3 1 Actuator Rod
4 1 1 Liter Container (not included)
5 1 1 Liter Container Holder (Bottom)
6 1 1 Liter Container Holder (Top)
ID QTY DESCRIPTION
7 1 Station Body
8 1 Back Cover
9 4 M8x20mm Screws
11 1 Foot Pedal
12 1 Short Actuator TAB

ASSEMBLY & SET UP
Page 4
7
13
2
11
6
4
14
5
3
DIAGRAM (FRONT VIEW)
HALF GALLON BOTTLE USAGE
ID QTY DESCRIPTION
22Base Legs
3 1 1/2 Gallon Container (not included)
4 1 1/2 Gallon Container Holder
(Bottom)
5 1 1/2 Galllon Container Holder (Top)
6 1 Station Body
ID QTY DESCRIPTION
7 1 Back Cover
11 4 M8x20mm Screws
13 1 Foot Pedal
14 1 Long Actuator TAB

ASSEMBLY & SET UP
Page 5
DIAGRAM (FRONT VIEW)
1 GALLON BOTTLE USAGE
2
10
3
6
8
5
1
4
11
12
ID QTY DESCRIPTION
111 Gallon Container Holder (Bottom)
21Actuator Rod
3 2 Base Legs
4 1 1 Gallon Container (not included)
5 1 Station Body
6 1 Back Cover
ID QTY DESCRIPTION
8 4 M8x20mm Screws
10 1 Foot Pedal
11 1 1 Gallon Container Holder
(Top)
12 1 Long Actuator TAB

ASSEMBLY & SET UP
Page 6
DIAGRAM (REAR VIEW)
ID QTY DESCRIPTION
22Base Legs
3 1 Station Body
4 1 1/2 Gallon Container Holder
(Bottom)
5 1 1/2 Galllon Container Holder (Top)
6 1 Actuator Rod
7 2 M5 Screws
8 4 M6x45mm Screws
9 4 M6 Nuts
10 4 M8x20mm Screws
11 1 Foot Pedal

ASSEMBLY & SET UP
Page 7
14
13
9
1
2
11
DIAGRAM (DETAIL VIEW)
Pedal Assembly & Actuator Tab
14
ID QTY DESCRIPTION
11Actuator Rod
2 4 M8x20mm Screws
9 4 M6x45mm Screws
11 2 Base Legs
13 1 Foot Pedal
14 1 Actuator Tab

ASSEMBLY & SET UP
Page 8
STEP 1 - OPENING THE BODY & PREPARATION
1- Remove the screw on the back
cover to expose parts.
(See Fig 2)
2- Open the back cover of the body,
and remove the components.
(See Fig 3)
3- Lay down all parts on a at surface.
NOTE:
There are 2 pump push actuator tabs, and 3
dierent container holders for your convenience
on using your preferred container size.
(1 Liter - 32oz., Half Gallon, One Gallon.)
REQUIRED TOOLS:
- Screwdrivers (medium size phillips)
*Container Bottles not included.
Fig 1.
Fig 2. Fig 3.

ASSEMBLY & SET UP
Page 9
STEP 2 - INSTALLATION OF LEGS
1- Locate and prepare two legs, 4
screws and 4 nuts, and the main body
of the unit.
(See Fig 1)
2- Insert the screws to the legs.
(See Fig 2)
3- Insert the legs to the holes on the
sides of the body.
(See Fig 2)
4- Tighten the screws and nuts using
the wrench and allen key.
(See Fig 3)
5- Repeat steps for both sides.
REQUIRED TOOLS:
- Allen Key (included)
- Mini Wrench (included)
Fig 1.
Fig 2.
Fig 3.

ASSEMBLY & SET UP
Page 10
STEP 3 - INSTALLATION THE PEDAL
1- Insert the pedal (13) mechanism
into the body from the groove.
(See Fig 2)
2- Insert the long screw and nut into
the rst hole of the pedal and install.
(See Fig 3)
IMPORTANT:
DO NOT OVERTIGHTEN THE SCREW AS THE
PEDAL MUST BE ABLE TO MOVE UP & DOWN
FREELY
(See Fig 3)
REQUIRED TOOLS:
- Allen Key (included)
- Mini Wrench (included)
Fig 1.
Fig 2. Fig 3.
13
9
1
2
11

ASSEMBLY & SET UP
Page 11
STEP 4 - INSTALLATION THE ACTUATOR TAB
1- Select desired pump actuator tab for
your use:
-LONG Actuator tab version is designed
for Half Gallon & 1 Gallon Containers.
-SHORT Actuator tab version is designed
for 1 Liter - 32 oz. Containers.
(See Fig 1)
2- Insert the long screw and nut into the
rst hole of the actuator tab and install.
(See Fig 3 - 14)
3- Make sure actuator tab mechanism can
move up and down easily.
(See Fig 2)
IMPORTANT:
DO NOT OVERTIGHTEN THE SCREW AS THE
PEDAL MUST BE ABLE TO MOVE UP & DOWN
FREELY.
(See Fig 3)
Fig 1.
Fig 2. Fig 3.
14

ASSEMBLY & SET UP
Page 12
STEP 5 - INSTALLATION ACTUATOR ROD
1- Place the Actuator Rod as shown
on picture
(See Fig 1)
2- Insert the long screws and nuts into
the rst holes of the rod, connecting
the Pedal Assembly and Actuator Rod
(See Fig 1)
3- Install the screw and nut.
(See Fig 3)
4- Make sure rod mechanism can
move up and down easily.
(See Fig 2)
IMPORTANT:
DO NOT OVERTIGHTEN THE SCREW AS THE
PEDAL & ACTUATOR TAB MUST BE ABLE TO
MOVE UP & DOWN FREELY.
(See Fig 2)
Fig 1.
Fig 2. Fig 3.

ASSEMBLY & SET UP
Page 13
STEP 6- INSTALLATION CONTAINER HOLDERS
There are 3 sets of container holders
Each set consists of 2 components.
-1 Liter - 32 OZ version.
- Half Gallon version.
- One Gallon version.
1- Select desired holders.
(See Fig 2)
2- Insert the top and bottom assembly
into slots of the desired height.
(See Fig 3)
3-Make sure the mechanism can
move freely up and down
(See Fig 3)
IMPORTANT:
Mechanism will not work properly without a
container with a pump in place. It will stay down
when there is no container in place.This is Nor-
mal. (See Fig 1)
Fig 1.
Fig 2. Fig 3.

ASSEMBLY & SET UP
Page 14
STEP 7 - PLACEMENT OF CONTAINER BOTTLE
1 - Place a full sanitizer bottlle into the
holder.
-For 1 Liter 32oz. Bottles you can just
place them in the holder.
-Hallf Gallon & One Gallon Bottles
require the holder to be secured
between neck of the bottle and the
pump nozzle.
2 - Check if the operation of the ped-
dal is functioning.
NOTE:
Adjust Actuator rod ccrew holes, and/or holder
slots if necessary.
Fig 1.
Fig 2. Fig 3.

ASSEMBLY & SET UP
Page 15
STEP 8- INSTALLATION OF BACK COVER
1- Insert the back the back cover in
the same way you removed before in-
stallation, and slide down on the slots.
Make sure the teeth of the slot tabs
look down. and they all align in slots
(See Fig 2)
2- Align the top and bottom screw
holes.
(See Fig 1)
4- Screw and tighten.
(See Fig 3)
REQUIRED TOOLS:
- Allen Key (included)
- Mini Wrench (included)
Fig 1.
Fig 2. Fig 3.

PRODUCT VISUALS
Page 16
HAND SANITIZER DISPENSER STATION
with 1 liter/32oz. Holders & Container

PRODUCT VISUALS
Page 17
HAND SANITIZER DISPENSER STATION
with 1 Gallon. Holders & Container

PRODUCT VISUALS
Page 18
HAND SANITIZER DISPENSER STATION
with 1/2 Gallon. Holders & Container

TROUBLESHOOTING & WARRANTY
Page 19
BEFORE YOU CALL FOR SERVICE
IF THE DISPENSER FAILS TO OPERATE:
A) Check to make sure if you have followed all the assembly steps
B) Check to see if you have a working sanitizer container with operational pump
and liquid inside. Check proper operation of the sanitizer before placing in slot.
C) Make sure you are using the correct SET of container holders.
D) Make sure the screws holding the pedal, actuator tab. and actuator rod are not
overtighten, and mechanism can move easy, and freely.
IF NONE OF THE ABOVE SOLVES THE PROBLEM, CONTACT SANITAME BY
WITHIN 48 HOURS DURING WEEKDAYS.
CUSTOMER SERVICE
IMPORTANT
DO NOT RETURN THIS PRODUCT TO THE STORE
If you have a problem with this product please contact the
Sanitame Customer Satisfaction Center at 800-999-4521 or
DATED PROOF OF PURCHASE, MODEL # REQUIRED FOR
WARRANTY SERVICE
LIMITED WARRANTY
MK Creatives LLC. warrants to the original purchaser that the product willl be free from de-
fects in material parts and workmanship for the period designated for this product.
The warranty commences the day the product is purchased and covers up to a period of 1
year for labor and parts (manufacturer defects only.)

SANITAME logos and product names and the color scheme are trademarks of MK
Creatives Limited Liability Company. All rights reserved.
Product in this box may dier slightly from that pictures. Does not aect function.
Not all accessories shown in photography are included in this package.
MK Creatives LLC, 8000 River Road Unit 9C, North Bergen, NJ 07047
“For a clean and healthier environment”
October 2020 - V1.0 Printed in Turkey
This manual suits for next models
3
Table of contents