■バンダルカメラの場合:A-1、A-2、A-3タイプ
1A-1、A-2タイプのカメラの場合:必ずサブ基板の接続ケーブルをメイン基板の
根元から切りはなす
A-3タイプのカメラの場合:サブ基板を取り付ける
•カメラを矢印aの方向に回し、カメラ下側のネジbをゆるめ、図のようにサブ
基板を取り付けられる程度にブラックシートのあそびを作ってください。
•サブ基板の切れこみをカメラ本体のネジcに確実にはめ込んでください。
•ブラックシートのあそびをなくし、ネジbを締めなおしてください。
2メイン基板を取り付ける
3コネクターをHEATER端子に接続する
■防水カメラの場合:Bタイプ
1金属板と放熱シートaを取り外す
•放熱シートaはメイン基板を取り付けた後(4)、再度同じ位置に貼ります。
2サブ基板を取り付ける
•サブ基板の切れこみをカメラ本体のネジbに確実にはめ込んでください。
3コネクターをHEATER端子に接続する
4メイン基板を取り付ける
•ケーブル類は、図のように整形してください。
•1ではがした放熱シートaを再度同じ位置に貼ってください。
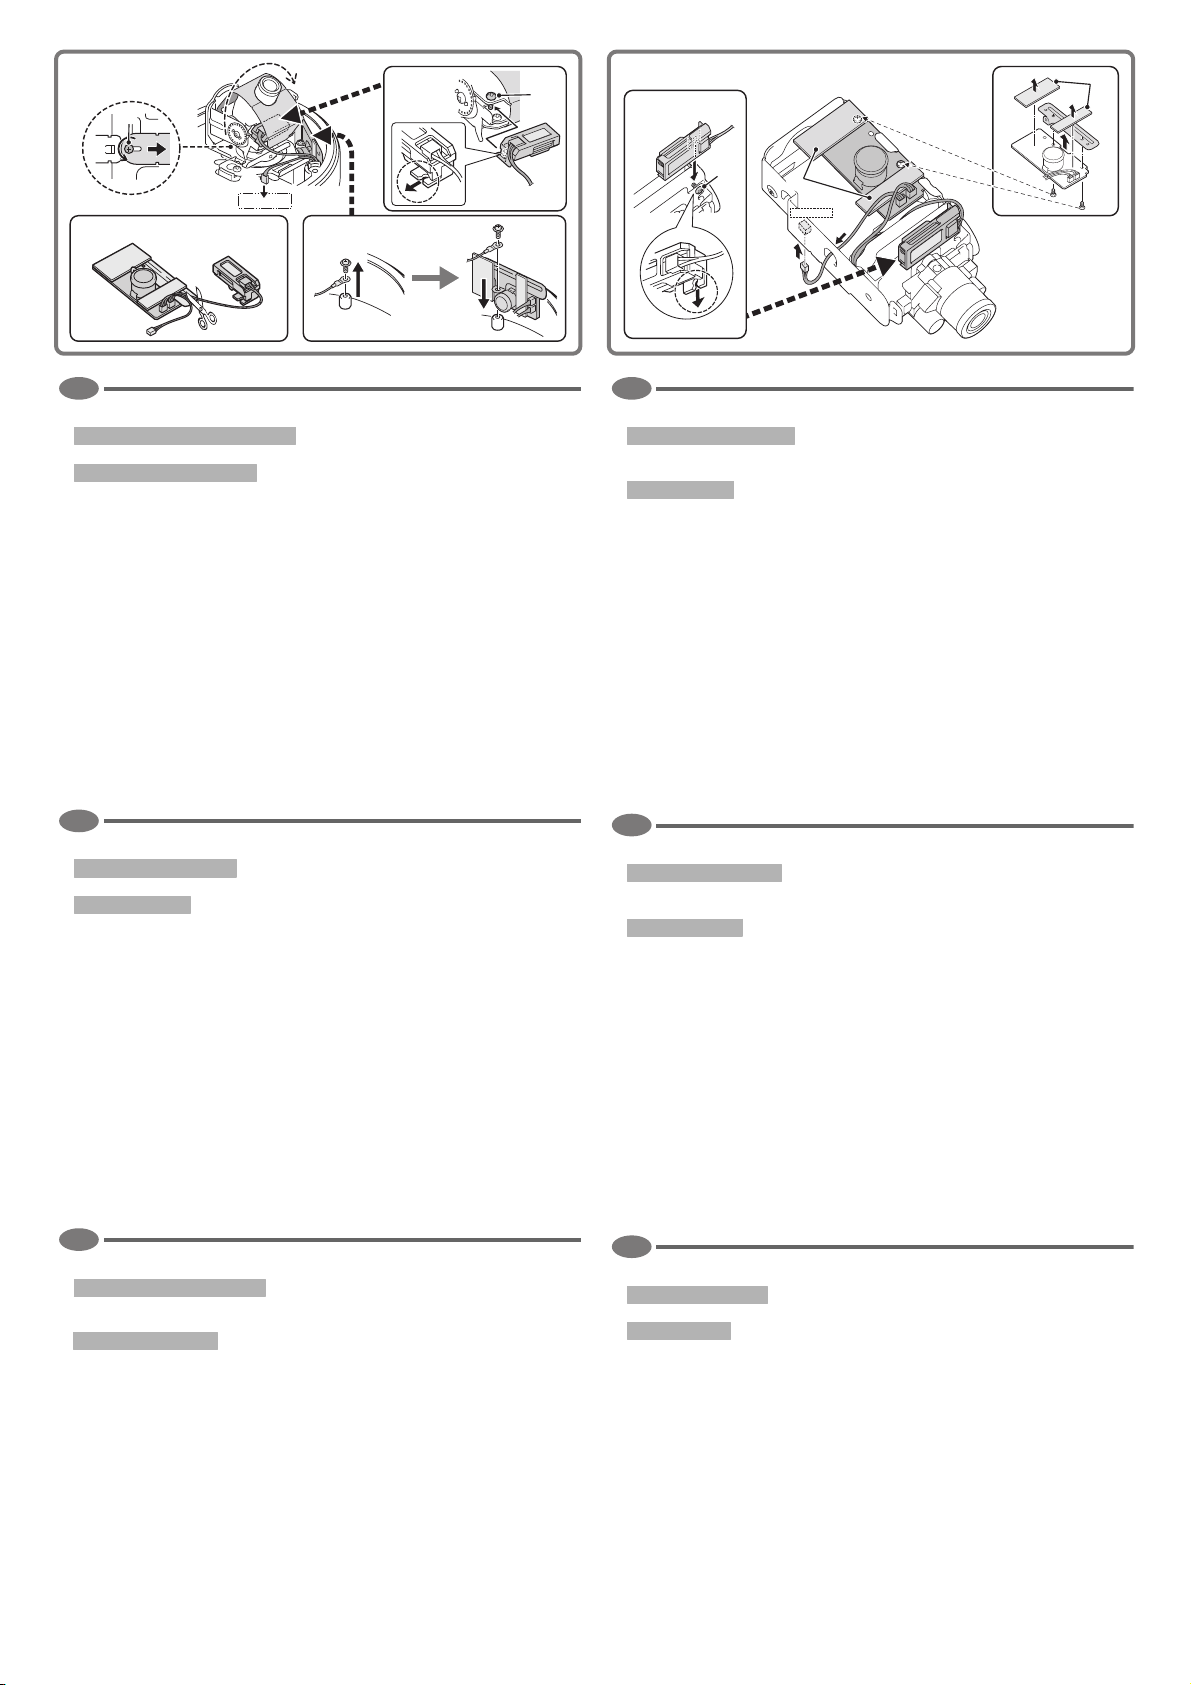
■For vandal proof cameras: Types A-1, A-2, and A-3
1A-1 or A-2 type camera: Find the connecting cable between the main and
sub boards and be sure to cut the cable at the end of the main board
A-3 type camera: Install the sub board
• Turn the camera in the direction of arrow
a
, and loosen the screw
b
located underside of the
camera to give enough space between the camera and the black sheet so that the sub board
can be installed properly as illustrated in the figure shown above.
• Be sure to secure the sub board by fitting the screw
c
in the slot in the sub board.
• Remove the space between the camera and the black sheet, and then tighten the screw
b
securely.
2Install the main board
3Connect the cable to the HEATER terminal
■For water proof cameras: Type B
1Remove the metal plate and the radiator sheets a
• Replace the radiator sheets
a
once the main board has been installed correctly (
4
).
2Install the sub board
• Be sure to secure the sub board by fitting the screw
b
in the slot in the sub board.
3Connect the cable to the HEATER terminal
4Install the main board
• Organize the cables as illustrated in the figure shown above.
• Replace the radiator sheets
a
(which had been removed as described in step
1
).
■Pour les caméras anti-vandalisme : Types A-1, A-2, et A-3
1Caméra de type A-1 ou A-2 : Repérez le câble de connexion entre la carte
principale et la sous-carte et veillez à couper le câble à l’extrémité de la
carte principale
Caméra de type A-3 : Installez la sous-carte
• Tournez la caméra dans la direction indiquée par la flèche
a
, puis desserrez la vis
b
située
sous la caméra pour libérer suffisamment d’espace entre la caméra et la feuille noire afin de
pouvoir installer correctement la sous-carte de la façon indiquée dans la figure ci-dessus.
• Veillez à bien fixer la sous-carte en montant la vis
c
dans la fente présente sur la sous-carte
elle-même.
• Supprimez l’espace entre la caméra et la feuille noire puis serrez la vis
b
à fond.
2Installez la carte principale
3Branchez le câble à la borne HEATER
■Pour les caméras étanches à l’eau : Type B
1Déposez la plaque métallique et les feuilles du radiateur a
• Remplacez les feuilles du radiateur
a
une fois la carte principale posée correctement (
4
).
2Installez la sous-carte
• Veillez à bien fixer la sous-carte en montant la vis
b
dans la fente présente sur la sous-carte
elle-même.
3Branchez le câble à la borne HEATER
4Installez la carte principale
• Placez les câbles comme indiqué dans la figure ci-dessus.
• Reposez les feuilles du radiateur
a
(qui ont été déposées au point
1
).
■Für vandalensichere Kameras: Typen A-1, A-2 und A-3
1Kameratyp A-1 oder A-2: Das Verbindungskabel zwischen Haupt- und
Unterplatine ausfindig machen und das Kabel am Ende der Hauptplatine
abschneiden
Kameratyp A-3: Unterplatine montieren
• Die Kamera in Pfeilrichtung
a
drehen und die Schraube
b
an der Unterseite der Kamera
lösen, um ausreichenden Freiraum zwischen den Kamera und der schwarzen Folie zu schaffen,
so dass die Unterplatine einwandfrei montiert werden kann, wie oben gezeigt.
• Sichern Sie die Unterplatine durch Einsetzen der Schraube
c
in den Schlitz auf der Unterplatine.
• Den Zwischenraum zwischen der Kamera und der schwarzen Folie beseitigen und dann die
Schraube
b
fest anziehen.
2Hauptplatine montieren
3Das Kabel an den Heizungsanschluss (HEATER) anschließen
■Für wasserdichte Kameras: Typ B
1Die Metallplatte und die Heizfolien aabnehmen
• Die Heizfolien
a
wieder anbringen, sobald die Hauptplatine richtig montiert worden ist (
4
).
2Unterplatine montieren
• Sichern Sie die Unterplatine durch Einsetzen der Schraube
b
in den Schlitz auf der Unterplatine.
3Das Kabel an den Heizungsanschluss (HEATER) anschließen
4Hauptplatine montieren
• Die Kabel wie in der obigen Abbildung gezeigt anordnen.
• Die Heizfolien
a
(die bei Schritt
1
abgenommen wurden) wieder anbringen.
■Para cámaras a prueba de vándalos: Tipos A-1, A-2 y A-3
1Cámara tipo A-1 o A-2: Busque el cable de conexión entre la sub-placa y la
placa principal y asegúrese de cortar el cable en el extremo de la placa
principal
Cámara tipo A-3: Instale la sub-placa
• Gire la cámara en la dirección de la flecha
a
y afloje el tornillo
b
situado debajo de la cámara
para que haya bastante espacio entre la cámara y la hoja negra, de modo que pueda instalarse
correctamente la sub-placa, como se muestra en la figura arriba.
• Asegúrese de fijar la sub-placa colocando el tornillo
c
en la ranura presente en la sub-placa.
• Elimine el espacio entre la cámara y la hoja negra y apriete firmemente el tornillo
b
.
2Instale la placa principal
3Conecte el cable al terminal HEATER
■Para cámaras a prueba de agua: Tipo B
1Quite la placa de metal y las chapas del radiador a
• Cambie las chapas del radiador
a
después de haber instalado correctamente la placa principal (
4
).
2Instale la sub-placa
• Asegúrese de fijar la sub-placa colocando el tornillo
b
en la ranura presente en la sub-placa.
3Conecte el cable al terminal HEATER
4Instale la placa principal
• Disponga los cables como se ilustra en la figura que se muestra a continuación.
• Cambie las chapas del radiador
a
(las cuales se quitaron como se describe en el paso
1
).
■对于超强型摄像机:类型A-1、A-2与A-3
1A-1或A-2类型摄像机:找到主板与子板之间的连接电缆,并务必在主板的尾端切
断电缆
A-3类型摄像机:安装子板
•按箭头的方向a旋转摄像机,并且松开摄像机底面上的螺钉b,在摄像机和黑色
垫片之间留出足够的空隙,以便如上图所示正确安装子板。
•请务必将螺钉c拧入子板插槽中,固定子板。
•在摄像机和黑色垫片之间不留空隙,并将螺钉b牢牢固定。
2安装主板
3将电缆连接到HEATER端子
■对于防水型摄像机:类型B
1卸下金属板和散热器薄片a
•正确安装主板后(4),重新装上散热器薄片a。
2安装子板
•请务必将螺钉b拧入子板插槽中,固定子板。
3将电缆连接到HEATER端子
4安装主板
•如上图所示布置电缆。
•重新装上散热器薄片a(在步骤1中散热器薄片a已被卸下)。
HEATER
3
2
1
11
3
HEATER
■A-1, A-2, A-3 ■B
a
A-1, A-2
A-3
2
4
a
a
c
b
b
JP
GB
F
D
E
CS


