Sapa Alumax 340 Series User manual

340 & 350
Series
Deluxe Frameless
ByPass Bath
Enclosures
With Extended
Panel
202 Anderson Ave., Belvue, KS 66407
Phone: 800-669-9867 Fax: 800-393-6699
www.onyxcollection.com
351D-1018
Full Showers
with Extended Panel
Full Showers
with Extended Panel
800-643-1514
www.alumaxshowerdoor.com

!WARNINGS!
INSTALLATION WARNINGS
a) Alumax Bath Enclosures by Sapa are intended to be installed by an experienced installer. If you need assistance withlocating an experienced
installer, contact us at 1.800.643.1514 or go to our website to accessour "dealer locator". If a dealer is not listed in
your area, call or send us an e-mail and we will find one for you.
b) The enclosure must be properly installed per our published installation instructions. If NOT, the unit will not operate asdesigned which will
cause hardware failure, glass breakage, leaking, other unidentified issues, and may cause nullificationof warranty.
c) Unpack your unit carefully and inspect for freight damage. Lay out and identify all parts using the instruction sheets as areference. Before
discarding the carton, check for small hardware bags that tend to fall into the bottom of the box. If anyparts are damaged or missing, refer to the
descriptions noted in the instructions when contacting your dealer forreplacements.
d) Before beginning installation, check the tub rim for level and both walls for plumb. If either is off more than ¼" to 3/8", youshould use a tapered
filler which can be used to level the tub track or plumb the wall jambs.
e) Wear safety glasses when drilling or cutting to avoid injury to the eyes.
f) When drilling holes in ceramic tile or marble, use a center punch and hammer to carefully break the surface glaze so thedrill can start without
skidding. A skidding drill can cause damage to the surface and can be dangerous (risk of personalinjury).
g) Use caution and proper technique whenever using tools to avoid damage to property and/or personal injury.
GENERAL USAGE AND HANDLING WARNINGS
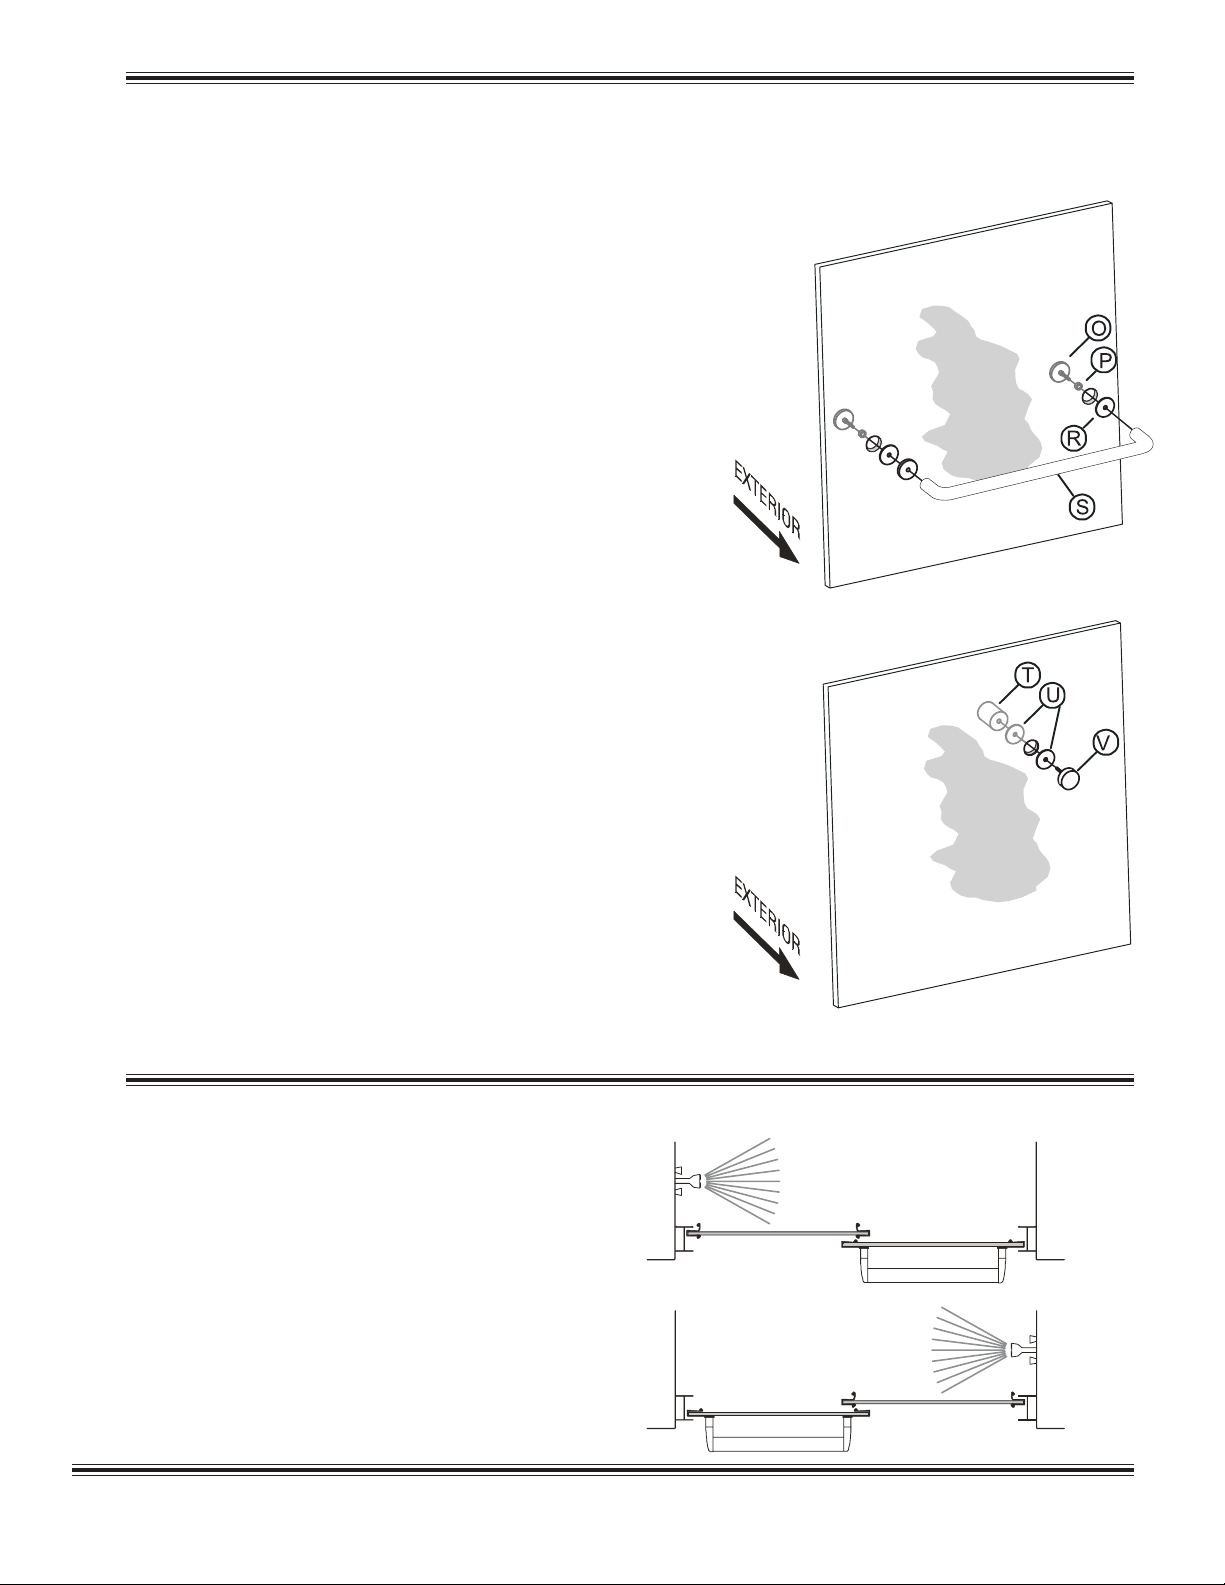
a) Shower doors are not leak-proof. They are designed to direct water to the interior of the tub or shower under normalconditions. Excessive
water pressure or directing the shower head directly at the door can result in leaks.
b) Do not hang on towel bars or handles or use them to support your weight getting in and out of the bathtub or shower.Towel bars and handles
are not intended to be used as grab bars for assistance getting in and out of the shower or bathtub.They are not intended to support a person's
weight and could break.
c) Do not use excessive force when opening and closing the enclosure. Excessive force can lead to glass breakage or otherdamage to the
enclosure. Make sure wall jamb bumpers are securely fastened in place per the installation instructions.
GLASS USAGE AND HANDLING WARNINGS
a) TEMPERED GLASS CANNOT BE CUT. Attempting to cut tempered glass will result in the glass breaking or shattering.
b) USE CAUTION WHEN HANDLING GLASS PANELS. Safety tempered glass is very resistant to breakage, but it can stillbreak if unequal
pressure is placed on it during installation (or if cutting of the glass is attempted). In addition, the sharpcorners of the panels can damage tile and
floor coverings or cause injury.
c) PROTECT THE EDGES OF THE GLASS. Never let the edge of the glass come in direct contact with concrete, tile, marbleor other hard
surfaces that may nick, or damage the glass edge in any way as this damage may cause a delayed blow.Always check the edge of the glass for
nicks, slivers, rough areas, or clam shelling. Do not install the glass if theseconditions are present.
d) Alumax Bath Enclosures by Sapa is not liable for glass breakage of any kind.
CARE AND CLEANING WARNINGS
a)The simplest and preferred method of cleaning your unit is by washing it with clean water and drying with a soft cloth.
b)If soil is still present after drying, a non-abrasive cleanser with a pH of seven to eight may be used. Comet BathroomCleaner® has been tested
and is recommended by the Bath Enclosure Manufacturers Association (BEMA).
c) Contact your dealer for more information about glass coatings that will help keep the glass clean.
d) DO NOT USE SCOURING PADS, SHARP INSTRUMENTS, BLEACH OR ACID-BASED CLEANSERS TO CLEAN THEUNIT AS THEY MAY
DAMAGE THE UNIT.
LIMITED WARRANTY
a) Alumax Bath Enclosures by Sapa provides a LIMITED WARRANTY on material and workmanship only. Primary glass andcomponent suppliers
must be included in all warranty claims.
b) Alumax Bath Enclosures by Sapa is not responsible for glass breakage.
c) Products must be handled, installed and maintained per our published Warning and Installation instructions or the warrantymay be nullified.
d) The Limited Warranty applies to the original owner only, and is not transferable.
e) Please visit our website www.alumaxshowerdoor.com or call us at 1.800.643.1514 to get copies of our published warranty,installation
and warranty policies.
www.alumaxshowerdoor.com


340D-350DPARTS LIST
A. 1 Curb Track withVinyl
B.2 WallJambs
C. 6 Plastic Wall Anchors
D. 6 #8 x 2”Truss Head Screws
E. 4 Nylon Spacers
F. 1 Header
G. 2 Glass Panels
H.4 (or 6)Hanger Brackets(Pre-assembled)
J. 1 PVC BottomGuide
K. 2 #6 x 3/8” Pan Head Screws
M. 4 Vinyl JambBumpers
N. 1 Vinyl Silencer
O.2 TowelBar Caps
P. 2 Spaces
Q. 1/16”spacer (if needed)
R.2 PlasticWashers
S.1 Towel Bar
T. 1 Knob
U. 2 Plastic Washers
V.1KnobCap
Extended Panel PARTSLIST
D.#8 x 2Truss HeadScrew
Z.Vertical Black Glazing Vinyl
Z
M
Y
Inline Rail
Q
M
M
M

MEASURING CURB TRACK
ALIGNING VERTICAL CHANNELS
Measure the wall-to-wall opening along the center of the
threshold. Cut the curb track [A] 1/16” short of this
dimension. An inexpensive miter box available at your
hardware store will help you get clean square cuts.
If the vinyl silencer [W] is separate from the curb track [A],
slide the silencer into the slot in the curb track.
Position the curb track in the center of the threshold with the
tall leg to the exterior. It may be necessary to file a radius on
the ends of the curb track and wall jambs to match the corners
of the curb.
Press both wall jambs [B] into position over the curb track.
Masking tape can be used to hold parts in place temporarily.
SILICONE
INSTALLING CURB TRACK
Before replacing the curb track [A], force a slight
downward bow in the extrusion. This will ensure the track
fits tight to the curb. Run two beads of silicone inside the
penciled marks on the threshold. Place the curb track in the
exact position marked in Step#2 and seat firmly in the
silicone.
NOTE: Siliconing is a very important step as it is necessary
to keep the shower door from leaking.
NOTE: Improper caulking will result in leaks.
Page 4
Use a level to plumb wall jambs [B], then mark the pre-
drilled hole locations on the wall. Lightly mark along both
sides of the curb track [A] with a pencil, then remove all
parts.
Drill six 1/4” diameter holes through the shower walls. If
wood backing is not in the wall, insert the plastic wall
anchors [C]. A center punch helps locate the holes
accurately.
Note: Attachments to fiberglass or acrylic shower units can
be made in two ways. If a reinforcement is built into the
wall of the unit, drill six 1/8” diameter holes and install the
screws directly into the reinforcement. If the walls are not
reinforced, drill 1/4” holes and install plastic wall anchors
or molly bolts (molly bolts not supplied).
Note: The track or jambs should never be screwed directly
to the Onyx curb or wall panels. Drill pilot holes through
the Onyx and screw into wood backing or anchors.
CAUTION: The track should never be screwed to the tub.
This will damage the tub and cause leakage.

EXTENDED PANEL SHOWERS
To install the center jamb, repeat previous step of
inserting F-Channel into the jamb. Drill 1/8” holes and
use supplied screws.
Install glass panel into F-Channel and insert Vertical
Black Glazing Vinyl [Z] between glass and frame.
This will hold glass in snugly in frame. Then instal
header track.
Glazing Vinyl can be trimmed with a razor knife after
installation is complete.
For Bench Seat Showers
For showers with bench seats, the glazing
channel will need to be installed on the
vertical face of the seat and also along the
top part of the seat as seen in the picture.
The overhang on the seat will need to be
notched where the glazing channel will go.
The channels supplied with the door should
be cut to fit you shower, but an extra channel
is included if needed.
For the extended panel over the seat, follow
the same steps as above.
For Bench Seat Showers Only
Notch bench seat
for glazing channel
4
C
Installing the Wall Jamb
First dry-fit the wall jamb (B) over the
curb track, then remove the tape
backing from the F-Channel and
insert into the jamb and press so it is
stuck to the wall jamb. Then remove
both and drill the F-Channel from the
pre-drilled holes in the wall jam. Then
re-instal on curb track and screw to
the wall with supplied screws (D).
Installing the Center Jam
A
B
Wall
Side
Fixed Glass Panel (Top View)
Wall Jamb Inline Rail Glass Center Jamb
CD
Z
Page 5
NOTE: Do not over tighten the jamb screws.

INSTALLING HEADER TRACK
Replace the wall jambs [B] and attach to the wall with a
#8 x 2 truss head screw [D] inserted through the center hole.
Slip a nylon spacer [E] over #8 x 2 truss head screw and
install in the top hole of the wall jamb. Repeat for the
bottom hole. Check jamb for plumb and tighten screws.
NOTE: Do not over tighten the jamb screws
INSTALLING VERTICAL CHANNELS
5
6
7
This bath enclosure is equipped with safety teelock
wall jambs. When installed properly, the header
is permanently locked to the wall jambs and cannot be
accidentally dislodged.
Measure the wall-to-wall opening at the top of the wall
jambs [B] and cut the header [F] 1/16" short of this dimension.
Check the header for fit. Slide the safety tee-lock of the
unmounted wall jamb into the header.
Holding the header at an angle, engage the end onto
the mounted wall jamb. Pivot the header into place, then
slide the loose wall jamb to the wall and press into positionon
the tub track. Attach to the wall per instructions
in Step #4. NOTE: Some doors may not have the “T-Lock” on
the top of the channel. This will not effect the operation of the
door
Page 6
MOUNTING HANGER BRACKETS
NOTE: For wider doors, 3 hanger brackets are provided for each door.
To attach the hanger bracket, remove the screw and plastic
bushing. Insert the plastic bushing into the hole in the glass.
Slip the hanger bracket over the edge of the glass and align
the hole in the hanger bracket with the hole in the glass.
Thread in the screw to secure the hanger bracket to the
glass. Tighten the screw.
Repeat for the other hanger brackets.
Note: If using obscured glass, [G] the glass panels should
be installed with the textured surfaces of the glass to the
exterior of the unit. The hanger brackets must be attached as
seen in the picture to the right as the brackets will affect the
direction of the glass when it is installed onto the header
track.
If Hanger Brackets are loose, use 1/16" spacer to remove
and play from the bracket.
ROLLERS SHOULD
START CENTERED
ON BRACKETS
NOTE: The 8–32 slotted hex washer head screw used to attach
the roller to the hanger bracket should be torqued to 25 in-lbs.
The 1/4-20 flat head screw that attaches the hanger bracket to
the glass should be torqued to 35 in-lbs.
CAUTION – Do not over tighten the brackets and cause the end
to clamp down on patterned glass. Do NOT use a screw gun.
This can cause the glass panel to shatter.

Place space saver [P] over a towel bar cap screw
[O]. Place the towel bar cap screw [O] through the
glass. Place the plastic washer [R] and the metal
washer [Q] over the towel bar cap screw. Screw the
towel bar cap screw into the towel bar. [S].
Make sure your towel bars and/or knobs are on the opposite side of the glass.
If you have a towel bar please see (A) below. If you have a knob, please see (B) below.
8
A
BPlace plastic washer [U] on knob cap screw [V].
Place the knob cap screw [V] through the glass
panel. Place other plastic washer [U] on knob cap
screw [V]. Screw the knob [T] onto the knob cap
screw [V].
Before installing the door panels, the proper orientation
should be determined. For maximum water-proofing, the
interior panel should always be positioned closest to the
shower head, as shown in the illustration.
MOUNTING HANDLES
9DOOR ORIENTATION
Page 7

10
11
12
Locate the nylon bottom guide [J] in the middle of the
curb track [A] with the glass panels in the position shown.
With a 7/64” bit, drill two holes into the V-groove through
the mounting holes in the guide. Install the bottom guide
with two holes as shown, making sure that the guide is
tight against the curb track. It is recommended to pre drill
holes in the Curb Track.
INSTALLING DOOR PANELS
INSTALLING JAMB GUIDE
Page 8
While standing inside the shower, lift the exterior glass
panel into position with the rollers pointed to the outside
of the shower. Gently lift the glass panel into the inside of
the header track and set the rollers onto the roller track
groove.
Repeat for the interior pane, with the rollers facing the
interior.
If panels are not parallel to their respective wall jambs,
remove and adjust the rollers up or down in their slots
to compensate.
INSTALL EXTERIOR
PANEL FIRST
SILICONE
Neatly silicone each end of the curb track [A] where it
meets the wall jambs [B] and the interior edge of the wall
jambs as shown. Run a bead of silicone along the interior
and exterior edge of the track.
NOTE: The Silicone should be allowed to cure for twenty-
four hours before using your new bath enclosure. CURB
TRACK
WALL
JAMB
This manual suits for next models
1
Table of contents
Other Sapa Other manuals
Popular Other manuals by other brands

Sparkfun Electronics
Sparkfun Electronics LilyPad Arduino Guide

EHEIM
EHEIM Professionel II 2026 operating instructions

Fichet-Bauche
Fichet-Bauche Complice Installation and use

Yardbeast
Yardbeast 2050RX owner's manual

SWEEX
SWEEX MI102 quick guide

Pro-Ject Audio Systems
Pro-Ject Audio Systems Box Design Phono Box E BT Instructions for use