manuals.online logo
Brands
  1. Home
  2. •
  3. Brands
  4. •
  5. Sapphire Audio
  6. •
  7. Projector Accessories
  8. •
  9. Sapphire Audio LF-PE Series User manual

Sapphire Audio LF-PE Series User manual

..._
一一-
SAPPHIRE
!
~
⑧
Techical
Assistance
If
you
need
help
with
installing
this
screen
please
visit
αx
Ro
HS
www.sapph1reav.com
SAPPHIRE
_LIKE
BEING
THERE
...
_
Model:
LF-PExxx
User's
Manual
for
Large Flat Series Edge Fixed Frame Screen
Thank you for purchasing a sapphire
projecti
。
n
screen
Before use, please read instructions carefully. After installation, store instructions for future reference
Note: Please make sure the concrete ceiling is strong enough
to
be
bear the
weight
。
f
20kg or
above
in
order
to
avoid any property lost and casualty due
to
insufficient bearing
一「\
Product
Structure
/
一飞
~旦
/
Fixing parts
Pre-measured tether
Decoration cover
Ten
sion rod
~
Tension rod
Snap lug
Screen fabric
Decoration cover
Ou
叫
e
t
E
画
-旦巴~
ti
叫司
-
叫司
m
Corner
piece
components
Sectional
view
of
frame
Sketch for structure
of
Edge fixed frame screen • Qualification certificate ( 1 set)
1.
Pl
ease pay attention
to
the rear and front sides of screen fabric during insta
ll
ation.
Th
ere
is
label attached
to
rear side of
screen fabri
c.
2. Kindly handle with care to avoid distortion due to crash of the aluminum frame material
3.
In
case of infrequent use, please cover the screen
f
abric
川
th
cloth
(。
r
so
mething el
se
fit
to
cover)
to
prevent screen fabric
from dusty
4. Do not clear screen fabric with detergent
of
corrosi
vi
ty such as
di
lu
ent
5.
Pl
ease clean the
ve
lvet wrapped
on
the
fr
ame along the
ve
lvet grains. Prevent
ve
lvet from crash to avoid damage
6.
Do not
sc
rape screen fabric with fingers or edge tool, which
wou
ld leave flaws or marks
on
fabric.
7.
In
order
to
avoid any unexpected injury, it is advisable to manage and install
the
白
xed
frame screen by adult
司曹
Warning: Regardless
of
the warnings
wou
ld
possibly l
ead
to damage to product or casualty due
to
any improper operation
Mandatory: The screen shou
ld
be
insta
ll
ed
where
is
strong enough to bear its weight, or it
wo
uld cause accident
by
fa
ll
ing
o
何
Note:
Pl
ease don’t disassemble screen for replacement of parts.
Pl
ease kindly contact
to
after
sa
le department for service
if
any fault. It is not prior to notice if there
is
any
change
。
n
product.
Pl
ease refer
t
。
the
product
• Up
and
down frames( 4 pcs
in
equal length)
A •
Dec
。
ration
cover for up and down frames
( 4 pcs
in
equal length)
•
Leπ
and
right frames( 2 pcs
in
equal length)
• Decoration
c
。
ve
r f
。
r
left
and
right
fr
ames
( 2 pcs
in
equal length)
·φ5mm
tension rods for
l
e
仕
and
right frames
(2
pcs
in
equal length)
• Mounting brackets with pre-measured tether (1 set)
• Inner fixing parts for frame
(2
pcs) • Outer fixing parts for frame
(2
pcs)
·
φ5mm
tensi
。
n
rods
fo
r
up
and down frames
(4
pcs
in
equal length)
• Corner piece parts
(4
sets) • Cover for corner piece
(4
pcs)
份
E
主国
运远远
售
F
\\÷\
。
\
。-
~
Ms·a
screw •
Er
ecting rack for
supporting bar(4 pcs)
哥
nuu
n
AU
r
)
∞E
C
川
as
n
AU
、,
que
延民元,
UdHE
--
WC
叩
os
’-
r
>
nHnvbu
qur
飞
. •
Ms•amm
screw ( 24 pcs)
·φ
3•amm
tapping screw
( 4 pcs)
~
Fi
xing
parts
• User’s manual
(1
copy) • Warranty
ca
rd
( 1
se
t)
。
·φ
5•40
tapping screw ( 4 pcs)
and expansion tube(4 pcs)
0:-
0::::
善罢
6
Detail
s B
一一一飞
市
:
(
且由工
)
ωHωv
-
umw
』且巳宝。百百
C
而且
2
』。
ωωcmvω
-
O
"'
!
w
W
z=W+58
2u
一「\
Overall
view
and
dimension
/
fr
u
A
Detail
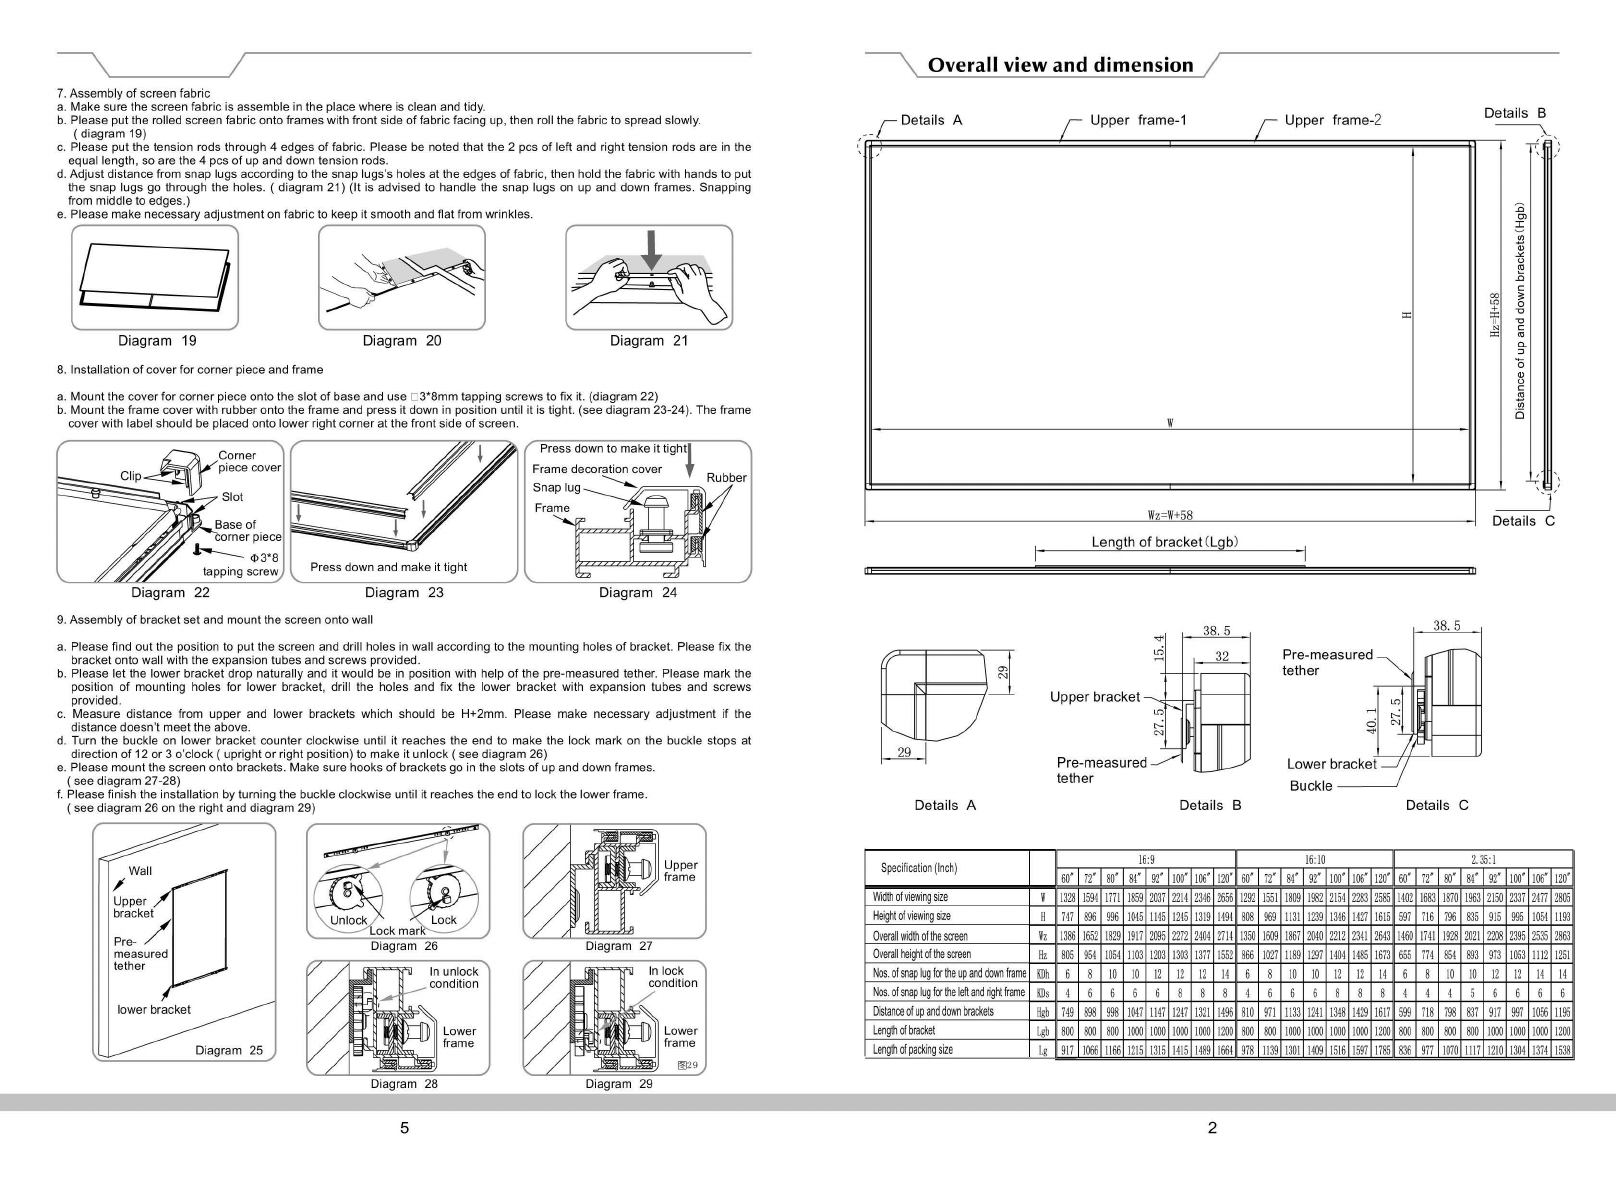
7. Assembly of screen fabric
a. Make sure the screen fabric
is
assemble
in
the place where
is
clean and tidy
b. Please put the rolled screen fabric onto frames with front side
of
fabric facing
u 口,
then
roll the fabric to spread slowl
y.
(diagram 19)
c.
Please put the tension rods through 4 edges of fabric. Please
be
noted that the 2 pcs of left and right tension rods are
in
the
equal length,
so
are the 4 pcs of up and down tension rods.
d. Adjust distance from snap lugs according to the snap
lu
gs’s holes at the edges of fabric, then hold the fabric with hands to put
the snap lugs go through the holes. (
diagran
刊
21)
(It
is
advised to handle
th
e snap lugs
on
up
and
do
wn frames. Snapping
from middle
to
edges.)
e.
Please make necessary adjustment
on
fabric
to
keep it smooth and fiat from wrinkles
A
三
Di
ag
ram
20
Diagram
19
8.
ln
sta
ll
ati
旧
n
of cover for corner piece and frame
a. Mount the cover for corner piece onto the slot of base and
use
口
3
咆
mm
tapping screws to fix it. (diagram 22)
b. Mount the frame cover with rubber onto the frame and press
it
down
in
position until it
is
tight. (see diagram 23-24). T
he
frame
cover with label should
be
placed onto lower right corner
at
the front side of screen
Press down to make it tight
Frame decorati ’
Snap
lu
g
冒
k
Frame
Length
of
bracket
(
Lgb
)
a
w
。
t
n
o
n
ee
•
r
户
L
>
Qψ
阻阳。
W
J
〕呻
旧
r
陌
-
川
J
川
pφ
记
-
时
CrE
-
J
e
旧
~
9
-
U
cuγl
』
nH
-
啊
陆臼
~
阳俨
-
们
FE
、
《lM
『
nv
-
V
川
唱
阳
-
2
剧
-
a2
副
m
归
B
阳
mdm
3r
D
仙
uy
hu
m
e
ss
A
《叫》
Pre-me
asured
tether
Lower
bracket
Buckle
Pre-me
asu
red
tether
口口
1
~
___)
叫
Diagram
24
a.
Please find out the position
to
put the screen
and
dri
ll
holes
in
wall according to the mounting holes of bracket. Please fix the
bracket
。
nto
wa
ll
with the expansion tubes and screws provided.
b. Please let the lower bracket drop naturally and
it
w
。
u
l
d
be
in
position with help of the pre-measured tether. Please mark the
position
。
f
m
。
unting
holes for lower bracket, drill the holes
and
们
x
the lower bracket with
expans
旧
n
tubes and screws
provided.
c.
Measure distance from upper and
lo
wer brackets which should
be
H+2mm. Please make necessary adjustment if the
distance
does
门
’
t
meet the above.
d. Turn the buckle
on
lower bracket counter clockwise until
it
reaches the end
to
make the lock mark
on
the buckle stops at
direction of 12 or 3 o'clock
(upr
ight or right position)
to
make it unlock
(see
diagram 26)
e.
Please mount the screen onto brackets. Make sure hooks of brackets
g
。
in
the
sl
。
ts
of up
and
down frames
(see
diagran
叫
27
28)
f.
Please finish the installation
by
turning the buckle clockwise until
it
reaches the
end
to lock the lower frame
(see
diagran
叫
26
on
the right
and
diagram 29)
Pr
ess
d
。
wn
and make
it
tight
Diagram
23
Details
C
16:9
16
:
10
2
目
l
60
'
72
•
割
84
’盟’
l
田’
106'
l
凹’
60
'
72
’例
’
92
’
l
田’
l
肥’
I
血
.
60
'
72•
80
’
84
’
92
’
!Oil
’
l
侃’
l
罚’
Widtho
f
v
旧'
wi
咱"'
I
l
坦坦
159
咱
1771
l
自
9
四
37
2214
自
46
1
日
4
1292
1551
lBOg
1982
2154
2283
2
四
5
14
但
l
创
1
1870
l
阻
3
2150 2337 2477
2
朋
5
H回
国
h
i
of
vie
川吨
s
i
ze
H
747
sgfi
回
6
l
创
5
1145 1245 1319
14
例
808
因
9
1131
12
凹
1346
1427
1615
5
盯
716
79
陆
835
915
四
5
1054 1193
O
ve
ral
l.,dth
ofl
he
sere
凹
lz
l
拥
6
l
创
1
1829
1917
2095 2272
2404 2714
!35C
l
创
9
1867
2040
四
12
目
41
2643
146C
1741 1928
四
21 22
阻
自
95
1
臼
5
2863
创
e
「副
I
he
i
ghl
of
t
he
s
creen
Hz
80.I
954
1054
11
03
1203
13C3
1377
l
目
4
866
1021
1189
1291 1404
l
咽
5
1613
65.1
714
部
4
的
3
盯
1
1053
1112
l
历
l
N
田
o
f
s
n
叩
l
u
g
for
t
he
叩
and
down
阳
me
KDn
6 8
10 10
12
12 12 14
6 8
10 10 12
12
14
6 8
10 10
12
12 14 14
N
田
o
f
回
a p
l
u
g
forthe
l
elta
nd
rig
ht
fra
me
KOs
4 6 6 6 6 8 8 8 4 6 6 6 8 8 8 4 4 4 5 6 6 6 6
Dis
t
an
田
d
叩
a
nd
do
nbrackets
H
地
b
149
898
998
l
剧
7
1141 1241
l
臼
l
149
唱
810
911
1133 1241
1348
142
旧
1611
599
718
1
锦 回
1
911 991
1056
H
囚
L
en
目
h
of
b
ra
出
e
t
Lgb
800
BOii
8CO
lOIJO lOOIJ lOOIJ lOOIJ
1200
800 800
100。
100
。
lOOIJ
1000
1200
800
BOii
800
BOii
lOOIJ
1000
100
。
1200
Le
吨
t
h
o
f
p a
ck
i
吨
si
ze
Lg
917
1066
11
创
1215
1315 1415 1489
l
创
4
918
1139
1301
14
四
1516 1597
17
囚
836
977
1010
1117
1210
13
创
1374 1538
Detail
s B
Details
A
Upper
frame
|。
wer
bracket
Diagram
29
5 2
D
旧
gram
28
一「\
Installation instructions /
一「\
Installation
in
川
ctions
/
Open the package
and
take out all of the parts. Kindly check the types
and
quantity of the parts according to user's manual
Please put all of frames
on
clean and flat dest or ground
in
a square.
(see
diagram
1)
Please pay attention to correct placement
of aluminum frames.
(the
front side should
be
facing up, while the inner side should
be
facing the center of the screen). Please
follow the order shown in diagram
to
assemble the frames
3. Assembly
of
corner piece
a.Please insert corner piece into the slot of horizontal frame till
it
reaches the end. There should not
be
any apparent seam
found. Please use Ms•a screw to fix it, see diagram 8 1O
b.Assemble other corner piece
in
the same way
Left frame ( 2 pcs
in
equal
length),
,
恤
L
二
p
力
ual l~n
6)
~一一二→「
队\旷、学
4
飞
lug
~.垠
f~~~~
、:"'
Le
e ( pcs
in
e
·歹…
Upper frame
(4
pcs
in
equal length)
」
ν
Diagram 8 Diagram 9 Diagram
10
.头...
气吵揭
4. Join the
frames
together
a.Please
insert
the
other
side
of
corner
piece into the vertical
frame
till it
reaches
the end.
There
should
not
be
any
apparent
seam
found. Kindly
use
M5•a
screw
to
fix it,
see
diagram
11-12.
b.Join the
other
vertical
frame
with up and
down
frame
in the
same
way,
see
diagram
13.
Screw
hole
H
。时
zontal
frame
frame'\
「
l
7
Diagram 1
1 Please put the snap lugs into lug’s slot of frame
(see
diagram 2) according to the
N
。
s.
of
holes
in
the screen fabric
Screw
hole Diagram
11
Diagram 12
Diagram
才
3
5.
Assembly
of
supporting
bar
Attach the
supporting
bar
with the erecting
rack
along the
extending
pa
同
on
it till it
reaches
the
end
and the
hook
would
clip into the
square
hole
in
the
supp
o
时
ing
bar,
see
diagran
门
14-15
Note:
It
is not advise to
disassemble
or
assemble
the
supporting
bar
frequently.
If
it is
necessary,
please
use
the flat
screw
driver
to
insert
into
square
hole
in
supporting
bar
to
unlock
the
hook
for
disassembly
,
see
diagram
16
Diagram
2
Diagram
3
Diagram
4
Supporting
bar
Erec
尤
ing
rack
for
supporting
bar
Us
e
flat
screw
driver
to
unlock
the
hook
2.Joint of up
and
down frames
a.Put the inner fixing
pa
同
for
frame through hole
on
the base of supporting bar (
see
diagran
刊
3).
Please pay attention
to
the
di
肝
erence
of inner
and
outer fixing part of frame. The inner fixing part
is
with 5 holes, 4 out ofwhich has screw thread. The
middle hole of inner fixing
pa
川
should
face the center of screen. It would cause failure
in
assembly if mistaking the inner
and
outer
白
xing
part or the incorrect placement of
it.
Please refer
to
diagram 4 for correct assembly.
b.Please
inse
叫
the
base of
supp
。而
ng
bar with inner fixing
pa
时
mentioned
above into the frame (diagram
5)
to join the 2
p
臼。
f
upper frames together. Please
be
noted that the base of supporting bar should
be
inserted till
it
reaches the
end
to
avoid any
apparent seam between frames and the base of supporting
bar.
c.Assembly of outer fixing part for frame. There are 4 holes
in
it
and
2
gaps
。
n
the edge. The gaps should face the center of
screen (diagram
6).
Please
put
the outer fixing part onto the slot for snap lugs
and
adjust
its
positi
旧
n
to
match the holes of
inner fixing part with screw thread. Please fix the inner
and
outer fixing
pa
同
s
wit Ms•a screws (
di
旧
gram
7)
d.Assemble
lower
什
ame
in
the same
way.
叫住骨
…
@
D
旧
gram
14
Diagram
15
Diagram
16
E
奇主
6. Join the
other
set
of
horizontal
frame
Join the
other
set
of
horizontal
frame
with the vertical
frames
with
screw
in
the
same
way
as the step 4 and
step
5
mentioned
above,
see
diagram
17-18.
Please
check
it again to
see
if
all
of
the
screws
are tighten
Diagram
5
D
旧
gram6
Diagram
7
//////
Insert into the frame
D
旧
gram
17 Diagram
18
3 4

Other Sapphire Audio Projector Accessories manuals

Sapphire Audio RFR-IP User manual

Sapphire Audio

Sapphire Audio RFR-IP User manual

Sapphire Audio SETC200WSF-ATR User manual

Sapphire Audio

Sapphire Audio SETC200WSF-ATR User manual

Sapphire Audio SSM-BR User manual

Sapphire Audio

Sapphire Audio SSM-BR User manual

Popular Projector Accessories manuals by other brands

Vutec VU-PRO VT14X installation instructions

Vutec

Vutec VU-PRO VT14X installation instructions

NorthVision VisionShare manual

NorthVision

NorthVision VisionShare manual

Projecta Professional Instruction book

Projecta

Projecta Professional Instruction book

Navitar 635MCL024 installation instructions

Navitar

Navitar 635MCL024 installation instructions

Navitar 645MCL1028 installation instructions

Navitar

Navitar 645MCL1028 installation instructions

Sony LMP-C280 operating instructions

Sony

Sony LMP-C280 operating instructions

Panasonic TY-WPR1 Operating instructions (functional manual)

Panasonic

Panasonic TY-WPR1 Operating instructions (functional manual)

VADDIO AutoPresenter 999-5675-000 Installation and user guide

VADDIO

VADDIO AutoPresenter 999-5675-000 Installation and user guide

Christie Brio Enterprise quick start guide

Christie

Christie Brio Enterprise quick start guide

Sony VCL-CPJ07 operating instructions

Sony

Sony VCL-CPJ07 operating instructions

HP PN1050 Quick setup guide

HP

HP PN1050 Quick setup guide

Epson ELPMB27 Product overview

Epson

Epson ELPMB27 Product overview

Elitech EW2 Assembly instructions

Elitech

Elitech EW2 Assembly instructions

Da-Lite Tensioned Cosmopolitan Electrol Instruction book

Da-Lite

Da-Lite Tensioned Cosmopolitan Electrol Instruction book

Sony LMP-H400 operating instructions

Sony

Sony LMP-H400 operating instructions

Hitachi CPX885 - XGA LCD Projector Specifications

Hitachi

Hitachi CPX885 - XGA LCD Projector Specifications

Reflecta Supvex installation manual

Reflecta

Reflecta Supvex installation manual

Panasonic ET-RFL100 operating instructions

Panasonic

Panasonic ET-RFL100 operating instructions

manuals.online logo
manuals.online logoBrands
  • About & Mission
  • Contact us
  • Privacy Policy
  • Terms and Conditions

Copyright 2025 Manuals.Online. All Rights Reserved.