Sargent EC176 Series User manual

EC176PowerControlSystem
Issue 1Page 1 of1213 July2018
1Introduction
Thissection ofthe handbookwillguide youthrough the operation ofthe electricalsystem.
Furthertechnicaldetailsare contained laterinthisdocument orin the supporting technicalmanual
available from www.sargentltd.co.uk
Forthe safe operationofall electricalequipment within yourleisurevehicle itisimportantthatyou read
and fullyunderstand these instructions. If you are unsure ofanypoint please contactyourdealer/
distributorforadvicebeforeuse.
The systemhasa numberofkeycomponentsthat youwillneedto be familiarwithbefore attempting to
use thesystem, these are:
·The EC176 series PowerSupplyUnit(PSU) -acombined mains230V/12Vconsumerunit and
charger/ controllerlocatedin the front bed box.
·The EC361 orEC362 series ControlPanel (CP) -aremotelylocated usercontrolpanelused to
turn 12Vcircuitsonand off and to displaybatteryand watertankinformation (where applicable).
2Using theSystem
The PSUislocatedinthefront offside upperlockerand similarlocations.
2.1EC176 PowerSupplyUnit–ComponentLayout

EC176PowerControlSystem
Issue 1Page 2 of1213 July2018
2.2Activating theSystem
The EC176 systemhasa shutdown feature that should be used whenthevehicleisinstorageorisnot
being used forlong periodsoftime. Thisallowsthe leisure electronics to be turned off when not
required tosave batterypower. When in theoff state the supplyforan optionalalarmand tracking
systemisstill active, most othersuppliesareturned off.
Before using the systemplease ensure the systemshutdown switchisin the on position (button in).
PSU– 12VControls
The blacksystemshutdown button isshown onthe
left. In isON and out isOFF.
The othertwo switchesarefor230V,andare
coveredin section 2.3
2.3Connecting totheMains230V supplyand Safetychecks
Foryoursafetyit isIMPORTANTthat you follow theseconnectionsinstructionseach timeyourvehicle
isconnected to a mainssupply. Thissection assumesthat the systemiscomplete and that aLeisure
batteryhasbeen installed (see 4.3).
A)Ensure suitabilityof theMains Supply.Yourvehicle shouldonlybe connected to an approved
supplythat meetsthe requirementsofBS7671orrelevant harmonised standards.In most cases
the sitewarden will hold information regarding suitabilityofsupply. Ifusing a generatoryou also
needto complywith the requirements/ instructionssupplied withthegenerator. Please note that
some electronicgenerators maynot becompatiblewithyourleisure system. Furthergenerator
operationalinformation iscontained in section 4.4.
B)Switchthe PSUinternalPowerConverterOFF. Locate the green ‘Charger’powerswitch on the
PSUand ensure the switchisintheoff position (buttonout)before connectionto the mainssupply.
C)Connectthe Hook-up Lead. Firstlyconnect the supplied hook-up lead (orange cablewith blue
connectors) to the vehicle and then connect to the mainssupply.
D)Check Residual Current Device operation. Locate the RCDwithin thePSUand ensurethe RCD
isswitched on(leverinup position). Press the ‘Test’button and confirmthat the RCD turnsoff
(leverindown position). Switch the RCD backto the on position (leverin up position).Ifthe test
button failed to operate theRCD see section 4.1 &4.8.
E)Check Miniature CircuitBreakers. Locate the MCB’s within the PSU(adjacent to the RCD)and
ensure theyareallin the on (up)position. IfanyMCBfailsto ‘latch’inthe on positionsee section
4.1 &4.8.
F) Turnthe PSU ON. Locatethe black‘Shutdown’buttonand ensureitisintheon position (press
button tochange, button in=on, button out =off). Locate the green ‘Charger’switch on the PSU
and turn totheon position (press button to change, button in=on, button out =off). The charger
switchwillilluminatewhen turned on.
G) Check operation of equipment. It isnowsafe to operate the 12Vand 230Vequipment.

EC176PowerControlSystem
Issue 1Page 3 of1213 July2018
PSU– 230VControls
Levertype switch, farleft – ResidualCurrent
Device (RCD)and main 230Von / off switch.
Push button, farleft – RCD Test button.
3 xleverswitches, right –Miniature Circuit
Breakers (MCB). Note thelevercolourand MCB
ratingmayvary. Seethesafetyand rating
stickeradjacent to the PSUforfurtherdetails.
Green pushswitch,farright– Chargerswitch,
thisswitchturnsthe 12Vbatterychargeron or
off. In isON out isOFF.
Amberpush switch– Heaterswitch, thisswitch
turnsthe 230Vsupplyto the combination water
heater/ centralheatingsystemon oroff. In is
ON out isOFF.
Note the farleft 12VDC Shutdown switchis
coveredin section 2.2.
2.4Operation whiledriving
The EC176 systemisdesigned to shutdown partsofthe systemwhilst the vehicleengine isrunning.
Thisisto meet ElectroMagneticCompatibility(EMC)regulationsand to ensure the safe operation of
the system.
Please ensure the systemshutdown switchon the PSU isin the “on”(button in)position before driving
(see 2.2). Thiswillensure the electronicsystemisactiveand will therefore be able to controlthe
charging process, supplythe refrigeratorand monitorothersystemcircuits.
2.5Control Panel -ComponentLayout
EC361 DigitalControlPanelwith LCD display

EC176PowerControlSystem
Issue 1Page 4 of1213 July2018
EC362 DigitalControlPanelwith LCD display
2.6Control Panel Overview
Button Button Description
Powerbutton. Press the powerbuttonto turn the leisure poweron. Press the buttonagain
to turnthe poweroff. The adjacent LED will illuminatewhenthepowerison, and also the
voltage oftheselected batterywillbe displayed on the screen. When the vehicleengine is
running thisLEDwill flashto indicate the leisurebatteryisbeing charged.
Pump button. With the poweron, press the pump button to turnthe waterpump on. Press
the button again toturnthe pump off. The adjacent LEDwill illuminate when the pump is
on, and also the levelofthewatertankwillbedisplayed on the screen.
Light button. With the poweron, press the light button toturna selection ofinternallights
on. Press the button againto turntheselightsoff. The adjacent LEDwillilluminatewhen
the lightsareon. The lightswillbeturned on and off automaticallyeach time the power
button isoperated.
Awning Light button. With thepoweron, press theawning light button to turn the awning
light on oroff. The adjacent LED will illuminatewhen the light ison.
Levels / scroll button. Use thisbutton to scroll through thevariouslevelsscreens/ menu
itemsorto cancelalarms/ warnings. Note: The screen illumination/ backlight willturnoff
aftera period oftime. Press the levelsbutton toreactivate the illumination.
Selectbutton. Use thisbutton to select options/ itemsorto change settings.

EC176PowerControlSystem
Issue 1Page 5 of1213 July2018
3Control Panel Operation
3.1ScreenIllumination
The screen illumination (backlight)isturned on and off automatically. Pressing the levelsbutton will
reactivate the illumination.
3.2HeaderArea
LBatt 13:45 V113
The headerarea ofthe screen showsthefollowing information;
LBatt
or
VBatt
Leisurebatteryselected. Thissymbolindicatesthat the leisurebatteryisselected asthe battery
to useorto charge. Thisisthe defaultsetting.
Vehiclebatteryselected. Thissymbolindicatesthat the vehicle batteryisselected asthe battery
to useorto charge.
13:45 Clockdisplay. Thisshowsthe currenttime ina 24hourformat.
V113 Thisshowsthe softwareversion ofthe controlpanel.
3.3LEDBarGraph
The LEDBarGraph displaysthe voltage ofthe selected battery.
LED Colour Voltagereading
1 Red <9.5 (<9 LED Flashes)
2 Red 9.5 -10.9
3 Amber 11 -11.4
4 Amber 11.5 -11.9
5 Amber 12.0 -12.4
6 Green 12.5 -12.9
7 Green 13.0 -13.4
8 Green 13.5 -13.9
9 Green 14.0 -14.4(>15.4 LED Flashes)
When the controlpanelpowerison, pressing the levels button will displaythe batteryvoltage on
the bargraph.
3.4Information Area
The main information areacan displayavarietyofsysteminformation screens. These have been
designed to present the information ina clearand concise form, while retaining technicaldetailforthe
more advancedusers.
The selected screencan be changed byusing thelevels/ scrollbutton,andworkon acontinuousloop
basis(when the last screenisreached the scrolling returnsto the first). The selected screen maybe
changed automaticallybythe systemdepending on the action being performed.

EC176PowerControlSystem
Issue 1Page 6 of1213 July2018
1 – LeisureBattery
Hereleisurebatteryinformationis shown.
The digitdisplayshowsthebatteryvoltagefollowed byaguide tothe battery
chargecondition(i.e POOR, FAIR, GOOD, CHARGING).
The voltage is alsoshownon the LED bar graph belowthe display.
Pressing the levels button tomovetothe next screen.
LeisureBattery
13.9VGOOD
2 – VehicleBattery
Herevehicle batteryinformationis shown.
The digitdisplayshowsthebatteryvoltagefollowed byaguide tothe battery
chargecondition(i.e POOR, FAIR, GOOD, CHARGING).
The voltage is alsoshownon the LED bar graph belowthe display.
Pressing the levels button tomovetothe next screen.
VehicleBattery
12.2VFAIR
3 – WaterTank
The 3rd screenshowsinformation relating tooptional on-boardwater tank.
Thisscreen is onlyavailable when therelevant tankisfitted.
The freshwater level isshownin ¼steps(i.e.0%,25%, 50%, 75% & 100%)
The wastewater level isshownin 1step (i.e. 0%& 100%)
The displayed level iscontinuouslyrefreshed if thewater pumpisturned on.
Pressing the levels button tomovetothe next screen.
Water Tank Levels
FRESH 50% WASTE0%
4 - SelectBattery
Hereyou can select whichbatterytouseorcharge.
Bydefaultthe leisurebatteryisautomaticallyselected. If themainssupplyis
connected and thecharger turned on, this batterywill alsobecharged.
If you need toselect thevehiclebatterypresstheselect button tochange
the selectedbatteryfromleisuretovehicle(or viceversa).
The relevantsymbol(LBatt) or(VBatt) will be shownin the headerarea.
Information relating totheselected batteryis shownon the screen.
Pressing the levels button tomovetothe next screen.
Select Battery
Battery= LEISURE
7 – Adjust Hour
Hereyou can adjust the hourdisplay.
Press the select button toincreasethe value by1. Press andholdthe
buttontorapidlyincreasethe value.
Pressing the levels button tomovetothe next screen.
AdjustHour
Hour =13
8 – Adjust Minute
Hereyou can adjust the minutedisplay.
Press the select button toincreasethe value by1. Press andholdthe
buttontorapidlyincreasethe value.
Pressing the levels button tomovetothe next screen.
AdjustMinute
Minute =45

EC176PowerControlSystem
Issue 1Page 7 of1213 July2018
9 – System Info
Hereyou can viewthe control panelmodelnumber (i.e. EC361). Notethat the
softwareversion number isalsoshownin the top right.
Pressing the levels button tomovetothe firstscreen.
SARGENTEC361
LCDControlPanel
The systemcan displaya numberofwarnings. The controlpanelwill beep and displaythe appropriate
message. Press the levels button to cancelthewarning. See 4.6 forfurtherdetails.
4System Technical Information
The following section providesfurthertechnicalinformation relating to the electricalsystem.
4.1Residual CurrentDevice &MiniatureCircuitBreakers
The Residual Current Device(RCD) is basically
provided toprotect theuser fromlethalelectricshock.
The RCD will turnoff (trip)if thecurrent flowing inthe
liveconductordoesnot fullyreturndowntheneutral
conductor, i.e.somecurrentispassingthrougha
persondowntoearthor through afaultyappliance.
Toensurethe RCD isworkingcorrectly, thetest
buttonshouldbe operatedeachtimethevehicleis
connected tothemainssupply(see section2.3).
The MiniatureCircuit Breakers(MCB’s) operatein a
similar waytotraditionalfusesand areprovided to
protect thewiring installationfromoverload or short
circuit. If anoverload occursthe MCB will switchoff
the supply. If this occursyou should investigatethe
causeofthefault beforeswitching the MCB back on.
The following table showsthe rating and circuitallocation forthe three MCB’s
MCB Rating Description (cablecolour)
1 10 Amps 230VSockets/ Cooker(white)
2 16 Amps Combination waterheater/centralheating system(yellow)/ Extra 230V
Sockets(white)
3 10 Amps Fridge (black)/ 12VCharger(internallyconnected)
4.2BatteryCharger
The EC176PSUincorporatesa fixed voltage batterycharger/ powerconverter. The batterycharger/
powerconverteralso powers the leisureequipment when the mainssupplyisconnected.Thismodule
supplies13.8VDC to the leisure equipment up toa maximumof12 Amps(155 Watts), therefore the
available powerisdistributed between the leisure loadand the battery,with the leisure load taking
priorityasperthe following example:
Leisureload Available powerforbattery charging
3A 9A
6A 6A
9A 3A
12A 0A

EC176PowerControlSystem
Issue 1Page 8 of1213 July2018
WARNING
Underheavyloadsthe powersupplyunit case maybecome hot. ALWAYS ensure theventilation
slotshavea clearflowofair. Do not place combustible materialsagainst / adjacent to the EC176.
The PSUwillshutdown ifoverheated and willrestartautomaticallywhencool.
4.3LeisureBattery
4.3.1Type / Selection
Foroptimumperformance and safetyitisessentialthat onlya proprietarybrand LEISUREbatteryis
used and it issuggested to select a batteryfromthe NCC Verified BatterySchemewith a typical
capacityof75 to 120 Ah (Ampere / hours). Depending on the prospectiveuse ofthe vehiclethe
correct typeshouldbe selected (A,BorC). AnormalcarbatteryisNOTsuitable. Thisbatteryshould
alwaysbe connected when the systemisin use.
The PSUisconfigured to workwith standard lead acid leisure batteries, and in most casesisalso
compatiblewiththelatest rangeofAbsorbed Glass Matt (AGM)batteries. Beforefittingnon-standard
batteriespleasecheckthat the fixed charging profiledescribed in4.2 issuitable forthe type ofbattery
byreferring to the batterydocumentationorbatterymanufacturer.
The batteryfeed isfitted with an inline fuse between the batteryandtheelectricalharness,whichis
usuallylocated immediatelyoutside the batterycompartment orwithin 500mmofthe battery. The
maximumrating ofthisfuse is20A.
4.3.2Installation & Removal
Alwaysdisconnect the 230Vmainssupplyand turn the PSU green chargerswitch to the off position
(buttonout)before removing orinstalling the battery.
When connecting the battery,ensure that the correct polarityisobserved (blackis negative[-] and red
ispositive [+])and that the terminalsare securelyfastened. Crocodile clipsmustnot be used.
WARNING
Explosive gasesmaybe present at the battery.Takecare to prevent flamesand sparks in thevicinity
ofthe batteryand do not smoke.
4.3.3Operation / Servicing
Undernormalcircumstancesit shouldnot be necessaryto remove thebatteryotherthanforroutine
inspection ofthe terminalsand “toppingup”ofthe batteryfluidwhere applicable. Please see
instructionssupplied withthe battery.
Note: Do not overdischarge thebattery.One ofthe most common causesofbatteryfailureiswhen
the batteryisdischarged below therecommended levelofapproximately11.5V. Discharging a battery
belowthisfigure can causepermanent damage to one ormore ofthe cellswithin the battery.
To preventoverdischarge, the EC176 systemincorporatesa batteryprotect circuit that warnsthe
users and thendisconnectsthe batterieswhen theyfall belowset values. See 3.6 belowfordetails.
4.4Generator Usage
Caution should be used before connecting a generatorto yourvehicle.
WARNING
Neverstart orstopthegeneratorwhile electricalloadsare connectedand switched on.Start the
engine,let itstabilise and then connect the electricalload. To stop the engine, disconnect the
electricalload and let engine stabilise before switching off
Whilst some generators use electronicinvertertechnology,others use a more basicprinciple to
generate the 230Vsupply. Preference shouldbe to choose a generatorwhichproducesa consistent
sinusoidalwave formwith accurate voltage control.

EC176PowerControlSystem
Issue 1Page 9 of1213 July2018
4.5Awning LightOperation
The awning light iscontrolled bythe controlpanelawning light button.
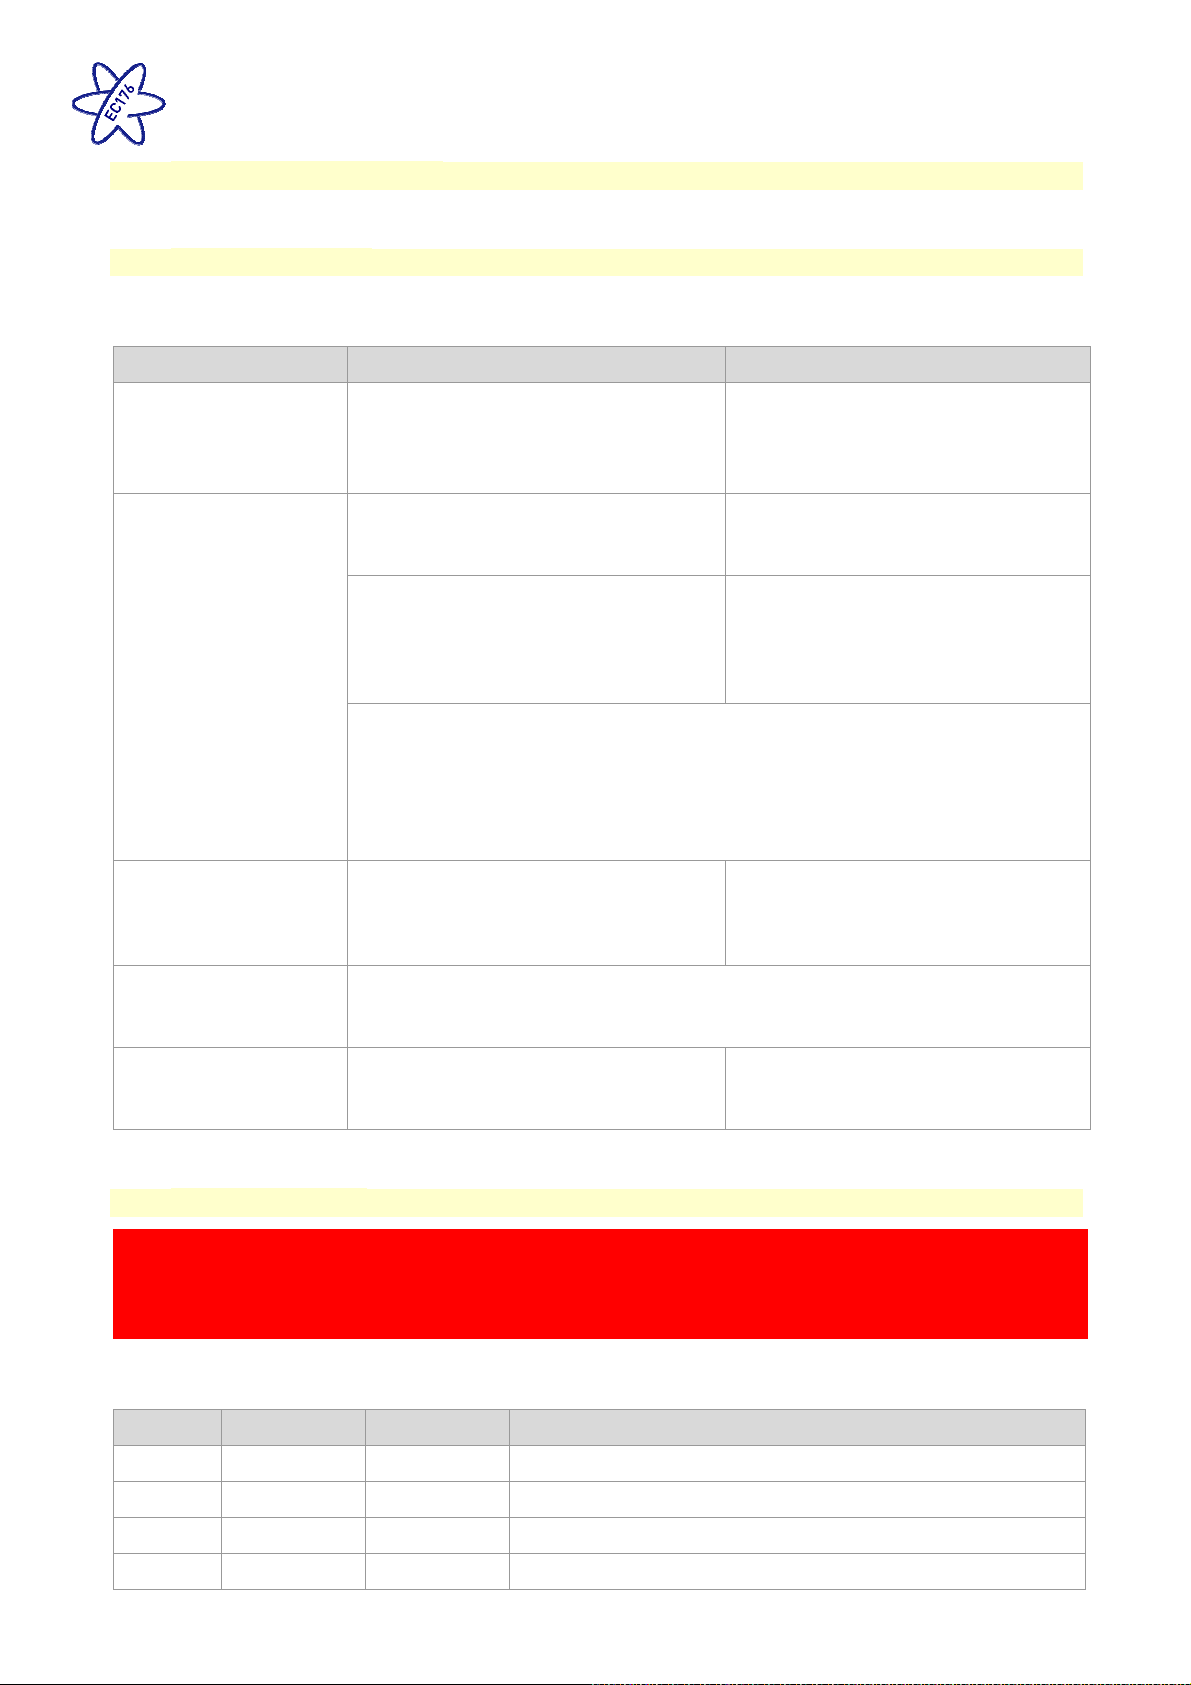
4.6SystemWarnings
The systemincorporatesa numberofwarningsthat are activeat specifictimes. These are
summarised below, and also covered byrelevant sectionsofthismanual.
Warning When Type
Fresh waterlevellow With pump turned on and freshwater
levellow (less than 25%full)
Onlyavailable when an onboard tankis
fitted
Message on screen and 30second
audible beep
Leisurebatteryvoltage
low
With controlpanelpoweron and leisure
batteryselected (asactivebattery)and
the voltage levelfallsbelow10V
Message on screen and 30second
audible beep.
With controlpanelpoweron and leisure
batteryselected (asactivebattery)and
the voltage levelisbelow 9V
Message on screen and 30second
audible beep.Ifno action taken after
30 secondsthen the systemwill switch
the powerofto preventsevere
dischargeofthe battery
Note: Thisisan emergencycut off leveltoprotectthe batteryfromsevere
damage. You should not relyonthiscut off levelduring normaloperation,but
manage yourpowerconsumption to a discharge levelof11.5Vorabove.
Thiscut off onlyappliestopowerdrawn fromthe batterybythe leisureequipment
that iscontrolled bythe controlpanelpowerswitch; itwillnot protect thebattery
fromdischarge bypermanentlyconnectedequipment.
Leisurebatteryvoltage
high
With controlpanelpoweron oroff and
leisure batteryisselected (asactive
battery)and thevoltage levelrises
above15.4V
Message on screen and repeated
beepsfromthe controlpanel. The
beepingwillnot stop until the faultis
cleared.
Vehiclebattery
warnings
Ifthe vehicle batteryisselected insteadofthe leisure battery,then the same
warningsdescribed above forthe leisure batteryareapplied to thevehicle
battery.
Engine running When the engine isstarted the system
powerwillbe turned off
Message on screen and powerbutton
LED flashing indicating both batteries
are connected forcharging.
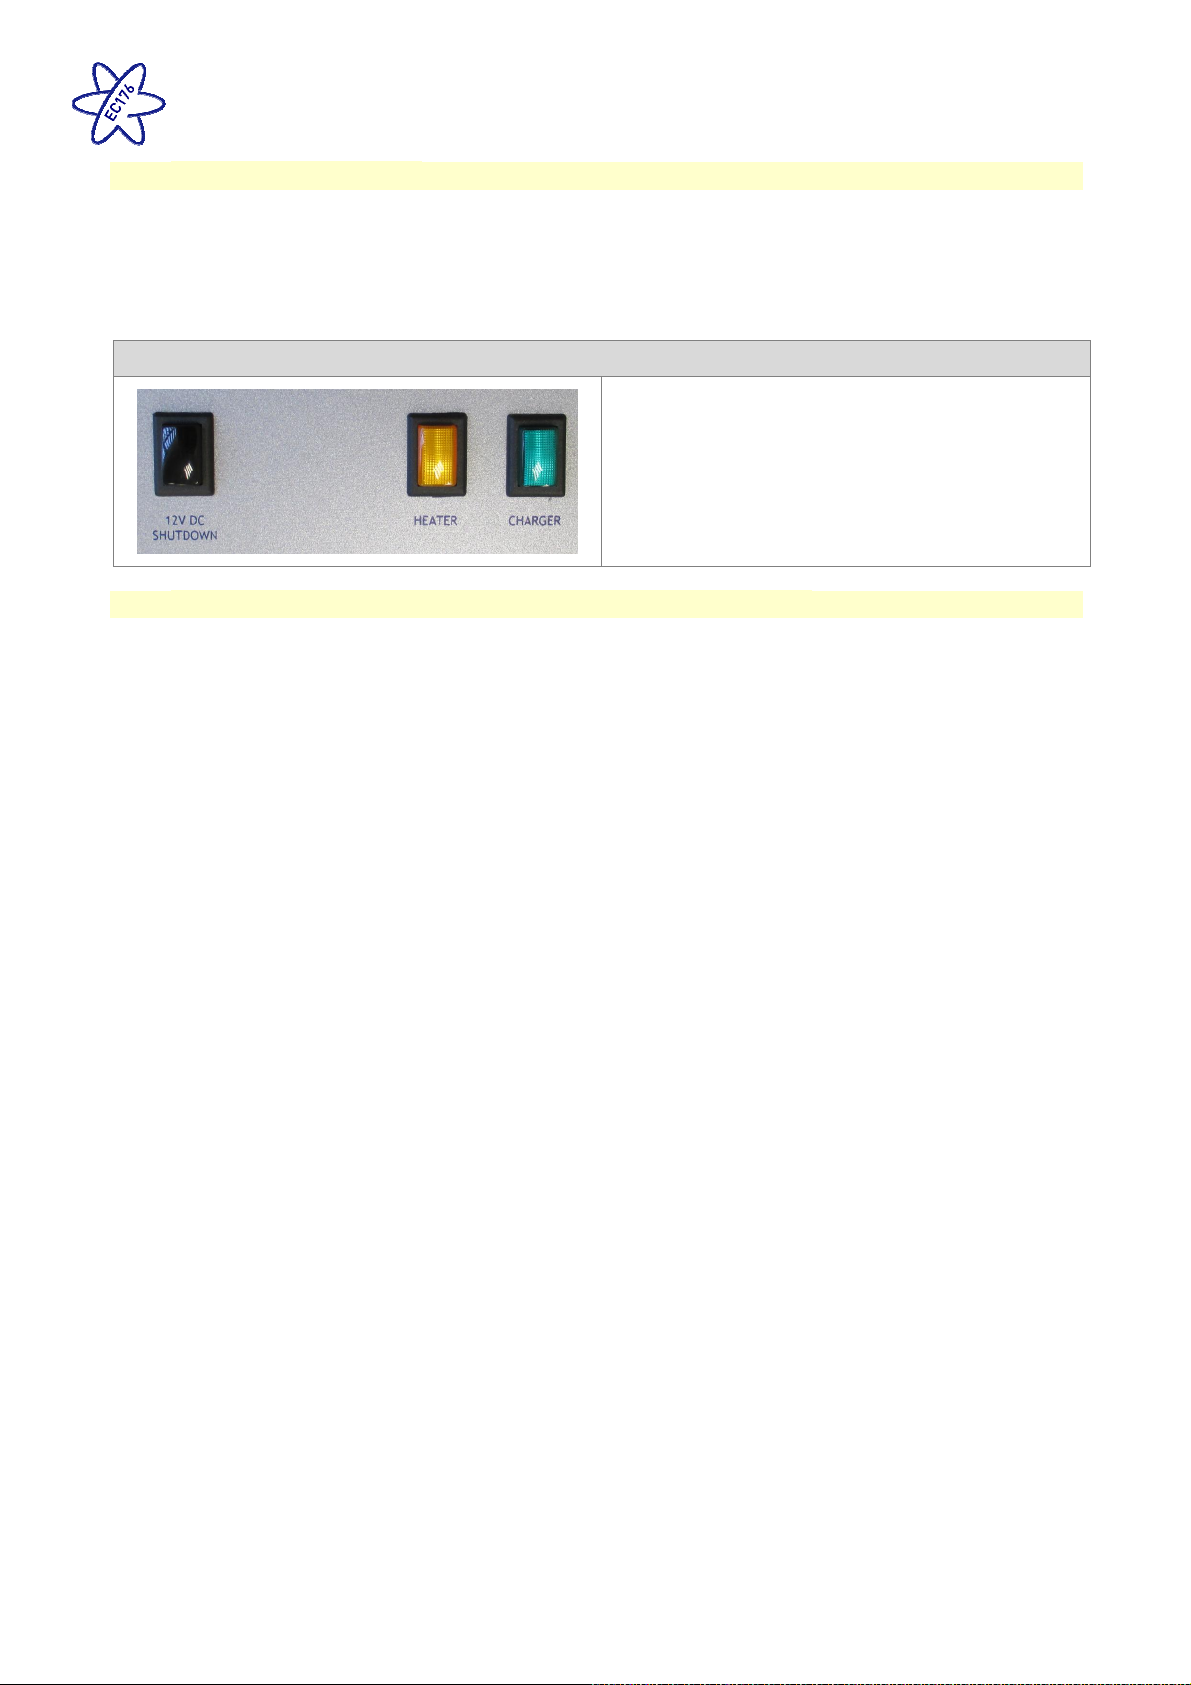
4.712 VoltDC Fuses
WARNING
When replacing fusesalwaysreplace a fusewiththecorrect value. NEVER replace witha highervalue /
ratingasthiscould damage the wiring harness. Ifa replacement fuse ‘blows’ do not keep replacing the
fuse asyou could damage the wiring harness. Pleaseinvestigate the fault and contactyourdealer.
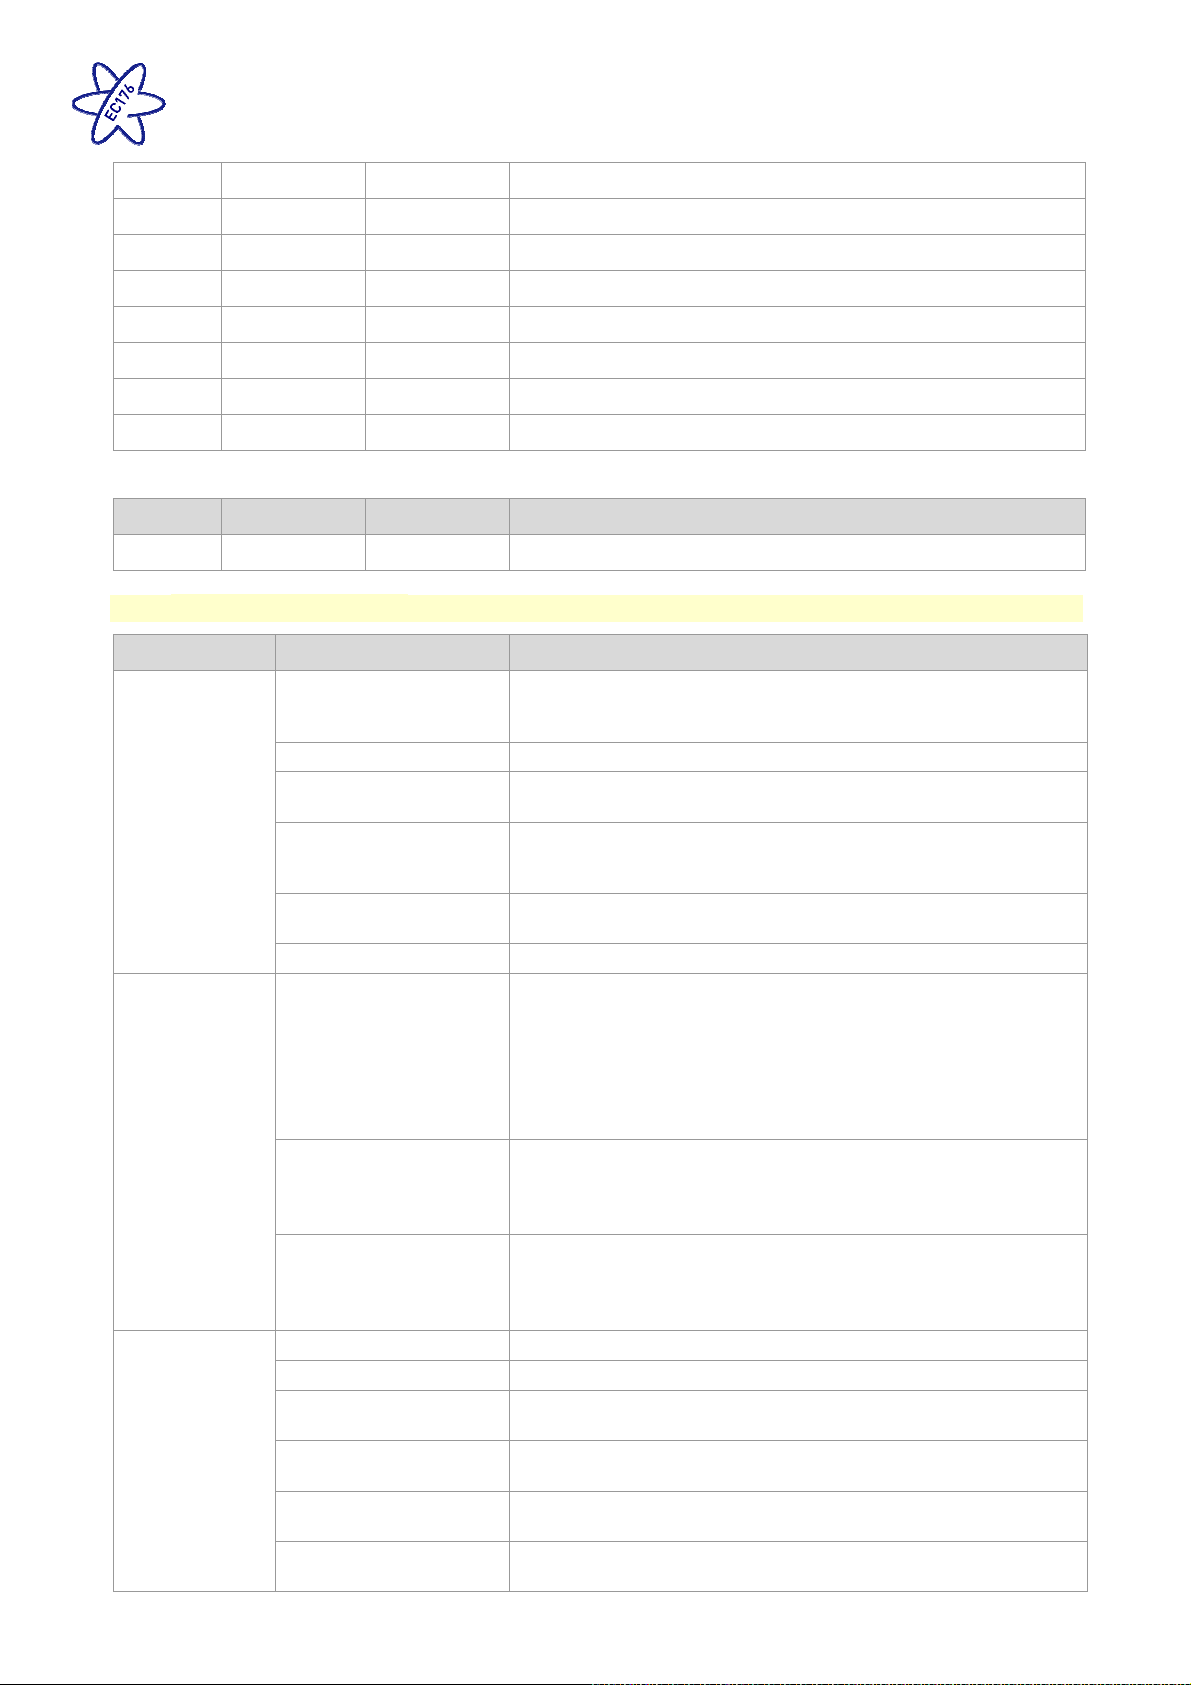
The following table showsthe fuse allocation forthe 12 fusesfitted to the PSU. Please note that fuses
are dependant onPSUversionsand installation, sonot all fusesmaybe present orused.
Fuse Rating Fuse Colour Description
1 10 Amps Red WaterPumps/ Appliances
2 5 Amps Tan Permanent Supplies/ Electronics
3 10 Amps Red HeaterFans
4 10 Amps Red Lighting CircuitA

EC176PowerControlSystem
Issue 1Page 10of1213 July2018
5 15 Amps Blue Fridge Element (during towing)
6 10 Amps Red Ventilation Fans
7 10 Amps Red Lighting CircuitB
8 10 Amps Red Switched Lights(fromcontrolpanellightsbutton)
9 20 Amps Yellow VehicleBattery
10 20 Amps Yellow LeisureBattery
11 10 Amps Red 12VSockets
12 15 Amps Blue Charger
The following table showsdetailsofthe fuse(s) located at the Leisure battery.
Fuse Rating Fuse Colour Description
Battery1 20 Amps Yellow Fuse remotelylocated nearbattery
4.8Common FaultTable
Fault Possible Cause ProposedFix
No230 volt
outputfromPSU
Connectinglead between
the siteand Leisure
Vehicle notconnected
Checkandconnect lead asper 2.3C
RCD switched off Reset RCD asper2.3D
RCD not operating
correctly
Checksupplypolarity; if the RCD continuestofailcontact your Dealer
asthereisprobablyan equipmentor wiring fault.
MCB switched off
Reset MCB byswitching OFF (downposition)thenback ON(up
position), ifthe MCB continuestofail contact yourDealer asthereis
probablyan equipment orwiring fault.
Noor deficientsupply
fromsite Contact siteWardenforassistance.
Other fault Contact your Dealer.
Control Panel
Problems
Control Panelhasno
display
Backlight / illumination mayhaveswitched off. Pressthepower
buttonorselectbuttontoreactivatethebacklight.
Checkbatteriesand fuses, turnPSU shutdownswitchand charger
switchonandensuremainssupplyisconnected.
Checkcontrolpanel connectingleadat PSU and behind Control
Panel.
Contact your Dealer.
12vPower turnsoff
Batteryprotectfeaturehasoperated toprotect theVehicle battery
and orthe Leisurebattery. See3.6
Enginehasbeen started, all equipmenthasbeen disconnected to
meet EMC requirements.See2.4
Control Panellocked /
erraticfunction
Observecontrolpanel handlinginstructions
Control panel softwaremayhavecrashed.Reboot controlpanel by
turningoffthe PSU isolateswitch. Wait30 secondsthen turnthe
switchback on.
No12 voltoutput
fromPSU
No230vsupply Checkallabove.
Charger notswitched on Turncharger switchon,switchwill illuminate.
Batterynotconnected and
/ or charged Install charged batteryasper3.3
Power button oncontrol
panelnotswitchedtoon Turnpower on atcontrol panel.
Batteryflat/ Batteryfuse
blown
Rechargebattery, check fuses, checkcharging voltage is presentat
battery.
Fuseblown Checkallfusesareintact and the correct valuefuseisinstalled as
per fusetable.

EC176PowerControlSystem
Issue 1Page 11of1213 July2018
Fault Possible Cause ProposedFix
Equipmentswitchedoff /
unplugged Checkequipmentis switchedon andconnectedtothe 12vsupply.
PSU overheated/ auto
shutdownoperated
Reduceload onsystem.AllowPSU tocool down. PSU will
automaticallyrestart when cool.
Other fault Contact your Dealer.
Pumpnot
working
Fuseblown Replacefusewithcorrect valueasper fusetable.
Pumpturnedoff Turnpumpon bypressingthepumpbutton at thecontrolpanel.
Settingincorrect
Boththeinternalandexternal pumpfeedsarecontrolledfromthe
control panel. Toalter thesetting of the pumpswitchseeyour dealer.
Ensurethe settingmatchesyour desiredrequirement.
4.9Contactdetails
Sargent ElectricalServicesLimited, provide a technicalhelp line duringoffice hours. Please contact
01482 678981 if yourequire technicalhelp. Forout ofhoursupportplease referto thetech support
section ofthe Sargent website www.sargentltd.co.uk
5Technical Data& Approvals
5.1Outlinespecification –EC176PSU&EC361/362Control Panel
INPUT230V 230 Volts/ 0to16Amps +/ - 10%
OUTPUT230V
RCD protected,3xMCB outputsof 1x16A and 2x10A
Separateswitched channelsfor combinationheaterand
charger
INPUT12V 2x20A batteryinputsvia 9wayconnector
OUTPUT12V 20A total output via multipleswitched channelsprotected
by12 fused outputs
Builtin
CHARGER
Input220-240 VoltsAC +/- 10%, Frequency50 Hz+/- 6%,
Current 3Amax.
DC Output 13.8Voltsnominal,Current12 Ampsmax(155
Watts).
SignalINPUT 4xFreshwater level (direct tocontrol panel), 1xEngine
running, plusmultiple vehicle connections
Freshwater negativesensed
DataIN / OUT Datacommunication toControlPanelvia 8wayconnector
IP rating IP31
Operating
temperature
Ambient 0to35° Centigrade
PSU casetemperaturewithfullload65°C Max
Automaticshutdownandrestart
if overheated / overloaded
EC176
PSU
Overall size(HxWxD) 260 x273 x110mm
Clearances75mmabove,20mmbelow, 50mmleft & right
Fixing centres262 x224mm
Weight 2.2Kg
EC361 & EC361
Control Panel
Overall size(HxWxD) 95 x200 x25mm
Cut-outsize(HxW) 82 x178mm
Fixing centres190mm
Weight 180g
5.2Approvals
System: BSEN 1648-1, BSEN1648-2compliant, BS7671:2008 compliant
Residual Current Device: RCD40A 30mA trip toBS EN 61008
MiniatureCircuit Breakers: MCB’s type C 6000Abreaking capacitytoBSEN 60898
ElectroMagneticCompatibility(EMC) directive89/336/EEC
Integrated ChargerModule: BS EN 60335-1/2.29,89/336/EEC, IEC61000-3.2/3:1995, EMC certificate5A121501E
3rdpartytested.
LowVoltage Directive: 2006/95EC TUV-014900-A1,EN55022, Class B,EN55024/ Level 2

EC176PowerControlSystem
Issue 1Page 12of1213 July2018
5.3Declaration ofConformity
Equipment: LeisurePower Control SystemModel name: EC176, EC361, EC362
I herebydeclarethatthe equipmentnamed abovehasbeen designedtocomplywiththerelevantsectionsofthe
abovereferenced approvals.The unitcomplieswithall essentialrequirementsofthe Directives.
Signed: Name: Position: Manufacturer:
I LSargent Technical Director Sargent Electrical ServicesLtd
Unit 39, TokenspireBusinessPark
Woodmansey, Beverley
East Yorkshire,United Kingdom
Date:
Whilsteveryefforthasbeen madetoensure the accuracyand completenessofthisdocument,no guarantee isgiven against errorsor
omissions. Thisdocumentmaybe updated /improved over timetherefore pleasecheckwithyour dealer /supplier for update
informationor visit www.sargentltd.co.uk
This manual suits for next models
2
Table of contents
Other Sargent Power Supply manuals
Popular Power Supply manuals by other brands

Moxa Technologies
Moxa Technologies DR-120 Series Hardware installation guide

Eaton
Eaton AMPGARD Series Instructions for installation, use and maintenance

Technology Dynamics
Technology Dynamics TCP Series Connection diagram & user manual

Pulsar
Pulsar RAC24P manual

Nemtek
Nemtek MERLIN 4 Installer manual

Siemens
Siemens SITOP PSU8600 manual