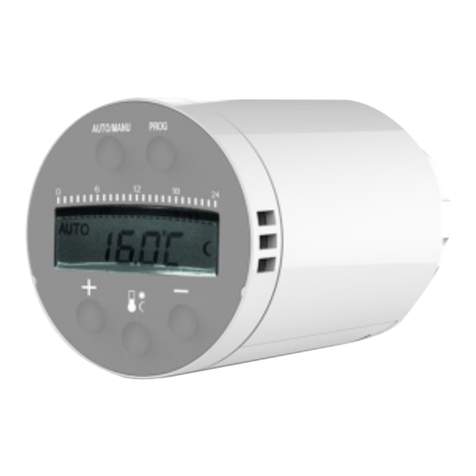
Saswell SEA801-APP User manual

Safety Comfort Energy saving
435-145-04
SEA801-APP(EN) Electronic Radiator Controller
Installaon and User Guide
ﻲ95029101043514504

Technical specification
Product introduction Adding thermostat
Main Features
SASWG-01(Gateway)
Phone
Internet
12
SEA801-APP is a stylish and accurate TRV programmable controller
has been designed for independent control heang radiators and also
able to remote monitoring by a phone. It is fied to a new or exisng
thermostac radiator valves (Short name---TRV), and according to a
series of programmed sengs to control temperature in a room.
1) PID control
2) 7 days independent programming
3) Child lock funcon
4) Open window funcon
5) Lime scale protecon
6) Frost protecon
7)
Holiday mode oponal
8)
9) Baery lifeme 1 year
10) Temporary hold funcon
11) Low baery indicator
12) Easy to install
Monitoring by phone
Thermostat type Programmable electronic radiator valve controller
Power supply 2x1.5V AA alkaline
Battery life Up to 1 year
Ambient temperature 0℃~50℃
Storagetemperature range -10 ℃
Accuracy ±0.5℃
Dimensions L:85mm, ¢:50mm
Color White
Spring force 80N≤F≤130N
Connection M30x1.5mm
Radio frequency 868MHz
Radio range 100M(Unobstructed)
IP class IP21
~60
If you want to control your thermostat remotely, what
you only need is to activate the mobile app, and learn to
use it:
1. Operation of adding thermostat
Step1: operaon on thermostat, press buon “AUTO/MANU” and buon
“+” simultaneously ll the screen shows up “ ” which means current
status is available to adding thermostat, exit this status if failure to adding
thermostat in 30s, also press buon “AUTO/MANU” and buon “+” ll the
screen shows up “ ” which means eliminang the current coding and
adding thermostat again.
Step2: operaon on phone, long press the H O USE in the Overview interface
that will shows up a pull-down menu, then press “add thermostat” and toggle
to interface of adding thermostat.
2. Aer add thermostat the interface of thermostat will show the coding
number of thermostat, the interface of phone will back to the Overview,
if failure to add thermostat, thermostat will back to the main screen and
indicate failure on phone.

Product specification Installation
Dimensions
Buttons and Display
50.00 85
54.97
24
18
12
6
0
24
18
12
6
0
AUTO/M ANU
PRO G
+
-
12
3
4 5
AUTO
MANU
10
11
24
18
12
6
0
ON
PROG16:55
6
7
8 12
9 15
13
14
1. Inserting/replacing the batteries (Please note: before you change the
battery, keep the valve completely open convenient for the following
installation)
Remove the battery cover and insert the two batteries. Ensure that the
batteries are correctly inserted.
2. After install the battery, first the screen is fully displayed, then show
the software version, finally the symbol (TEST) will blink, and now
the connector will retract entirely. It will be convenient for you to mount
the adapter.
(PS: Press any key to end the test after mounting the valve adapter.)
3. Mounting the RA and Caleffi adapter
Tighten the RA adaptor using the screw. Tighten the Caleffi adaptor by
hand.
4. Screw the thermostat onto the adaptor and hand tighten (max.4.5mm).
34
(1) Auto/Manual mode switch buon
(2) Program /D ate/T ime set buon
(3) Comfort/Economic temperature seng buon
(4) Raise the temperature/meseng
(5) Lower the temperature/meseng
(6) Show when the controller is in Auto mode
(7) Show when the controller is in Manu seng or holiday mode
(8) Show when the controller is in program seng mode
(9) Shows current set temperature or me clock
(10) Comfort mode symbol
(11) Economic mode symbol
(12) F rost protecon open symbol
(13) Low baery indicaon symbol
(14) Show the program me period(0-24hours)
(15) Valve opening symbol

56
Temperature and time factory setting chart as follows:
If the user want to change the default temperature, press the button, the
display will show temperature blink, and then press the “+” or “-” button to
set the temperature you wanted.
When the thermostat is in program mode, Both hold the“+” & “-” button at
least 3 seconds, and the screen will show “DEF” blink three times and all
the program setting will back to factory default.
Start time
Time period
Operating mode
Monday~Sunday
06:00-08:00 08:00-18:00 18:00-22:00 22:00-06:00
Temperature 21℃21℃16℃16℃
Operation
E 1
E 2
9. Error code
● When the NTC sensor is short circuit, the display shows “ ”
● When the NTC sensor is open circuit, the display shows “ ”
Low baery indicator
When the baery is low, the screen will show “ ”, which is reminds you to
change the baery as soon as possible. As the baery is lower than ulmate
work voltage, the valve will automacally open completely; meanwhile, the
controller will also close the screen display.
2. Program seng
2.1 Holiday mode: constant temperature without mer program
●Press the “AU TO/MANU” buon to switch to manual operang mode
●Press the “+” or “-” buon to set the temperature. This temperature is
maintained unl you return to automac operang mode. (the temperature
set range is 5℃-30℃) .
2.2 Timer program seng
You can set 2 comfort and 2 economy periods for each day of the week are
numbered from 1 to 7 (Monday to Sunday) in the mer program.
●Press the “PROG” buon, you can make the same seng for all the days of
a week, select 1-7 via the “+” or “-” buon. You can also make independent
seng for each day of the week, select the day you want with the “+” or “-”
buon. Press again the “PRO G” buon to confirm your seng.
3. Date/Time seng
8. Frost protecon
If the temperature drops below 6℃, the radiator controller will open the
valve unl the temperature rises above 8℃ again. In this way, it can ensure
the radiator will not freeze.
7. Lime scale protecon
If the valve is not open completely once within two weeks, the valve will be
automacally open and closed in short me. This can ensure that the valve
not seize. The display then shows the message “AdAp”.
6. Open Window funcon
If you open a window the temperature will drops dramacally, the radiator
controller closes the valve for saving energy. The screen will show message
“OPEN” , the radiator controller will reopen the valve when the temperature
rise again, or aer 46 minutes at least. You can also open the valve by pressing
any buon.
5. Child lock seng
If you want to lock the S EA800 to prevent it being tampered with:
Press the “AU TO/MANU” and “PROG” buon together about 3 seconds.
● The display screen will show message”B LOC”. Use the same combinaon
of buons to free the SEA800 for operaon again.
4. Temporary override
In program operaon, if you want to change the current program seng
temperature, press “+” or “-” buon to set the temperature. Meanwhile,
the logo” ”or” ”on the display screen will disappear. The controller
will override the current program seng temperature and keep the room
temperature at the selected temperature unl the next period begins.
Once the baeries got inserted or replaced, system will automacally
requests you to set date and me. Use the “+” or “-”buon to set the
years, press the “PROG” buon to confirm, and the same way to set the
month, day, hour, minute.
Other Saswell Controllers manuals