manuals.online logo
Brands
  1. Home
  2. •
  3. Brands
  4. •
  5. Satco
  6. •
  7. Lighting Equipment
  8. •
  9. Satco Nuvo Lighting S9299 User manual

Satco Nuvo Lighting S9299 User manual

Satco Products Inc.
110 Heartland Blvd.,
Brentwood, NY 11717
PH 631-243-2022
FX 631-243-2027
Distribution Centers:
New York, Florida,
Texas, Washington,
California, Puerto Rico
National Toll-Free:
800-43-SATCO
(800-437-2826)
www.nuvolighting.com
Copyright © 2016
Satco Products, Inc.
All Rights Reserved.
5/16 NU1311
50
1966–2016
L
e
a
d
e
r
s
i
n
l
i
g
h
t
i
n
g
f
o
r
5
0
y
e
a
r
s
Specications:
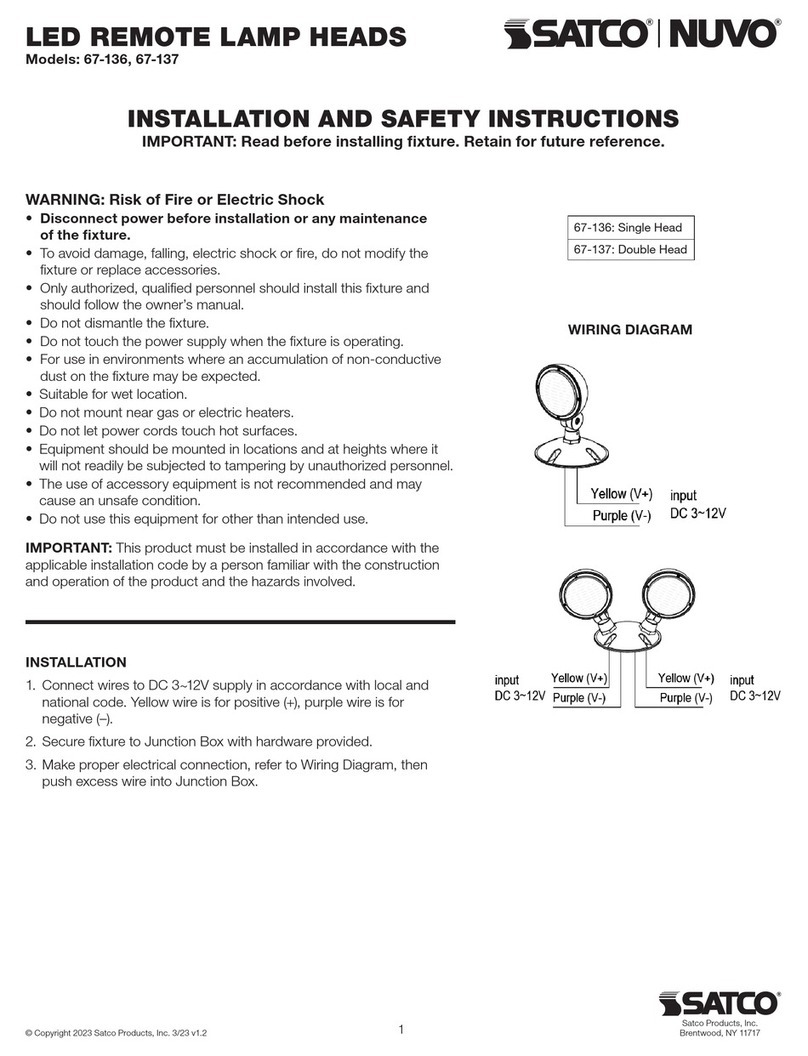
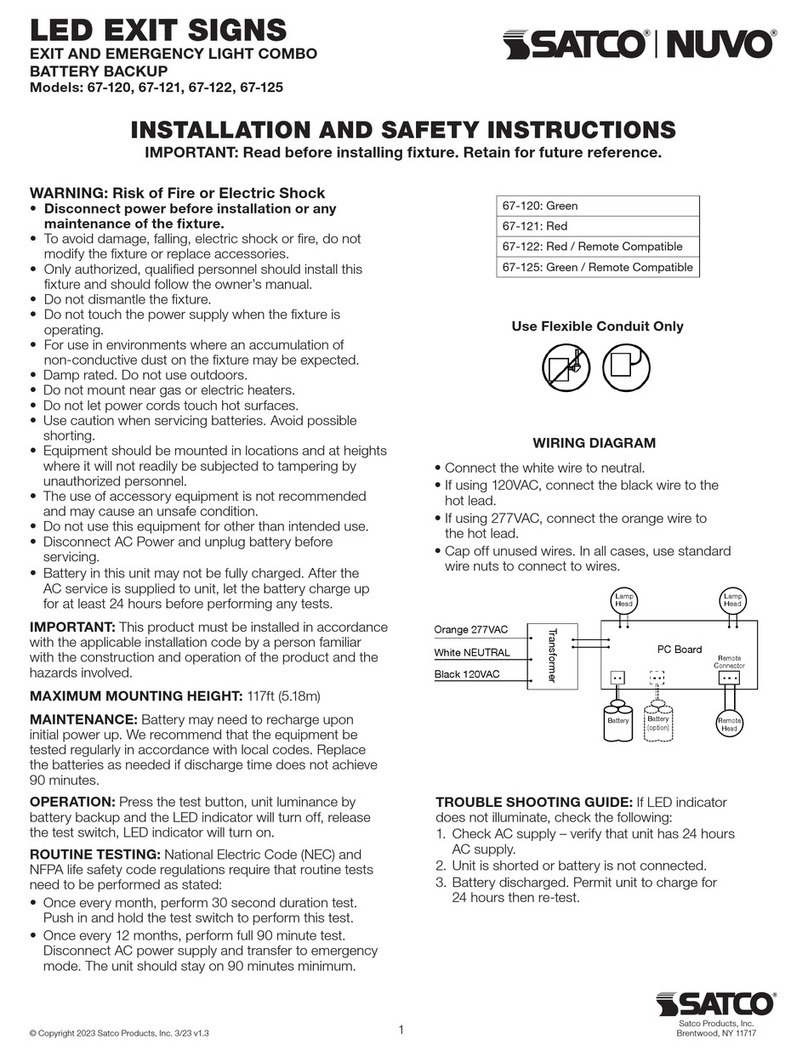
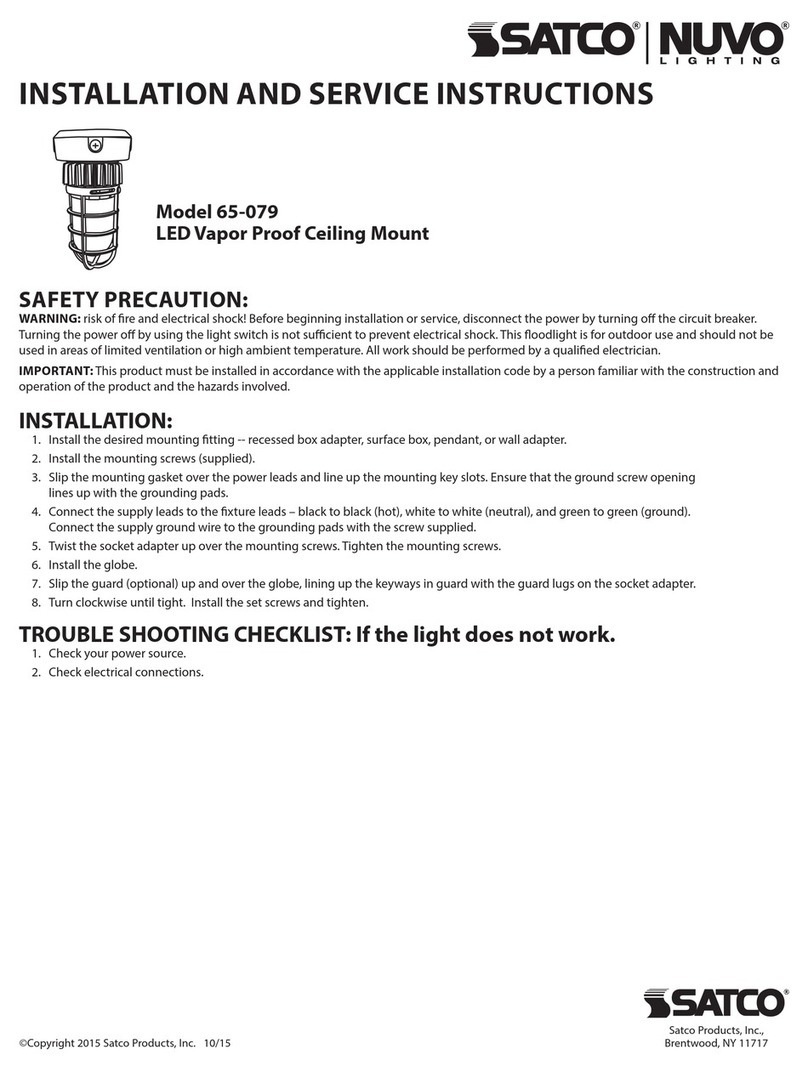
Model: S9299
Light Fixture Wattage: 20W
Input Voltage: 110V-120V
Input Current: 230mA Max
Installation: 3" or 4" Junction box
Patent pending
Operation manual
Emergency battery backup disk
Model: S9299
Test Button and LED Indicator
Test Button functions
1. While main power is on:
A quick press of the test button, (3 seconds), simulates the “main power outage”or
“emergency mode”. The light xture will come on in this case – it will be running on
battery power. Pressing test button for 3-6 seconds puts the unit into the monthly
self-check routine. (approx. 3 minutes runtime).
Press test button again any time to stop the routine.
As the system runs its check on the battery power and circuit connections, the LED
indicator will ash green @ 1 cycle/second.
Pressing test button for 6 seconds puts the unit into the annual self-check routine
(up to 9 minutes runtime).
NOTE:
The system will completely discharge the battery during this routine.
Press test button again any time to stop the routine.
As the system runs its more detailed annual check on the battery power and circuit
connections, the LED indicator will quickly ash green @ 3 cycle/second.
2. While in Emergency Status (main power outage):
Pressing test button for 6 seconds shuts o the unit. Press again to turn it back on.
Pressing test button for 6 seconds complete shuts o emergency output. In this state,
the system will not function unless the main power is reset.
LED indicator colors/functions:
Red: Battery is charging.
Green: Battery at full charge
Yellow: Check system - possible battery replacement needed or system
maintenance required.
Green Flashing: Monthly or annual checking mode is running.
O: Indicates a power outage. When the Battery Backup unit is in “Emergency Mode”
the LED indicator will be “O”.
Minimum charge time: 24 hours
ONE YEAR LIMITED WARRANTY
The purchased product is covered with a 1 year
warranty in respect of any defect in material or
workmanship after purchase date. SATCO shall
bear no responsibilty on account of guarantee,
as well as shall bear no liability for the unit, or if
any unauthorized alteration or repair followed.
CLEANING AND STORAGE
• Clean with a soft or damp cloth. While cleaning
with damp cloth make sure the power is o.
• Do not clean with liquids or abrasives.
• Store at room temperature.
Thank you for purchasing our product. This device has
been manufactured from components with advanced
optoelectronics to ensure high reliability and long life.
Before assembling please read this Operation Manual
carefully and save in a safe place for future reference.
Please note that all electrical connections must be in
accordance with local and National Electrical Code
standards as well as local building codes. In case you are
not familiar with proper wiring connections and building
codes, consult a qualied electrician.
Safety recommendations
1. The lighting shall be mounted at a height of maximum 4.0m.
2. Do not use outdoors.
3. Do not mount near gas or electric heaters. Do not let power supply cords touch
hot surfaces.
4. Use caution when changing batteries - TURN ALL POWER OFF, BOTH WALL SWITCH
AND MAIN POWER! Use only designated battery as supplied with original unit or as
listed for use with this product. Dispose of old battery in designated disposal location.
5. Equipment should be mounted in locations at heights where it will not be subjected
to tampering by unauthorized personnel.
6. This product is design for use with the series lighting. Must not be used with any
other xture.
7. Do not use this product for other than its intended use.
All serving should be performed by professional personnel.
SAVE THESE INSTRUCTIONS.
www.satco.comcustomer service 1-800-43-SATCO
2 3
Step 3
From the outside of the xture,
insert the indicator light, wires
rst, into the smaller hole and
secure with lock nuts from
other side.
Step 4
Plug the indicator light into the
battery back up unit.
Use:
Emergency battery back up
unit can only be used with
Satco/Nuvo EMR Series xtures
using an LED module.
Step 2
From the outside of the xture,
insert the test button, wires rst,
into the larger hole and secure
with lock nuts from other side.
Step 1
Remove the Nuvo Lighting
name plate from the xture to
reveal the indicator light and test
button mounting holes.
Installation
Step 5
Plug the test button into the
battery back up unit.
Option 1
As 24/7 lighting:
Connect the two black wires
(labeled as “Continuous Main
Power” and “Switched Line”)
from the battery backup to the
black main wire in the junction
box and connect the white
(“Neutral”) to white from the
battery backup xture to junction
box wires.
Option 2
As dedicated Emergency
Lighting Only:
Connect the black wire
(labeled as “Continuous Main
Power”) from the battery backup
to the black main wire in the
junction box and connect the
white (“Neutral”) to white from
the battery backup xture to
junction box wires. Screw wire
nut over the “Switched Line”and
leave unconnected.
Option 3
When installing in a “switched”
application - a 3 wire circuit is
required. Connect the black wire
marked “Continuous Main Power”
to the constant (un-switched)
black wire from the junction box.
Connect the black wire marked
“Switched Line” to the switched
black wire in the junction box.
Connect the White “Neutral” wire
from the battery backup to the
white wire from the junction box.
Battery Replacement
Batteries can be accessed by
removing the LED module.
There is no need to take the
xture down.
Wiring options
Step 6
Plug the xture connector from
LED light source into the battery
back up.
Step 7
On the back of the xture, locate
the slots that correspond to the
tabs on the battery back up unit.
Step 8
Line up the tabs on the battery
back up with the slots on the
back of the xture and press into
place.
Battery specications (3 required)
* 2600mAh 3.7V 18650 Rechargeable Lithium Battery
*Type Lithium Ion
*Battery Model 18650
*Battery Capacity 2600 mAh
*Battery Voltage 3.7 V
*Rechargeable Yes
*Rechargeable Times 1000

Other Satco Lighting Equipment manuals

Satco NUVO STARFISH User manual

Satco

Satco NUVO STARFISH User manual

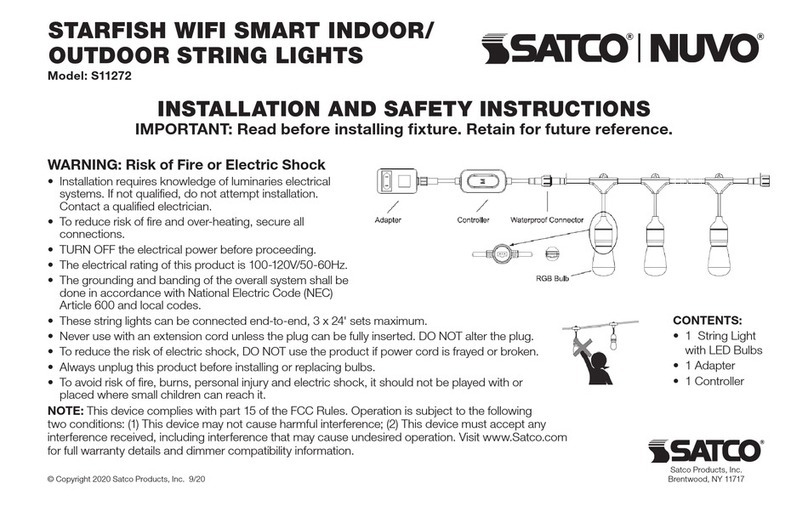
Satco NUVO S11272 Manual

Satco

Satco NUVO S11272 Manual

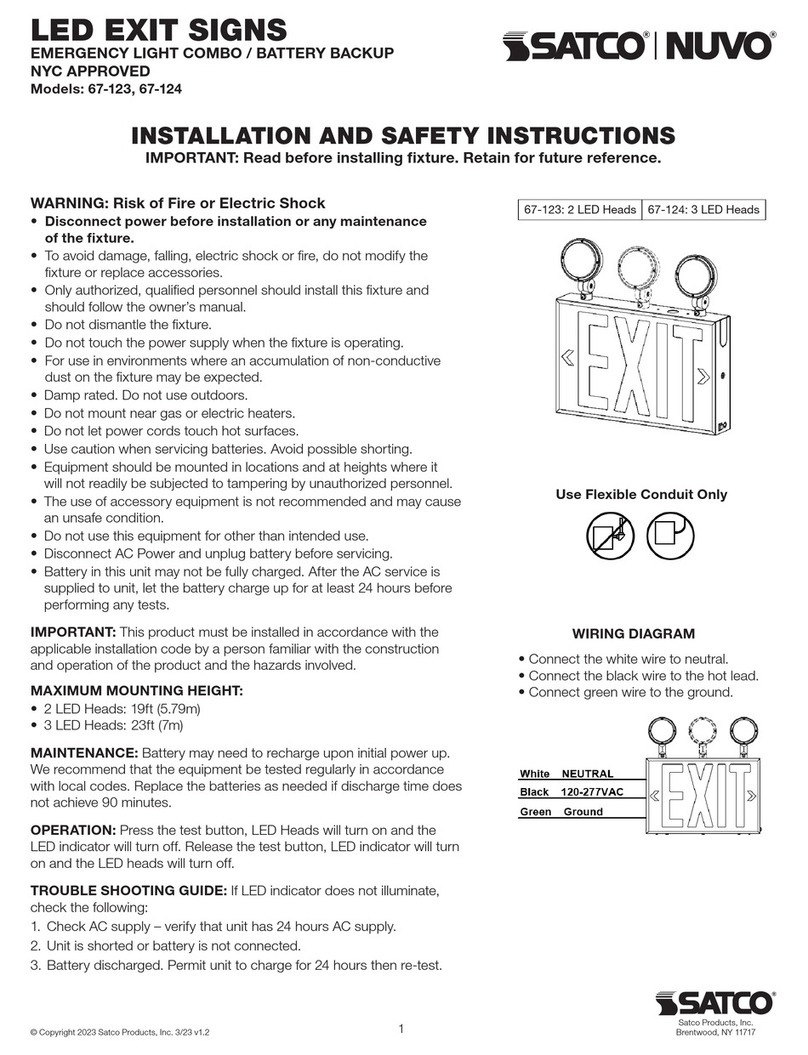
Satco NUVO 67-123 Manual

Satco

Satco NUVO 67-123 Manual

Satco Blink User manual

Satco

Satco Blink User manual

Satco Nuvo 65-080 Quick guide

Satco

Satco Nuvo 65-080 Quick guide

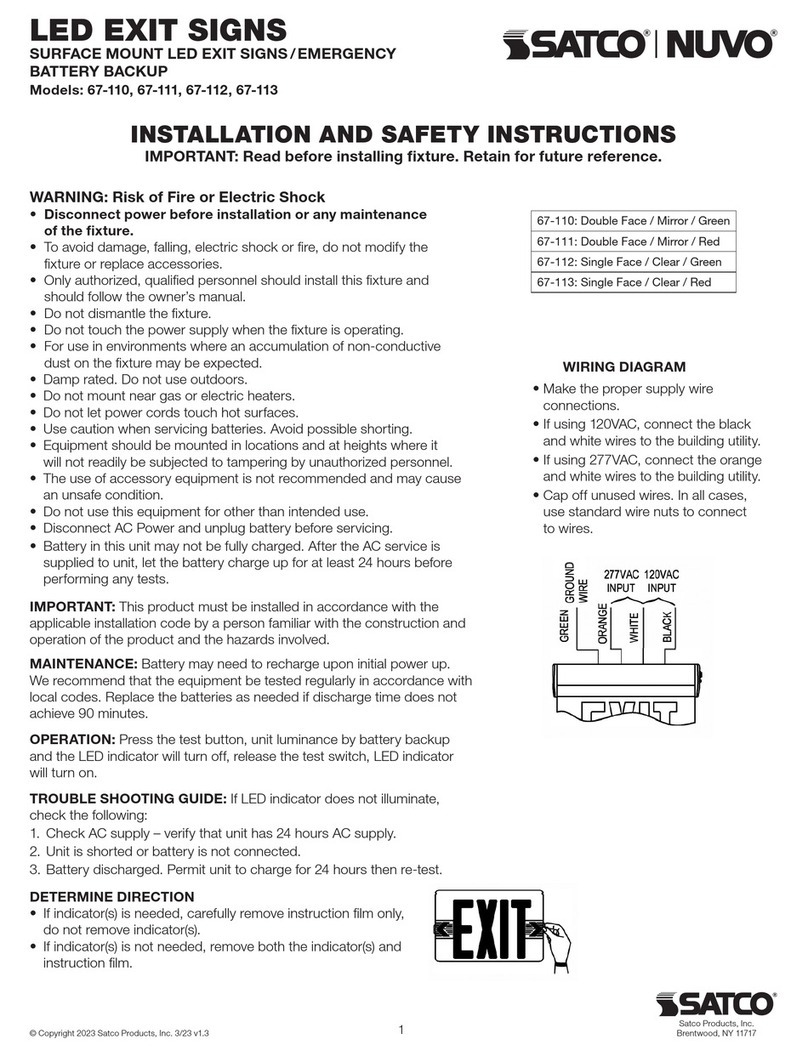
Satco NUVO 67-110 Manual

Satco

Satco NUVO 67-110 Manual

Satco NUVO 67-134 Manual

Satco

Satco NUVO 67-134 Manual

Satco NUVO 67-120 Manual

Satco

Satco NUVO 67-120 Manual

Satco NUVO 65-711 User manual

Satco

Satco NUVO 65-711 User manual

Satco NUVO 64-100 Manual

Satco

Satco NUVO 64-100 Manual

Satco NUVO 67-100 Manual

Satco

Satco NUVO 67-100 Manual

Satco NUVO S11846 Manual

Satco

Satco NUVO S11846 Manual

Satco NUVO LIGHTING 65-079 Quick guide

Satco

Satco NUVO LIGHTING 65-079 Quick guide

Satco NUVO 67-102 Manual

Satco

Satco NUVO 67-102 Manual

Satco NUVO 67-136 Manual

Satco

Satco NUVO 67-136 Manual

Satco NUVO 67-130 Manual

Satco

Satco NUVO 67-130 Manual

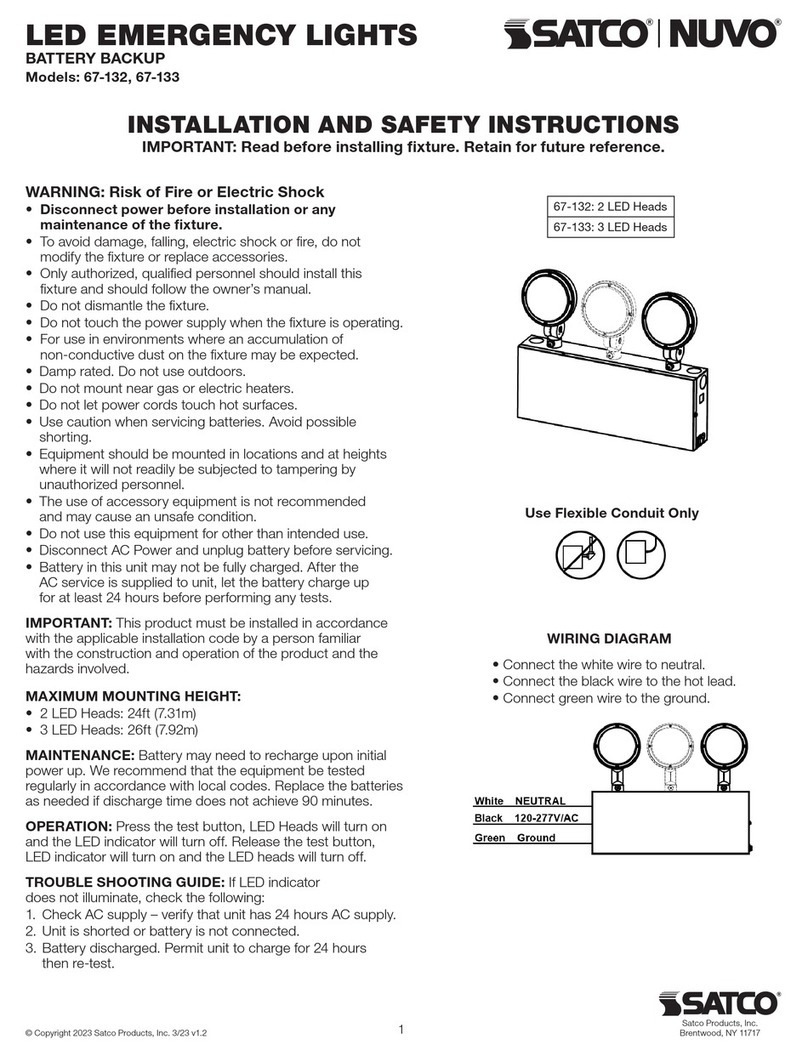
Satco NUVO 67-132 Manual

Satco

Satco NUVO 67-132 Manual

Satco NUVO 65/700 Manual

Satco

Satco NUVO 65/700 Manual

Satco NUVO 67-114 Manual

Satco

Satco NUVO 67-114 Manual

Satco NUVO 65-093 Manual

Satco

Satco NUVO 65-093 Manual

Satco NUCO 62-1580 Manual

Satco

Satco NUCO 62-1580 Manual

Popular Lighting Equipment manuals by other brands

Lightolier Lytespan 6294 specification

Lightolier

Lightolier Lytespan 6294 specification

QTX Light 152.740 user manual

QTX Light

QTX Light 152.740 user manual

RSA Lighting COMBOLIGHT LV316 Specification sheet

RSA Lighting

RSA Lighting COMBOLIGHT LV316 Specification sheet

Schwaiger LED220 011 instructions

Schwaiger

Schwaiger LED220 011 instructions

ACME Libre user manual

ACME

ACME Libre user manual

Lightolier Calculite C4P20MHGA specification

Lightolier

Lightolier Calculite C4P20MHGA specification

GoPro Zeus Mini user guide

GoPro

GoPro Zeus Mini user guide

Soltech SOLPORT 7W installation manual

Soltech

Soltech SOLPORT 7W installation manual

Northern Acorn user manual

Northern

Northern Acorn user manual

GTV BRESSI LB-BRE8W-11-DEC Assembly instruction

GTV

GTV BRESSI LB-BRE8W-11-DEC Assembly instruction

iSolution Xperior 300A Beam user guide

iSolution

iSolution Xperior 300A Beam user guide

Anslut 946-487 operating instructions

Anslut

Anslut 946-487 operating instructions

Leuze electronic MLC 500 Series SAFE IMPLEMENTATION AND OPERATION

Leuze electronic

Leuze electronic MLC 500 Series SAFE IMPLEMENTATION AND OPERATION

REV Ritter JR0621 Instructions for use and installation

REV Ritter

REV Ritter JR0621 Instructions for use and installation

GVA LIRA installation guide

GVA

GVA LIRA installation guide

Inspire Olga W91285201WH Assembly, Use, Maintenance Manual

Inspire

Inspire Olga W91285201WH Assembly, Use, Maintenance Manual

Magnum MLT3060K operating manual

Magnum

Magnum MLT3060K operating manual

Cameo AURO SPOT 300 user manual

Cameo

Cameo AURO SPOT 300 user manual

manuals.online logo
manuals.online logoBrands
  • About & Mission
  • Contact us
  • Privacy Policy
  • Terms and Conditions

Copyright 2025 Manuals.Online. All Rights Reserved.