Place the decimal separa-
tor with the [ ][ ] and
press the ENTER-button
ENTER:
Press ENTER to move to lower level in a menu or to accept a com-
mand or parameter value.
UPARROW:
Use the UP arrow key to move up on the current menu level or to
increase the selected parameter value.
DOWN ARROW:
Use the DOWN arrow key to move down on the current menu level or
to decrease the selected parameter value.
ESC:
Press the ESC to move back/higher in menu or cancel current action.
press the ESC- button to
enter the menu
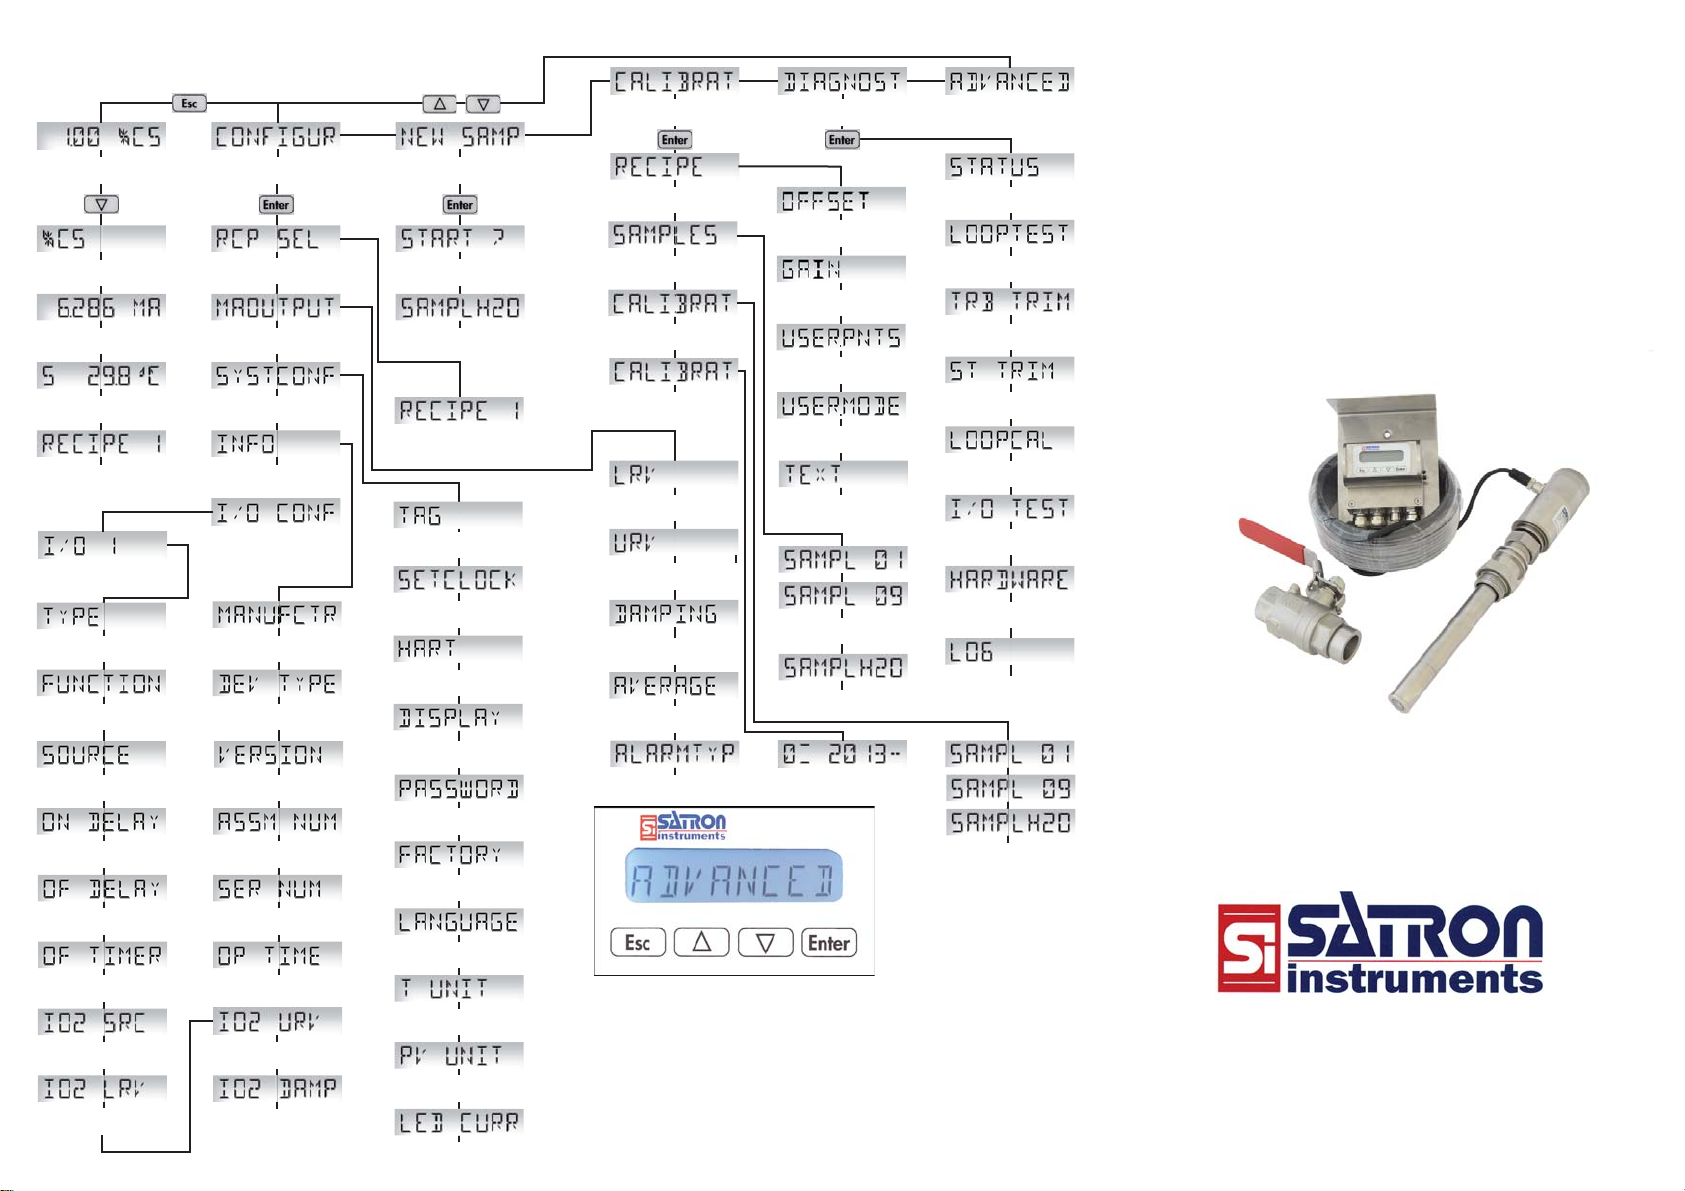
Basic settings
select CONFIGURA-
TION and press the
ENTER-button
press the ESC- button to
enter the menu
2-calibration with water
and one sample point
press the [ ] -button and
select MAOUTPUT and
press the ENTER-button
select LRV (mA-output
lower range value 4mA)
and press the ENTER-but-
ton
insert lower range value
(4mA) with the[
][ ]
and ENTER- buttons and
press the ENTER-button,
until upper separator
reaches the right end
of display. press the
ENTER-button to store
the lower range value for
mA-output
press the [ ]-button and
select URV (mA-out upper
range value 20mA) and
press the ENTER-button
Place the decimal separa-
tor with [ ] [ and
press the ENTER-button
insert upper range value
(20mA) with the[][ ]
and ENTER- buttons and
press the ENTER-button,
until upper separator
reaches the right end
of display. press the
ENTER-button to store
the upper range value for
mA-output
press the [ ] -button
and select DAMPING
(time constant for mA-out
damping) and press the
ENTER-button
set the time constant with
the [ ] [ ]-buttons
and press the ENTER
press the ENTER-button
to store the time constant
for mA-output damping
press the [ ]-button and
select ALARMTYP and
press the ENTER-button
Set alarm current with the
[ ] [ ]-buttons (3.7
or 22.5mA) and press the
ENTER-button
press the ENTER-button
to store the alarm current
value
press the ESC-button
to return to the main
measuring screen
Collect sample
press the [ ] -button and
select NEWSAMPLE and
press the ENTER-button
press the ENTER-button
to activate sampling
the screeen will blink
SAMPLING text during
sampling process. Press
the ENTER-button when
sample has been taken to
end sampling
the sample time stamp,
average and min and max
cs-values during the sam-
pling process are shwon on
display. Press ENTER to
store the sample or press
ESC to cancel
press the [ ] -button and
select SAMPLES and press
the ENTER-button
Laboratory
values
press the ESC- button to
enter the menu
press the [ ] -button and
select CALIBRATION and
press the ENTER-button
select witht he [ ] [ ]
buttons the desired sample
point to which laboratory
value will be inserted and
press the ENTER-button
Place the decimal separa-
tor with [ ] [ and
press the ENTER button
insert the laboratory value
with the [ ] [
] and
ENTER- buttons and press
the ENTER-button, until
upper separator reaches
the right end of display
press the ESC-button
to return to the main
measuring screen
Start-up cali-
bration
press the ESC- button to
enter the menu
press the [ ] -button and
select CALIBRATION and
press the ENTER-button
press the [ ] -button and
select CALIBRATE and
press the ENTER-button
press the [ ]-button and
select the SAMPLEH2O
to be the 1st calibration
point and press the
ENTER-button
press the[ ] button
and select the second
point for calibration
(SAMPL 01..09) and press
ENTER-button.the display
rolls the new calculated
OFFSET, GAIN values.
press ENTER to store val-
ues or press ESC to cacel
press ESC-button to return
to measuring screen
1-Point
calibration
press the ESC- button to
enter the menu
press the [ ] -button and
select CALIBRATION and
press the ENTER-button
press the [ ] -button and
select CALIBRATE and
press the ENTER-button
press the [ ]-button
and select the sample
point (SAMPL 01...09) for
1-point calibration and
press the ENTER-button
press ESC-button (1-point
calibration, no second
point). the display rolls the
new calculated OFFSET,
GAIN values. press
ENTER-button to store
ESC-button to cacel.
press ESC-button to return
to the main measuring
screen
2-point calibration with
two sample points
2-Point
calibration
press the ESC- button to
enter the menu
press the [ ] -button and
select CALIBRATION and
press the ENTER-button
press the [ ] -button and
select CALIBRATE and
press the ENTER-button
select with the [][ ]
-buttons the rst sample
point for calibration
(SAMPL 01...09) and press
the ENTER-button
select with the [ ][
] -buttons the second
sample point for calibra-
tion (SAMPL 01...09) and
press the ENTER-button.
the display rolls the new
calculated OFFSET, GAIN
values. press ENTER-but-
ton to store ESC-button
to cacel.
press ESC-button to return
to measuring screen
select RECIPE and press
the ENTER-button
OFFSET
adjustment
press the ESC- button to
enter the menu
press the [ ] -button and
select CALIBRATION and
press the ENTER-button
select OFFSET and press
the ENTER-button
place the decimal sepa-
rator with the [ ] [
]
buttons and press ENTER
insert the OFFSET value
with the [ ] [ ] and
ENTER- buttons and press
the ENTER-button, until
upper separator reaches
the right end of display
press the ENTER-button
to store the OFFSET value
press ESC-button to return
to main measuring screen
select RECIPE and press
the ENTER-button
GAIN
adjustment
press the ESC- button to
enter the menu
press the [ ] -button and
select CALIBRATION and
press the ENTER-button
place the decimal sepa-
rator with the [ ] [
]
buttons and the ENTER
insert the GAIN value
with the [ ] [ ] and
ENTER- buttons and press
the ENTER-button, until
upper separator reaches
the right end of display
press the ENTER-button
to store the GAIN value
press ESC-button to return
to main measuring screen
press the [ ] -button
and select GAIN and press
the ENTER-button
press the ESC- button to
enter the menu
TIME and
DATE settings
select CONFIGURA-
TION and press the
ENTER-button
press the [ ] -button
and select SYSTCONF and
press the ENTER-button
press the [ ] -button and
select SETCLOCK and
press the ENTER-button
insert date with [ ][ ]
-buttons (dd.mm.yyyy),
press ENTER-button to
move from dd->mm-
>yyyy and press the
ENTER-button
insert time with [ ][ ]
-buttons (hh.mm.ss), press
ENTER-button to move
hh->mm->ss and press the
ENTER-button
press ESC-button to return
to main measuring screen