Saunacore CTY-WN16 User manual

'Country Living' Wood Burning
Sauna Heater Instructions
Oven Use: Use only firewood. Do not use
materials with a high combustion temperature
(wood partical board, plastic, coal, etc).
The draught is regulated by opening the ash
bin. Too strong draught overheats the oven
and makes its service life shorter.
Heating of the sauna room depends on its
volume.
To add water to the stones, only use pure water, do not use salty or water
which may contain iron (hard water) which may affect the life of the sauna
stove.
Before adding the sauna stones, wash them thoroughly. Add largers stones
towards the bottom of the sauna tray, and the smaller stones on top. Do not
allow the sauna stones to hinder the escape of air flow through the grate.
The sauna heater warranty is for a period of 1 year to the original purchaser
from date of purchase.
Oven Use:
Sauna Stones:
- Heats Volume (16 cubic meters - 565 cubic feet)
790 mm high x 490 mm wide x 630 mm deep
(31 inches high x 19 inches wide x 25 inches deep)
Holds up to 57 KG (125 pounds) stones
- Heats Volume (20 cubic meters - 705 cubic feet)
840 mm high x 490 mm wide x 630 mm deep
(33 inches high x 19 inches wide x 25 inches deep)
Holds up to 62 KG (136 pounds) stones
CTY-WN16
CTY-WN20

Description & Features of the CTY-WN wood stove.
The ovens are designed to create dry and wet heat. The oven consists of
the heater main box, the ash bin, and sauna stone compartment. There is
a heat pocket in the top section of the stove. The stones compartment is
heated from 5 sides and has a pyramidal shape shutting upwards and focusing
heat radiation. There is a narrow cast-iron tray between the stove and the
ash bin. The stove door and the iron tray are situated so there is a threshold,
hindering of pieces of wood or coal to fall out when loading the firewood.
Necessary air for burning enters through the ash bin and iron tray.
The stove has one 115mm (4.5 inches) diameter outlets for smoke exhaust
from the top of the stove. The trapazoidal smoke flue has two
openings 115mm (4.5 inches) diameter with caps for cleaning. If your stove has
the water inlet and outlet have external thread of 3/4" inches (optional) .
Some of the ovens have a water heating system.
The stove has a heat pocket which is where the smoke flue outlets are located.
Between the stove itself and the enclosure there is a smoke pocket of 50mm
(2.0 inches) thickness, where heated air moves upwards. Upper clearance
between the oven and the enclosure is covered with drilled grate. Holes from
the grate allows free flow of air. The air is directed through the holes of the
grate which promotes room heating.
The sauna stove has a heat-resisting paint which completely hardens only after the
first burning or first initial use. At the beginning of the first use or burning, the paint
softens. To not damage the paint, try to avoid any contact with any part of the
painted surfaces before and during the first burning or use. During the first burning
the painted surface may emit some odors, so keep area well ventilated.
Do not add sauna stones at this time. Burn only with firewood.
INSTALLATION:
Before installing the sauna stove, take into consideration of the overall sauna stove
dimensions, area of your sauna room, 1 meter (5.0 feet) service area and
fire-prevention requirements of your local authorities.
Our recommendations of the following safety distances from the oven: from the
sides and back of stove - 500 mm (20 inches), from the front - 1000 mm (39 inches),
from the top of the heater to the ceiling - 1200 mm (48 inches). The dimensions
may be decreased with the use of thermal insulation.
If the sauna walls and ceiling are constructed with wood, the distance from the
stove to the walls is less than safety requires, cover the walls with additional
insulationl It may be metal sheets with thickness of 1 mm (0.125 inches) or
thermo-insulation plate from non-combustible mineral cement with a thickness
of 7 mm (0.5 inches). When using 1 (one) layer of thermal insulation the
from the stove to combustible materials is 250 mm (10 inches).
2

If the sauna floor is made from wood or combustible materials, use a concrete
slab with a thickness of no less than 60 mm (2.5 inches) to protect the floor.
The slab must protect directly beneath the stove and extend out beyond
the stove sides and front, 400 mm in front (16 inches) and 300 mm (12 inches)
at the sides. The slab should be just a little higher than the floor level.
Do not place any wiring or electrical equipment near the oven.
CONTACT YOUR LOCAL FIRE INSPECTOR OR LOCAL AUTHORITIES TO
OBTAIN THE COMPLETE APPROVAL AND COMPLETE SET OF INSTALLATION
INFORMATION.
Chimney Connection:
The stove has one outlet for the chimeny, located on the top side of the heater.
The diameter of the chimney pipe to be used must be 150 mm (6") .
Servicing Stove:
Accumulated soot is removed through the openings on top for which are
located at the top of the stove covered with caps.
Stones in the oven should be inspected minimum yearly. Small cracked
ones should be removed and changed. For a good draught clean the
chimney regularly. Ash bin is cleaned before adding wood (stoking) to
promote a good passage for air circulation. Do not place ashes in a
combustible container.
Wood burning sauna stoves installations must be approved before using the sauna.
As we are not aware of any specific codes or regulations which govern wood burning sauna stoves.
Before installing the wood burning sauna heater, please contact your local municipal officials or
fire department to find out if any guidelines are available
3
www.saunacore.com (905) 857-8085
A 6" diameter single wall stove pipe, used to connect the stove to the chimney, must
be installed with the crimped end towards the stove. This will ensure that the moisture
which condenses from the burning wood will flow back into the stove.
Each joint in the stove pipe must be secured with at least three sheet metal screws.
This heater must be connected to a chimney complying with the requirements for Type
HT chimneys in the Standard for Chimneys, Factory-Built, Residential Type and Building
Heating Appliance UL 103.
(refer to diagrams on page 4)
A 4.5" to 6" pipe adapter is available as an accessory.

Safety setbacks of sauna heater to combustible materials, such as wood sauna
walls, wood benches, etc...
Follow these minimum safety distances outlined below, and recommendations from your local
fire and safety authorities.
4
1. The minimum distances between the sauna heater and
any vertical combustible material such as the sauna wood
walls and benches which are unprotected should be a
minimum of 20 inches. (DIA 1)
2. The safety distances mentioned in item 1 can be decreased
to a minimum of 10 inches if a single shield protection is used.
This type of single shield protection can be made from using
a 1/4 inch thick non-combustible cement board reinforced with
fibre, or by attaching a 1 millimeter thick metal shield to the wall.
A minimum of 1-1/4 inch air gap must be left between the protective
metal shield and the wooden wall surface to be protected.
Pipe cuplings or bushings can be used as intermediate spacers/
supports for fastening. (DIA 2)
3. Safety distances stated in item 1. may be further decreased up to
a minimum of 5 inches provided that a double layer of protection is
used. The double layer of protection may be fabricated using two
shields described in item 2., in addition to an additional air gap of
1-1/4 inch is provided between each plate and the wood sauna wall.
(DIA 3)
4. The distance between the top of the heater and the wood
non protected ceiling finish should have a minimum distance
of 48 inches. With this distance, no protection is required for
the ceiling. If a single shield is added as in item 2., then the
distance from the top of the heater to the ceiling can be a
minimum of 36 inches. (DIA 4)
1-1/4 inch air gap
1 mm (0.40") meta shield or 1-1/4 inch
non-combustible cement board reinforced
with fiber.
anchor screw and pipe spacer
1 mm (0.040") metal shield or 1-1/4 inch
non-combustible cement board reinforced
with fiber.
1-1/4 inch air gap
DIA 1
DIA 2
DIA 3
DIA 4
Non-protected ceiling - 48 inches clearance
Protected ceiling with single metal shield
panel with 1-1/4 inch air gap - 36 inches
clearance
wall
wall
wall
wall
ceiling
wall
wall
wall
stove
stove
stove
stove

- This fireplace can be very hot when burning.
- Combustible materials such as firewood, wet clothing, etc. placed too close can catch fire.
- Children and pets must be kept from touching the fireplace when it is hot.
- The chimney must be sound and free of cracks. Before installing this unit, contact the local
building or fire authority and follow their guidelines.
- Operate only with the door tightly closed.
- Do not use an elevated grate or otherwise raise the fire.
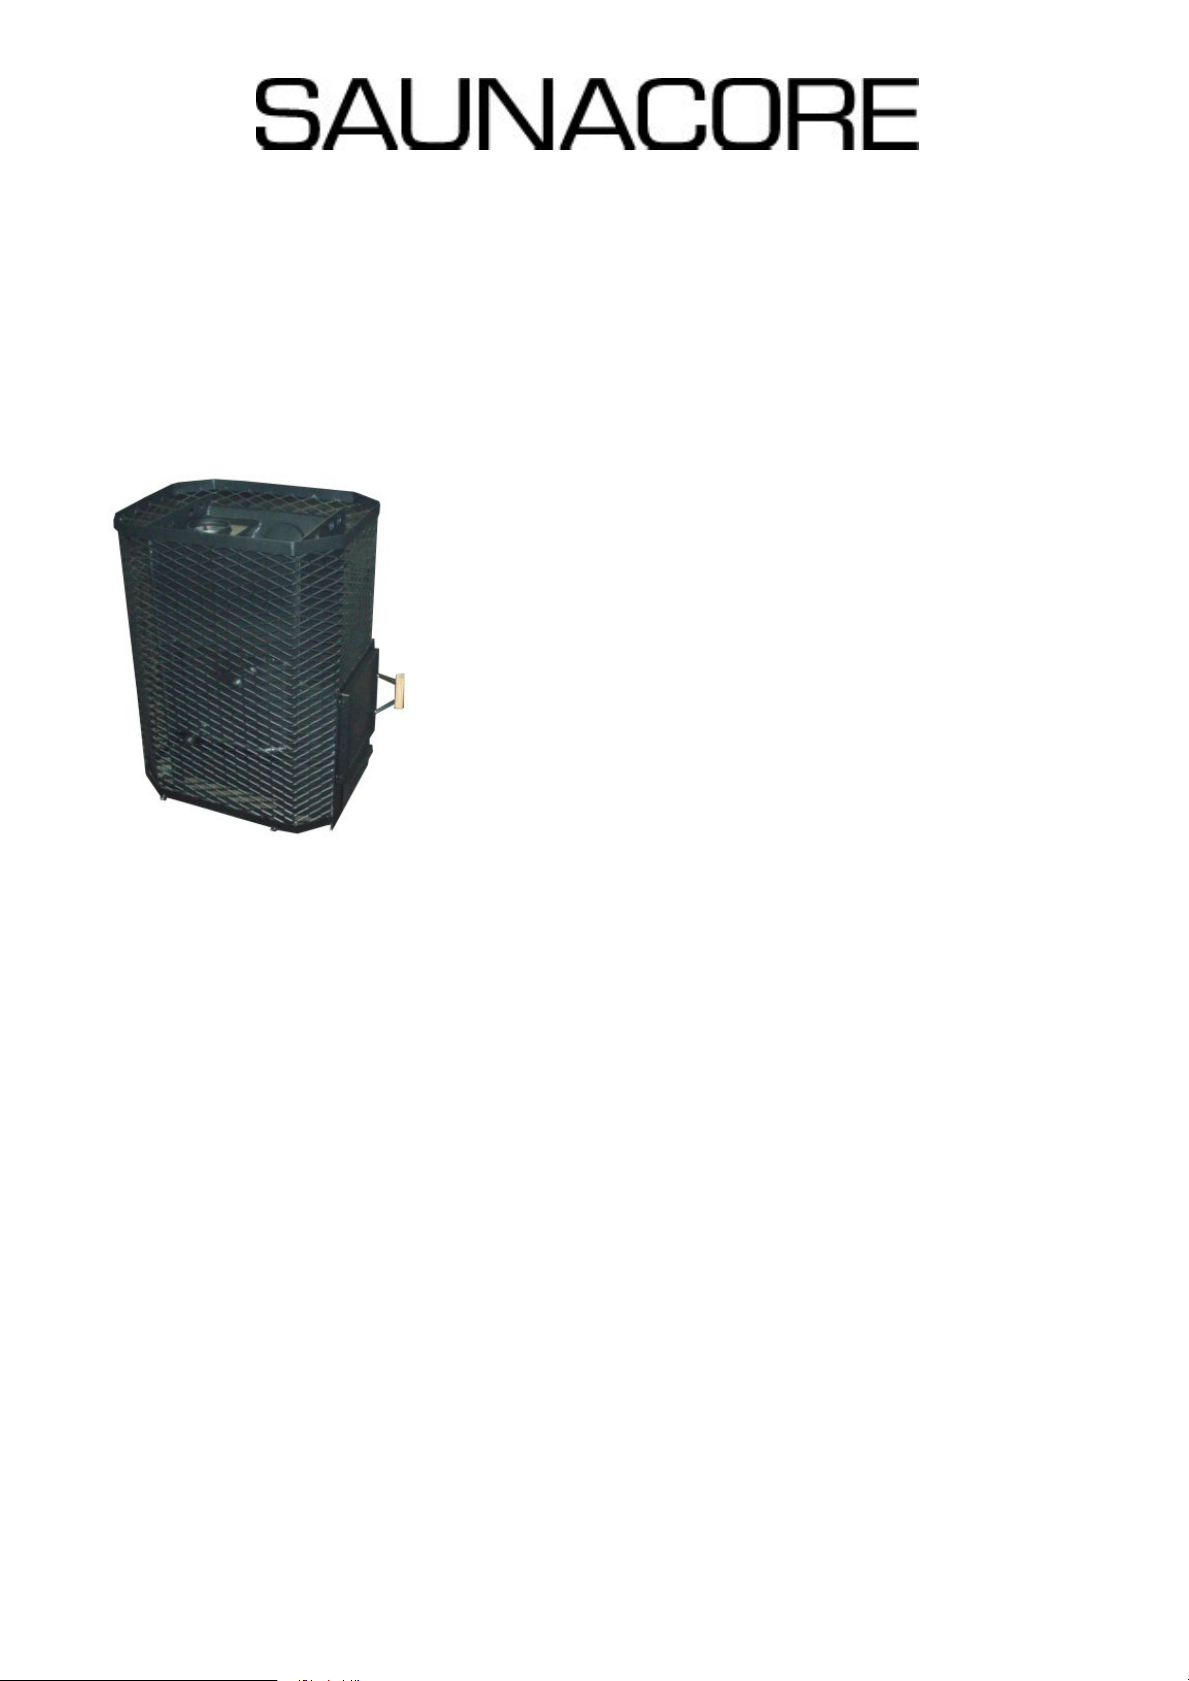
- This fireplace is designed to burn natural wood only. Higher efficiencies and lower emissions
generally result when burning air dried seasoned hardwoods, as compared to softwoods or
to green or freshly cut hardwoods.
- Do not start a fire with chemicals or fluids such as gasoline, engine oil, etc.
- Do not burn treated wood, coal, charcoal, colored paper, cardboard, solvents or garbage.
- Do not let the fireplace become hot enough for any part to glow red.
- KEEP THE STOVE TOP TEMPERATURE BELOW 700°F (371°C). Attempts to acheieve
heat output rates that exceed design specifications can result in steel distortion and
damage.
WARNING !!
Shipping costs, removeal costs, etc are not covered by the warranty.
SAUNACORE reserves the right to have its representative inspect any product or part thereof prior to honouring any warranty.
must be returned within fourteen days to register the warranty, with a copy of the receipt.
The bill of sale or copy will be required when making any warranty claims from your authorized dealer. The warranty registration card
provided that the product has been operated in accordance with the operation instructions and under normal conditions.
In the first year only, this warranty extends to the repair or replacement of warranted parts which are defective in material or workmanship
chemical cleaners nor chipping on porcelain enamel parts, nor any venting components used in the installation of the fireplace.
This limited warranty further does not cover any scratches, dents, corrosion or discolouring caused by excessive heat, abrasive and
will nullify this warranty.
This limited warranty does not cover damages caused by misuse, lack of maintenance, accident, alterations, abuse or neglect
the installation instructions included with the product and all local and national building and fire codes.
The wood fireplace must be installed by a QUALITIFIED technician or contractor. Installation must be done in accordance with
This factory warranty is non-transferable and may not be extended whatsoever by any of our representatives.
was made through an authorized SAUNACORE dealer and is subject to the following conditions and limitations:
(registered customer) whose name appears on the warranty registration card filed with SAUNACORE -- provided that the purchase
SAUNACORE warrants its products against manufacturing defects to the original purchaser only -- i.e., the individual or legal entity
CONDITIONS AND LIMITATIONS
Any repair work must be done by SAUNACORE only.the prior approval of an authorized company official.
Labour related to warranty repair is covered free of charge during the first year. Repair work, however, requires
replacement parts free of charge during the fi rst year of the limited warranty.
are covered and SAUNACORE will provideashdrawer, and cast iron castings
(thermal breakage only),
defects for as long as you own the fire place. This covers: combustion chamber, ceramic glass
The following materials and workmanship in your new SAUNACORE wood fire place are warranted against
SAUNACORE WOOD-FIRED SAUNA HEATER LIMITED WARRANTY
5
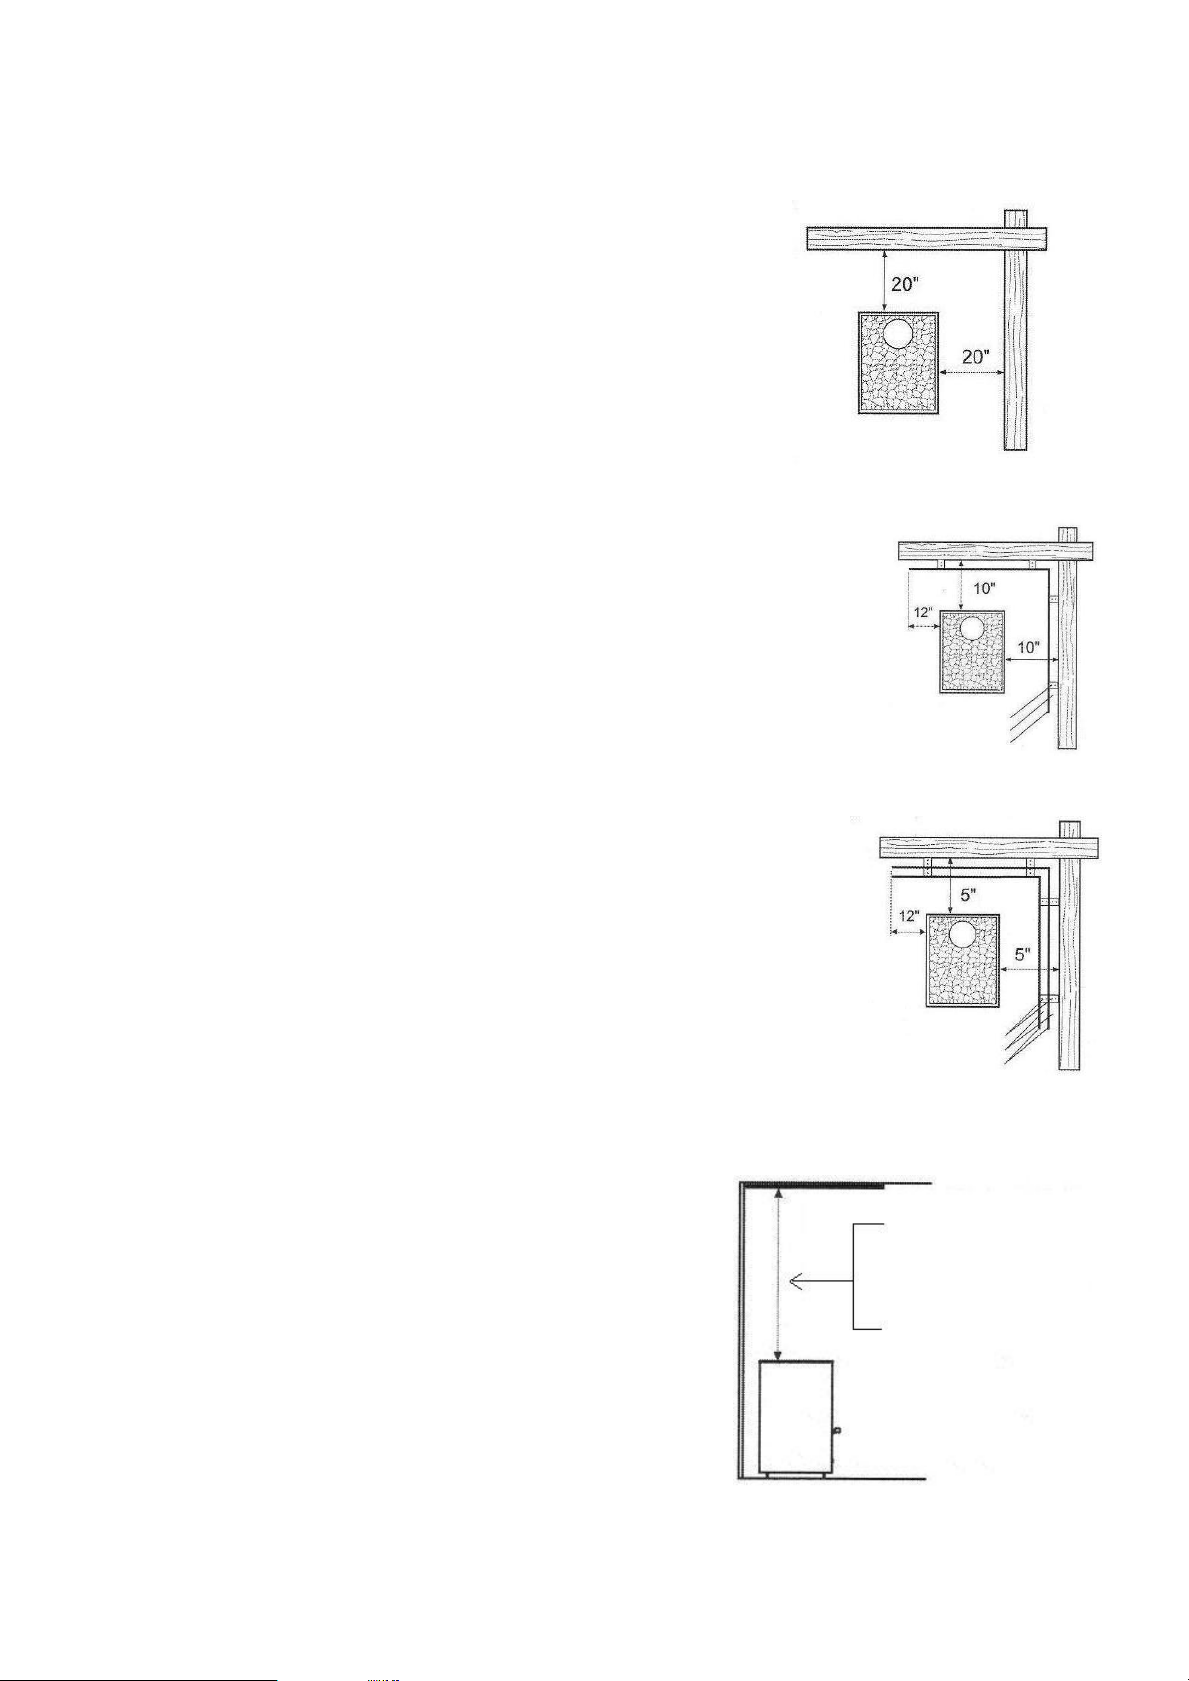
-Use a pre-fab UL listed floor mat beneath the heater or on walls around wood burning stove.
or thick concrete slab, cement boards, etc.
-All wood-fired sauna heaters must have a chimney, use only a stainless steel UL listed class "A"
insulated chimney or equivalent.
-All chimneys must extended 3 ft above the roof surface and a minimum of 2ft above any part of
building that is within 10ft.
-The least amount of bends in the chimeny allows more updraft.
-Use a chimeny cap to prevent water and birds, etc from entering.
-Sauna wood-fired heaters should be installed in sauna rooms or structures that are detached
from other dwellings/buildings or residence.
REGULATIONS OF LOCAL FIRE AUTHORITIES MUST BE OBSERVED IN ADDITION TO
THE ABOVE INSTRUCTIONS.

Cross Section View of CTY-WN
50 mm air
gap between
heater exterior
and inner fire
chamber
Beginning
of smoke
channel
Top (ceiling)
of fire chamber.
Stove door with
window.
Entrance to fire
chamber.
Cast iron
tray
Ash Drawer
Firewood
Placement
FIRE CHAMBER
End of smoke
channel.
Cleaning Traps
(remove caps)
Potential chimney
connection.
Top mount or rear
mount.
Smoke
exhaust
direction
(arrow)
Upper air panel -
stainless steel with
holes for air flow.
6
This manual suits for next models
1
Table of contents
Other Saunacore Heater manuals
Popular Heater manuals by other brands

Detroit Radiant Products
Detroit Radiant Products DSC series Installation, operation, maintenance guide

AREBOS
AREBOS AR-HE-HS2500FB user manual

Dimplex
Dimplex SRX 080 Installation and operating instructions

Quadra-Fire
Quadra-Fire TOPAZ Direct Vent Room Heater 839-1290 owner's manual

Sunshower
Sunshower P1220 manual

EOS
EOS Gracil Installation and operating instructions