Savin 4000 User manual

FAX Option Type 4000
Operating Instructions
Facsimile Reference (option)
<Basic Features>
ZCHH0 10N. eps
Read this manual carefully before you use this product and keep it handy for future
reference.
For safety, please follow the instructions in this manual.

FAX Option Type 4000 Operating Instructions
Printed in Japan
UE USA B383-8607B

Available Options
• Expansion Memory (FAX Feature Expander Type 450)
• Optional Hard Disk (FAX Feature Expander Type 4000)
• 400 dpi Option (FAX 400dpi Option Type 450)
• ISDN Unit (ISDN Option Type 450)
• Stamp Unit (FAX Stamp Type 4000)
• Handset (Handset Type 4000)
Supplies
• Marker Ink (Marker Type 30 is recommended for the best performance)

i
TABLE OF CONTENTS
1.Getting Started
Guide to Components ............................................................................... 1
Front View ..................................................................................................... 1
Rear View...................................................................................................... 2
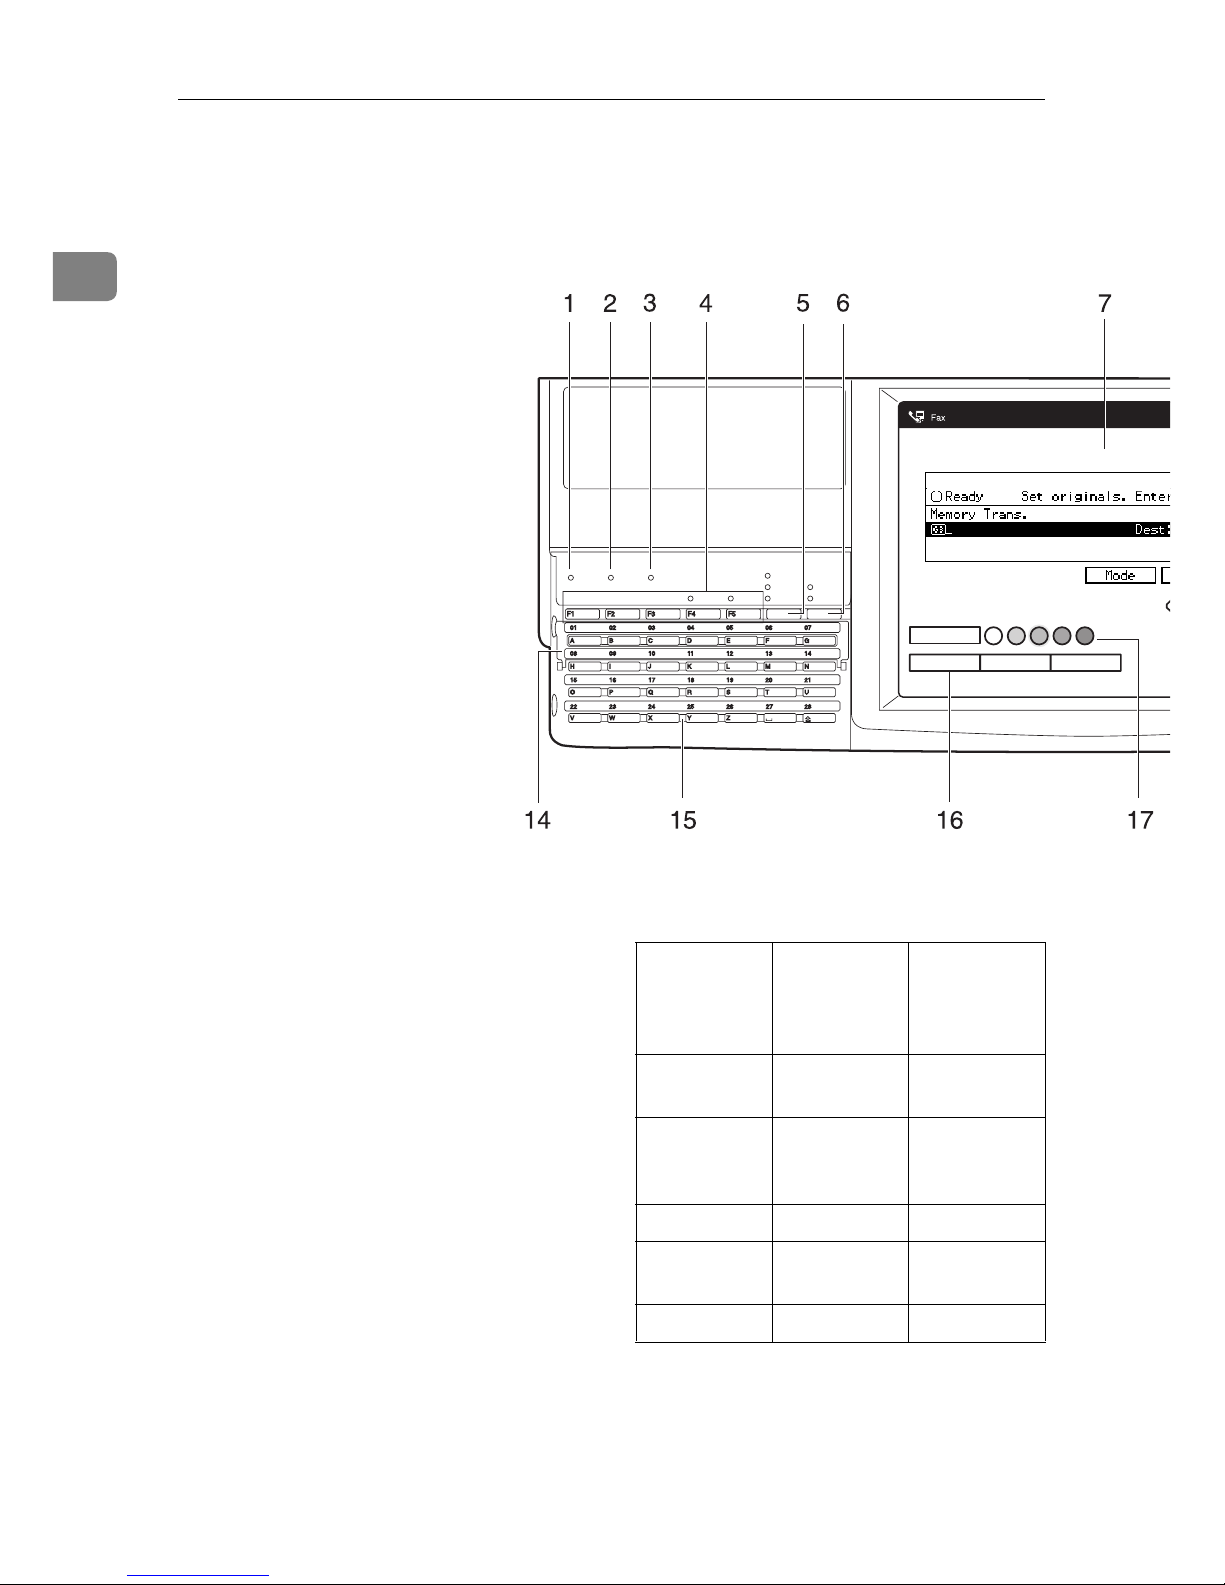
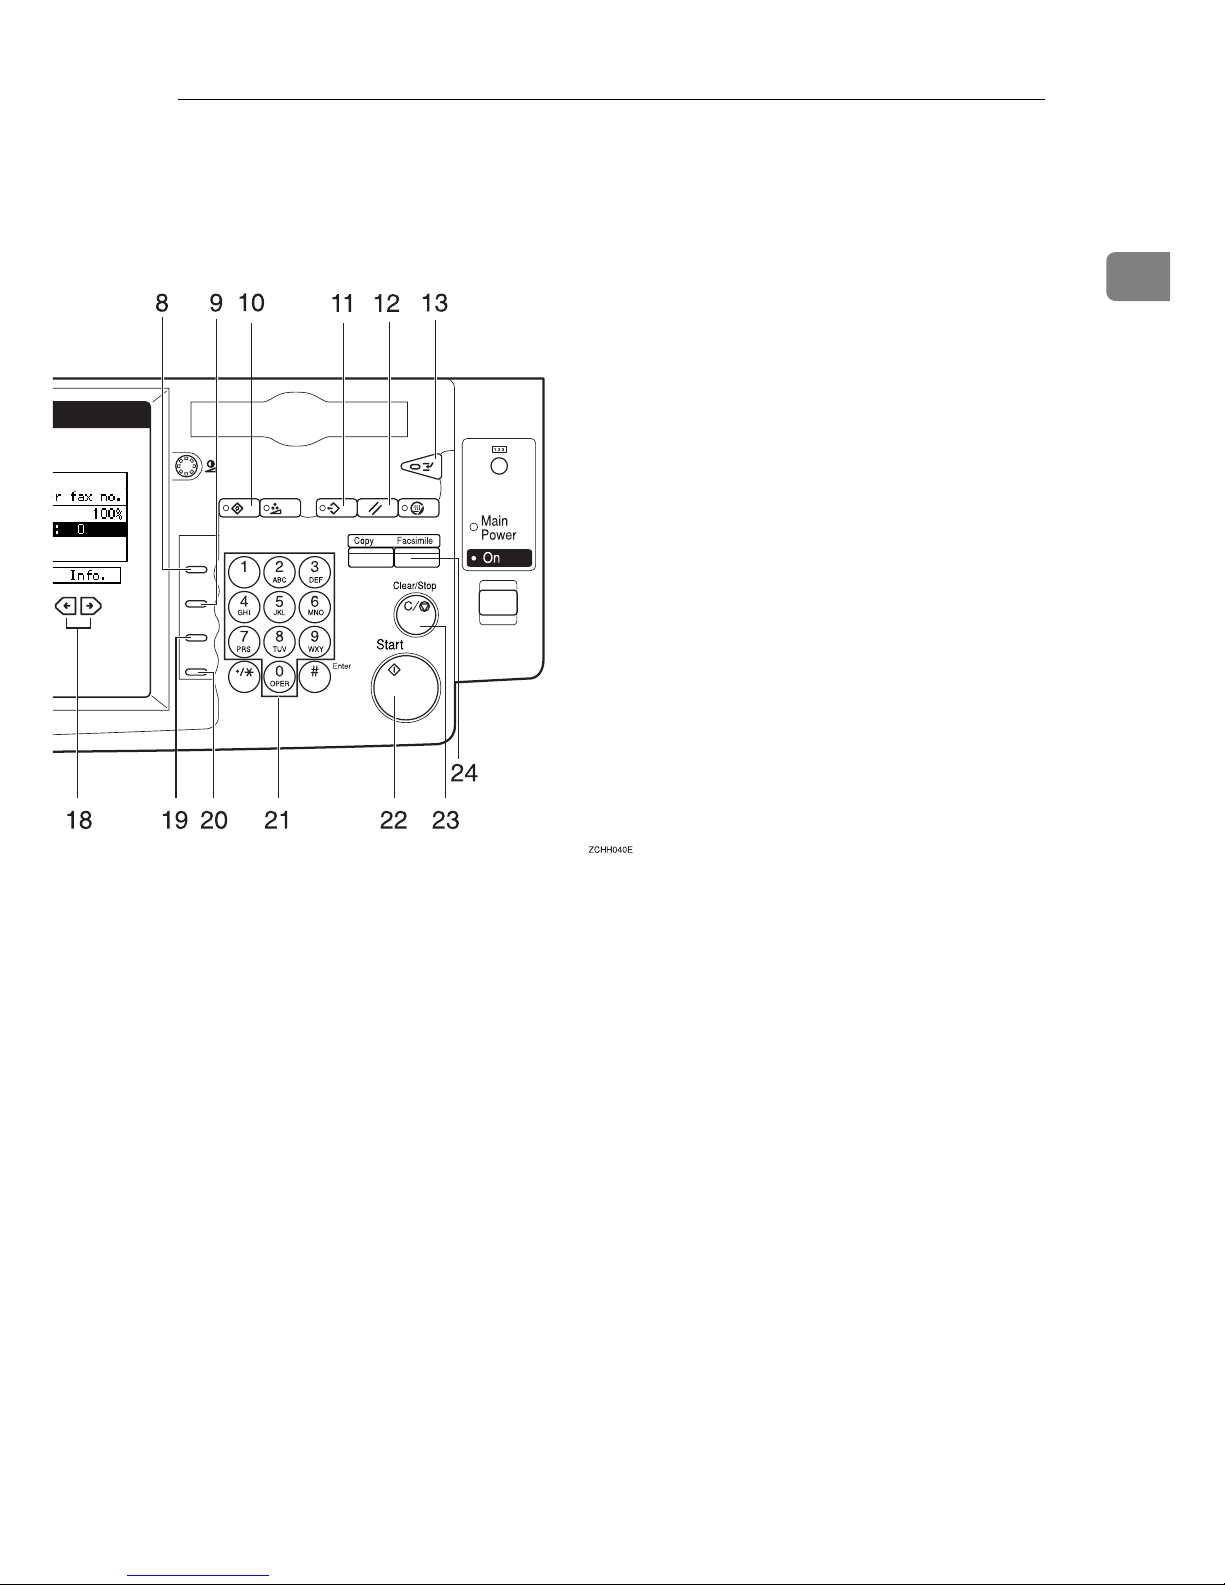
Operation Panel......................................................................................... 4
Starting the Machine ................................................................................. 7
Turning on the Power.................................................................................... 7
Turning off the Power.................................................................................... 7
Switching Between Copy Mode and Facsimile Mode ............................ 8
Reading the Display .................................................................................. 9
Reading the Display Panel and Using Keys.................................................. 9
Standby Display ............................................................................................ 9
Communication Display .............................................................................. 10
Display Prompts .......................................................................................... 10
2.Faxing
Overview................................................................................................... 11
Changing Memory Transmission and Immediate Transmission ................. 11
Setting Originals...................................................................................... 12
Setting a Single Original on the Exposure Glass ........................................ 13
Setting Originals in the Document Feeder (ARDF) ..................................... 14
If the machine cannot detect the size of your original ................................. 16
Original Sizes Difficult to Detect.................................................................. 16
Memory Transmission ............................................................................ 18
Canceling a Memory Transmission ....................................................... 23
Canceling the Transmission Before the Original is Scanned ...................... 23
Canceling a Transmission While the Original is Being Scanned ................ 23
Canceling a Transmission While the Message is Being Sent ..................... 23
Immediate Transmission ........................................................................ 25
Canceling an Immediate Transmission................................................. 28
Canceling a Transmission Before You Have Pressed Start........................ 28
Canceling a Transmission After You Have Pressed the Start Key ............. 28
Scan Settings........................................................................................... 29
Resolution ................................................................................................... 29
Original Type............................................................................................... 30
Image Density (Contrast) ............................................................................ 30
Mixing Scan Settings for a Multiple Page Original ...................................... 31

ii
Dialing....................................................................................................... 33
Number Keys .............................................................................................. 33
Quick Dials .................................................................................................. 35
Speed Dials................................................................................................. 36
Groups ........................................................................................................ 37
Optional Group Dial..................................................................................... 38
Reception ................................................................................................. 39
Selecting the Reception Mode .................................................................... 39
3.Registering
RTI/TTI ...................................................................................................... 41
Registering RTI/TTI..................................................................................... 41
G3 Analog Line ........................................................................................ 43
Quick Dial................................................................................................. 45
Registering Quick Dials............................................................................... 45
Quick Dial Key and Function Key Label (Dial label).................................... 47
Deleting Quick Dials.................................................................................... 50
Speed Dial ................................................................................................ 52
Registering Speed Dial ............................................................................... 52
Deleting Speed Dial .................................................................................... 54
Groups...................................................................................................... 56
Registering Groups ..................................................................................... 56
Deleting Groups .......................................................................................... 58
Registering Optional Groups....................................................................... 60
Deleting Optional Groups............................................................................ 63
Entering Text............................................................................................ 65
Available Characters ................................................................................... 65
Keys ............................................................................................................ 65
How to Enter Text ....................................................................................... 66
4.Troubleshooting
Adjusting Volume.................................................................................... 69
Error Messages and Their Meanings..................................................... 71
When the {Fax}key is Lit in Red ............................................................ 72
Solving Problems .................................................................................... 73
INDEX........................................................................................................ 74

1
1. Getting Started
Guide to Components
Front View
1. Document Feeder (ARDF)/Platen
Cover (Option)
Holds a document stack of up to 50
sheets which are fed automatically one at
a time. Place documents face up here.
2. Exposure Glass
Place the original face down on the upper
left corner of the exposure glass, aligning
the upper left corner with the reference
mark. Close the platen cover when you
set a document on the exposure glass.
3. 3–bin Sorter (Option)
Sorts and stacks copies.
4. Optional Handset
This permits voice communication.
5. Main Power Switch
Do not touch this switch. This switch
should be only used by a service repre-
sentative.
Note
❒If the operation switch is on and there
is still no power, turn on the Main
Power switch.
❒If you leave the Main Power switch
off for more than an hour, all files in
memory are lost.
ZCHH020N.eps

Getting Started
2
1
6. Operation Switch
Press this switch to turn the power on
(the On indicator lights up). To turn the
power off, press this switch again (the On
indicator goes off).⇒P.7 “Turning on the
Power”
7. Optional Tray Unit (Option)
For information about optional tray unit,
see the Copy Reference.
Rear View
1. Bypass Tray
Select this tray for non-standard size pa-
per.
See “Copying from the Bypass Tray” in
the Copy Reference.
2. G3 Line Connector
3. External Telephone Connector
4. ISDN Line Connector (Option)
ZCHH030N.eps

Guide to Components
3
1
This page is intentionally blank.

Getting Started
4
1
Operation Panel
1. Communicating Indicator
Lights during transmission or reception.
2. Receive File Indicator
Lights to tell you a message has been re-
ceived into memory.
Note that this indicator does not inform
you of a Confidential Reception.
3. Confidential File Indicator
Blinks when a Memory Lock file has been
stored in memory.
Lights when a message has been received
into memory with Confidential Recep-
tion.
4. User Function keys
Each of these can be programmed for
rapid access to frequently used features.
❖
❖❖
❖Features Programmed by Default
5. Resolution key
Press to switch between Standard, Detail
and Super Fine (optional 400dpi Option
required).
TX File
Status
Memory
Trans.
Immediate
Trans.
Standard
Detail
Super Fine
Commu-
nicating
Receive
File
Confidential
File
Start
Manual RX
TEL
Mode
Auto Image Density
TEXT TEXT-PHOTO PHOTO
ZCHH040N.eps
Key Standard With ISDN
Unit and
Stamp op-
tions
F1 Start Manu-
al RX
←
F2 Transmis-
sion Result
Display
←
F3 TEL Mode ←
F4 - G3/G4 Line
Selection
F5 - Stamp

Operation Panel
5
1
6. Transmission Mode key
Press this key to toggle between Memory
Transmission (Memory Trans.) and Im-
mediate Transmission (Immediate
Trans.) modes.
7. LCD display
This guides you through tasks and in-
forms you of the machine status. A mes-
sages appears here.
8. {
{{
{Speed Dial}
}}
}key
Press to select a Speed Dial.
9. {
{{
{On Hook Dial}
}}
}key
Use to dial a number from the numeric
keypad without having to lift the hand-
set.
10. {
{{
{User Tools}
}}
}key
Press to enter User Tools mode. These
tools allow you to customize the default
settings.
11. {
{{
{Program}
}}
}key
This key is used in Copy operation mode.
12. {
{{
{Reset}
}}
}key
Cancels the current settings and returns
the machine to standby mode.
13. {
{{
{Interrupt}
}}
}key
Interrupts the current fax operation to
start copying.
14. Quick Dial Flip Plate
Flip this plate down to access Quick Dial
keys 01 through 28, flip up to access keys
29 through 56.
15. Quick Dial keys
Use to dial numbers at a single touch or
to enter letters and symbols. Also use for
the Group Dial, Keystroke Program fea-
tures.
Speed Dial
On Hook Dial
Pause /
Redial
Tone
Adjustment
User Tools
Program
Energy Saver
Clear Modes
Interrupt
Screen Contrast
eps

Getting Started
6
1
16. Original Type key
Use when sending a halftone image such
as a photograph or a color original.
17. Image Density key
Use to change the setting of image densi-
ty.
18. <
<<
<>
>>
>keys
Press to move the cursor or select func-
tions.
19. {
{{
{Pause/Redial}
}}
}key
Pause:
Inserts a pause when you are dialing or
storing a fax number. A pause cannot be
inserted as the first digit.
Redial:
Press to redial one of the last ten num-
bers.
20. {
{{
{Tone}
}}
}key
Press to send tonal signals down a pulse
dialing line.
21. Number keys
Use to dial fax numbers or enter the
number of copies.
22. {
{{
{Start}
}}
}key
Press to start all tasks.
23. {
{{
{Clear/Stop}
}}
}key
Clear:
Deletes one character or digit.
Stop:
Interrupts the current operation (trans-
mission, scanning, copying or printing).
24. {
{{
{Facsimile}
}}
}key
Press to switch to Facsimile mode.

Starting the Machine
7
1
Starting the Machine
To start the machine, turn on the op-
eration switch.
Note
❒This machine automatically enters
Energy Saver mode or turns itself
off if you do not use the machine
for a while. See “Energy Saver
Timer”, “Auto Off Timer”in the
Copy Reference.
-
--
-Power switches
This machine has two power switch-
es: See P.1 “Guide to Components”.
❖
❖❖
❖Operation switch
Turn on this switch to activate the
machine. When the machine has
warmed up, you can make copies
or send faxes.
❖
❖❖
❖Main power switch
Do not touch the Main Power
switch. It should be used only by a
service representative when the
optional fax unit is installed.
Important
❒If you leave the Main Power
switch off for more than one hour,
all fax files in memory are deleted.
See “Turning Off The Power”be-
low.
Turning on the Power
AConfirm that the power cord is
plugged into the wall outlet firm-
ly and the Main Power switch is
on.
BTurn on the operation switch. The
On indicator should light.
The panel display will turn on.
Note
❒If nothing happens when you
turn on the operation switch,
make sure the Main Power
switch is turned on.
Turning off the Power
ATurn off the operation switch.
The On indicator will go out.
Important
❒Before you unplug the power
cord, confirm that the display in
Facsimile mode indicates that the
remaining memory space is 100%.
❒Fax files stored in memory will
be deleted an hour after you
turn the Main Power switch off
or you unplug the power cord.
Energy Saver
Clear Modes
Interrupt
LTWO020E.eps
Energy Saver
Clear Modes
Interrupt
LTWO020E.eps

Getting Started
8
1
Switching Between Copy Mode and
Facsimile Mode
This machine is both a fax and a copier. When you turn on the power switch, the
copier screen is shown and the machine is ready to make copies. When you wish
to use fax functions, press the {Facsimile}key on the right of the operation panel.
You can set this machine to display facsimile mode immediately after the power
switch is turned on. See “Changing the Machine Settings”in the Copy Refer-
ence.
Limitation
❒You cannot switch modes under the following circumstances:
•While scanning in a fax
•During Immediate Transmission
•While editing the System Settings
•During Interrupt Copying
•While using On-hook Dial
D
ial
k
Dial
LTWO122E.eps

Reading the Display
9
1
Reading the Display
The display tells you the machine status and guides you through operations.
Note
❒Functions that have been selected are highlighted (for example ).
Keys that you cannot select are shown with a dashed outline (for example
).
❒All procedures in this manual assume you are in Facsimile mode. By default,
when you turn the machine on it is in Copy mode. Press the {Facsimile}key
to change to Facsimile mode. You can have the machine start in Facsimile
mode. See “Changing the Machine's Settings”in the Copy Reference.
Reading the Display Panel and Using Keys
1. Display for the currently selected
function.
2. Machine status and messages.
3. Press these keys to navigate menu
screens and confirm or cancel selec-
tions.
4. Press to select an item from a se-
lection. The currently selected item
is highlighted.
Note
❒Press <to select the item one place to
the left.
❒Press >to select the item one place to
the right.
Standby Display
While the machine is in standby
mode (immediately after it is turned
on or after the {Reset}key is pressed),
the following the display is shown.
❖
❖❖
❖Memory Transmission
11 17
Fax
Auto Image Dens
Text PhotoAuto Text / Photo
1
2
3
4
LTWO290E.eps
Us28-1.tif

Getting Started
10
1
❖
❖❖
❖Immediate Transmission
Note
❒To return the machine to standby
mode, do one of the following:
•If you have set the original and
have not pressed the {Start}key,
remove the original.
•If you have not set an original,
press the {Reset}key.
•If you are in User Tools mode,
press the {User Tools}key.
Communication Display
While the machine is communicating
the status is displayed.
❖
❖❖
❖Display during Memory Transmission
or Memory Reception:
The status “PARIS BRANCH A4→A4
P001/P003”for exomple, appears
on the vary top of the LCD display.
Note
❒Even when the machine is send-
ing or receiving a fax message
from/into memory, you can
still scan the next original into
memory.
❖
❖❖
❖Immediate Transmission:
Display Prompts
Depending on the situation, the ma-
chine will show various prompts on
the display.
❖
❖❖
❖Instructions and Requests
❖
❖❖
❖Questions
❖
❖❖
❖Selections
❖
❖❖
❖Status
Us35-1.tif
Us15-1.tif
Us37-2.tif
Us79-2.tif
Us15-4.tif
Us87-3.tif
Us15-6.tif

11
2. Faxing
Overview
Changing Memory
Transmission and Immediate
Transmission
The basic procedure to send a fax
message is:
AMake sure the Facsimile indicator
is lit
BSet your original
CDial the number
DPress the {Start}key
The rest of this section describes these
steps and the various features that are
available in more detail.
There are two ways to send a fax mes-
sage:
•Memory Transmission
•Immediate Transmission
Check the indicators on the operation
panel to check which mode is current-
ly active and press the {Transmission
Mode}key to toggle between them.

Faxing
12
2
Setting Originals
In this manual an original can mean a
single or multiple page document.
You can set your originals either in
the Document Feeder (ARDF) or on
the exposure glass. Some types of
originals are unsuitable for the Docu-
ment Feeder (ARDF) so they must be
set on the exposure glass.
Which way you place your original
depends on its size and whether you
are using the Document Feeder (AR-
DF) or the exposure glass.
Limitation
❒If you set 51/2"×81/2" /A5 size doc-
uments on the exposure glass, they
will not be detected. 51/2"×81/2" /
A5 size documents with the ARDF
results in sent as 81/2"×11" /A4
size.
Note
❒When sending a fax, the image
output at the other end depends on
the size and direction of paper
used in the receiver's terminal. If
the receiver does not use paper of
the same size and direction as that
of the original, the fax image may
be output reduced, trimmed at the
both edges, or divided into two or
more sheets. When sending an im-
portant original, we recommend
that you ask the receiver about the
size and direction of the paper
used in their terminal.
❒When sending an original of an ir-
regular (i.e. non-standard) size or
part of a large original, you can
specify the scan area precisely.
❒You can scan non-standard sized
documents as standard sized doc-
uments with the Irregular Scan
Area feature. When you turn on
this feature, the area scanned will
be in the specified range regardless
of the actual document size. A
blank margin will appear or the
image will be truncated at the re-
ceiving end.
❒Make sure that all ink, correcting
fluid etc., has completely dried be-
fore setting your original. If it is
still wet, the exposure glass will be
marked and those marks will ap-
pear on the received image.
❒If you set an 81/2"×11" /A4 size
original in the portrait direction,
the machine rotates the image by
90 degrees before sending it. See
Chapter1, “Transmission with Im-
age Rotation”in the Advanced
Features manual.
Reference
For how to set 2-sided documents,
see Chapter3, “Book Fax”in the
Advanced Features manual.

Setting Originals
13
2
-
--
-How to set A4, B4, A3, Lt, LG
and DLT size originals
-
--
-How to set A4, A5 and B5 size
originals
Limitation
❒51/2"×81/2" /A5 size on the expo-
sure glass is not detected. Set 51/2"
×81/2" /A5 size documents in the
ARDF.
Setting a Single Original on
the Exposure Glass
Set originals that cannot be placed in
the Document Feeder (ARDF), such
as a book, on the exposure glass one
page at a time.
ALift the Document Feeder (ARDF)
by at least 30 degrees. Place the
original face down and align its
upper left corner with the refer-
ence mark at the upper left corner
of the exposure glass.
1. Reference mark
2. Scale
Note
❒If you do not raise the Docu-
ment Feeder (ARDF) by at least
30 degrees, the original size will
not be detected.
BClose the Document Feeder (AR-
DF).
Note
❒When sending a bound original,
the received image may contain
some black areas. To reduce this
effect, hold down the original to
prevent its bound part from ris-
ing.
Where original is set
Exposure glass Document Feeder(ADF)
Original
ND0X01E2
ND0X01E2.eps
Where original is set
Exposure glass Document Feeder(ADF)
Original
ND0X01E1
ND0X01E1.eps
Zaah220e.eps

Faxing
14
2
-
--
-Bound Original Page Order
When sending bound originals
(books, magazines, etc.), you can
choose to have either the left page or
right page sent first.
Note
❒The default setting is Send Left
Page first.
Setting Originals in the
Document Feeder (ARDF)
Use the Document Feeder (ARDF) to
scan in a stack of originals in one op-
eration. The Document Feeder (AR-
DF) can handle both single-sided and
double-sided originals.
Limitation
❒The maximum document length is
17" (432mm).
❒Place all the originals to be sent in
a single stack.
❒You cannot set originals in the
Document Feeder (ARDF) one
page at a time or in sheaves.
❒Do not open the Document Feeder
(ARDF) while it is scanning the
originals or your document could
be jammed.
Note
❒If an original jams, press the {Clear/
Stop}key then remove the original
carefully.
❒If your original is bent or folded,
flatten it before you set it.
❒Set thin originals on the exposure
glass.
Reference
For information about the sizes
and number of originals that can
be placed in the Document Feeder
(ARDF), see Chapter9, “Accepta-
ble types of Originals”in the Ad-
vanced Features manual.
AAdjust the document guide to
match the size of your originals.
Align the edges of your originals
and stack them in the Document
Feeder (ARDF) face up.
1. Limit mark
2. Document guide
ND1D0100E.EPS

Setting Originals
15
2
-
--
-Scanning in Mixed Sized
Originals
If you wish to scan in stacks of origi-
nals containing mixed paper sizes
from Document Feeder (ARDF), you
can have the machine automatically
detect the size of each originals.
Note
❒By default this feature is turned off.
To turn it on, adjust the User Param-
eters. See Chapter6, “Changing the
User Parameters (Switch05, Bit6)”
in the Advanced Features manual.
❒Scanning may take slightly longer
when this function is turned on.
❒Small originals may be sent at a
slight slant if they are not stacked
flush against the Document Feeder
(ARDF) document guides.
❒If you try and set a stack of mixed
size originals in the Document
Feeder (ARDF) with this function
turned off, a paper jam may occur.
Originals unsuitable for the Document Feeder (ARDF)
Do not set the following types of originals in the Document Feeder (ARDF) be-
cause they may be damaged. Place them on the exposure glass instead.
•Originals of sizes other than those specified in the previous table
•Originals containing staples or clips
•Perforated or torn originals
•Curled, folded, or creased originals
•Pasted originals
•Originals with any kind of coating, such as thermosensitive paper, art paper,
aluminum foil, carbon paper, or conductive paper
•Originals with index tabs, tags, or other projecting parts
•Sticky originals, such as translucent paper
•Thin and soft originals
•Originals of inappropriate weight (see table above)
•Originals in bound form, such as books
•Transparent originals, such as OHP transparencies or translucent paper
Table of contents
Other Savin Printer Accessories manuals