1. Primary button: Turn on/off
2. Microphone
3. Docking station/power bank
4. Charging micro USB socket
5. LEDs indicating power bank operation mode
6. LEDs on the earphones
2. Earphones charging
2.1. Charging of earphones and power bank from
an external power source
2.1.1. Connect the micro USB cable into
the charging socket in the power bank
(the blue LEDs in the power bank will
blink blue it is mean the power bank is
charging)
2.1.2. Put earphones to the docking station.
In case when earphones are
depleted, the diodes will be backlit in
red colour and charging will begin.
2.1.3. If the power bank will charge fully,
then the red diodes backlit will be
constant in blue colour.
2.1.4. In case of fully charged earphones,
red backlit will go off. Earphones are
ready to use.
2.2. Charging headphones using the built-in
power bank
2.2.1. Put earphones to the docking station
in the power bank
2.2.2. Earphones will start to charge
automatically, diode placed on the
power bank will start to blink in blue
colour and earphones diode will be
backlit in the red colour signalizing
charging process.
2.2.3. In case when the earphones are fully
charged, red backlit will go off
2.2.4. Earphones are ready to use
3. Earphones paring
3.1. Hold the primary button placed on each on
the earphones. You will hear „Power on”
3.2. Next, you will hear the communicates about
channels („Left channel, Right channel”)
after hearing communicates, place these
headphones in your ears.
3.3. Communicate „Pairing” informs you
that the headphones have connected
properly with each other. Earphones are
ready to be connected with a transmitting
device (for example smartphone)
3.4. Turn on the Bluetooth mode in the
transmitting device (e.g. smartphone),
then turn on the devices search and chose
SAVIO TWS-05 earphones from the list. If
the earphones have already been paired
with a given device, they will connect
automatically.
3.5. After connecting with a device LED
diodes on the earphones will stop to blink,
you will hear comunnicate "Connected".
Earphones are ready to use.
EN The user manual is available at:
PL Instrukcja obsługi dostępna jest na stronie:
DE Die Bedienungsanleitung finden Sie unter:
UA Посібник користувача доступний на веб-сайті:
RO Manualul de utilizare este disponibil pe:
HU A felhasználói kézikönyv elérhető a:
GR Το εγχειρίδιο χρήσης είναι διαθέσιμο στη διεύθυνση:
ET Kasutusjuhend on saadaval veebisaidil:
CS Uživatelská příručka je k dispozici na:
SK Používateľská príručka je k dispozícii na adrese:
RU Руководство пользователя доступно на сайте:
LT Vartotojo vadovą galima rasti:
SE Användarmanualen finns på:
HR Uputa za upotrebu je dostupna na:
LV Lietotāja rokasgrāmata ir pieejama:
BG Ръководството за употреба е достъпно на:
www.savio.net.pl
Battery charging level
0-25% The blue LEDs blink
once every few seconds
25-50% The blue LEDs blink
twice every few seconds
50-75% The blue LEDs blink
three times every few seconds
75-99% The blue LEDs blink
four times every few seconds
Full charge-100% The blue LEDs light constant
LED signalling
on the power bank
45
4. Primary button description
Clicking and holding the primary button for a
longer time will cause earphones to turn on/turn
off
4.1. During a track playback:
- Single-click: playback pause/play
- Double-quick click: select the next song
- Triple-quick click: a selection of the last
selected song
4.2. During an incoming call:
- Single-click: picking up an incoming call
- Click and hold: rejecting an incoming call
5. Power bank operation diagram
Power bank operation diagram is presented
on the table below:
6. Package content
- Wireless Bluetooth earphones SAVIO TWS-05
- Docking station/power bank
- Charging cable
- 2 pair of silicone pads
- 2 pair of foam pads for better comfort and fit
and soundproof from the outside
7. Technical specification
- Bluetooth version: 5.0
- Range: up to 10 meters
- Total earphones work time: up to 17,5 h
(including power bank)
- Earphones work time on a single charging
cycle: up to 2,5 h
- Charging time: up to 40 minutes
- Standby time: up to 120 h
- Impedance: 32 Ω
- Frequency Response: 42 dB
- Sensitivity: 20 Hz -20kHz
- Built-in microphone: Yes
- Weight of earphones: 7,2g
8. Important information:
- The headphones will switch on automatically
after removing them from the power bank -they
are ready to connect with a transmitting device
(e.g. smartphone)
- Alternately blinking red and blue LED placed
on one of the earphones, informs that the
headphones are ready to be paired with the
transmitting device ( e.g. smartphone)
- In case when LED will not be backlit, it means
that the power bank is depleted and it needs to
be charged
- After 5 minutes of idle, the earphones will
automatically be turned off
- To charge the power bank, it is recommended to
use a 1A charger, or you can charge it using a
USB port on your computer.
- Charging the power bank does not require
placing headphones in it.
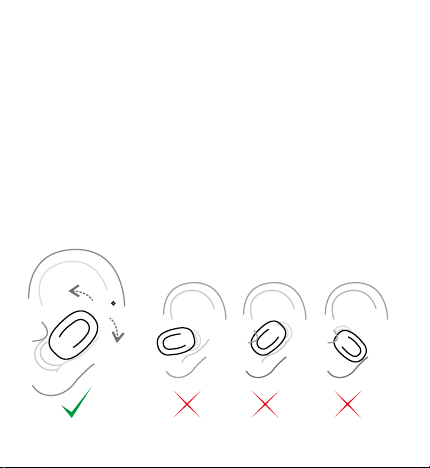
9. Proper earphones placement:
Gwarancja:
Gwarancja obejmuje okres 24 miesięcy. Dokony-
wanie samodzielnych napraw i modyfikacji
urządzenia, skutkuje natychmiastową utratą
gwarancji. Karta gwarancyjna dostępna jest
również do pobrania na stronie: www.savio.-
net.pl/serwis
Warranty:
The warranty covers a period of 24 months
Independent repairs and modifications result
in automatic loss of the varranty. Warranty card is
also available for download on our website:
www.savio.net.pl/en/service
Informacja o utylizacji urządzeń elektrycznych i
elektronicznych
Information of the utilization of electrical and
electronic equipment
Ten symbol oznacza, że zgodnie z dyrektywą Unii
Europejskiej 2012/19/UE, urządzeń elektrycznych i
elektronicznych nie należy wyrzucać razem z innymi
odpadami domowymi. Urządzenia należy przekazać
do lokalnego punktu zbierania tego typu odpadów
lub do centrum odzysku surowców wtórnych . W
celu uzyskania informacji o dostępnych na Państwa
terenie metodach utylizacji, należy skontaktować
się z władzami lokalnymi. Nieprawidłowa utylizacja
odpadów jest zagrożona karami przewidzianymi
prawem obowiązującym na danym terenie.
Prawidłowa utylizacja urządzeń pomoże uniknąć
negatywnych skutków grożących środowisku
i ludzkiemu zdrowiu w przypadku utylizacji
niewłaściwej.
This symbol means that in according with
European Union directive 2012/12EU, electrical
and electronic equipment should not be disposed
of with other household waste. The equipment
should be sent to a local collection point for this
type of waste or to a recycling center. Please
contact your local authority for information on
available disposal methods. Importer disposal of
waste is threatened by the penalties provided for
by law in force in the given area. Proper disposal
of equipment will help to avoid the negative
effects that threaten the environment and human
health, in the event of improper utilization.
Producent:
Ul. Morgowa 81
35-323 Rzeszów
Elmak Sp. zo.o.
www.elmak.pl
www.savio.net.pl
Elmak Sp. z o. o. niniejszym oświadcza,
że typ urządzenia radiowego TWS-05
jest zgodny z dyrektywą 2014/53/UE
z dnia 16 kwietnia 2014 r.
Pełny tekst deklaracji zgodności UE
jest dostępny pod następującym adresem internetowym:
www.savio.net.pl/do-pobrania