Warning
Please read these instructions carefully before commencing any work.
This unit must be fitted by a competent and qualified electrician.
Install in accordance with the IEE Wiring regulations and current Building Regulations.
Check the pack and make sure you have all the parts listed.
To prevent electrocution switch off at the mains supply before installing or maintaining this fitting. Ensure other persons cannot
restore the electrical supply without your knowledge.
This product is designed and constructed according to the principles of the appropriate British Standard. Using this fitting in
an environment where there are prolonged periods of use or higher than normal ambient temperatures may result in a
shortened working life.
If replacing an existing fitting, make a careful note of the connections.
Never put anything on the product or hang anything on any part of this product.
Never use the terminal cables to bear the product weight.
Waste electrical products should not be disposed of with household waste. Please recycle where facilities exist. Check with
your local authority or retailer for recycling advice.
Thank you for purchasing this light fitting. Please read the instructions carefully before use to ensure safe and satisfactory
operation of this product. Please retain these instructions for future reference.
This light fitting is Class 1 product, must be connected to Earth.
Installation
Existing fittings must be completely removed before installation of a new product. Before removing the existing fitting, carefully
note the position of each set of wires.
Note that the switch is turned off before installation.
The ceiling surface must be flat and smooth to ensure a good fit.
Ensure the ceiling is capable of holding the weight of the track and products. Take care to avoid damaging any concealed wiring
and pipes. The correct fixings should be used for brick, cavity walls or plasterboard.
The chosen location of your fitting should allow for the product to be securely mounted and anchored to a solid surface e.g.
concrete, brick or a joist—do not fix directly onto paneling, plasterboard etc.
Do not attach to surfaces which are damp, freshly painted or otherwise electrically conductive (e.g. metallic surfaces).
Choose suspension or bracket installation
Layout
Plan the desired layout of these fittings carefully, ensuring the cables will reach the distances between each light fitting.
Avoid locating any cables in positions that would cause a hazard. Position cables and junction boxes (not supplied)
away from areas where they may be at risk from being cut, trapped or damaged.
This unit is suitable for indoor use only.
This product is designed for permanent connection to fixed wiring. this must be a suitable circuit
(protected with the appropriate MCB or fuse).
The mains supply cable must have a minimum cross section area of 1.0mm2
Cables must be protected using suitable conduit or plastic trunking.
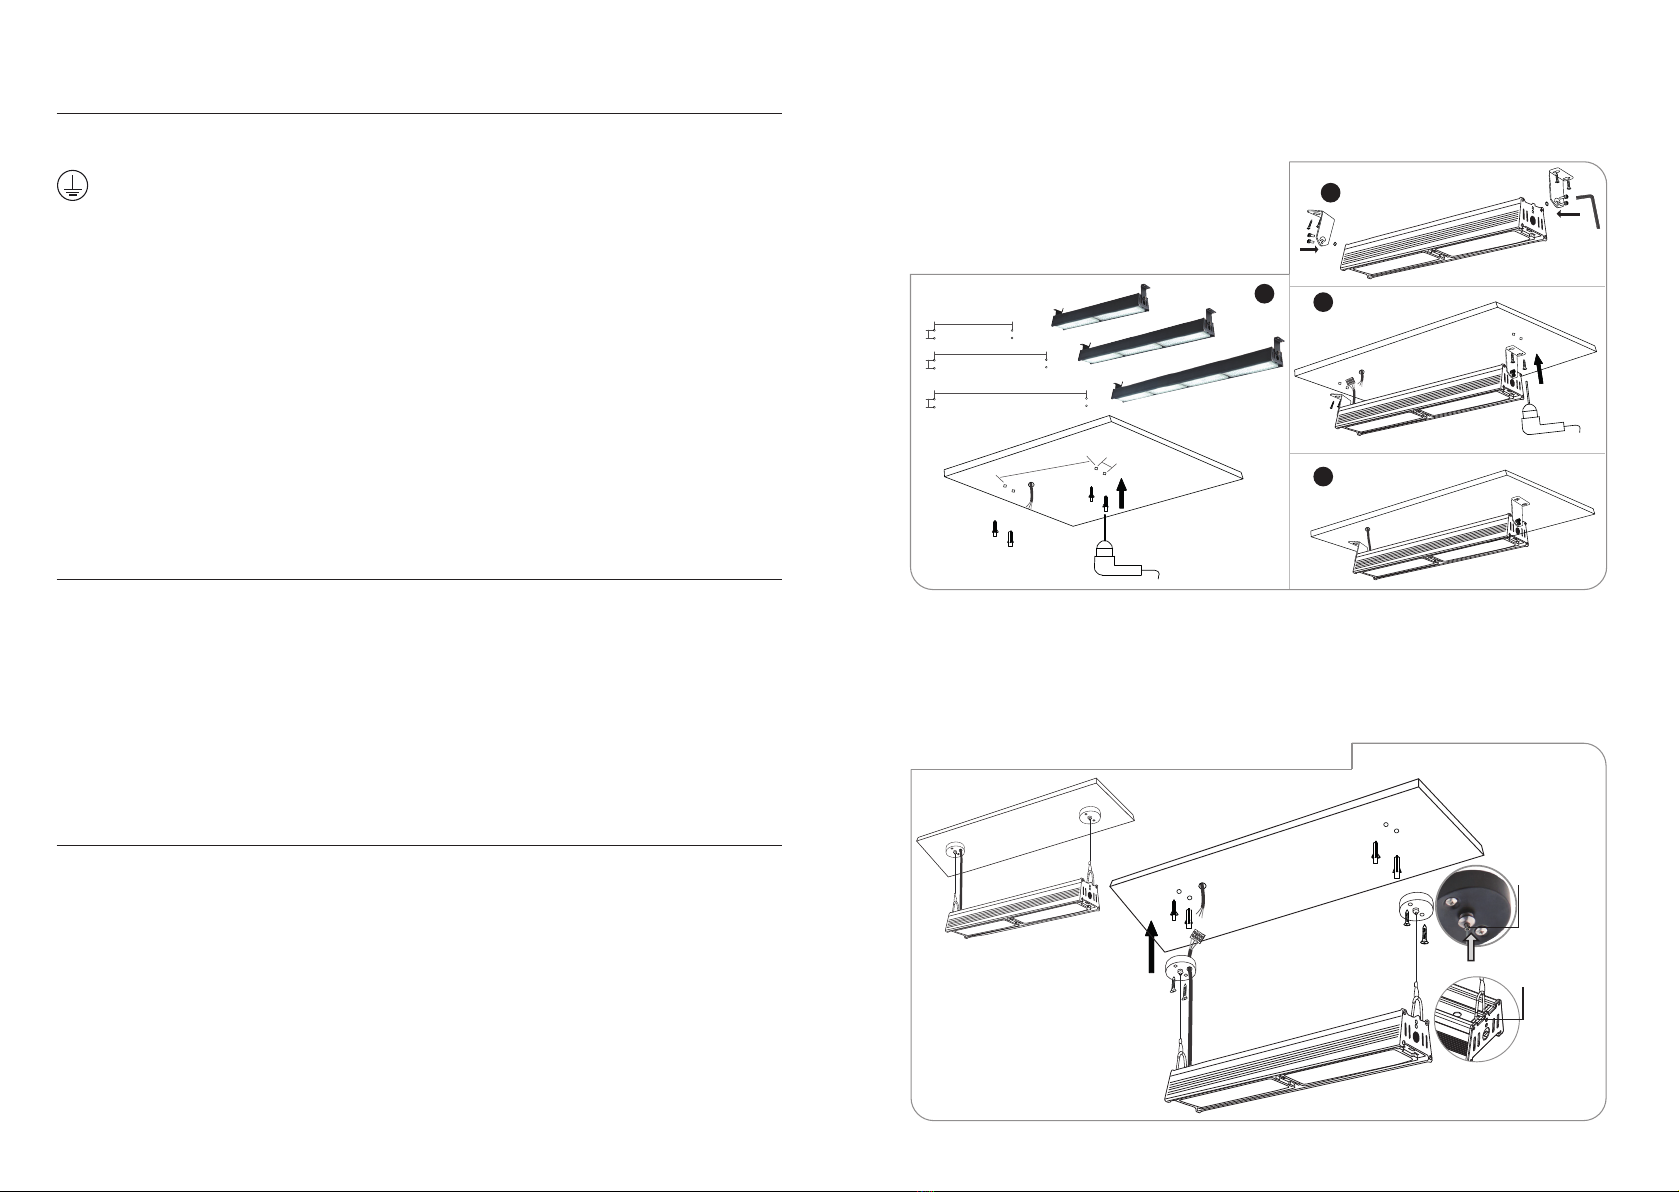
Suspension Kit Installation
• Use upper cover as a template, mark and drill the fixing holes on the ceiling to determine the positon of your light fitting.
• Hook carabiner into the holes on the end of the light fitting. Press the button per direction of arrow to release or adjust the
suspension cable length to determine the light fitting height.(suspension cable Max. L=1m). Ensure the light fitting hanging level.
• Pull the wire through the hole and connect to the connection block (not supplied) refering to the wiring diagram.
• Fixing the light fitting in place on the ceiling with the screws. Ensure light fitting is fixed securely.
• Replace fuse or circuit breaker and switch on. Your light is now ready for use.
Surface Mount Installation
• Deciding the correct distance, mark and drill the fixing holes on the ceiling.
• Fixing the two brackets with allen key to the end of the light fitting. Ensure the bracket fixed securely.
• Fixing the product in place on the ceiling with the screws.
Ensure that the product is fixed securely.
• Pull the wire through the hole and connect to the connection block
(not supplied) refering to the wiring diagram.
• Replace fuse or circuit breaker and switch on. Your light is now
ready for use.
L
40
1
2
3
4
L=598
40
L=873
40
L=1148
40
unit: mm
100W
150W
200W
92311
92515
92516
See diagram
wiring
not supplied
See diagram
wiring
not supplied
Press the button per
direction of arrow
to release or to adjust
the suspension cable
length, Max. L=1m
Hook carabiner into
the holes on the end
of the product


