Saxon 1026AZ3 SC User manual

1026AZ3 SC
Refractor Telescope
Instruction Manual
SKU# 214224

SAXON 1026AZ3 SC REFRACTOR TELESCOPE INSTRUCTION MANUAL 2 | P a g e
CAUTION!
Never use your telescope to look directly at the sun. Permanent eye damage will
result. Use a proper solar filter for viewing the sun. When observing the sun, place a
dust cap over your finderscope to protect it from exposure. Never use an eyepiece-
type solar filter and never use your telescope to project sunlight onto another
surface, the internal heat build-up will damage the telescope optical elements.
Eyepiece
Pan Handle/
Altitude Adjustment
Optical Tube
Attachment Knob
Objective Lens
Finderscope
Azimuth Knob/
Adjustment
Accessory Tray
Tripod Leg
Erect Prism
Diagonal
Slow Motion Controls
Telescope
Optical Tube
Focuser Knob
Saxon 1026AZ3 SC
Refractor Telescope Features

SAXON 1026AZ3 SC REFRACTOR TELESCOPE INSTRUCTION MANUAL 3 | P a g e
Setting up your telescope
Remove the tripod, telescope and accessories from the box.
1. Set the tripod upright and pull the tripod legs outward until each leg is fully extended.
2. Attach the accessory tray to the tripod.
3. You can adjust tripod height by releasing tripod leg lock thumbscrew and lock the
thumbscrew at your desired height.
4. Attach the slow motion controls to the mount.
5. Attach the telescope to the mount using the optical tube attachment knob.
6. Attach the erect prism diagonal to the focuser drawtube.
7. Attach the eyepiece to the erect prism diagonal.
8. Attach the finderscope to the telescope.
Adjusting your telescope
1. You may adjust the telescope upwards or downwards with the pan handle at the rear of
the mount to make coarse adjustment.
2. You may adjust the telescope left or right by the azimuth adjustment. Loose the
azimuth adjustment anti-clockwise, lock the azimuth adjustment at the desired position
by turning clockwise.
3. You may also use the slow-motion controls to fine adjust your telescope.
Finderscope alignment
When a finderscope is correctly aligned with the telescope,
objects can be quickly located and brought to the centre of
the field. Alignment is best done outdoors in day light when it
is easier to locate objects. If it is necessary to refocus your
finderscope, sight on an object that is at least 500 meters
away.
1. Choose a distant object that is at least 500 meters away and point the main telescope at
the object. Adjust the telescope so that the object is in the centre of the view in your
eyepiece.
2. Check the finderscope to see if the centered object in the main telescope view is
centered on the finderscope.
3. Use the two alignment screws to overlap the red-dot to the object.
Condenser
Operating your telescope #1
Alignment Screw
Power Switch

SAXON 1026AZ3 SC REFRACTOR TELESCOPE INSTRUCTION MANUAL 4 | P a g e
Using the Barlow Lens
A Barlow is negative lens which increases the magnifying power of
an eyepiece, while reducing the field of view. It expands the cone of
the focused light before it reaches the focal point, so that the
telescope’s focal length appears longer to the eyepiece.
The Barlow is usually inserted between the diagonal and the
eyepiece. With some telescopes, it can also be inserted between
the focuser and the diagonal, and with this position it gives even
greater magnification. For example, a Barlow which is 2x when
inserted after the diagonal can become 3x when placed in front of
the diagonal.
In addition to increasing magnification, the benefits of using a Barlow lens include improved eye
relief, and reduced spherical aberration in the eyepiece. For this reason, a barlow plus a lens
often outperform a single lens producing the same magnification. However, its greatest value
may be that a barlow can potentially double the number of eyepiece in your collection.
Focusing your telescope
Slowly turn the focus knobs under the focuser, one way or the
other, until the image in the eyepiece is sharp. The image
usually has to be finely refocused over time, due to small
variations caused by temperature changes, flexures, etc. This
often happens with short focal ratio telescopes, particularly
when they haven’t yet reached outside temperature. Refocusing
is almost always necessary when you change an eyepiece or
add or remove a Barlow lens.
Operating your telescope #2

SAXON 1026AZ3 SC REFRACTOR TELESCOPE INSTRUCTION MANUAL 5 | P a g e
Calculating the magnification (power)
The magnification produced by a telescope is determined by the focal length of the eyepiece that is used with
it. To determine a magnification for your telescope, divide its focal length by the focal length of the eyepieces
you are going to use. For example, a 10mm focal length eyepiece will give 66X magnification with a 660mm
focal length telescope.
Magnification = = = 66x
When you are looking at astronomical objects, you are looking through a column of air that reaches to the
edge of space and that column seldom stays still. Similarly, when viewing over land you are often looking
through heat waves radiating from the ground, house, buildings, etc. Your telescope may be able to give very
high magnification but what you end up magnifying is all the turbulence between the telescope and the subject.
A good rule of thumb is that the usable magnification of a telescope is about 2X per mm of aperture under
good conditions.
Calculating the field of view
The size of the view that you see through your telescope is called the true (or actual) field of view and it is
determined by the design of the eyepiece. Every eyepiece has a value, called the apparent field of view, which
is supplied by the manufacturer. Field of view is usually measured in degrees and/or arc-minutes (there are 60
arc-minutes in a degree). The true field of view produced by your telescope is calculated by dividing the
eyepiece's apparent field of view by the magnification that you previously calculated for the combination.
Using the figures in the previous magnification example, if your 10mm eyepiece has an apparent field of view
of 52 degrees, then the true field of view is 0.79 degrees or 47 arc-minutes.
True Field of View =
To put this in perspective, the moon is about 0.5° or 30 arc-minutes in diameter, so this combination would be
fine for viewing the whole moon with a little room to spare. Remember, too much magnification and too small
a field of view can make it very hard to find things. It is usually best to start at a lower magnification with its
wider field and then increase the magnification when you have found what you are looking for. First find the
moon then look at the shadows in the craters!
Calculating the exit pupil
The Exit Pupil is the diameter (in mm) of the narrowest point of the cone of light leaving your telescope.
Knowing this value for a telescope-eyepiece combination tells you whether your eye is receiving all of the light
that your primary lens or mirror is providing. The average person has a fully dilated pupil diameter of about
7mm. This value varies a bit from person to person, is less until your eyes become fully dark adapted and
decreases as you get older. To determine an exit pupil, you divide the diameter of the primary of your
telescope (in mm) by the magnification.
Exit Pupil =
For example, a 200mm f/5 telescope with a 40mm eyepiece produces a magnification of 25x and an exit pupil
of 8mm. This combination can probably be used by a young person but would not be of much value to a
senior citizen. The same telescope used with a 32mm eyepiece gives a magnification of about 31x and an exit
pupil of 6.4mm which should be fine for most dark adapted eyes. In contrast, a 200mm f/10 telescope with the
40mm eyepiece gives a magnification of 50x and an exit pupil of 4mm, which is fine for everyone.
Focal length of the telescope
Focal length of the eyepiece
660mm
10mm
________________________
_______
Apparent Field of View
Magnification
____________________
Diameter of Primary mirror in mm
Magnification
_____________________________
Understand your telescope more

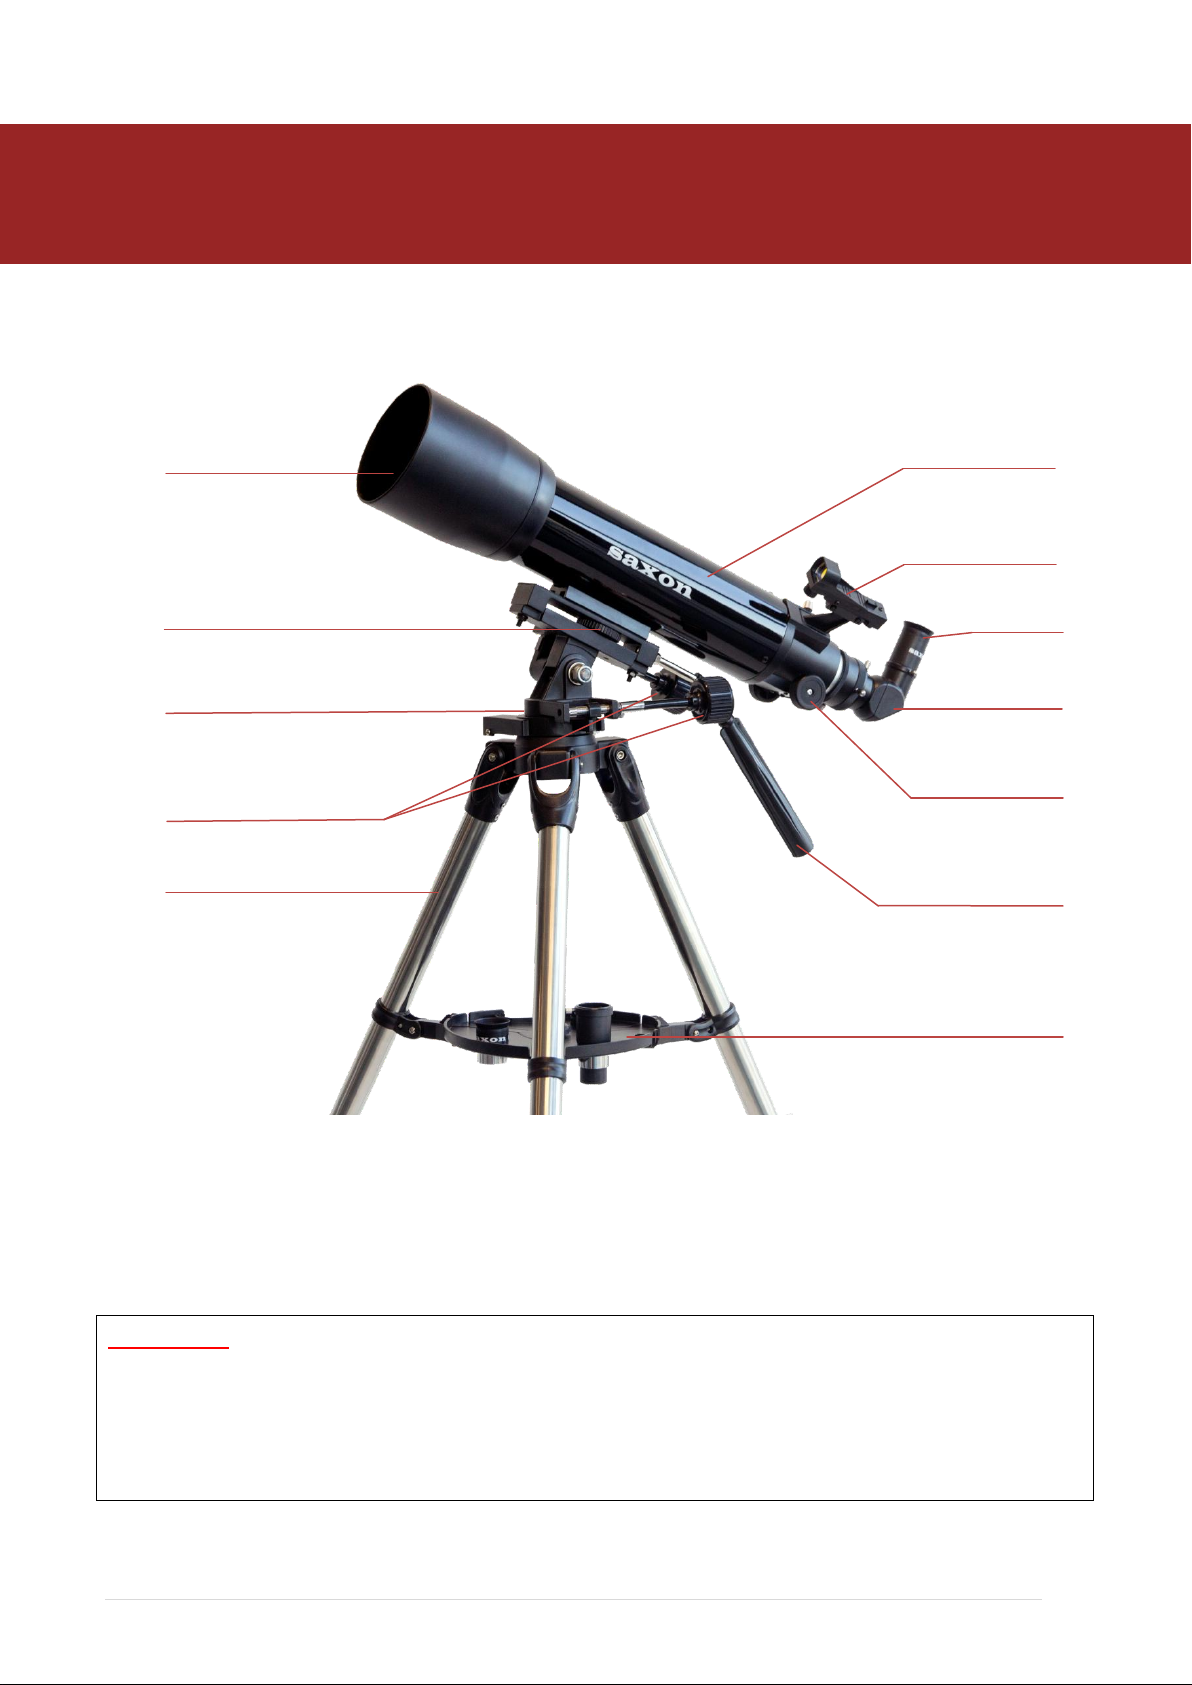
SAXON 1026AZ3 SC REFRACTOR TELESCOPE INSTRUCTION MANUAL 6 | P a g e
1. Sky conditions
Sky conditions are usually defined by two atmospheric characteristics, seeing, or the steadiness of the
air, and transparency, light scattering due to the amount of water vapour and particulate material in the
air. When you observe the Moon and the planets, and they appear as though water is running over
them, you probably have bad "seeing" because you are observing through turbulent air. In conditions of
good "seeing", the stars appear steady, without twinkling, when you look at them with unassisted eyes
(without a telescope). Ideal "transparency" is when the sky is inky black and the air is unpolluted.
2. Selecting an observing site
Travel to the best site that is reasonably accessible. It should be away from city lights, and upwind from
any source of air pollution. Always choose as high an elevation as possible; this will get you above
some of the lights and pollution and will ensure that you aren't in any ground fog. Sometimes low fog
banks help to block light pollution if you get above them. Try to have a dark, unobstructed view of the
horizon, especially the southern horizon if you are in the Northern Hemisphere and vice versa. However,
remember that the darkest sky is usually at the "Zenith", directly above your head. It is the shortest path
through the atmosphere. Do not try to observe any object when the light path passes near any
protrusion on the ground. Even extremely light winds can cause major air turbulence as they flow over
the top of a building or wall. If you try to observe on any structure, or even a sidewalk, movements you
make may cause the telescope to vibrate. Pavement and concrete can also radiate stored heat which
will affect observing.
Observing through a window is not recommended because the window glass will distort images
considerably. And an open window can be even worse, because warmer indoor air will escape out the
window, causing turbulence which also affects images. Astronomy is an outdoor activity.
3. Choosing the best time to observe
The best conditions will have still air, and obviously, a clear view of the sky. It is not necessary that the
sky be cloud-free. Often broken cloud conditions provide excellent seeing. Do not view immediately
after sunset. After the sun goes down, the Earth is still cooling, causing air turbulence. As the night
goes on, not only will seeing improve, but air pollution and ground lights will often diminish. Some of the
best observing time is often in the early morning hours. Objects are best observed as they cross the
meridian, which is an imaginary line that runs through the Zenith, due North-South. This is the point at
which objects reach their highest points in the sky. Observing at this time reduces bad atmospheric
effects. When observing near the horizon, you look through lots of atmosphere, complete with
turbulence, dust particles and increased light pollution.
4. Cooling the telescope
Telescopes require at least 10 to 30 minutes cooling down to outside air temperature. However this
may take longer if there is a big difference between the temperature of the telescope and the outside air.
This minimizes heat wave distortion inside telescope tube (tube currents). Allow a longer cooling time
for larger optics. If you are using an equatorial mount, use this time for polar alignment.
5. Using your eyes
Do not expose your eye to anything except red light for 30 minutes prior to observing. This allows your
pupils to expand to their maximum diameter and biochemical light adaptation to occur. It is important to
observe with both eyes open. This avoids fatigue at the eyepiece, allows you to check against reference
material, and is a good habit to develop if you sketch at the eyepiece. If you find this too distracting,
cover the unused eye with your hand or an eye patch. Use averted vision on faint objects: The center of
your eye is the least sensitive to low light levels. When viewing a faint object, don't look directly at it.
Instead, look slightly to the side, and the object will appear brighter.
Observing the Sky

SAXON 1026AZ3 SC REFRACTOR TELESCOPE INSTRUCTION MANUAL 7 | P a g e
Victoria
New South Wales & ACT
Mornington Peninsula Astronomical Society
Astronomical Society of NSW
Astronomical Society of Victoria
Sydney Northwest Astronomy Group
Astronomical Society of Melbourne
Western Sydney Amateur Astronomical
Ballarat Astronomical Society
Northern Sydney Astronomical Society
Bendigo District Astronomical Society
Sutherland Astronomical Society
Latrobe Valley Astronomical Society
Redlands Astronomical Society
The Astronomical Society of East Gippsland
Astronomical Society of Coonabarabran
Oasis Stargazers Club Mildura Inc
Macarthur Astronomical Society
Snake Valley Astronomical Society
Shoalhaven Astronomers
Astronomical Society of Geelong
Wollongong Amateur Astronomy Club
Port Macquarie Astronomical Association
South Australia
Central West Astronomical Society Inc
Astronomical Society of South Australia
Canberra Astronomical Society
Astronomical Society of Albury Wodonga
Tasmania
Centaurus Astronomical Society
Astronomical Society of Tasmania Inc.
Grafton Astronomical Society
Coffs Harbour Astronomical Society Inc
Queensland
Illawarra Astronomical Society
Southern Astronomical Society (QLD) Inc
Hawkesbury Astronomical Association
Astronomical Association of Queensland
Brisbane Astronomical Society
Northern Territory
South East Queensland Astronomical Society
Darwin Astronomy Group
Townsville Astronomy Group
Gove Amateur Astronomers
Mt. Isa Astronomy Group
Alice Springs Astronomical Society
Bundaberg Astronomical Society
Western Australia
Astronomical Society of WA
Australian Astronomical Society

SAXON 1026AZ3 SC REFRACTOR TELESCOPE INSTRUCTION MANUAL 8 | P a g e
Specifications
Optical Design
Achromatic Refractor
Aperture (mm)
102mm (4 inch)
Focal Length
660mm
Focal Ratio
F/6.5
Eyepiece #1
26mm (25x magnification)
Eyepiece #2
9mm (73x magnification)
Eyepiece #3
6.3mm (105x magnification)
Finderscope
Red-dot finderscope
Maximum Practical Magnification
204x
Warranty
5-Years limited warranty
What’s included in the box
1x Saxon D102mm x F660mm SC Refractor Telescope
1x Red-dot finderscope
1x 26mm Eyepiece
1x 9mm Eyepiece
1x 6.3mm Eyepiece
1x 90 Degree Erect Prism Diagonal
1x 2x Barlow Lens (attach before an eyepiece to achieve double magnification!)
1x Stainless Steel Tripod with Accessory Tray
2x Slow Motion Controls
1x User Manual
1x Star & Moon Chart
You can also obtain the e-Manual from our website at
www.saxon.com.au
Specification

SAXON 1026AZ3 SC REFRACTOR TELESCOPE INSTRUCTION MANUAL 9 | P a g e
Saxon 1.25” Colour Planetary Filter Set
The saxon 1.25" Colour Planetary Filter Set is a great addition for lunar and
planetary observing. They help increase image contrast and resolution on the Moon
and planets as well as reduce glare from the full or near-full Moon.
The set comes in four colours of Yellow (#12), Red (#23A), Neutral Density (#25) and
Blue (#80A).
Saxon Super Wide Angle Eyepieces (68 degree)
The saxon Super Wide Angle (SWA) eyepieces can be used on all types of telescopes
–refractor, reflector and catadioptrics. These eyepieces featuring an 8-elements design
and offer excellent light transmission, colour correction and long eye relief.
The 68° apparent field of view gives wide views, allowing you to see the entire object
clearly. The eyepiece's blackened lens edges provides for improved contrast and the
rubber grips maximise comfort and safety. The eyepiece also comes with a rubber eye
guard which helps eliminate stray light.
Available in:
3.5mm
5mm
8mm
13mm
17mm
21mm
189x
132x
83x
51x
39x
31x
SKU#512035
SKU#512005
SKU#512008
SKU#512013
SKU#512017
SKU#512021
Saxon 1.25” Plossl Eyepieces
The saxon Plossl eyepieces are a class on its own. With edge-to-edge blackened
optics, this Plossl eyepiece features a 4-element design that delivers clear, high
contrast images while minimising spherical aberration and distortion.
Featuring a 4-element design, this Plossl eyepiece ensures maximum light transition,
minimises spherical aberration, distortion, astigmatism and off-axis colour. The edge-to-
edge blackened optics provides excellent contrast across the 50° apparent field of view.
Available in:
6.3mm
10mm
12.5mm
15mm
20mm
25mm
30mm
40mm
105x
66x
53x
44x
33x
26x
22x
17x
#510163
#510110
#510012
#510015
#510020
#510125
#510030
#510040
Saxon Weather Station WSD006
The saxon Weather Station WSD006 is a classy weather station that's easy
to use and setup.
With thermo-hygrometer sensors for indoor and outdoor temperatures, the
WSD006 is feature-packed:
Hour, minute and second 12 or 24 hour display
Time, day, date, month display
Alarm with snooze
Temperature in selectable Cº or Fº
Indoor humidity display
The saxon Weather Station WSD006 is powered by 2 x AAA batteries.
We recommend the following accessories for your telescope
SKU# 643905
SKU# 710100

SAXON 1026AZ3 SC REFRACTOR TELESCOPE INSTRUCTION MANUAL 10 | P a g e
Saxon 1.25” Variable-Projection Camera Adapter
The saxon 1.25” Variable-Projection Camera Adapter allows you to take
photography with your DSLR camera (a t-mount must be applied to your brand
of DSLR camera).
This adapter can be used for either prime focus (without eyepiece) or with an
eyepiece. Prime focus can also be achieved with the threaded-in separable
unit.
Saxon T-mount for various camera brands
The T-mount is a standard lens mount for cameras. Different camera brands
have different thread on its camera body.
Kindly contact us if you are unsure of which T-mount to be purchased.
Available in:
Canon
Nikon
Minolta/Sony
Pentax
#640001
#640002
#640003
#640004
Saxon 1.25” Universal Digital Camera Bracket Adapter
The saxon 1.25” Variable-Projection Camera Adapter is an exceptional
convenient instrument to couple almost any brands of compact digital
cameras.
This adapter can be attach to spotting scope, telescopes and monocular for
photographic use in no need of additional setup attachments.
Saxon 1.25” Colour Filters
The saxon 1.25” colour filters allow you to see and photograph fine details of
the object by applying the right colour filters.
Available in:
No.8
No.12
No.21
No.23A
No.25A
No.56
No.58
No.80A
No.82A
ND96
Light
Yellow
Yellow
Orange
Light
Red
Red
Light
Green
Green
Blue
Light
Blue
Grey
#643208
#643212
#643221
#643223
#643225
#643256
#643258
#643280
#643282
#643003
SKU# 644001
SKU# 644010
Taking photo? We got you covered!

SAXON 1026AZ3 SC REFRACTOR TELESCOPE INSTRUCTION MANUAL 11 | P a g e
Date
Time
Location
Object
Remarks
My Astronomy Journey note

SAXON 1026AZ3 SC REFRACTOR TELESCOPE INSTRUCTION MANUAL 12 | P a g e
This manual suits for next models
1
Table of contents
Other Saxon Telescope manuals

Saxon
Saxon 607AZ2 User manual

Saxon
Saxon 1201EQ5 User manual

Saxon
Saxon 1149EQ2 User manual

Saxon
Saxon Mini Dob User manual

Saxon
Saxon 909EQ2 User manual

Saxon
Saxon Traveller Scope User manual

Saxon
Saxon 1309EQ2 User manual

Saxon
Saxon 2001EQ5 User manual

Saxon
Saxon 606R User manual

Saxon
Saxon 90125 EQ User manual
Popular Telescope manuals by other brands

ORION TELESCOPES & BINOCULARS
ORION TELESCOPES & BINOCULARS Observer 60mm EQ instruction manual

Meade
Meade 4504 instruction manual

ORION TELESCOPES & BINOCULARS
ORION TELESCOPES & BINOCULARS StarMax 127mm EQ 9826 instruction manual

Celestron
Celestron NexStar SE Quick setup guide

McVoice
McVoice Wildlife Reference manual

Bushnell
Bushnell Model 78-9570 manual