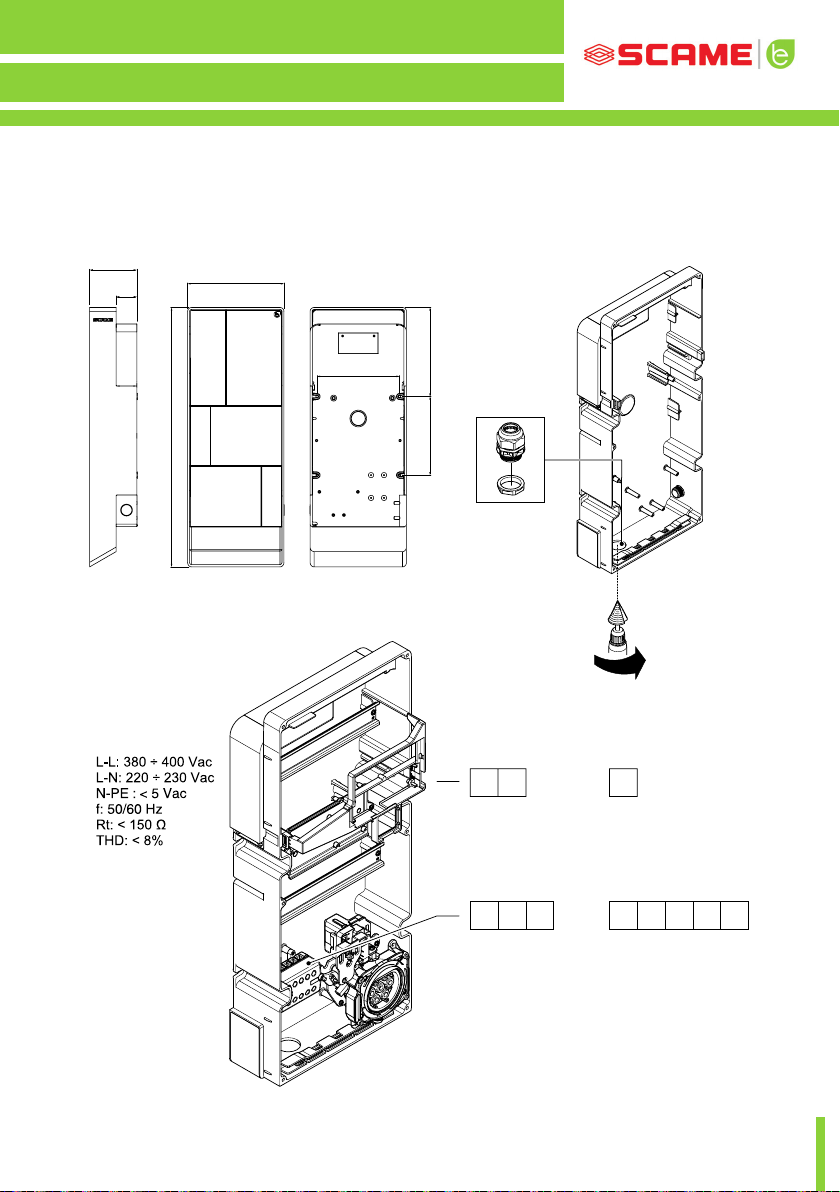
Scame BE-T Series User manual

USER
MANUAL
BE-T SERIES

2
BE-T USER MANUAL
CONTENTS
GENERAL INFORMATION AND WARRANTY 3
ASSEMBLY INSTRUCTIONS 4
CABLING INSTRUCTIONS 8
ADDITIONAL INFORMATION 9
PRODUCT DESCRIPTION 10
FREE MODE 13
PERSONAL MODE 15
NET OPERATION 18
ERRORS 31
PROGRAMMER 33
POWER MANAGEMENT (OPTIONAL) 36
SCAME APP 42
CHAIN2 ACTIVATION 42
MAINTENANCE AND SUPPORT 44
ACTIVATION CODE 45
e-mobility@scame.com

3
GENERAL INFORMATION
Scame charging stations use the mode 3 charging technique (as per IEC/EN 61851-1 standard), which
involves connecting an electrical or hybrid vehicle to a power network in AC using specic connectors (as
per standards IEC/EN 62196-1 and 2).
• This manual contains warnings and instructions that must be followed for the installation, use and
maintenance of the charging station and which must be available for consultation by authorised
personnel.
• Station installation and start-up, together with maintenance operations, must be carried out
by qualied and specically authorised personnel in compliance with current safety standards,
regulations and legislation.
• The manufacturer of the station shall not be held liable for any damage to persons, animals and/or
property resulting from failure to comply with the instructions in this manual.
• Given that improvement is continuous, we reserve the right to make changes to the product and
this manual at any time.
• The total or partial reproduction of this manual without the prior consent of Scame Parre S.p.A. is
prohibited.
HAZARD: Risk of electrical shock, explosion or electric arcs
• Prior to performing any operations on the charging station, disconnect the power and use suitable
tools to check that the power is disconnected from all parts.
• Before starting up the station, check that the metal structure is earthed by way of the yellow-green
conductor and protect the power line using an automatic safety device and dierential switch
coordinated with the grounding system.
• Before connecting the vehicle to the station, make sure it is rmly secured.
• Power cables, sockets and plugs used to connect the vehicle must comply with safety requirements
laid down by current legislation.
• It is prohibited to use extension cords to connect the vehicle.
• Failure to comply with safety precautions may cause serious injury and even death.
CAUTION: Risk of damaging the station
• Donottouchtheprintedcircuit boardsand/orusesuitableinstrumentswhenaccessingcomponents/
parts subject to electrostatic discharges.
• If necessary due to the environmental conditions, install devices to protect against atmospheric
discharges in the upstream power distribution board (e.g. surge arrester type 2, Up = 1.5 kV, In = 20 kA).
• If the station is damaged it should not be installed or used.
• To clean, use a damp cloth or neutral detergent compatible with plastic.
WARRANTY
• The charging station referred to by this manual is covered by a two-year manufacturer’s warranty in
accordance with the Consumer Code (articles 128 and following), which includes reimbursement,
necessary repairs or replacement to rectify any manufacturing defects encountered during normal
use for a period of 24 months from the date of delivery of the product.
• Any modications to the station, or installations and start-ups not compliant with the instructions
reported in this manual shall result in the nullication of the warranty and the invalidation of the
product certicates.

4
BE-T USER MANUAL
TECHNICAL FEATURES
• Rated current: 32A
• Rated voltage: 230Vac-400Vac
• Rated frequency: 50-60 Hz
• Insulation voltage: 250V-500V
• Protection rating: IP54
• Installation temperature: -30°C +50°C
• Material: Thermoplastic/Aluminium
• Self-extinguishing behaviour: (GWT): 650°C
• Impact resistance (IK rating): IK09
• Installation: Wall-mounted
• Saline solution: Resistant
• UV light: Resistant
ASSEMBLY INSTRUCTIONS
WALL STATIONS
• Wall charging stations are supplied assembled (base and cover).
• Access the internal compartment by removing the shutter to secure the station.
Follow the instruction sheet to secure.
INSTALLATION IN AREAS NOT DIRECTLY EXPOSED TO THE SUN IS RECOMMENDED. USE
SUITABLE SUPPORTS.

5
ASSEMBLY INSTRUCTIONS
120
245
660
210
200 226.5
52.5
MAX PG 21
A+ A-
0,5 mm²
ES. BELDEN 9841
SERIAL LINE TCP/IP LINE
RJ45
CAT5
L1 L2 L3 NPE
2,5÷16 mm²
ORLNPEL
2,5÷16 mm²
POWER SUPPLY
ART. 205.Txxx
MONTAGGIO / MOUNTING / MONTAGE / MONTAJE
CABLAGGIO / WIRING / CÂBLAGE / CABLEADO

6
BE-T USER MANUAL
1
2
1
2
3

7

8
BE-T USER MANUAL
CABLING INSTRUCTIONS
SYSTEM REQUIREMENTS
• Check the following electrical values:
◊ Grounding system: TT, TN(S), TN(C),
◊ Phase to phase voltage (L-L): between 380 and 400Vac inclusive
◊ Phase to neutral voltage (L-N): between 220 and 230Vac inclusive
◊ Neutral to ground voltage (N-PE): less than 5Vac
◊ Frequency (f): 50 or 60Hz
◊ Ground resistance (Rt): less than 50Ω
◊ Total Harmonic Distortion (THD): less than 8%
• Other values may compromise charging.
POWER LINE
• The stations have spaces provided for cable entry: drill holes and install cable
glands as indicated on the instruction sheet (included).
• The stations have terminal blocks for cable connections: connect phase, neutral
and earth conductors as shown in the wiring diagram (included).
• Create the power line using conductors of suitable cross-section for the load
Power (kW) Voltage (V) Current (A) Wire gauge
(mm²) Max. length
(m)
7.4 230 32 3G6 40
22 400 32 5G6 80
Values determined considering cables of FG7OR type 0.6/1kV and voltage drop <4%
The designer of the electrical system is solely responsible the sizing of the power line.

9
ADDITIONAL INFORMATION
SCU: controller board
SW1: reboot button.
• Press briey to restart the station.
• Long press (>20S) will reset the board to the default conguration with controls
disabled.
Caution: the default conguration is to be used only in the event of an emergency
and may not work correctly on some versions, and the original conguration must
be restored as soon as possible.
CN8: maximum current output selector
• 0: 6A, 1: 10A, 2: 13A, 3: 16A, 4: 20A, 5: 25A, 6: 32A, 7: 40A, 8: 50A, 9: 63A
AB-REM: remote enable contact
• If closed, stops the charging under way or prevents a new charging session.
• If open, resumes charging in progress or permits new charging session.
SBC-LAN: local server with OCPP protocol (Optional):
• Device for remote management

10
BE-T USER MANUAL
PRODUCT DESCRIPTION
Depending on the version, the stations can be equipped with:
1. Display (multi-language). Only for versions w/o APP
2. RFID reader (Mifare Classic or Mifare Plus).
3. LED - RGB strip
4. Button: Only for versions w/o APP
• Change language (press when charging point is not in use).
• Consumption display (long press when charging point is not in use. Only with
energy meters).
• Charging interrupted (press during charging in free mode).
5. Sockets:
• Picoblade connector with cable (type 2).
• With plug block (e.g. type 2).
6. Protection
Depending on the version, the stations can have the following operat-
ing modes:
• FREE: user identication not necessary.
• PERSONAL: user identication necessary.
• NET: required user identication and remote management

11
1*
*for versions with no APP
2
6
5
4
3
*

12
BE-T USER MANUAL
DISPLAY VISUALISATION
01 IN CHARGE 16/32T
Pist 0.0KW 01:24s
State
WAIT FOR EV
IN CHARGE
SUSPENSION
NET mode: Address
PERSONAL mode: PM
Cyclical display
Pist: Instant power
Pest: External power
Etot: Energy supplied
L1: Current absorbed
L2:
...
Current set value
Full scale value
Charge duration
Way of charging
T: Typical
S: Simplied

13
FREE MODE
STATION ACCESSIBLE TO ALL PERSONS
BE-T Stations
1
2
34
5
7
6
2
3
4
5
8
7
B
CARD
CARD
CARD
CARD
CARD
6
CARD
1
G G
BBG
GG
BG
B
G: Green B: Blue
NB: Disconnection of the cord-set from the station is mandatory following charging.
To begin a new charging session, re-connect the cord-set to the station.
CHANGE MODE
• Terminate charging in progress
• Press and hold the stop button and simultaneously present the MASTER CARD
(red) to the RFID reader to change mode
• Repeat the procedure to return to the previous mode.
CHANGE MODE VIA APP
• Mode change is available directly via APP

14
BE-T USER MANUAL
Status RGB LED Description
Station not powered × ×
Supply power to station ((( 2))) SCAME PARRE
(rmware release)
Station powered 2SOCKET AVAILABLE
Insert plug in socket 2PLUG INSERTED
Connect vehicle ((( 2))) WAITING FOR EV
If vehicle needs charging 2CHARGING (calibration)
(current)(power)(time)
If vehicle does not need charging ((( 2))) SUSPENSION
(current)(power)(time)
If station suspends charging ((( 2))) WAITING FOR RM
(time)
Press button ((( 2))) REMOVE PLUG
Remove plug 2SOCKET AVAILABLE
× = o 7- 2- 2= steady light ((( 7))) - ((( 2))) - ((( 2))) = ashing light

15
PERSONAL MODE
STATION WITH RESTRICTED ACCESS VIA USER CARD
BE-T Stations
1
2
34
5
7
6
2
3
4
5
8
7
B
CARD
CARD
CARD
CARD
CARD
6
CARD
1
G G
BBG
GG
BG
B
G:Green B: Blue
NB: Disconnection of the cord-set from the station is mandatory following charging.
To begin a new charging session, re-connect the cord-set to the station.
CHANGE MODE
• Terminate charging in progress
• Press and hold the stop button and simultaneously present the MASTER CARD
(red) to the RFID reader to change mode
• Repeat the procedure to return to the previous mode.
CHANGE MODE VIA APP
• Mode change is available directly via APP
USER CARD USER CARD

16
BE-T USER MANUAL
Status RGB LED Description
Station not powered × ×
Supply power to station ((( 2))) SCAME PARRE
(rmware release)
Station powered 2CARD PRESENT
Present card ((( 2))) INSERT PLUG
Insert plug in socket ((( 2))) PLUG INSERTED
Connect vehicle ((( 2))) WAITING FOR EV
If vehicle needs charging 2CHARGING (calibration)
(current)(power)(time)
If vehicle does not need charging ((( 2))) SUSPENSION
(current)(power)(time)
If station suspends charging ((( 2))) WAITING FOR RM
(time)
Present card ((( 2))) REMOVE PLUG
Remove plug 2CARD PRESENT
× = o 7- 2- 2= steady light ((( 7))) - ((( 2))) - ((( 2))) = ashing light

17
USER MANAGEMENT
PRESENT NEW USER CARDS
• With the station in PERSONAL mode
(display: PM PRESENT CARD)
• Show the master card on the RFID reader to enter programming mode
(display: DATABASE MANAGEMENT – PRESENT CARD)
• Show the user card on the RFID reader to be inserted into the memory
(display: ID REGISTER – 001 USERS)
• Show all user cards to be inserted into the memory or close database
management presenting the master card or allowing countdown to terminate
USER CARD DELETION
• With the station in PERSONAL mode
(display: PM PRESENT CARD)
• Show master card on the RFID reader to enter programming mode
(display: DATABASE MANAGEMENT – PRESENT CARD)
• Show the user card on the RFID reader to be deleted from the memory
(display:DELETE USER?)
• Show the same user card on the RFID reader to conrm deletion (display:ID
DELETED–000 USERS)
• Show all user cards to be deleted from the memory or close database
management presenting the master card or allowing countdown to terminate

18
BE-T USER MANUAL
J3 J4
J5 J6
A-
A+
GND
J3 J4
J5 J6
A-
A+
GND
12
3 4
A-
A+
GND
J5
J3
NET TCP/IP
J4
SCU
+
EXP SCU
SCU SCU
J3 J4
J6
N1 N2 N3 N4...N16
Maximum of 16 addresses for each Master station
J5 J6
A-
A+
GND
A-
A+
GND
NETWORK CABLE TYPE F/UTP
CAT6 IN SEPARATE TUBE
Mutual Capacitance < 10 pF/m
Capacitance Unbalance < 60 pF/m
Blue/white pair:
Blue : A+
White : A-
Brown/white pair:
Brown : GND
White : GND
NET OPERATION (OCPP)
REMOTELY MANAGED STATION
• NET: list of authorised users included in the local server memory
• OCPP: list of authorised users included in the central station memory
CONNECTION INSTRUCTIONS
SCU electronics-only connection system

19
J3 J4
J5 J6
A-
A+
GND
J3 J4
J5 J6
A-
A+
GND
12
3 4
A-
A+
GND
J5
J3
NET TCP/IP
J4
SCU
+
EXP SCU
SCU SCU
J3 J4
J6
N1 N2 N3 N4...N16
Maximum of 16 addresses for each Master station
J5 J6
A-
A+
GND
A-
A+
GND
NETWORK CABLE TYPE F/UTP
CAT6 IN SEPARATE TUBE
Mutual Capacitance < 10 pF/m
Capacitance Unbalance < 60 pF/m
Blue/white pair:
Blue : A+
White : A-
Brown/white pair:
Brown : GND
White : GND

20
BE-T USER MANUAL
J3 J4
J5 J6
A-
A+
GND
J3 J4
J5 J6
A-
A+
GND
3 4
SCU SCU
N3 N4...N16
N1 N2
Maximum of 16 addresses for each Master station
NETWORK CABLE TYPE F/UTP
CAT6 IN SEPARATE TUBE
Mutual Capacitance < 10 pF/m
Capacitance Unbalance < 60 pF/m
Blue/white pair:
Blue : A+
White : A-
Brown/white pair:
Brown : GND
White : GND
208.SERV
Net TCP/IP
SBC
12
MAX0/SCU electronic mixed connection system
This manual suits for next models
1
Table of contents
Other Scame Automobile Accessories manuals
Popular Automobile Accessories manuals by other brands

Thule
Thule 156 Mounting & installation

ULTIMATE SPEED
ULTIMATE SPEED HG03845 manual

Cruz
Cruz Evo Rack E48-158 Assembly instructions

Airlocker
Airlocker RD159 installation guide

Kolpin Outdoors
Kolpin Outdoors 26-1020 Product instructions

Discount Car Stereo
Discount Car Stereo A2DIY-CHRY02 Quick start installation guide