manuals.online logo
Brands
  1. Home
  2. •
  3. Brands
  4. •
  5. Scan Optics
  6. •
  7. Medical Equipment
  8. •
  9. Scan Optics SO-2200LED User manual

Scan Optics SO-2200LED User manual










 !!"# 


 



Please read the following information carefully before installing and using
the Scan Optics SO-2200LED binocular indirect ophthalmoscope. Scan
Optics is responsible for the safety, reliability and performance of the
equipment only if it is used in accordance with these instructions.
This device is designed for use by a certified practitioner. Environmental
storage and packing conditions of 60-95% relative humidity and 10-40 °C
are recommended. No parts or accessories are supplied in sterile condition.
Apart from those identified in the instructions within this manual, there are
no user-serviceable parts in this device. Scan Optics will retain the
discretion to advise whether any repairs may be carried out by external
qualified technical personnel, or whether part(s) of the device must be
returned to the manufacturer’s premises for service or repairs to be carried
out under warranty or otherwise. Where appropriately qualified technical
personnel are identified, Scan Optics will make available on request
information which may assist in maintaining or repairing this device.



Scan Optics
32 Stirling Street Tel +61 8 8234 9120
Thebarton SA 5031 Fax +61 8 8234 9417
AUSTRALIA Email [email protected]m.au
Priory Analysts Ltd
The Atrium, Park St
Luton, LU1 3BE
United Kingdom.
 !!"# 


 

Do not use the power pack if there is any evidence of damage to the mains
supply cord.
Do not disassemble this device.
Do not immerse any part of this device, charger or charger power supply in
liquids, or expose them to liquids generally.
Do not open or dismantle the battery unit, dispose of in fire, or short circuit
- may ignite, explode, leak, or become heated causing personal injury.
Do not plug any device other than the SO-2208 head mounting assembly
into the top of the SO-2218 battery unit.
Do not plug any other device other than the SO-2207 power pack into the
bottom of the SO-2218 battery unit.
Do not plug or unplug the head mounting assembly into the battery unit
while the battery unit is switched on.
Do not use this device if damaged.
This equipment is not suitable for use in the presence of a flammable
anaesthetic mixture with air or with oxygen or nitrous oxide.
Parts of this device may get hot after extended use.
 !!"# 


 

Head mounting assembly
Battery unit
Power pack
Mains power lead
User manual (this manual)


 
Power pack SO-2207
Head mounting assembly SO-2208
Teaching mirror SO-2211
Red-free filter SO-2212
Cobalt blue filter SO-2213
Battery unit SO-2218
Low voltage lead (for head mount assembly) SO-2219
20D Hand condensing lens SO-2220
28D Hand condensing lens SO-2228
 !!"# 


 
$
Place the head mounting assembly on your head in the same way as a pair
of spectacles. Adjust the head strap as necessary to achieve a firm,
comfortable fit. Connect the head mounting assembly to the battery unit by
plugging the lead into the socket on the top of the battery unit. Switch the
battery unit on and adjust the light output by rotating the intensity knob.
The blue ‘lamp
on’ indicator will
light up. Switch
the unit off again
when it is not
being used. Do
not plug or
unplug the head
mounting
assembly into the
battery unit while
the battery unit is
switched on.
Note that the
instrument will
not operate when
the battery unit is
being charged by
the power pack.

 !!"# 


 
%&$
The distance from the hand-held condensing lens to the instrument during
use should be approximately 400mm; the instrument will then form an
image of the fundus 600mm from the observer. Convergence to this point
and a corresponding accommodation of about +1.5D by the examiner will
then be required.
'
The corneal reflex is often a problem of indirect ophthalmoscopy.
Elimination of the corneal reflex involves separating the image of the lamp
filament and the images of the sight holes (in this case the examiner’s
pupils) in the pupil plane of the examined eye. A mydriatic may be
necessary to dilate the pupil sufficiently for the images to fall within the
pupil area. The pupil diameter needs to be about 3.5mm with a 30D
condensing lens. The hand-held condenser should be moved both
longitudinally and laterally to find the best position to minimise the corneal
reflex. Note however, that longitudinal movement will also alter the field of
illumination and lateral movement will move the fundus image laterally.
Movement of the hand-held condenser may require adjustment of the angle
of the lamphouse.
The hand-held condenser lens surface reflections can be moved by tilting
the lens, when the reflections will move in opposite directions.

'(
To explore the fundus it should be remembered that the image will move in
the same direction as the hand condenser. For example, to explore the area
of the right eye from the disc to the macula the condenser must be moved to
the left. Condenser movements can be used to explore small areas.
To explore the periphery of the retina, the patient should be asked to rotate
the eye. To explore the lower retina, for example, the patient should be
asked to look downwards, and to explore the upper retina, to look upwards.

 !!"# 


 

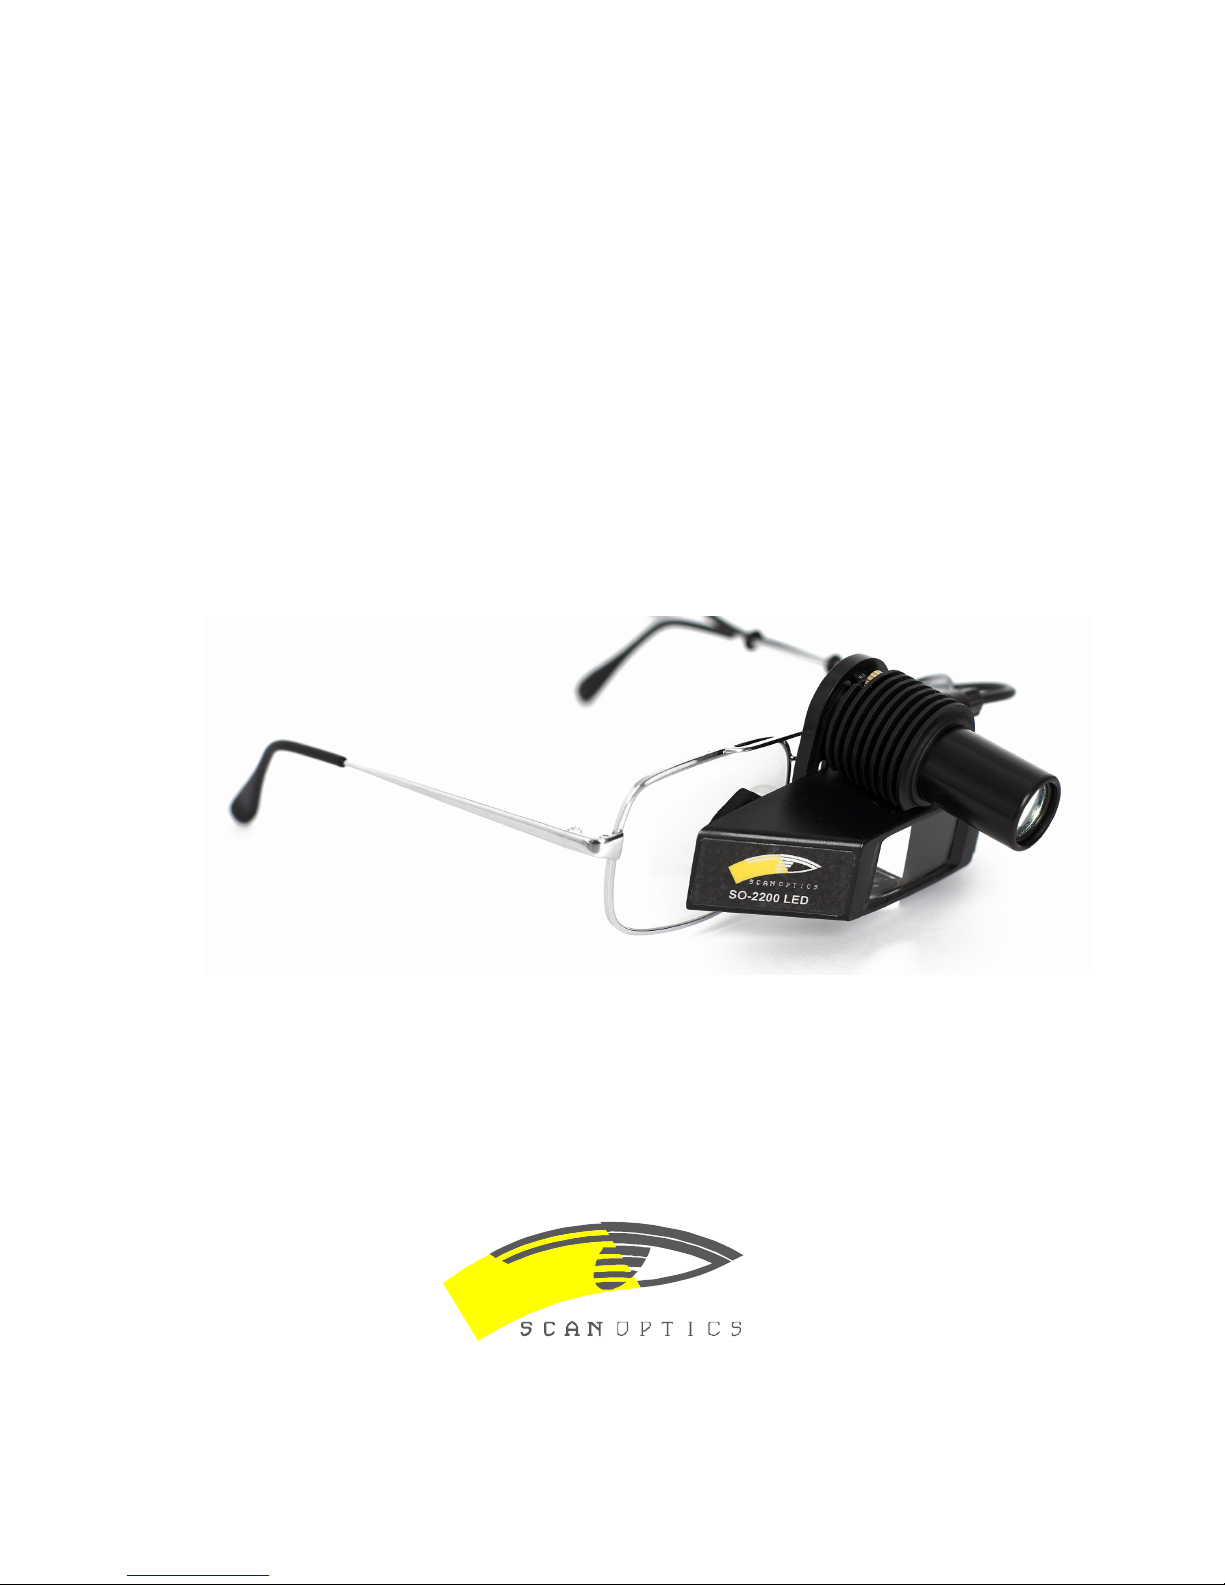
The SO-2200LED binocular indirect ophthalmoscope can be used to
estimate the refractive error of an eye. Observe the image size as the hand
condensing lens is moved from a point close to the eye (say 30mm) to a
point further away (say 120mm) in a line from inside to outside the point
where the first principle focus of the lens is at the anterior focus of the eye.
If the image size remains constant, the eye is emmetropic; if the image
diminishes, the eye is hypermetropic and if the image size increases, the eye
is myopic. If the eye is astigmatic, a meridional difference in magnification
may be seen. At the point where the first principal focus of the lens is at the
anterior focus of the eye (that is, a lens to cornea distance of about 60mm)
magnification of the image is independent of refractive error. Normally
however, the lens is closer to the eye than this, so the image magnification
is greater in hypermetropia and less in myopia than emmetropia (that is, the
linear field of view varies with refractive error). The angular field however,
being limited by the condensing lens aperture, is constant.
$
Condensing lenses of powers between 15D and 30D are available from
several manufacturers. These lenses have a major influence on both the
illuminating and viewing optical systems, and it is important that only high
quality lenses are used. Scan Optics offer high quality lenses in powers of
20D and 28D.
When held, the higher power surface should be towards the observer, for
correct aberration control. A higher power lens will increase the field of
view, reduce the image magnification, increase the image brightness and
reduce the pupil size needed.

 !!"# 


 
)$$
You may need to adjust the nose pads on the spectacles to achieve the most
comfortable fit. If needed, the light patch position may be fine adjusted up
or down by rotating the small knurled nut on top of the lamp housing. The
light intensity may be changed by using the control knob on top of the
battery unit. No other adjustments are required.


 !!"# 


 
$$*
1. Connect the plug on the power pack to the socket on the underside of
the battery unit. This will disconnect the output from the battery unit.
Note that the instrument will not operate when the battery unit is being
charged by the power pack.
2. Connect the ‘figure 8’ socket end of the mains power lead to the power
pack.
3. Connect the plug on the mains power lead to a suitable source of mains
AC power and switch it on. Both the green LED on the power pack
AND the green ‘Charger power in’ indicators should light up.
4. Observe the status of the middle LED on the battery unit: If the battery
unit requires charging, the yellow ‘Charging’ indicator will light up. It
will take between 90-100 minutes to charge a fully exhausted battery.
When the yellow ‘Charging’ indicator will switches off, the battery unit
is fully charged. In this case, a small trickle current from the power
pack will be used to detect the voltage status of the battery unit.

 !!"# 


 
$
1. Only mild cleaning agents should be used to clean the exposed
surfaces of the instrument.
2. Non-optical surfaces may be wiped down with a damp cloth
3. Optical surfaces including the spectacle lenses, front viewing lens
and front lamphouse lens may be gently cleaned using pure alcohol
or optical cleaning foams.
4. Always blow dust from optical surfaces before attempting to clean
them.
5. Do not use excessive force when cleaning the front viewing lens of
the device.
 !!"# 


 
$
$
The SO-2211 teaching mirror allows simultaneous observation of an image
by the person wearing the instrument and another observer positioned at
their side. To attach the teaching mirror, slide the black bracket in between
the gasket on the front of the spectacles and the main housing. Clip it on to
the boss. The teaching mirror may be clipped on either side of the
instrument.
'*
Various filter assemblies such as the SO-2212 red-free filter may be
attached to the light source. Simply slide the assembly in place over the
barrel.
 !!"# 


 
$
*  *
Intensity set low Increase intensity.
Light dim Low battery voltage Recharge battery unit.
Battery unit switched off Turn on battery unit.
Battery unit exhausted Recharge battery unit.
Charging socket
connected
The instrument will not work
while the battery unit is being
charged. Disconnect the power
pack lead from the battery unit
charging socket to use the
instrument.
No light
visible
Head mount assembly
connector dislodged from
lead
Reconnect the lead to the head
unit.
No light
visible, blue
indicator LED
does not
come on
when battery
unit is
switched on
The head mounting unit
was plug in whilst the
battery unit was in
the 'ON'position. The
safety circuit activated to
prevent damage to the
battery unit.
Reset the safety circuit by
switching the unit to the 'OFF'
position and ensuring the head
mounting unit is firmly plugged
into the battery pack. Connect
the charging socket into the
battery unit briefly (5 seconds)
and then remove the charging
socket.
Adjust the nose pads as
necessary to position the head
mounting assembly relative to
your eye point.
Light patch
not central in
viewing area
Adjustment required for
new user head shape
Use the adjusting nut to move
the light path up or down.

For any other problems, consult your local distributor or Scan Optics.
 !!"# 


 
'

* 
Class Class I medical device
(MDD and TGA)


Working distance 400 mm to hand-held lens

Type LED
Rated life 10 years (based on average use)
Voltage 7 volts
Power 5 watts
Colour temperature 5500K (typ)
*
Battery type Li Ion
Battery voltage 3.7V
Capacity 1 hour at maximum intensity
Input charging voltage 13.8V dc
Output 7.0V, 160-450mA
%&
TypeClass II and Internally
Powered Equipment
Input voltage 100-240 volts
50/60 Hz
Output voltage 13.8V dc
Power consumption 0.5A at 115V
0.25A at 230V
$+
Temperature 10 - 40˚C
Relative humidity 60-95%

*'$   Australia 

Popular Medical Equipment manuals by other brands

Potec PDR-7000 Operation manual

Potec

Potec PDR-7000 Operation manual

AREQUIPMENT M766 instruction manual

AREQUIPMENT

AREQUIPMENT M766 instruction manual

3B SCIENTIFIC ATLAS THE ALS SIMULATOR P75 user manual

3B SCIENTIFIC

3B SCIENTIFIC ATLAS THE ALS SIMULATOR P75 user manual

Gymna Pulson 100 user manual

Gymna

Gymna Pulson 100 user manual

TZ Medical TRIDENT NANO PATIENT QUICK START GUIDE

TZ Medical

TZ Medical TRIDENT NANO PATIENT QUICK START GUIDE

Stryker Performance-LOAD Cot Fastener System Operation manual

Stryker

Stryker Performance-LOAD Cot Fastener System Operation manual

Albrecht CDS ELBOW BRACE DUO User instructions

Albrecht

Albrecht CDS ELBOW BRACE DUO User instructions

Flaem 4Neb Instructions for use manual

Flaem

Flaem 4Neb Instructions for use manual

Hologic ATEC SAPPHIRE Operator's manual

Hologic

Hologic ATEC SAPPHIRE Operator's manual

Lumex PATRIOT US0458 user manual

Lumex

Lumex PATRIOT US0458 user manual

Omron Intelli Wrap HEM-FL31 Instructions for use

Omron

Omron Intelli Wrap HEM-FL31 Instructions for use

ZOLL Aed Plus Operator's guide

ZOLL

ZOLL Aed Plus Operator's guide

Amico ICU Series Operation & maintenance manual

Amico

Amico ICU Series Operation & maintenance manual

Physiolab S1 user manual

Physiolab

Physiolab S1 user manual

Asclepion MeDioStar NeXT user manual

Asclepion

Asclepion MeDioStar NeXT user manual

MIR SPIROBANK Oxi user manual

MIR

MIR SPIROBANK Oxi user manual

Prism Healthcare smirthwaite Asiento manual

Prism Healthcare

Prism Healthcare smirthwaite Asiento manual

Bodypoint BB111 Installation and user instructions

Bodypoint

Bodypoint BB111 Installation and user instructions

manuals.online logo
manuals.online logoBrands
  • About & Mission
  • Contact us
  • Privacy Policy
  • Terms and Conditions

Copyright 2025 Manuals.Online. All Rights Reserved.