Schäfer draft2go User manual

Foreword
draft2go
BA-49-001-09
1 von 21
Operating instructions
draft2go
dispensing system

Foreword
draft2go
BA-49-001-09
2 von 21
1 Foreword
The operating instructions contained in this manual must be followed for
•Transport
•Commissioning
•Handling
•Maintenance
ATTENTION
Before working with the draft2godispensing sys-
tem, the user / operator must have read and un-
derstood this manual.
This manual, and in particular the safety instructions, must be observed at all times by all
people working on or with the draft2go dispensing system. In addition, all rules and regulations
for accident prevention which apply at the place the container is used, as well as all national
directives (e.g. industrial safety regulations) must be complied with.
It is advisable to keep a copy of this instruction manual at all places where the draft2go dis-
pensing system is being used.
Only original replacement parts may be used.

Table of Contents
draft2go
BA-49-001-09
3 von 21
2 Table of Contents
1Foreword ............................................................................................................................. 2
2Table of Contents ................................................................................................................. 3
3Introduction and basic safety instructions ............................................................................. 4
3.1 Explanation of signs and symbols.................................................................................. 5
4The draft2go dispensing system............................................................................................ 7
4.1 Components of the draft2go dispensing system ............................................................ 8
5Assembly and commissioning ............................................................................................... 9
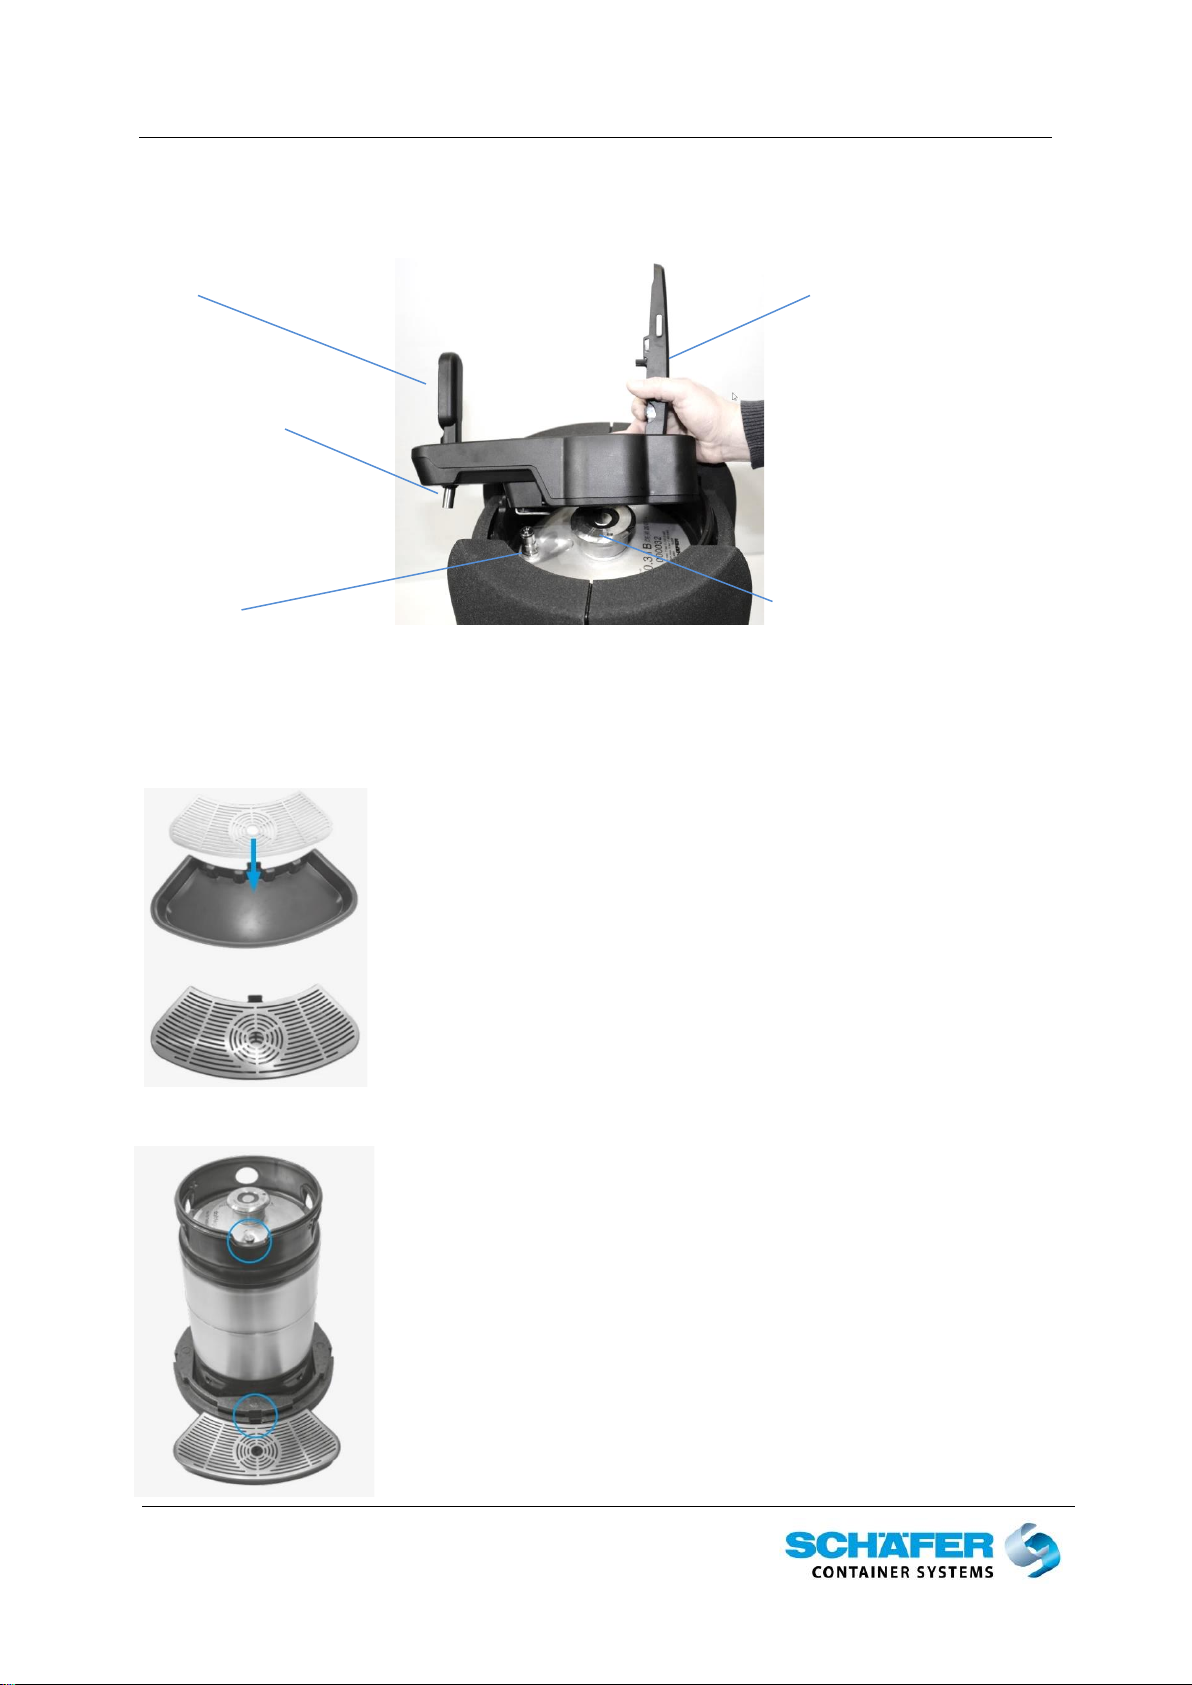
5.1 Explanation of various components .............................................................................. 9
5.2 Assembling the insulating jacket with KEG .................................................................... 9
5.3 Assembling the dispensing head ................................................................................. 10
5.3.1 Tappet and one-way line............................................................................................................... 10
5.3.2 Attaching the dispensing head to the draft2go KEG ..................................................................... 10
5.3.3 Fitting the beer line to the dispensing head ................................................................................. 11
5.4 Commissioning........................................................................................................... 14
5.5 General tips for tapping beer...................................................................................... 16
6Disassembly and Cleaning .................................................................................................. 17
6.1 Disassembly............................................................................................................... 17
6.2 Cleaning..................................................................................................................... 18
6.2.1 Cleaning the dispensing head ....................................................................................................... 18
6.2.2 Cleaning the insulation.................................................................................................................. 19
7Beverage residues in the draft2go KEG................................................................................ 20
8. Trouble shooting .................................................................................................................... 21
Contact: ..................................................................................................................................... 21

Introduction and basic safety instructions
draft2go
BA-49-001-09
4 von 21
3 Introduction and basic safety instructions
This operating instruction manual serves as the basis for using and operating the draft2go
dispensing system.
PLEASE NOTE
This instruction manual provides information on how to use the
draft2go dispensing system safely. The knowledge and application
of the information described here is absolutely essential to guaran-
tee the appropriate and error-free use of the draft2go system.
Failure to comply with the operating instructions may result in errors that can damage the
dispensing system or lead to the risk of accidents and consequently injury to other persons.
WARNING
The manufacturer refuses to accept any liability arising from use of
the draft2go dispensing system, if the safety instructions contained
in this operating manual have been disregarded.
The draft2go dispensing system may only be operated by persons,
who have read and fully understood this operating manual.

Introduction and basic safety instructions
draft2go
BA-49-001-09
5 von 21
3.1 Explanation of signs and symbols
PROHIBITED
This sign is used to describe a prohibition instruction that must be
followed.
Failure to comply with the information can lead to material damage
as well as slight or moderately serious injury.
WARNING
Indicates a potentially dangerous situation.
Failure to comply with this instruction can lead to material damage
as well as slight or moderately serious injury.
INSTRUCTION
Indicates a rule or instruction that must be followed.
PLEASE NOTE
Indicates general information, useful tips for users and working rec-
ommendations.

Introduction and basic safety instructions
draft2go
BA-49-001-09
6 von 21
Prohibiting signs
Prohibited!
No direct sunlight
Warning signs
Danger warnings!
Instructions
Information signs
Read the instruction manual

The draft2go dispensing system
draft2go
BA-49-001-09
7 von 21
4 The draft2go dispensing system
Thank you for choosing the draft2go dispensing system.
draft2go is an all-in-one dispensing system which is op-
erated without the dispensing technology usually re-
quired in hospitality businesses. Using it for any purpose
other than that described in this operating manual is
considered improper use.
The draft2go system consists of a two-chamber KEG with
gas and beer compartments, an insulating jacket and a
dispensing head.
The KEG is equipped with a flat fitting for the beer com-
partment and an NC valve for the gas compartment.
The draft2go dispensing head is made of high-quality plastic and all components coming into
direct contact with the beer are food-safe.
The flow of beer from the draft2go dispensing head is interrupted by compression of the beer
line tube.
The full KEG should be pre-cooled to 2 - 4°C. At this temperature, the insulating jacket keeps
the KEG at the usual drinking temperature in northern Europe of 4 to 8°C for up to 8 hours. If
the beer is too warm, this can result in excessive foam.
If the KEG is being kept in a standard refrigerator, the manufacturer’s recommend cooling
the KEG at 2°C for 24 hours before use.
PROHIBITED
The draft2go dispensing system must not be exposed to direct sun-
light and temperatures of above 30°C.
The draft2go KEG must never be placed in a deep freeze to cool it
down.

The draft2go dispensing system
draft2go
BA-49-001-09
8 von 21
4.1 Components of the draft2go dispensing system
Delivery scope
draft2go set
The draft2go-KEG is not in-
cluded in the delivery scope.
Item
KEG
Item
Insulation
Item
Dispensing head
1
draft2go KEG
2.1
Insulating base
3.1
Dispensing head
2.2
Drip tray
3.2
Tappet
2.3
Drip tray grill
3.3
One-way line
2.4
Insulating jacket
3.4
Faucet spout
3.5
Operating instructions
3.1
2.4
3.4
2.3
2.2
3.3
3.2
1
2.1

Assembly and commissioning
draft2go
BA-49-001-09
9 von 21
5 Assembly and commissioning
5.1 Explanation of various components
Tap Lever
Stainless steel
faucet spout
NC valve Flat fitting
5.2 Assembling the insulating jacket with KEG
Place the pre-chilled KEG onto the insula-
tor base, so that the NC valve and the re-
cess in the top ring are in line with the drip
tray. Slide the drip tray into place on the
base.
The draft2go dispensing system must al-
ways be placed on a stable surface.
Fit the drip grill into place inside the
drip tray.

Assembly and commissioning
draft2go
BA-49-001-09
10 von 21
5.3 Assembling the dispensing head
5.3.1 Tappet and one-way line
Rinse out the tappet and the beer line under cold running water before
every use. This is easiest when the two components are assembled.
5.3.2 Attaching the dispensing head to the draft2go KEG
ATTENTION
Always attach the dispensing head so that the flat
fitting and the NC valve can be coupled to it.
Put the two sides of the insulator
jacket together, so that the hand-
holds on the jacket are in line with
those on the KEG.
Press the dispensing head onto the flat fitting
and the NC valve and pull it forward until the
dispensing head clicks into place. A clicking
sound can be heard.

Assembly and commissioning
draft2go
BA-49-001-09
11 von 21
5.3.3 Fitting the beer line to the dispensing head
ATTENTION
Never press the lever down before the tappet
has been inserted, as this can lead to gas be-
ing released!
Before the beer line can be inserted from the
front, the stainless steel faucet spout must
be removed.
When it is inserted, the tappet must be
rotated to find the correct position.
Once this position is found, the tappet in-
dependently sinks down by approx.
3mm.
You can clearly see whether it is
in the correct position by looking
into the dispensing head from
above.
Before inserting the tappet, the black O-
ring must be moistened with or dipped in
water, or lubricated with food-safe oil or
grease.

Assembly and commissioning
draft2go
BA-49-001-09
12 von 21
ATTENTION
The beer line tube can only be compresses correctly when it is posi-
tioned exactly in the centre.
The beer line must be inserted from the
front to the right of centre. Then, the
tube must be pushed into the middle.
To insert the one-way line, the tap
must be pulled forward.
By turning the end of the
one-way line gently to the
right and left, the tube ad-
justs itself into the centre,
where it can be compressed
to interrupt the flow of beer.
The clamp can only press the beer line tube together and interrupt the flow of
beer, if installation has been carried out correctly.

Assembly and commissioning
draft2go
BA-49-001-09
13 von 21
Now let go of the tap and the one-way line will be compressed.
Press the one-way line at various points into the
holding groove provided. Do not press over the
entire length of the flexible tube. The holding
groove ensures that it remains in place. (see im-
age).
Push the one-way line's elbow connector into the
black connector socket on the tappet until it clicks
into place.
Replace the stainless steel faucet spout.
The function of the spout is to protect the end of
the beer line and prevent it from being acci-
dentally pushed out of position by a beer glass,
as this would stop the clamp from compressing
the one-way line.

Assembly and commissioning
draft2go
BA-49-001-09
14 von 21
5.4 Commissioning
To achieve the required pressing forceto lockthe dispensing head into place, the manufacturer
recommends using two-hands, as shown in the images, as this will enable the controlled ex-
ertion of the required pressing force of around 13 kg.
Make sure that the dispensing head is locked in
the forward position. (as described in 5.3.2)
Now press the lever down until it locks into the tap-
pet.
When this happens, you will
hear it click into place.
Hold the lever firmly with the left
hand.
Press down strongly with the ball of the
hand directly above the release buttons
until you hear them click into place on
both sides.
Pressing the lever down into the locking
position connects the dispensing head to
the beer and gas compartments. Be care-
ful not to touch the tap during this proce-
dure. (It could accidentally release beer.)

Assembly and commissioning
draft2go
BA-49-001-09
15 von 21
Release buttons
not in place
Release buttons in
place
To check if the lever is closed
properly, look down on the
two release buttons on the
right and left of the lever. If
they are fully visible, the lever
is in the correct position.
The dispensing head is ready for use.
When dispensing, always pull the tap all
the way forwards!

Assembly and commissioning
draft2go
BA-49-001-09
16 von 21
5.5 General tips for tapping beer
I. Rinse the glass with cold water and allow it to drain.
II. Hold the glass at an angle of approx. 45° directly under the spout.
III. Open the tap completely in one swift movement.
IV. Let the beer run down the inside of the glass.
V. The spout should not touch the glass, the beer or the beer foam.
VI. The angle at which you hold the glass when tapping is decisive for the amount of
foam. The straighter you hold the glass, the more foam will be created.
VII. Fill the glass until the beer has almost run over the rim then lower the glass down
from the 45° angle until it is straight and upright underneath the spout.
VIII. Close the tap with a swift movement just before the foam reaches the top of the
glass.
IX. You can now serve your freshly tapped draught beer.

Disassembly and Cleaning
draft2go
BA-49-001-09
17 von 21
6 Disassembly and Cleaning
6.1 Disassembly
WARNING
Be careful when releasing the dispensing head.
Opening the dispensing head releases a force of approx. 13 kg, so
never stand with your head directly over the dispensing head.
Lift the lever upwards.
To remove the beer line, the
tap must be pulled forwards.
When the two release buttons are
pressed inwards, the lever lifts up-
wards and the gas supply is inter-
rupted.
Pull the tappet out
upwards.
Using two hands is also recommended here.
Push the dispensing head backwards and lift it off the KEG.

Disassembly and Cleaning
draft2go
BA-49-001-09
18 von 21
6.2 Cleaning
6.2.1 Cleaning the dispensing head
PROHIBITED!
Never clean the draft2go dispensing head in a dish washer. The
draft2go dispensing head must not be placed or cleaned in a water
bath. This can lead to the dispensing head malfunctioning com-
pletely.
INSTRUCTION
Parts that come into direct contact with
beer should be rinsed under running
water immediately after use.
If the beer residues are dry, please use
a soft cloth and standard washing up
detergent to clean the dispensing
head.
A new disposable one-way line should be used each time the KEG is
changed. If you want to use a one-way line again to empty the KEG
the next day, make sure you take out the line and rinse it under run-
ning water before using it again.
One-way line and tappet can be cleaned or soaked in a water bath
with standard washing-up detergent. Afterwards, both components
must be rinsed with clean water.
All dispensing head components should
be rinsed under running water immedi-
ately after use.

Disassembly and Cleaning
draft2go
BA-49-001-09
19 von 21
PROHIBITED!
Never clean the tappet and the beer liner in a dish washer or with
harsh or abrasive cleaning agents.
INSTRUCTION
If the KEG is not empty and is intended for use on another occasion,
always remove the dispensing head, clean all parts which were in di-
rect contact with beer and place the KEG in cold storage.
Never put a KEG in cold storage with the dispensing head still in-
stalled.
6.2.2 Cleaning the insulation
The insulating jacket and base should be cleaned with standard washing up detergent.
The drip tray and grill can be cleaned in dish washers up to 70°C.

Beverage residues in the draft2go KEG
draft2go
BA-49-001-09
20 von 21
7 Beverage residues in the draft2go KEG
The amount of beer left inside the draft2go KEG can be determined easily by weighing the
KEG on suitcase scales, for example.
draft2go KEG
Weight
Full amount /
KEG with insulation
KEG only
Residue
and dispensing
head
10 litres
≈ 16.5 kg
≈14.5 kg
9 litres
≈15.5 kg
≈13.5 kg
8 litres
≈14.6 kg
≈12.6 kg
7 litres
≈13.6 kg
≈11.6 kg
6 litres
≈12.7 kg
≈10.7 kg
5 litres
≈11.7 kg
≈9.7 kg
4 litres
≈10.8 kg
≈8.8 kg
3 litres
≈9.8 kg
≈ 7.8 kg
2 litres
≈8.9 kg
≈ 6.9 kg
1 litre
≈7.9 kg
≈ 5.9 kg
Table of contents