Schaller BMA-2 User manual

78,0°F | 6,16% | 456kg/m
3
| -27,3td | 0,64aw | 51,9%r.H. | 14,8%abs | 100,4g/m
2
| 09m/s | 4,90Ugl | 1
Operating Manual
Always read this operating manual before using!
Version 1.0
Test equipment
for the device types BMA-2, BMC, FSG,
FS2, FS3, FS4, BP1, FSA, SG1

Operating manual testing equipment
Page 2
Introduction
1.1 Information about this operating manual
The operator must carefully read and understand this operating manual before starting
any work. The basic prerequisite for safe working is compliance with all the safety
notes and instructions for action given in this operating manual.
1.2 Limitation of liability
All information and notes in this operating manual have been compiled taking into ac-
count the applicable standards and regulations, the state of the art and the many years
of knowledge and experience of Schaller Messtechnik GmbH.
In the following cases, Schaller Messtechnik GmbH does not assume any liability for
damages and the warranty claims expire:
• Non-observance of this operating manual
• Improper use
• Inadequately qualified users
• Unauthorised modifications
• Technical changes
• Use of unapproved spare parts
This rapid measurement procedure can be influenced by various boundary conditions.
We therefore recommend checking the measurement results at periodic intervals by
means of a standard kiln drying test.

Page 3
1.3 Symbols used in this manual
All of the safety information provided in this manual is shown with a corresponding
symbol.
ATTENTION
It is essential to observe this warning. Non-compliance can lead to damage to
property or equipment.
1.4 Customer service
For technical advice, please contact our customer service department at:
Schaller Messtechnik GmbH
Max-Schaller-Straße 99
A - 8181 St.Ruprecht an der Raab
Telephone: +43 (0)3178 28899
Fax: +43 (0)3178 28899 - 901
E-Mail: info@humimeter.com
Internet: www.humimeter.com
© Schaller Messtechnik GmbH 2023

Operating manual testing equipment
Page 4
Table of contents
Introduction .............................................................................................................2
1.1 Information about this operating manual ................................................2
1.2 Limitation of liability ................................................................................ 2
1.3 Symbols used in this manual ...................................................................3
1.4 Customer service ....................................................................................3
1. Test equipment for the humimeter BMC ...................... 6
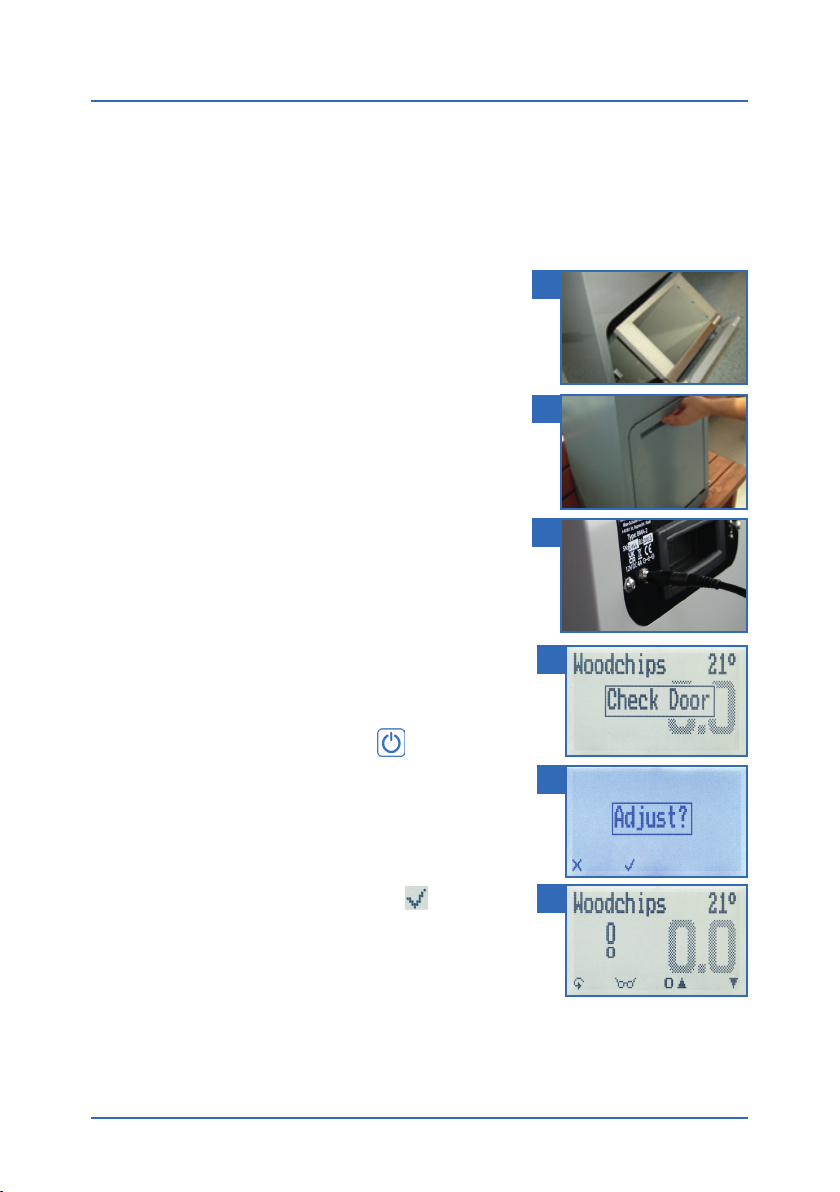
1.1 Verication process .................................................................................6
2. Test equipment for the humimeter BMA-2 ................... 8
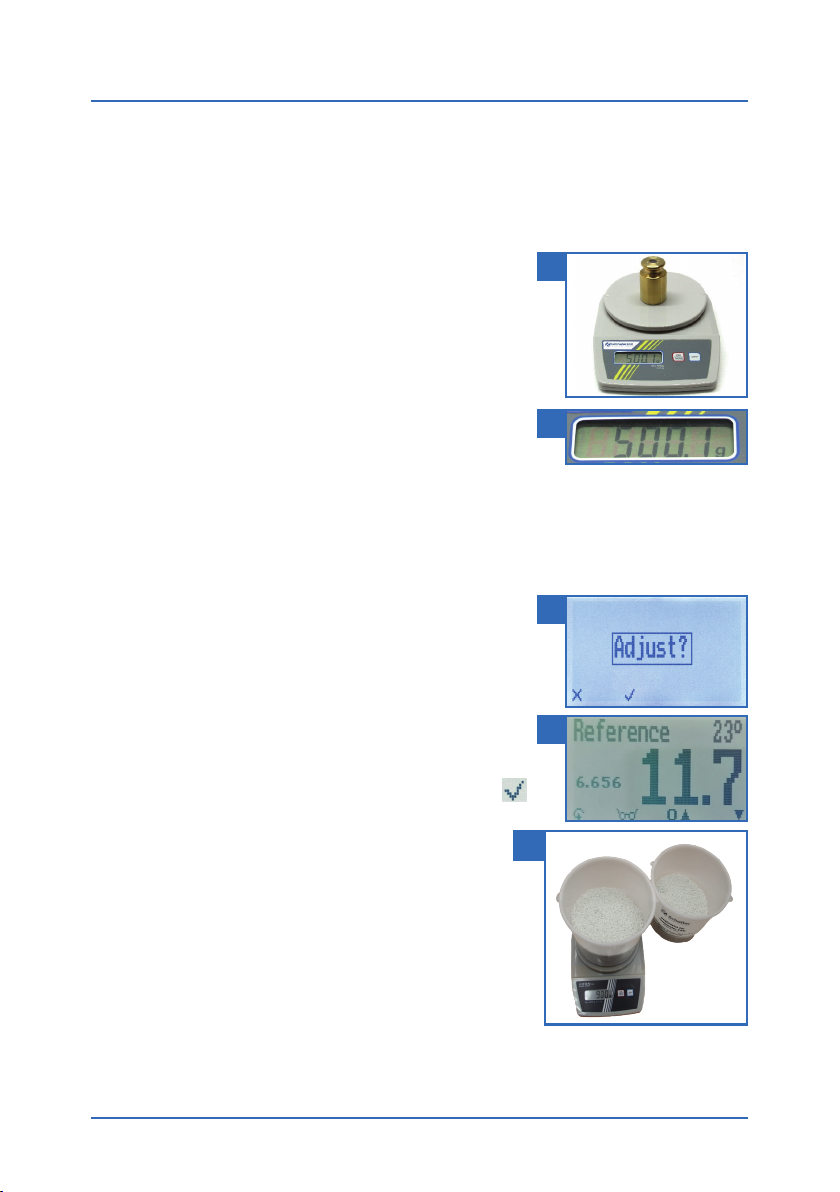
2.1 Verication process .................................................................................8
3. Checking the calibration of the humimeter FSG ........ 10
3.1 Checking the scale ................................................................................10
3.2 Checking the device .............................................................................. 10
4. Checking the calibration of the humimeter FS2 ......... 12
4.1 Checking the scale ................................................................................12
4.2 Checking the device .............................................................................. 12
5. Checking the calibration for the humimeter FS3 ....... 14
5.1 Checking the scale ................................................................................14
5.2 Checking the device .............................................................................. 14
6. Checking the calibration for the humimeter FS4 ....... 16
6.1 Checking the scale ................................................................................16
6.2 Checking the device .............................................................................. 16
7. Checking the calibration for the humimeter BP1 ....... 18
7.1 Checking the scale ................................................................................18
7.2 Checking the device .............................................................................. 18
8. Checking the calibration of the FSA ............................ 20
8.1 Sensor test ............................................................................................20

Page 5
8.1.1 Scale test ..............................................................................................21
8.1.2 Infrared temperature .............................................................................22
9. Checking the calibration for the humimeter SG1 ...... 23
9.1 Verication process ...............................................................................23

Operating manual testing equipment
Page 6
1. Test equipment for the humimeter BMC
1.1 Verification process
To do so: The device and the test equipment must have a temperature between
20.0 °C and 26.0 °C.
1. Check whether the measuring chamber of the device is empty.
»When switching on, there must be no measuring material or contamination in
it.
2. Switch on the measuring device and press the key for 3 seconds.
3. Now the query for self-calibration (adjustment)
of the device appears. Confirm this with the key
(Figure 1).
»This process is completed in a few seconds.
4. The measuring chamber must now be filled
completely with the test medium (white plastic
granules) slowly and evenly (Figure 2).
»Fill the measuring chamber from the gray rear side.
»Do not use a funnel or similar for filling the measu-
ring device!
5. Spread the granules evenly on the top edge
(Figure 3).
»No material may be compressed in the process!
6. Now the characteristic curve "Reference" must be
selected with the arrow keys.
7. Readings between 11.0 and 13.0 indicate that
the meter is correctly adjusted.
»If the measured values are below 11.0 or above 13.0, then contact Schaller
Messtechnik GmbH or your dealer!
8. Pour the test medium back into the bucket.
»Make sure that no residues collect in the measuring chamber.
1
2
3

Page 7
ATTENETION
The test equipment must always be stored in a closed bucket to prevent mois-
ture absorption.

Operating manual testing equipment
Page 8
2. Test equipment for the humimeter BMA-2
2.1 Verification process
To do so: The device and the test equipment must have a temperature between
20.0 °C and 26.0 °C.
1. Check whether the measuring chamber of the
device is empty.
2. Place the empty measuring chamber correctly in
the BMA-2 (Figure 4).
»The aluminum part must be centered in the plastic
jaws of the drawer.
3. Now close the drawer and push it downwards
(Figure 5).
»Usually happens automatically!
4. The round plug of the supplied power supply unit
on the BMA must be connected (Figure 6).
5. Now connect the power supply unit to an earthed
socket.
6. Now the humimeter BMA-2 switches on automa-
tically.
»IIf this is not the case, press the key for 3
seconds.
7. After switching on, the device performs a charging
test. The display shows Check Door (Figure7).
8. Now comes the query for self-calibration (Adjust) of
the humimeter BMA.
(Adjust?). Confirm this with the key
(Figure 8).
9. After successful self-calibration, the measurement
window is visible on the display
(Figure 9).
4
5
6
7
8
9

Page 9
10. Now open the drawer of the humimeter BMA and remove the measuring
chamber.
»This must first be raised, then it can be opened.
11. The measuring chamber must now be filled
completely with the test medium (white plastic
granules) slowly and evenly
(Figure 10).
»Fill the measuring chamber from the side with the aluminum sheet.
12. Spread the granules evenly on the top edge.
13. Hang the filled measuring chamber correctly back into the drawer and close it.
14. Now the characteristic curve "Reference" must be selected with the two arrow
keys.
15. After pressing the Start button, the measurement starts automatically.
»The LED now flashes blue and three symbols for the active measurement appear
on the display.
16. After the measurement is completed, the LED lights up blue again and the meas-
ured values are shown on the display.
17. Readings between 10.5 and 12.5 indicate that the meter is correctly adjusted
(Figure 11).
»If the measured values are below 10.5 or above
12.5, then contact Schaller Messtechnik GmbH or
your dealer!
18. Open the drawer and carefully remove the measur-
ing chamber.
19. Pour the test medium back into the bucket.
»Make sure that no residues collect in the measuring chamber.
ATTENTION
The test equipment must always be stored in a closed bucket to prevent mois-
ture absorption.
10
11

Operating manual testing equipment
Page 10
3. Checking the calibration of the humimeter FSG
The calibration of the device should be checked every four weeks. Use the optionally
available test equipment (Art.No. 11758) for checking.
3.1 Checking the scale
1. Switch on the scale.
2. Place the test weight on the scale (Figure 12).
3. The scale should now display a reading of 500 g
(Figure 13).
»If the balance indicates a measured value with a
deviation of more than 0.5 g, the balance can be
readjusted (see the balance operating manual).
3.2 Checking the device
To do so: The device and the test equipment must have a temperature between
17.0 °C and 23.0 °C.
1. Check whether the measuring chamber of the
device is empty.
»Empty the device and clean the measuring chamber
if necessary.
2. Switch on the device.
3. Now the query for self-calibration (adjustment)
of the device appears. Confirm this with the key
(Figure 14).
4. Select the "Reference" characteristic curve using
the arrow keys (Figure 15).
5. Place the empty clean measuring cup (0.5 liter)
on the switched off balance and switch it on.
»The balance must indicate 0.0 g with an empty
measuring cup, the measuring cup must not be
weighed as well.
6. Fill the measuring cup with 900 g of the granu-
les (Figure 16).
12
13
14
15
16

Page 11
7. Now fill the measuring chamber of the instrument
slowly and evenly with the 900g granules (Figure 17).
»Do not use a funnel or similar for filling the meter.
»Readings between 18.0 and 20.0 indicate that the
meter is correctly adjusted.
»If the measured values are below 18.0 or above 20.0,
then contact Schaller Messtechnik GmbH or your
dealer!
8. Instead of the 900g of test agent granules, fill 600g of granules into the measur-
ing cup in order to carry out another additional test.
»Readings between 13.0 and 15.0 indicate that the meter is correctly adjus-
ted.
»If the measured values are below 13.0 or above 15.0, then contact Schaller
Messtechnik GmbH or your dealer!
HINWEIS
The test equipment must always be stored in a closed bucket to prevent mois-
ture absorption.
17

Operating manual testing equipment
Page 12
4. Checking the calibration of the humimeter FS2
The device’s calibration should be checked every four weeks. For the check, the option-
ally available test equipment (article no. 11758) is required.
4.1 Checking the scale
1. Switch on the scale.
2. Place the test weight on the scale (Figure 18).
3. The scale should show a value of 500.0 g now
(Figure 19).
»If the balance displays a value with a deviation of
more than 0.5 g, the balance can be readjusted
(see manual of the scale).
4.2 Checking the device
To do so: The device as well as the test equipment must have a temperature between
17.0 °C and 23.0 °C.
1. Make sure that the measuring chamber of the device is empty.
»Empty the instrument and clean the measuring chamber if necessary.
2. Switch on the device .
3. Perform the automatic calibration
4. Select the product type „Reference“ by pressing the
arrow keys (Figure 20).
5. Place the empty and clean measuring cup
(0.5 liter) on the switched-off scale. Then switch
on the scale.
»The balance must display 0.0 g with the empty
measuring cup on it. The measuring cup must
not be weighed.
6. Fill the measuring cup with 400 gram glass
beads (Figure 21).
18
19
20
21

Page 13
7. Now slowly and evenly fill the measuring chamber
of the device with the 400 gram glass beads
(Figure 22).
»For the filling, no funnel or similar device may be
used.
»Readings between 11.5 and 12.5 indicate that the
meter is correctly adjusted. (Figure 23).
»If the measured values are below 11.5 or above
12.5, then contact Schaller Messtechnik GmbH or
your dealer!
8. Fill another 400 gram of glass beads into the
measuring cup.
»The glass beads filled into the device in point 7
must remain in the device.
»It is not possible to weigh 800 grams of glass beads
at once, as the scale has a maximum weighing
range of 500 gram and will be damaged if over-
loaded.
9. Now slowly and evenly fill the measuring chamber
of the device with the another 400 gram of glass beads.
»For the filling, no funnel or similar device may be used.
»Readings between 21.0 and 22.0 indicate correct adjustment of the measuring
instrument for 800 g glass beads (Figure 24).
»If the measured values are below 21.0 or above 22.0, then contact Schaller
Messtechnik GmbH or your dealer!
22
23
24

Operating manual testing equipment
Page 14
5. Checking the calibration for the humimeter FS3
The device’s calibration should be checked every four weeks. For the check, the option-
ally available test equipment (article no. 11758) is required.
5.1 Checking the scale
1. Switch on the scale.
2. Place the test weight on the scale (Figure 25).
3. The scale should show a value of 500.0 g now
(Figure 26).
»If the balance displays a value with a deviation of
more than 0.5 g, the balance can be readjusted
(see manual of the scale).
5.2 Checking the device
To do so: The device as well as the test equipment must have a temperature between
17.0 °C and 23.0 °C.
1. Make sure that the measuring chamber of the device is empty.
»Empty the instrument and clean the measuring chamber if necessary.
2. Switch on the device.
3. Effect the automatic calibration.
4. Select the product type „Reference“ by pressing the
arrow keys (Figure 27).
5. Place the empty, clean measuring cup (0.5 liter) on
the switched-off scale. Then switch on the scale.
»The balance must display 0.0 g with the empty
measuring cup on it. The measuring cup must
not be weighed.
6. Fill the measuring cup with 400 gram glass
beads (Figure 28).
25
26
27
28

Page 15
7. Now slowly and evenly fill the measuring chamber
of the device with the 400 gram glass beads
(Figure 29).
»For the filling, no funnel or similar device may be
used.
»Readings between 11.5 and 12.5 indicate that the
meter is correctly adjusted. (Figure 30).
»If the measured values are below 11.5 or above
12.5, then contact Schaller Messtechnik GmbH or
your dealer!
8. Fill another 400 gram of glass beads into the
measuring cup.
»The glass beads filled into the device in point 7
must remain in the device.
»It is not possible to weigh 800 grams of glass beads
at once, as the scale has a maximum weighing
range of 500 gram and will be damaged if over-
loaded.
9. Now slowly and evenly fill the measuring chamber
of the device with the another 400 gram of glass beads.
»For the filling, no funnel or similar device may be used.
»Readings between 21.0 and 22.0 indicate correct adjustment of the measuring
instrument for 800 g glass beads (Figure 31).
»If the measured values are below 21.0 or above 22.0, then contact Schaller
Messtechnik GmbH or your dealer!
29
30
31

Operating manual testing equipment
Page 16
6. Checking the calibration for the humimeter FS4
The device’s calibration should be checked every four weeks. For the check, the option-
ally available test equipment (article no. 11758) is required.
6.1 Checking the scale
1. Switch on the scale.
2. Place the test weight on the scale (Figure 32).
3. The scale should show a value of 500.0 g now
(Figure 33).
»If the balance displays a value with a deviation of
more than 0.5 g, the balance can be readjusted
(see manual of the scale).
6.2 Checking the device
To do so: The device as well as the test equipment must have a temperature between
17.0 °C and 23.0 °C.
1. Make sure that the measuring chamber of the device is empty.
»Empty the instrument and clean the measuring chamber if necessary.
2. Switch on the device.
3. Effect the automatic calibration.
4. Select the product type „Reference“ by pressing the
arrow keys (Figure 34).
5. Place the empty, clean measuring cup (0.5 liter) on
the switched-off scale. Then switch on the scale.
»The balance must display 0.0 g with the empty
measuring cup on it. The measuring cup must
not be weighed.
6. Fill the measuring cup with 400 gram glass
beads (Figure 35).
32
33
34
35

Page 17
7. Now slowly and evenly fill the measuring chamber
of the device with the 400 gram glass beads
(Figure 36).
»For the filling, no funnel or similar device may be
used.
»Readings between 11.5 and 12.5 indicate that the
meter is correctly adjusted. (Figure 37).
»If the measured values are below 11.5 or above
12.5, then contact Schaller Messtechnik GmbH or
your dealer!
8. Fill another 400 gram of glass beads into the
measuring cup.
»The glass beads filled into the device in point 7
must remain in the device.
»It is not possible to weigh 800 grams of glass beads
at once, as the scale has a maximum weighing
range of 500 gram and will be damaged if over-
loaded.
9. Now slowly and evenly fill the measuring chamber
of the device with the another 400 gram of glass beads.
»For the filling, no funnel or similar device may be used.
»Readings between 21.0 and 22.0 indicate correct adjustment of the measuring
instrument for 800 g glass beads (Figure 38).
»If the measured values are below 21.0 or above 22.0, then contact Schaller
Messtechnik GmbH or your dealer!
36
37
38

Operating manual testing equipment
Page 18
7. Checking the calibration for the humimeter BP1
The device’s calibration should be checked every four weeks. For the check, the option-
ally available test equipment (article no. 11758) is required.
7.1 Checking the scale
1. Switch on the scale.
2. Place the test weight on the scale (Figure 39).
3. The scale should show a value of 500.0 g now
(Figure 40).
»If the balance displays a value with a deviation of
more than 0.5 g, the balance can be readjusted
(see manual of the scale).
7.2 Checking the device
To do so: The device as well as the test equipment must have a temperature between
17.0 °C and 23.0 °C.
1. Make sure that the measuring chamber of the device is empty.
»Empty the instrument and clean the measuring chamber if necessary.
2. Switch on the device.
3. Effect the automatic calibration.
4. Select the product type „Reference“ by pressing the
arrow keys (Figure 41).
5. Place the empty, clean measuring cup (0.5 liter) on
the switched-off scale. Then switch on the scale.
»The balance must display 0.0 g with the empty
measuring cup on it. The measuring cup must
not be weighed.
6. Fill the measuring cup with 400 gram glass
beads (Figure 42).
39
40
41
42

Page 19
7. Now slowly and evenly fill the measuring chamber
of the device with the 400 gram glass beads
(Figure 43).
»For the filling, no funnel or similar device may be
used.
»Readings between 11.3 and 12.3 indicate that the
meter is correctly adjusted. (Figure 44).
»If the measured values are below 11.3 or above
12.3, then contact Schaller Messtechnik GmbH or
your dealer!
8. Fill another 400 gram of glass beads into the
measuring cup.
»The glass beads filled into the device in point 7
must remain in the device.
»It is not possible to weigh 800 grams of glass beads
at once, as the scale has a maximum weighing
range of 500 gram and will be damaged if over-
loaded.
9. Now slowly and evenly fill the measuring chamber
of the device with the another 400 gram of glass beads.
»For the filling, no funnel or similar device may be used.
»Readings between 20.3 and 21.3 indicate correct adjustment of the measuring
instrument for 800 g glass beads (Figure 45).
»If the measured values are below 20.3 or above 21.3, then contact Schaller
Messtechnik GmbH or your dealer!
43
44
45

Operating manual testing equipment
Page 20
8. Checking the calibration of the FSA
The device’s calibration should be checked regularly.
To do so: Optionally available test medium required
• Press the button Menu.
»The display will now show the main menu.
• Press the button Settings.
»The display will now show the settings.
• Press the button Device test.
»The display will now show the options for
checking the measuring accuracy (Figure 46).
8.1 Sensor test
1. Press the button Open Chamber
»By opening the measuring flaps completely, the flap opening adjusts itself cor-
rectly for the sensor test.
2. Check that the measuring chamber is free of
impurities and other materials.
3. Press the button Sensor.
4. Fill the material funnel with the optionally
available glass beads.
»Make sure that no other material is in the material funnel.
5. Press the button Startfor starting the
measurement (Figure 47).
»Make sure that the measuring chamber is full
with glass beads.
6. The display will show the current measuring
value and the result of the test (Figure 48).
»The result of the test is a green bar (if the test is ok) or a red bar (if the test is not
ok).
46
47
48
This manual suits for next models
8
Table of contents