Scharfen V 330 User manual

Technical alterations and alterations
Regarding accessories reserved
Operating Intructions for Food Slicer
Model V 330, V 330 F, V 330 T, V 330 FT
Hermann Scharfen
GmbH & Co. Maschinenfabrik KG
Ruhrstr. 76 - 76 a D - 58452 Witten
Telefon 02302–28277-0 Telefax 02302-22941

Seite 2
Contents
1. General Information 3
1.1. Notes regarding the operating instructions 3
1.2. Notes regarding warranty 3
1.3. Notes regarding security 3
1.4. Dimensions of the machine and technical data 4
1.5. Description of the machine 4
1.6. General plan of the machine 5
1.7. Usage 5
2. Installation and initial operation 6
2.1. Checking the contents of the carton 6
2.2. Installation 6
2.3. Electrical Installation 6
2.4. Checking the direction of blade rotation 7
3. Operation 7
3.1. Important notes before switching on the machine 7
3.2. Switch functions (main switch with signal lamp) 7
3.3. Thickness of slices 7
3.4. Operation 7
3.5. Slicing of end pieces 7
3.6. Slicing end pieces 8
4. Cleaning 8
4.1. How to proceed with cleaning 8
4.2. Cleaning the single parts 9
4.3. Cleaning the blade 9
4.4. Reassembling the parts 9
5. Sharpening the blade 10
5.1. Sharpening device 10
5.2. How to proceed for sharpening 10
5.3. Sharpening the blade 11
5.4. Remove sharpening device 11
6. Maintenance and cleaning 11
7. Trouble Shooting 12
8. Waste disposal 12

Seite 3
1. General Information
1.1. Notes regarding the operating instructions
Read the following hints before installing and operating this machine!
Make yourself familiar with this machine by reading this operating instructions carefully.
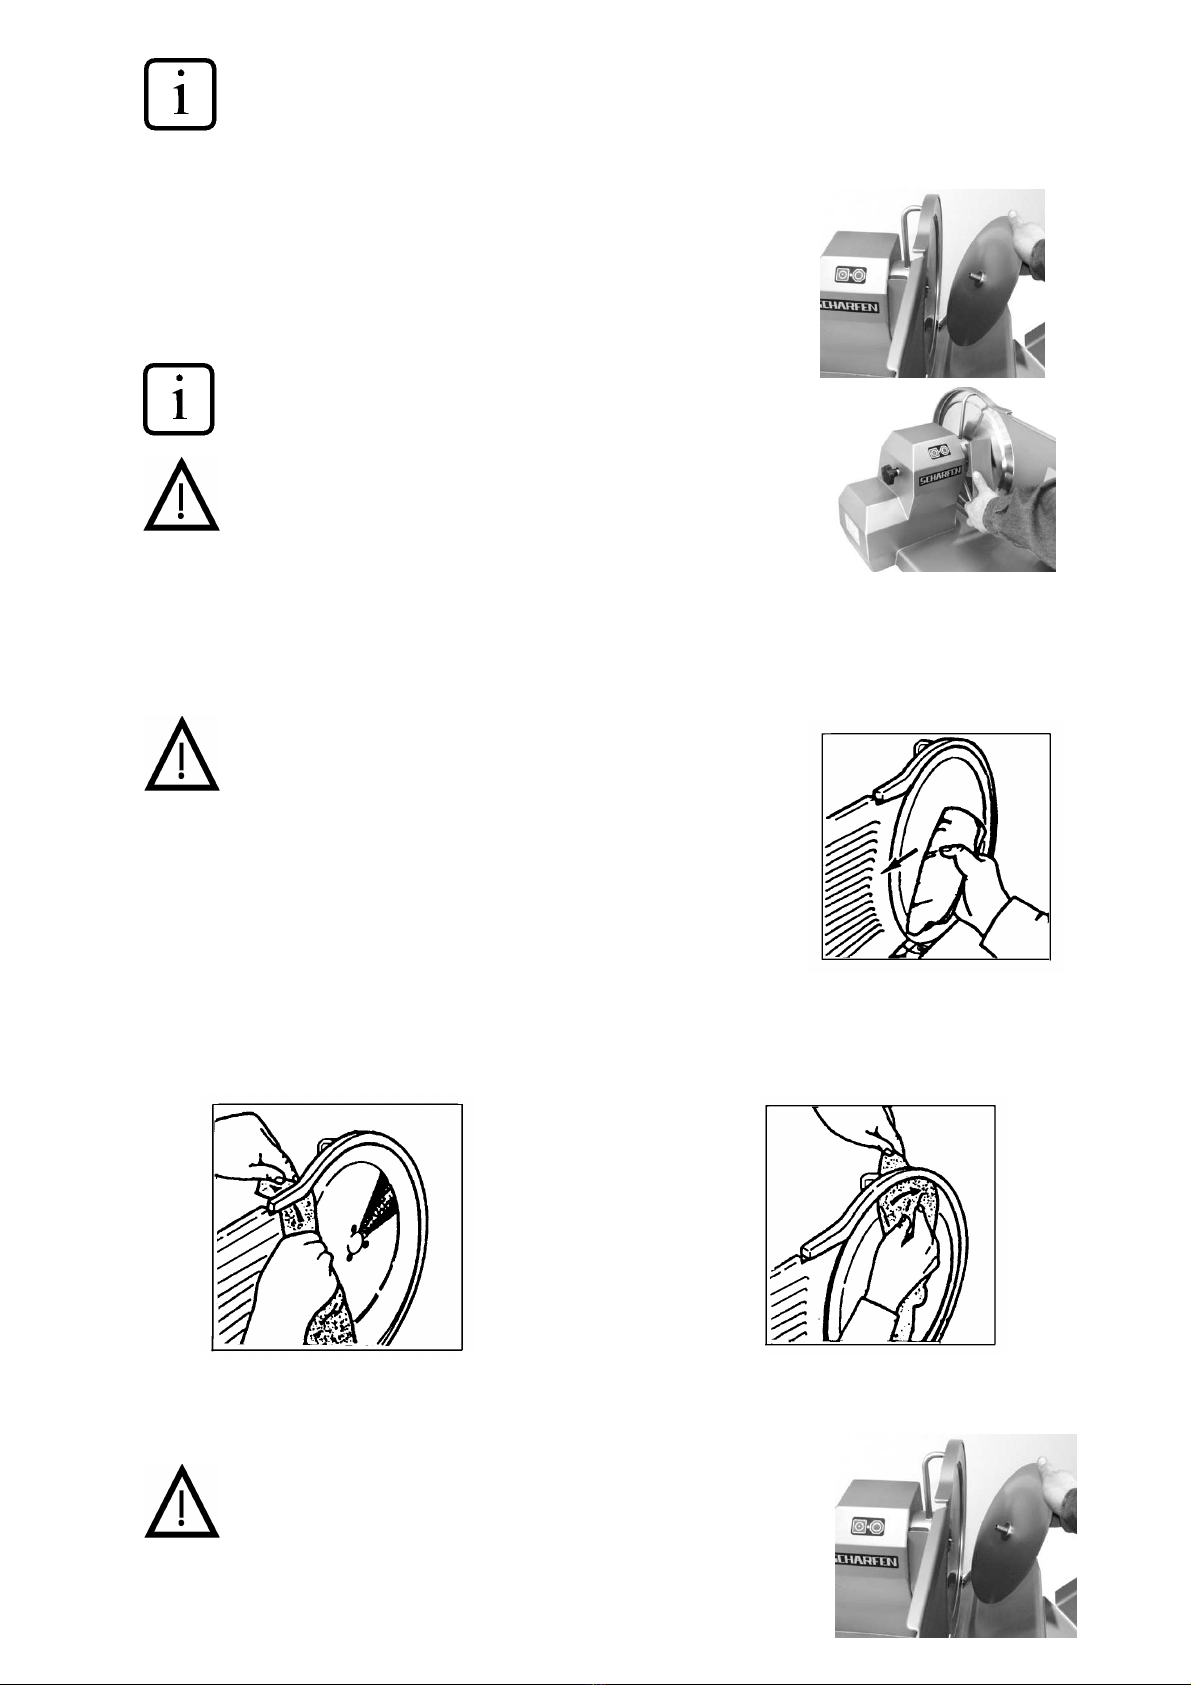
Within these operating instructions there are indicated the following safety notes and hints:
means Attention. Notes for probable danger and for avoiding mistakes.
means notes and hints regarding certain operation procedures.
1.2. Notes regarding warranty
The installation and initial operation has to be done by an authorised supplier or service technician.
Only trained persons are allowed to operate this machine. When required, the training has to be repeated.
Supervisory and operating staff have to read the operating instructions carefully before initial
operation of this machine. Starting, operating and cleaning have to be done according the
operating instructions and are only allowed after having been introduced to the way of working.
In case of
-unauthorised installation
-unauthorised electrical installation
-wrong operation
-misuse
-constructional alteration
-detaching security or protecting equipment
-and in case of using non-original Scharfen spare parts
any responsibility from our side is refused.
In above cases the operator acts on his own risk and is responsible himself for damages which might
occur.
Therefore, only use original Scharfen spare parts!
In case high pressure or steam cleaning devices or water plugs are used any claims
regarding warranty will be refused.
This is valid also for faults and damages which are caused by natural wear and tear.
The pictorial representation might differ from the machine supplied because of regional specific
requirements or as a result of technical improvement.
The contents of these operating instructions is not affected by that.
1.3. Notes regarding security
This machine corresponds to legal security and hygienic requirements. Nevertheless there is a risk of
getting hurt in case of wrong or inattentive operation or maintenance. Especially for your hands or fingers
there is a risk of injury. The operating staff has to be trained carefully how to operate and maintain this
machine according to these operating instructions.
Pay attention in any case to the following notes regarding security:
See to it that unauthorised, untrained persons and in particular children cannot start the
machine.
It is not allowed to detach, to modify or to disregard protecting or security equipment.
Otherwise there is a high risk of injury.
Always work with concentration, do not let distract yourself from your work.
Only cut food products as indicated in these operating instructions.
Never carry out experiments. Never try to cut foreign material.
Never cut deep frozen products.
Never check the sharpness of the blade with your fingers.

Seite 4
Never detach the blade without suitable devices.
Never use the machine as a place to put something on or to do other work on.
Take care that the floor space is clean, dry and non-slip.
In case the current supply cable or the plug are defective, these parts have to be exchanged or repaired by
your after sales service or an electrician.
For cleaning pull the plug in any case.
In case of non-typical noise switch off the machine immediately.
In case the fault cannot be put right by yourself, you have to inform your after sales service.
1.4. Dimensions of the machine and technical data
V 330 V 330 F
overall dimensions L x B x H 640 X 590 X 430 mm 730 x 650 x 430 mm
counter space required L x B 380 - 480 X 410 mm variable 380 – 480 x 410 mm
working space L1 x B1 640 X 710 mm 775 x 740 mm
max. cutting capacity app. 250 X 200 mm app. 320 x 220 mm
app. 190 mm app. 210 mm
thickness of slices (infinitely variable)0 - 25 mm 0 – 25 mm
diameter of blade 330 mm 330 mm
vibration total value < 2,5 m/s² < 2,5 m/s²
sound level < 70 db(A) < 70 db(A)
weight app. 50 kg app. 65 kg
voltage and cycles
power see rating plate
year of production
Manufacturer: Hermann Scharfen GmbH & Co. Maschinenfabrik KG
Ruhrstr. 76-76a, D - 58452 Witten, Tel. 02302/28277-0
1.5. Description of the machine
The blade is driven electrically with a 1-phase or 3-phase motor for continuous operation with high power
transmission to the blade because of Power Grip belt drive. This motor is maintenance-free and air-cooled.
By means of a special air circulation the warming up of the motor is very low, especially around the blade.
The carriage with the food product has to be moved forward and backward by hand. The food product has
to be pushed against the blade by hand.
The material used in the food zone corresponds to all requirements of food hygiene.
The complete machine body, the thickness plate, the blade guard and the carriage are made of stainless
steel. The blade is hard chromed.
All visible bearings as well as open sliding surfaces are lubricated only with lubricant suitable for food
zones.
H
L
B1
B
}

Seite 5
The hand protection of the carriage, the protecting plate of the end piece holder and the rifled plate of the
end piece holder are made of a break-proof plastic allowed for food processing.
For switching the machine on and off there is used a double red /green push button which is illuminated
when the machine is switched on.
Self-starting of the machine after a voltage drop is avoided by the electric control.
The carriage can only be tilted aside when the thickness plate is closed completely. When the carriage is
tilted aside, the thickness plate is locked in this position.
The protecting and security equipment as well as electrical and mechanical components correspond to
regulations in force.
The machine is equipped with the following security equipment:
no self-starting of the machine after a voltage drop
double push-button
carriage with large non-removable hand protection on the operator's side
fixed ring around the blade, non-removable
central blade protection, fixed, removable
locked thickness plate when the carriage is tilted aside
sharpening device with cover plate in the area of the blade edge
1.6. General plan of the machine
1 fixed ring 10 star knob
2 blade 11 carriage
3 blade guard 12 guiding axle for carriage
4 protecting plate of end piece holder 13 rubber foot
5 thickness plate 14 name plate
6 end piece holder plate 15 guiding axle end piece holder
7 thickness knob 16 hand protection carriage
8 movable lever 17 deflector
9 knurled knob for end piece holder plate 18 push button with signal lamp
19 star knob fixing screw blade guard
1.7. Usage
The following food products can be sliced by taking into account the maximum cutting capacity:
all kinds of sausages
ham / bacon
roast meat / cooked ham
meat
cheese
6 5 4 3 2 1
7 8 9 10 11 12 13
14
19 18 17 16 15

Seite 6
bread
The following products are not allowed to be sliced because of danger to get injured:
- NON FOOD articles
- food products with bones
- deep frozen food products
For slicing cheese we recommend the tefloned execution. Carriage, thickness plate, blade guard
and blade are tefloned.
For slicing bread we recommend to use a toothed blade on the machine.
The machine has to be installed in a shopping room. The installation in moist rooms is allowed. The room
temperature must not go under the limit of 10°C and not over the limit of 40°C.
The machine is drip-proof only.
High air humidity and condensation water may damage the machine. The machine is not splash-proof.
2. Installation and initial operation
First read the operating instructions very carefully!
You have to pay attention to all notes.
Operating procedures have to be carried out as described.
Always work carefully and with concentration, this way you can avoid damages and injuries. The
installation, introduction and initial operation has to be done by an authorised supplier or service
technician.
2.1. Checking the contents of the carton
The supplied carton has to have the following contents:
-SCHARFEN Food Slicer model V330
- sharpening device
- these operating instructions
2.2. Installation
The food slicer model V 330 has to be installed on a plain, horizontal, non-slip and stable
surface. Recommended height of the working surface about 800 mm. Pay attention to the
required counter space.
2.3. Electrical Installation
Before you plug in the machine, you have to check if the current supply is the same as indicated on the
rating plate. In case there are discrepancies you have to inform the supplier or technical service.
Under no circumstances plug in the machine!
The socket-outlet has to be equipped with earthing contact. It has to be connected according to customary
regulations.
A defective socket-outlet may damage the machine or endanger the operator.
The socket has to be installed at a place which can be reached easily by the operator, so that in case of
emergency the plug can be pulled out quickly. In any case the socket must not be under the counter or
at a place which cannot be reached easily.
In case it is necessary to exchange the plug, this has to be done by an electrician or the after sales
service.

Seite 7
2.4. Checking the direction of blade rotation
Switch on the machine.
Push the green push button.
Signal lamp is illuminated.
For machines with 3-phase motor:
The blade has to rotate in direction of arrow (counter clockwise).
In case the blade rotates in wrong direction, the positions
of the poles in the plug have to be changed by an
electrician or service technician.
3. Operation
3.1. Important notes before switching on the machine
Because of security reasons pay attention to the following notes:
- first read these operating instructions carefully
- take care that the machine is placed on a stable and secure surface
- work with concentration
- never touch the blade
3.2. Switch functions (main switch with signal lamp)
green push button = main switch on
red push button = main switch off
3.3. Thickness of slices
The thickness of slices is infinitely variable from 0 to 25 mm. In order to adjust the thickness of the slices
you have to turn the thickness knob. Turning to the right: thickness plate opens. Turning to the left:
thickness plate closes. The scale on the thickness knob serves as adjusting aid. In order to adjust a slice
thickness of more than 15 mm you have to turn the thickness knob over 15 mm. For the maximum slice
thickness you have to turn the thickness knob nearly two complete rotations.
3.4. Operation
Pull the carriage backwards for loading the carriage.
Pull back the end piece holder from the blade by using the handle
(for security reasons the end piece holder cannot be lifted up
within the area
< 60 mm distance to the blade)
Lift up end piece holder
Lay the food product against the back of the carriage.
Push the end piece holder by hand towards the thickness plate
Place the end piece holder upon the food product
Adjust the thickness of the slices with the thickness knob.
Switch on the machine at the green main switch.
Hold carriage and food product by hand.
Push food product with slight pressure towards the thickness plate.
Move carriage forward and backward.
After having finished the slicing procedure turn thickness knob to zero.
Switch off the machine.
3.5. Slicing of end pieces
Before placing the remaining piece of the food product in the carriage you have to cut off the
pointed end. Otherwise the food product cannot be held correctly by the end piece holder. It is
even better to turn the original cutting side of the food product to the end piece holder.

Seite 8
Attention! Risk of getting hurt!
Never try to hold the food product by hand, you may hurt yourself seriously!
Always use the end piece holder.
In case the end piece should clamp or move proceed as follows:
- Switch off the machine
- Pull up the end piece holder
- Place the end piece into the carriage as described below in chapter 3.6.
3.6. Slicing end pieces
Pull the carriage backwards for loading the carriage.
Pull back the end piece holder from the blade by using the handle (for security reasons the end piece
holder cannot be lifted up within the area
< 60 mm distance to the blade)
Lift up end piece holder
Lay the food product against the back of the carriage.
Push the food product by hand towards the thickness plate.
Place the end piece holder behind the food product.
Adjust the thickness of the slices with the thickness knob.
Switch on the machine at the green main switch.
Hold carriage by hand.
Push end piece holder with slight pressure towards the thickness plate.
Move carriage forward and backward.
After having finished the slicing procedure turn thickness knob to zero.
Switch off the machine.
4. Cleaning
Before initial operation and after a longer period of standstill the machine has to be cleaned carefully.
With permanent use of the machine you have to clean it at least one time per day or if necessary also a
few times per day. For cleaning proceed as follows:
Risk of getting hurt!
Be careful when cleaning the machine. Especially in the area of the knife there is a risk of
injury. Always work with concentration, do not let distract yourself from your work.
4.1. How to proceed with cleaning
Switch off the machine.
Pull off the plug.
Close the thickness plate completely by turning the thickness knob to the
left.
Remove end piece holder plate
Pull the carriage to the front.
Pull end piece holder to the back and turn it upwards
Loosen knurled knob of the end piece holder plate
Push end piece holder plate slightly downwards
Take off end piece holder plate
Turn back end piece holder
Take out of the carriage the metal sheet with spikes
(only model V 330 F)
Tilt carriage aside
Loosen the star knob of the carriage.
Pull the carriage to the utmost front position.
Tilt the carriage aside.

Seite 9
The carriage cannot be tilted aside in case
-the thickness plate is still opened
-Always tilt the carriage with care, do not use force!
Remove blade guard
Loosen the star knob and hold the blade guard with the other hand.
By pushing against the star knob the blade guard is tipped against
your hand and you can take the blade guard off.
Remove deflector
Push deflector upwards and take it off to the front.
For cleaning only use usual washing-up liquids. Do not
use scratching or scouring cleansing agents or devices.
The machine is only drip-proof. Therefore do not use high
pressure cleaning devices, water hoses or similar devices.
Furthermore you must not pour water over the machine.
Danger of short circuit or machine defect. In such cases
any claims regarding warranty will be refused.
4.2. Cleaning the single parts
Clean all removed parts separately with warm water. Wash them up with clear water and dry them.
4.3. Cleaning the blade
Attention! Risk of getting hurt!
Make sure that the thickness plate is closed completely
When the thickness plate is closed completely clean the inside of the
blade with a wet cloth from the centre towards the edge.
Proceed for the backside of the blade in the same way.
Dry the inside and the backside of the blade carefully.
1. Put a moist cloth between the blade and the fixed protecting ring.
2. Turn the blade by hand one complete rotation and push the moist cloth against the protecting ring
while turning.
1. 2.
4.4. Reassembling the parts
Reassemble the parts in reverse order. (4.3. -> 4.1).
Attention! Risk of getting hurt!
Reassemble the parts with concentration

Seite 10
Do not let distract yourself from your work
Place the splice bar of the blade guard onto the plastic bolt.
Turn the blade guard to the blade and see to it that the flange of the
blade guard is positioned in the centre of the blade.
Tighten the blade guard by turning the star knob clockwise by hand.
Do not use force.
Turn the carriage back.
Tighten the star knob of the carriage.
Mount the end piece holder plate
Screw tight the knurled knob
Check again the complete machine. Only after having checked the machine plug it in for operation.
5. Sharpening the blade
In case the cutting result should no longer be satisfactory or the food products are getting "beards", the
blade has to be sharpened. There cannot be indicated a certain period for sharpening as this depends on
the time of operation and the kind of food products.
Pay attention to the fact that the blade has to be exchanged if the gap between blade
edge and the fixed protecting ring is more than 5 mm. According to security regulations
further sharpening of the blade it is not allowed when the gap is more than 5 mm.
The supplied sharpening device is loosening its effect. A further sharpening is forbidden.
In case it is necessary to exchange the blade this has to be done by a service technician.
5.1. Sharpening device
Every sharpening device is marked with the serial number of the machine. Only this
sharpening device may be used for sharpening.
Usage of other sharpening devices can cause serious injuries or damage the machine.
Never use another sharpening device.
The sharpening device is equipped with two fine sharpening stones, 1 stone for sharpening and 1 stone for
taking off the burr.
Never use the sharpening device on an uncleaned machine as the stones will then loose their efficiency. In
case this should happen anyway, clean the stones carefully with washing liquid and a brush.
5.2. How to proceed for sharpening
Open the thickness plate completely.
Position the carriage in the centre.
Lift up end piece holder
Mount the sharpening device in such a way to the
thickness plate that the cone of the sharpening device fits
into the slit on the bottom of the thickness plate (direction
of arrow)
Pull out the pin on top of the sharpening device in
direction of arrow and move the sharpening device over
the edge of the thickness plate.
Move the sharpening device with the pulled out pin to the
front in direction of the blade (direction of arrow), so that
the pin is engaged in the hole of the thickness plate.
The sharpening stones are now in the correct position, i.e.
the blade edge is positioned between the two sharpening stones.

Seite 11
5.3. Sharpening the blade
Switch on the machine
Turn the yellow handwheel of the sharpening device in direction 1. By means of
this the sharpening stone sharpening the blade is pushed towards the blade.
Approximately 15 seconds are enough.
Switch off the machine
check if there has been built a visible burr at the edge of the blade
If not: Sharpen again
Switch on the machine again
For taking off the burr turn the yellow handwheel in direction 2. Now both
sharpening stones are touching the blade.
Approximately 2 seconds are enough to take off the burr.
When the sharpening procedure is terminated turn the yellow handwheel to 0.
5.4. Remove sharpening device
Switch off the machine.
Pull the pin of the sharpening device upright in direction of arrow.
Tilt the sharpening device aside to the right.
Remove the sharpening device.
Now clean the machine entirely from wheel swarf, see chapter 4. Cleaning. First clean the machine with a
dry cloth. Then make a complete wet cleaning.
Attention! Risk of getting hurt!
Always work with concentration! Do not let distract yourself from your work!
Never check the sharpness of the blade with your fingers.
6. Maintenance and cleaning
cleaning detergent procedure cleaning device procedure after cleaning
machine warm water,
detergent, acid free
from chlorine
manually cleaning rag, cleaning
brush
wash up with clear water,
dry
machine with
tefloned parts
warm water,
detergent, acid free
from chlorine
manually cleaning rag, cleaning
brush
wash up with clear water,
dry
dry tefloned parts very
carefully
detached parts warm water,
detergent, acid free
from chlorine
manually cleaning rag, cleaning
brush
wash up with clear water,
dry
blade warm water,
detergent, acid free
from chlorine
manually cleaning rag or sponge wash up with clear water,
dry
sharpening stones warm water,
detergent, acid free
from chlorine
manually cleaning brush degrease with degreasing
agent (spirit or similar)
Clean the machine at least one time per day.
If necessary sharpen the blade.
The blade has to be exchanged if the gap between blade edge and the fixed protecting ring is more than
5 mm.
If necessary clean or exchange the sharpening stones.
For lubricating only use acid free oil.
Oiling points:
Guiding axle of end piece holder (1 time per week)
Guiding axle of carriage (as required)
0
1
2
15 sec.
< 2 sec.

Seite 12
Take off the blade guard and lubricate the threaded bushing, the adapter, and
the fixing screw of the blade guard (we recommend Autol Top 2000, which is
used in our factory)
Lubricate the thread of the star knob at the bottom of the carriage arm (we
recommend Autol Top 2000, which is used in our factory)
7. Trouble Shooting
Trouble Solution
grinding noise blade guard has not been mounted correctly
loosen blade guard, mount it again and fix it
deflector has not been mounted correctly
blade guard or deflector are dirty
clean as described in chapter 4.
machine stops automatically short-term voltage drop, switch on the machine again
machine is getting warm wall socket and plug have to be checked by an electrician
8. Waste disposal
The producer is obliged to take back the machine for waste disposal. For this purpose the machine can be
returned to the manufacturer free of charge.
This manual suits for next models
3
Table of contents
Other Scharfen Kitchen Appliance manuals