Schleibinger CDF User manual

Schleibinger CDF/CIF - Freeze-Thaw Testing Equipment
Schleibinger Geräte
Teubert u. Greim GmbH
Gewerbestraße 4
84428 Buchbach
Germany
Tel. +49 8086 9473110
Fax. +49 8086 9473114
www.schleibinger.com
info@schleibinger.com
August 29, 2019
REV02

Contents 2
Contents
1 Introduction 4
2 Safety instructions 5
2.1 Protection switches . . . . . . . . . . . . . . . . . . . . . . 5
2.2 Personalsafety........................ 6
2.2.1 Firstaid........................ 6
2.3 Safety instruction for cooling liquid . . . . . . . . . . . . . 6
2.3.1 Protectives and behavioral rules . . . . . . . . . . 6
2.3.2 Reaction to malfunctions . . . . . . . . . . . . . . 7
2.3.3 Disposal of the cooling liquid . . . . . . . . . . . . 7
2.4 Safety instructions for the refrigerant . . . . . . . . . . . . 7
3 Installation 8
3.1 Set up of the CDF test equipmpent . . . . . . . . . . . . . 8
3.2 Configuration of the Network access . . . . . . . . . . . . 9
3.2.1 Network configuration between data logger and PC 9
4 Principles of operation 13
4.1 General ............................ 13
4.2 System operation . . . . . . . . . . . . . . . . . . . . . . . 13
4.3 Mechanical construction . . . . . . . . . . . . . . . . . . . 14
4.3.1 Testing bath . . . . . . . . . . . . . . . . . . . . . . 14
4.3.2 Refrigerant equipment . . . . . . . . . . . . . . . . 15
4.3.3 Filling the system . . . . . . . . . . . . . . . . . . . 16
4.3.4 Cooling liquid . . . . . . . . . . . . . . . . . . . . . 16
4.4 Cube Test, ASTM C 666 Procedure A . . . . . . . . . . . 17
4.5 Keyswitch........................... 18
4.6 Transport of the CDF test device . . . . . . . . . . . . . . 19
4.7 Emptying the cooling liquid . . . . . . . . . . . . . . . . . 19
4.8 Coooling water connection (optional) . . . . . . . . . . . . 19
5 Operation of the controller 20
5.1 Start.............................. 20
5.2 Status............................. 21
5.3 Cycletime........................... 21
5.4 Setup ............................. 22
5.4.1 Target value . . . . . . . . . . . . . . . . . . . . . . 22
5.4.2 Profile input . . . . . . . . . . . . . . . . . . . . . . 23
5.4.3 Display ........................ 24
5.4.4 Clock ......................... 25
5.4.5 System menu . . . . . . . . . . . . . . . . . . . . . 25

Contents 3
6 Software handling with web browser 32
6.1 Measured Values . . . . . . . . . . . . . . . . . . . . . . . 32
6.2 Data.............................. 33
6.3 Profile............................. 35
6.4 System ............................ 37
6.5 Help.............................. 37
7 Technical data 38
7.1 Values for the security devices . . . . . . . . . . . . . . . 38
8 Service hints 39
8.1 Repair and maintenance . . . . . . . . . . . . . . . . . . . 39
8.2 Maintenance controller . . . . . . . . . . . . . . . . . . . . 40
8.3 Helpyourself ......................... 40
9 Schematics and data sheets 42
9.1 Fuses ............................. 42
9.2 Electronics circuit diagram . . . . . . . . . . . . . . . . . . 42
9.3 Refrigeration diagram . . . . . . . . . . . . . . . . . . . . 43
10 Manufacturer 43

1 Introduction 4
1 Introduction
We congratulate you on the purchase of the CDF test equipment. With
this equipment, you have acquired a high-quality test device for the real-
ization of the freeze-thaw resistance test. Equipped with a microprocessor-
controlled controller with internet interface, the device complies with the
state of technology and thus meets the requirements of the future. Dur-
ing the execution of the equipment, the relevant safety regulations for
refrigeration and electrical systems were taken into account.
The technology of the system is easily accessible from all sides thanks
to removable panels. Thick meticulously executed piping insulation and
the transverse ventilation of the unit part reliably prevent condensation.
Very good fit of all components is achieved by the use of CNC punching
and CNC bending presses. Robust surfaces result from powder coating
of all sheet metal parts.
Figure 1: CDF test equipment

2 Safety instructions 5
2 Safety instructions
This machine is constructed according to DIN EN 378-1class A. This
means it is allowed to run this machine in a room where people are
sleeping, disabled persons are working, or a lot of not instructed people
are present. So there are no special requirements in the training of the
people working with, or nearby the machine.
A mix of 45 % water and 55 % glycol is used as a cooling liquid. Ac-
cording to the European water protection standard the cooling liquid is
assigned to level 0. There are no special requirements for environmental
or water protection for cooling liquid.
Until 2017, the CDF machines were built with the refrigerant R507. Since
2017 the Schleibinger CDF machines are being built with the refrigerant
R448a. Compared with CO2(GWP = 1.0) R448a has a high potential for
global warming (GWP = 1387) but lower than the previuous used R507
(GWP = 3800). This fact requires a careful handling with the refrigerant.
Service and repair jobs at the cooling machine are allowed only for well
trained and special educated persons. Please contact Schleibinger for
further questions.
The lubricant of the cooling machine is long-term stable and does not
need to be changed during the service life. The oil is classified at water
dangerous class 1. There are no special oil protection requirements
necessary. The CDF machine stops automatically when a leak occurs
in the system.
The CDF test machine has a mains connection with a 3x 32A/400V/50Hz
CEE connector. As circuit protection 3x 32A are necessary.
While using CDF equipment the environmental conditions should be at
10 to 28 °C at maximum 65 % relative humidity. At higher humidity,
more condensation may be present on some machine parts. Below 10
°C, a special winter controller should be ordered with the machine. At
temperatures above 28 °C additional water cooling system is required.
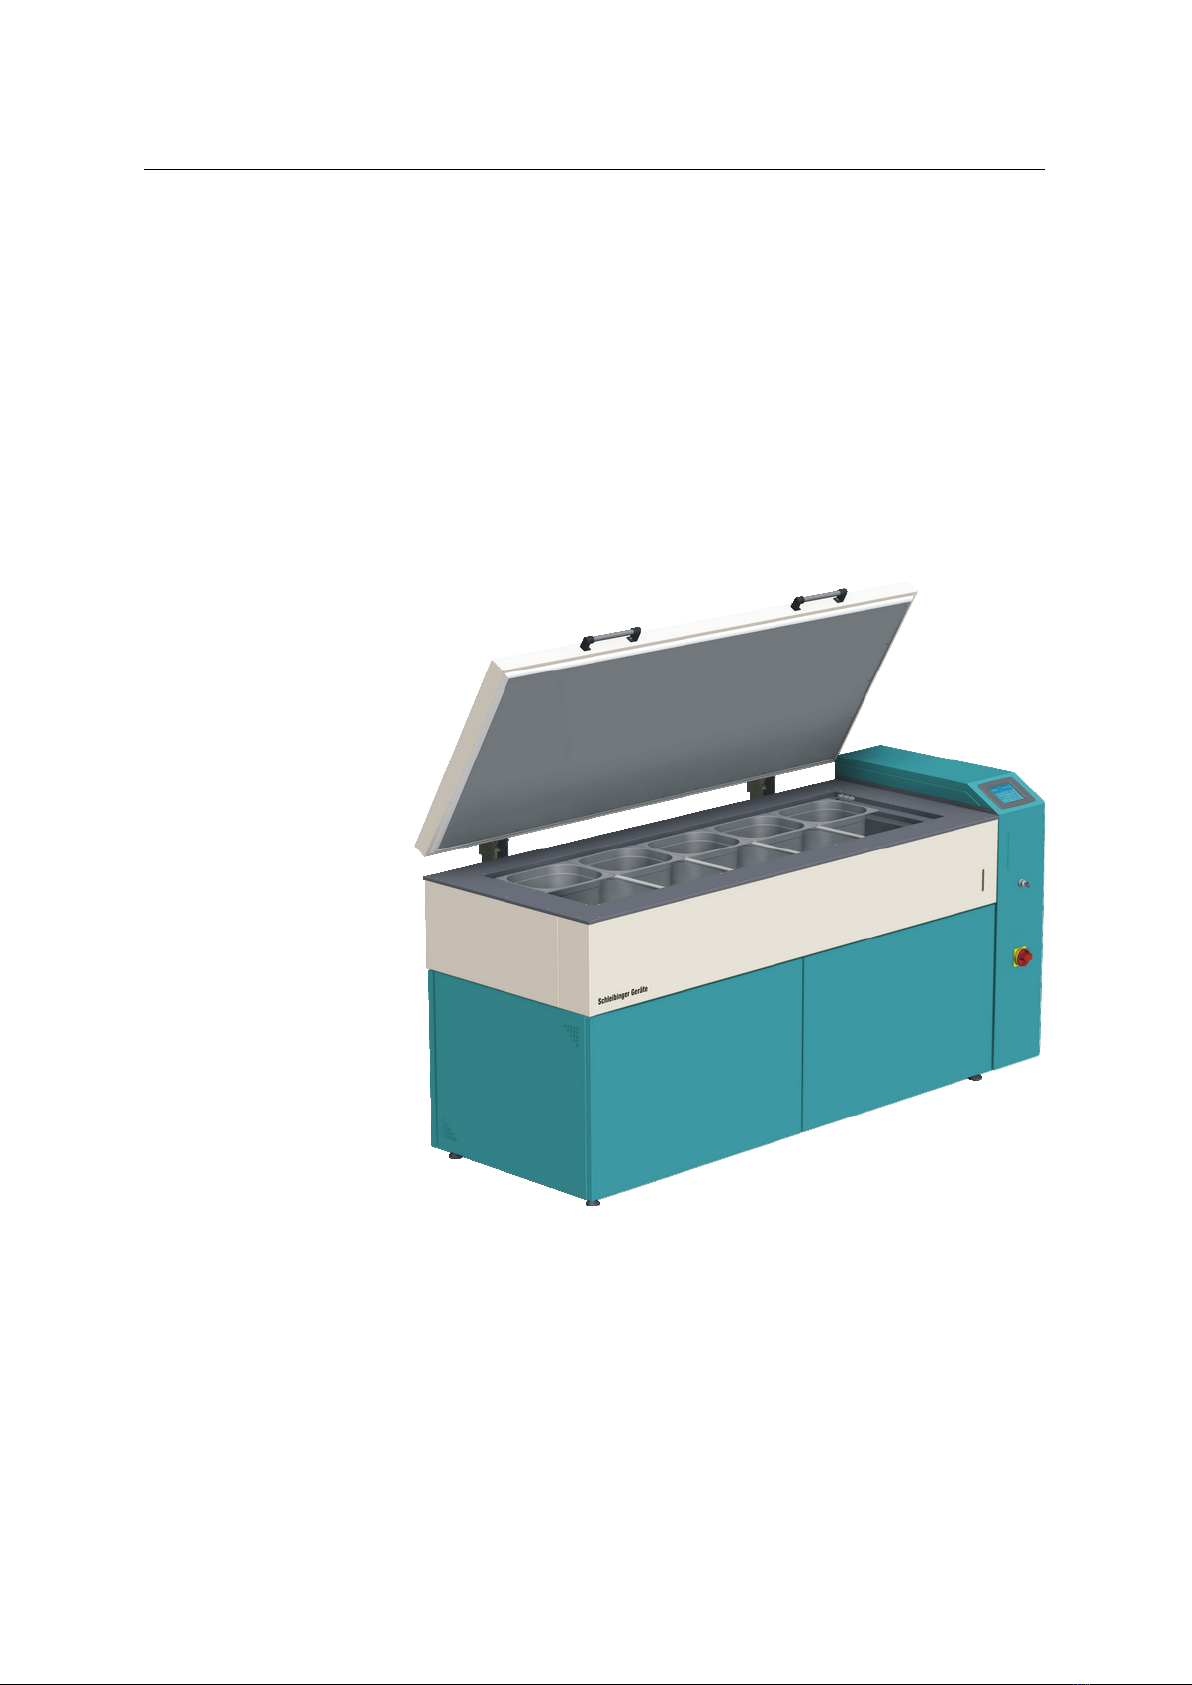
Opening the lid of the cooling bath is only permitted if the bath
temperature is close to room temperature. We strongly recommendAttention!
using waterproof isolation gloves for protection. Contact to the cooling
bath at low temperatures may cause freezing the skin.
2.1 Protection switches
The CDF machine is equipped with the following safety and security
components, which are adjusted by Schleibinger.
• Overtemperature protection for the heating unit (70 °C)
• Level indicator for the testing bath and the buffer.
• Safety switching device for limiting the high pressure for the com-
pressor.
• Safety switching device for limiting the low pressure for the com-
pressor
Changing the setup of the security devices is prohibited! Any ma-
nipulation will lead to a total warranty loss!Attention!

2 Safety instructions 6
2.2 Personal safety
To ensure the greatest possible protection for employees using the freeze-
thaw equipment follow carefully all standards and laws for personal pro-
tection and the standards EN 378-1 and EN 378-2 as well.
• Do not swallow the heat transfer medium (cooling liquid) and an-
tifreeze concentrate (glycol)!
• Avoid skin contact!
• Avoid eye contact!
• Risk of frostbite on prolonged skin contact and appropriate tem-
perature!
During hanging and removal of the sample containers:
• Avoid contact with skin. Wear protective gloves!
• Avoid contact with eyes. Wear safety glasses!
2.2.1 First aid
In case of contact with heat transfer fluid follow the instructions:
• In case of contact with eyes, rinse immediately with plenty of water
and seek medical advice.
• In case of contact with clothes and skin, take off immediately all
contaminated clothing and wash the skin immediately with plenty
of water for a minimum of 10 minutes.
2.3 Safety instruction for cooling liquid
• Frostbite at low temperatures and direct skin contact.
• Intake via the skin can lead to health problems.
• Ingestion may cause damage to health.
• May irritate the respiratory system, eyes, skin, digestive tract.
• May cause nausea, vomiting, dizziness, convulsions, arrhythmia,
difficulty breathing, impaired vision, kidney damage, liver damage,
and neve damage.
• Pentration into soil, water and sewage system is to be avoided.
2.3.1 Protectives and behavioral rules
• Do not leave the lid of the CDF machine open.
• Cover not used place in the CDF bath with some cover plates or
dummy containers.
• Wear eye/face protection.
• Wear suitable gloves.
• Avoid splashing when refilling.
• Avoid splashing when taking sample container.
• Do not use reactive substances.
• Do not eat, drink or smoke.

2 Safety instructions 7
• Avoid breathing vapors.
• Avoid contact with eyes, skin and clothing.
• Immediately remove product residues from the skin, gently clean
the skin and dry thoroughly.
2.3.2 Reaction to malfunctions
• In the case of safety-endangering defects and malfunctions, do not
use the device and inform those responisible.
• Collect spilled liquid with adsorbable non-sombustible material (such
as diatomaceous earth, sand) and dispose it according to local
regulations.
• In case of fire: use fire extinguisher. Do not use water in the full
jet! Do not breath fumes!
2.3.3 Disposal of the cooling liquid
• Avoid release to the environment.
• Do not empty into drains; dispose of this material and its container
in a safe way.
• Completely emptied or cleaned metal containers can be released
for scrap utilization.
• Completely emptied or cleaned plastic containers can be returned
for recycling.
2.4 Safety instructions for the refrigerant
The refrigerant R448a belongs to the group L1 according to EN 378-1.
It is not flammable and has no significant harmful effects on humans.
• The refrigerant is heavier than air and collects in the event of leak-
age on the ground.
• It is hardly noticeable by smell.
• At high concentrations, oxygen deficiency may occur. There is
danger of suffocation.
• When inhaling high concentrations, there is the possibility of car-
dac sensitization by adrenaline. It can lead to cardiac arrythmias
until cardiac arrest.
• Liquid refrigerant on the skin and in the eyes cuses frostbite.
• In case of leaks, protect hand and face with gloves and safety
glasses.
• Open flame or very hot surfaces can cause decomposition of the
refrigerant, producing very toxic gases. Smoking and open flames
are therefore prohibited.
• Ask for service for finding leaks!
Do not change safety, protection and control devices! When refilling,Attention!
use only the refrigerant R448a. Refrigerant may only refilled in a liquid
state.
• In case of fire, switch off the refrigeration system. Containers and
system parts that are filled with refrigerant can burst violently.
• When extinguishing, cool the container and system parts with wa-
ter spray.

3 Installation 8
3 Installation
3.1 Set up of the CDF test equipmpent
The floor should be designed for a load of at least 300 kg/m2. For a
purely air-cooled system, the room size should be at least 200 m3and
be well ventilated to dissipate the waste heat. According to EN 378-1,
the volume of the room should be at least 8 m3in terms of any escaping
refrigerant.
For the set up of the CDF equipment, please ensure free air circulation
around the equipment (2).
The CDF machine should be set up to be level. Please check this by a
level at the testing bath (3). If necessary, the device can be leveled with
four adjustable feets. It should be adjusted to ±1 mm/m exaclty.
Figure 2: Set up of the CDF machine.
Figure 3: Level check.

3 Installation 9
3.2 Configuration of the Network access
The Schleibinger data logger, the Slabtester and the CDF machine are
equipped with a 100 BaseT network interface. It can be integrated within
a local Intranet or globally into the Internet. The network configuration
can be done with the program Chiptool which can be found on USB stick
delivered with the equipment or downloaded from the page:
www.schleibinger.com/chiptool
.
Example of Default Settings:
Device: Data logger for the shrinkage cone
Customer: Miximaxi AG
Serial Nr: 201312324
MAC-ID: 00:30:56:90:7D:C3
Hostname: Scone_201312324
[] Obtain an IP-Address automatically
[] Use the following IP-Addresse: IP addresse:.......
Subnet mask:.......
3.2.1 Network configuration between data logger and PC
There are two options for the network configuration of the data logger
and PC available:
• by automatically getting an IP address = default setting at time of
delivery
• by using a static IP address
Automatically getting IP address
Connection of the data logger into a local network with DHCP- and DNS-
Server is the simplest and fastest method.
• Connect the data logger with your local network (switch) using the
network cable which was delivered with the device and switch on
the data logger (24V adapter)
• Enter the host name into the address line of your browser in a form
"http://. . . " (Fig. 4.)
A DHCP-Server assigns a free IP address to the data logger. You can
access the data logger via the default host name using the DNS (Fig. 4).
Hint: DHCP server are scanning the network from time to time assigning
a IP address and a symbolic name to all computers in the network. This
procedure may take some time. So please wait some minutes until you
try to access the data logger with its host name.
Alternatively, in the case the host name - DNS-server does not work or
supported in your network the connection with the data logger can be
done by using of the assigned IP address. This IP address can be found
from the program Chiptool, mentioned above (Fig. 5).
Make sure the data logger always getting the same IP address from
the DHCP server. Enter the IP address assigned by the DHCP server
into the address line of the browser instead of the host name (Fig. 6).

3 Installation 10
Figure 4: Accessing the data logger with a symbolic server name.
Figure 5: Readout the IP address to the data logger with the program
chiptool.
Figure 6: Accessing the data logger with a fix IP address.

3 Installation 11
using static IP address
If no network avaliable or you are not allowed to connect a measurement
device into your local network, the Schleibinger data logger can be con-
nected directly to a PC, e.g. with an older notebook. Most of the PCs are
configured in a way, that they take an IP address automatically assigned
by the DHCP server. In case of a direct connection between data logger
and PC, both peers are missing the DHCP server. For this chase use a
static IP address.
a) set static IP address on the computer:
Open
Control Panel
→
Network and Internet
→
LAN-Connection
→
Properties
and set a static IP-address from the so called private area
e.g.
192.168.1.1
and a sub net mask
255.255.255.0
. Gateway doesn’t
has to be set. See figure 7
b) set static IP address on the data logger:
Connect the data logger and the PC with the static IP address with a
cross-wired Ethernet cable (Cat5, RJ45)- not delivered with the equip-
ment, and start the program chiptool. The program is searching for the
data logger and if the PC is configured correctly and the right connection
cable is used, the Schleibinger device appears in the window of the pro-
gram. Click with the right mouse button on the entry within the window
and choose IP configuration. A small window appears. Enter an other
static IP address from the same private area as well [Fig. 8). This IP
address has to be different from one of PC e.g.
192.168.1.2
and the
same sub net mask. Finally click on
Config
.
Enter the new IP address of the data logger in the header of the browser.
The main page of the data logger should appear.
For the integration of the data logger into the network infrastruction,
please, ask your network administrator.
Figure 7: Configuration of PC for a direct connection with data logger.

3 Installation 12
Figure 8: Configuration of the data logger for direct connection using
program chiptool.

4 Principles of operation 13
4 Principles of operation
4.1 General
The CDF freeze-thaw testing device enables the implementation fo the
freezw-thaw resistance test according to RILEM Recommendation (Ma-
terials and Structures (1996) Vol 29 (193), pp 523-528), according to the
RILEM CIF test and according to CEN/TS 12390-9. The advantage of
these test methods lies in the very good reproducibility of the measure-
ment results.
The specimen containers are suspended in a temperature bath with heat
transfere liquid (fig. 9). This enables an optimal temperature distribution,
a fast temperature adjustment and a temperature gradient running per-
pendicular to the tested surface. Due to the optimal thermal contact, the
temperatures can be maintained very accurately over the entire temper-
ature curve.
With a appropriate system upgreade, the cube test (VDZ cube method)
in accordance with CEN/TS 12390-9 and the ASTM test in accordance
with ASTM C666 procedure A can be carried out. In contrast to air con-
ditioning cabinets, the freeze-thaw cycle can be run through in 12 hours
instead of 24 hours due to an efficient heat transfer from the heat transfer
fluid to the sample. Hence, testing time and costs will be minimized.
Figure 9: Positioning of the samples in the CDF test devoce (here:
Kühlflüssigkeit = heat transfer fluid; Prüfflüssigkeit = test fluid; Luft =
air; Beton = concrete sample).
4.2 System operation
The CDF test device is a temperature control bath that subjects a con-
crete samples placed in a sample container to a temperature profile (fig.
10). The temperature profile is freely programmable within the system
specification. Up to 8 different temperature profiles can be stored for this
test device.
The reference temperature is measured at the bottom of the container
in the middle of the CDF bath. Be sure that one container is in contact
with the temperature probe.
The cooling liquid is circulated by pump 1 (fig. 11). For heating the
heater is switched on. For cooling a dosage of cooling liquid from the
cooling liquid buffer is added by magnetic valves. The cooling liquid in
the buffer is pumped in a second circulation through the evaporator back
to the buffer. The evaporator is a plate heat exchanger where the liquid
refrigerant evaporates at a temperature of approx. -38 °C. The vaporized
refrigerant is compressed in the refrigeration system and condensed by

4 Principles of operation 14
cooling. The cooling is done by air, alternatively by water or in combina-
tion of air and water.
The temperature of the buffer liquid is always lower than the tempera-
ture of the bath liquid above. By this arrangement, a fast and precise
temperature adjustment of the cooling liquid is possible.
Figure 10: Temperature cycle for the CDF test device.
Figure 11: Cooling system from the CDF test device.
4.3 Mechanical construction
The CDF test device is supplied as a plug-in compact device in chest
form. It consists of three main parts (fig. 12):
• testing bath
• refrigerant equipment
• controller unit
4.3.1 Testing bath
The testing bath, the tub, is thermally insulated and is made of high
quality stainless steel. For the uniform temperature distribution in the
testing bath, the cooling liquid is kept flowing. The sample containers
are made of stainless steel and are placed in the cooling bath. The
concrete samples are placed in the sample containers. Directly under
the testing bath with the cooling liquid is the cooling liquid buffer.

4 Principles of operation 15
Figure 12: Basic structure of the CDF test device.
4.3.2 Refrigerant equipment
In this part of the device, the modules for temperature and circulation of
the cooling liquid are placed (fig. 13).
Figure 13: Refrigerant equipment of the CDF test device.
This part of the device is accessible by removing the trim panels. These
are attached with spring clips. To remove the panels, pick up best under
the panel and pull it out jerkily (fig. 14).
To attach the panel, insert the nipples into the openings of the spring
tabs. Lock the sheet by applying pressure to all edges of the panel. Do
not press in the middle of the panel.
Figure 14: Removing of the panels of the CDF test device.

4 Principles of operation 16
4.3.3 Filling the system
The amount of cooling liquid is about 100 liters (see chapter 4.3.4). The
cooling liquid is filled into the testing bath and passes through the over-
flow into the cooling liquid buffer (fig. 15, left).
Fill the cooling liquid until the optimal level in the buffer is reached (fig.
15, right). Before filling the system, make sure the device is in level.
Switch on the pumps from the manual menu (see chapter 5.4.5). You
may need to turn the pumps on and off several times until the ciruit
remains stable.
Check the filling quantity with hinged sample containers again. Never
run the pumps for long time without liquid. Always make sure that the
pumps are not sucking in air.
Figure 15: Filling amount of cooling liquid.
4.3.4 Cooling liquid
The cooling liquid is a water-glycol mixtures.
• Adjust the cooling liquid to a minimum of -40 °C and a maximum
of -50 °C.
• The density of the water-glycol mixture should be inbetween 1.072
and 1.075 g/cm3at 20 °C.
For concentration, replace the amount of water-glycol mixture with gycol
concentrate as shown in table below:
measured
antifreeze,
°C
density amount of gly-
col / water
amount to be re-
placed in liters
-20 1.051 35/65 18
-25 1.058 40/60 14
-30 1.065 45/55 9
-35 1.070 53/47 7
-40 1.075 55/45 0
During operation, the temperature of the testing bath is most of the time
below the room temperature. Therefore, a dilution with condensation,

4 Principles of operation 17
especially with the lid open is possible. By handling the samples addi-
tional water is added to the cooling liquid, thereby changing the concen-
tration of the water-glycol mixture. Check the antifreeze of the cooling
liquid regularly. For quick and safe control we recommend to use a re-
fractometer (fig. 16).
Figure 16: Refractometer and antifreeze indicator at -36 °C.
4.4 Cube Test, ASTM C 666 Procedure A
The equipment may optionally be used for the cube testing method ac-
cording CEN/TS 12390-9 or for the testing method according to ASTM
C 666 procedere A. Both methods require a higher fill level of cooling
liquid and a higher heat output. For the conversion, proceed as follows:
• screw on an additional sequence piece of the drain in the bath to
reach a level of at least 100 mm and put the filter back in (fig. 17).
• After the majority of the sampel containers has been placed in the
bad, additional cooling liquid must be filled.
• Check the filling level of the cooling liquid from the side of the de-
vice (fig. 18, left).
• The heater of this option can be operated with a power of 2 kW
or 6 kW. For using the heater with the power of 6 kW the param-
eter VDZkr has to be changed. Select from touch screen setup
–> system menu –> controller –> bath —> VDZkr. Enter the
number 5. The device heats up with higher power of 6 kW if the
deviation is greater than 5 °C (fig. 18, right).
• Choose the suitable profile in setup menu: profile for cube test
method (VDZ12 or VDZ24) or profile ASTM 666 for test profile ac-
codring ASTM C 666 procedere A.
Figure 17: Increase the level of cooling liquid in the bath.

4 Principles of operation 18
Figure 18: Level control of the cooling liquid and parameter setting for
the higher heating power.
4.5 Key switch
During operation, the touch screen can be protected against unautho-
rized users. The touch screen can be blocked so that the operation on
the touch screen is no longer possible. To do this, turn the key on the
front side of the device under the touch screen to position 0. The key
can then be removed.
Nevertheless, it is possible to access the system via the network.Please note:
Figure 19: Blocking of the touch screen.

4 Principles of operation 19
4.6 Transport of the CDF test device
In the case of a trasportation of the CDF test device, remove the cooling
liquid from the bath and the storage tank (buffer).
Only attach the system to the frame of the chest and avoid exerting
any force on the side (trim panels) of the chest or the controller
unit.Attention!
The trim panels should be additionaly secured or trasported extra. If no
frost-proof transport is to be expected, the residual water from the water-
cooled systes must be drained from the plate heat exchanger (evapora-
tor) to prevent frost damage.
4.7 Emptying the cooling liquid
Connect a water hose to the drain valve and run the cooling liquid into
containers. Remove the overflow piece of the drain in the bath (fig. 17,
left) so that the cooling liquid can run out.
4.8 Coooling water connection (optional)
If the system is equipped for this purpose, it can be supplied with cooling
water via 1/2 "hoses. When connecting, observe water input and output
(fig. 20). The side panel has corresponding implementations for the
water hoses.
One-site installation of manometers in the water input and water output
and a water meter are recommend. The differential pressure should
be between 1 and 10 bar. The flow regulator is set so that the system
only removes cooling water, if cooling by air is disturbed or if the room
temperature is too high.
To reduce the heat input into the room, the volume controller can be
turned to position 3. If no heat input into the room desired, the fan of the
condenser can be disconnected by an expert.
Figure 20: Water connectors for cooling water.

5 Operation of the controller 20
5 Operation of the controller
This part of the user manual describes all the functions that can be set
by the user from the touch screen of the CDF controller. The controller
itself is located in the controller unit at the top left.
The display and input can be done from the touch screen.
Turn the red main switch below the USB port to turn on the system. After
a few seconds the main menu appears on the display (fig. 21).
To stop the CDF controller when running, press anywhere on the display
and select stop.
Figure 21: Main menu on touch screen.
5.1 Start
The main switch of the system should be switched on for at least one
hour before the testing is started. The compressor heater is then acti-
vated. The warming up prevents overpressure failure of the compressor
after a long standstill. If you are sure the device is already warm, you
can skip this hint with Continue (fig. 22).
Figure 22: Hints for warming up of the system.
Choose Start to start the system. The system starts at the specified
cycle time. This time is retained even after switching off and can be
changed in the menu cycle time (see chapter 5.3). For the CDF test 28
cycles of 12 hours each will be executed. The corresponding number of
cycles will expire, if another profile is activated. At the end of the last
cycle, the temperature is kept constant at +20 °C until the cycle time is
reset and restarted. This means in case of a new test the cycle time has
to be reset.
Other manuals for CDF
2
This manual suits for next models
1
Table of contents
Other Schleibinger Test Equipment manuals