Assembly and Operating Manual
TENDO HSK-F 63
Hydraulic expansion toolholder
for wood and plastic machining
1General
1.1About this manual
This manual is part of the product and contains important
information for safe and correct use. It must be kept accessible
at all times. Personnel must have read and understood this
manual before starting any work. All safety notes and the
associated specifications in particular must be observed and
complied with. Illustrations may differ from the actual design.
1.2Applicable documents
– General terms of business
– Catalog data sheet of the purchased product
The other applicable documents can be downloaded from
schunk.com.
1.3Warranty
The warranty is valid for 24 months from the date of delivery
from the production facility if the product is used as intended
and in compliance with the prescribed operating data.
Wear parts and parts that come in contact with the tool or
machine are not covered by the warranty.
1.4Illustration of warnings
WARNING
Dangers for persons!
Non-observance can lead to irreversible injury and even
death.
CAUTION
Dangers for persons!
Non-observance can cause minor injuries.
NOTICE
Material damage!
Information about avoiding material damage.
1.5Scope of delivery
– Product
– Assembly and Operating Manual
1.6Accessories
The following accessories for the product are available
separately:
– Test shaft for monitoring the expansion rate
– Allen key for operating the clamping screw
– Hexagon socket wrench for length adjustment
– GZB-S intermediate sleeves for clamping several different
shank diameters
– GZB-S sleeve remover for removing intermediate sleeves
2Basic safety notes
2.1Appropriate use
– The product is used to clamp rotationally symmetric tools.
– The product is intended for industrial use on wood and
plastic processing machines.
– The product is intended for installation in a machine/
automated system. The applicable guidelines for the
machine/automated system must be observed and complied
with.
– The product may only be used and operated within the scope
of the technical data and the specifications in this
manual, }Chap.3.
2.2Inappropriate use
The product is not being used as intended if:
– The information in the technical data is not observed when
using and operating the product }Chap.3.
– The maintenance and storage instructions are not
observed }Chap.5.
– The product is used with heat shrinking technology.
2.3Ambient conditions and operating conditions
The ambient and operating conditions must correspond or be
adapted to the version of the product and the specifications in
the technical data.
2.4Structural changes, spare parts
Structural changes such as modification and reworking, e.g.
additional threads, bore holes or attachments, may only be
carried out with the written approval of SCHUNK. Only use
original spare parts and spares authorized by SCHUNK.
2.5Notes on safe operation
–The product is designed for an operating/product
temperature of +50 to +70°C. This temperature range offers
the optimum clamping force.
– The product must not be clamped without a tool above 25°C.
– Never combine multiple product extensions.
– Only use SCHUNK intermediate sleeves and always insert up
to the fixed backstop point. The use of intermediate sleeves
can reduce the transmittable torque.
– Long, projecting or heavy tools may only be clamped if the
speed of rotation is reduced according to the ambient and
operating conditions on site. The level of reduction is the
responsibility of the operator and must ensure safe operation
of the product.
– Maintain and service the product on a regular basis.
– Do not remove the air bleed screw (secured with pin or
resin).
– All repair work must be performed by SCHUNK.
– The operational safety and function of the product must not
be impaired by external influences.
– Follow the country-specific applicable safety, accident
prevention, and environmental protection regulations for the
application field of the product.
– Use mechanical screwdrivers only after approval by SCHUNK.
2.6Personnel qualifications
– All operations may only be carried out by personnel that are
qualified and instructed for the respective operation.
– Personnel qualifications must comply with the on-site
country-specific requirements and laws.
2.7Personal protective equipment
– When working on and with the product, follow the
respective country-specific legal requirements for
occupational health and safety, and wear the necessary
personal protective equipment.
– Follow country-specific accident prevention regulations and
the general safety notes.
2.8Transport
To avoid product damage, the transport and handling of the
product must be adapted according to the version, weight and
packaging of the product. If necessary, use additional aids.
3Technical data
Operating temperature range [°C] 50 – 70
Max. unclamping temperature [°C] 45
Test temperature for
the clamping force control [°C] 20 – 25
Max. coolant pressure [bar] 80
Tool shank tolerance h6
Max. tightening torque of
the clamping screw [Nm] 10 – 12
Adjustment travel of
the length adjustment screw [mm] 10
Clamping Ø
[mm]
Permissible
transmittable
torque*
[Nm]
Minimum
clamping
depth
[mm]
Permissible radial
force F on the
product at 50 mm
projecting length
L1 [N]
10 20 31 540
12 25 36 650
16 60 39 1410
20 130 41 1860
25 170 47 4400
* Tool shank minimum tolerance h6, tool shank oiled.
Measured at room temperature, the transmittable torque
increases at higher operating temperatures.
The load limits of the spindle holder must be observed.
Max. speed of rotation** for clamping diameter
Clamping Ø [mm] 10 12 16 20 25
Max. speed of
rotation [RPM] 50000 25000
** depending on the interface of the spindle and tool to be
clamped.
① Length-setting screw*** ④ Projecting length L1
② Minimum clamping depth ⑤ Clamping screw
③ Clamping diameter
*** if available.
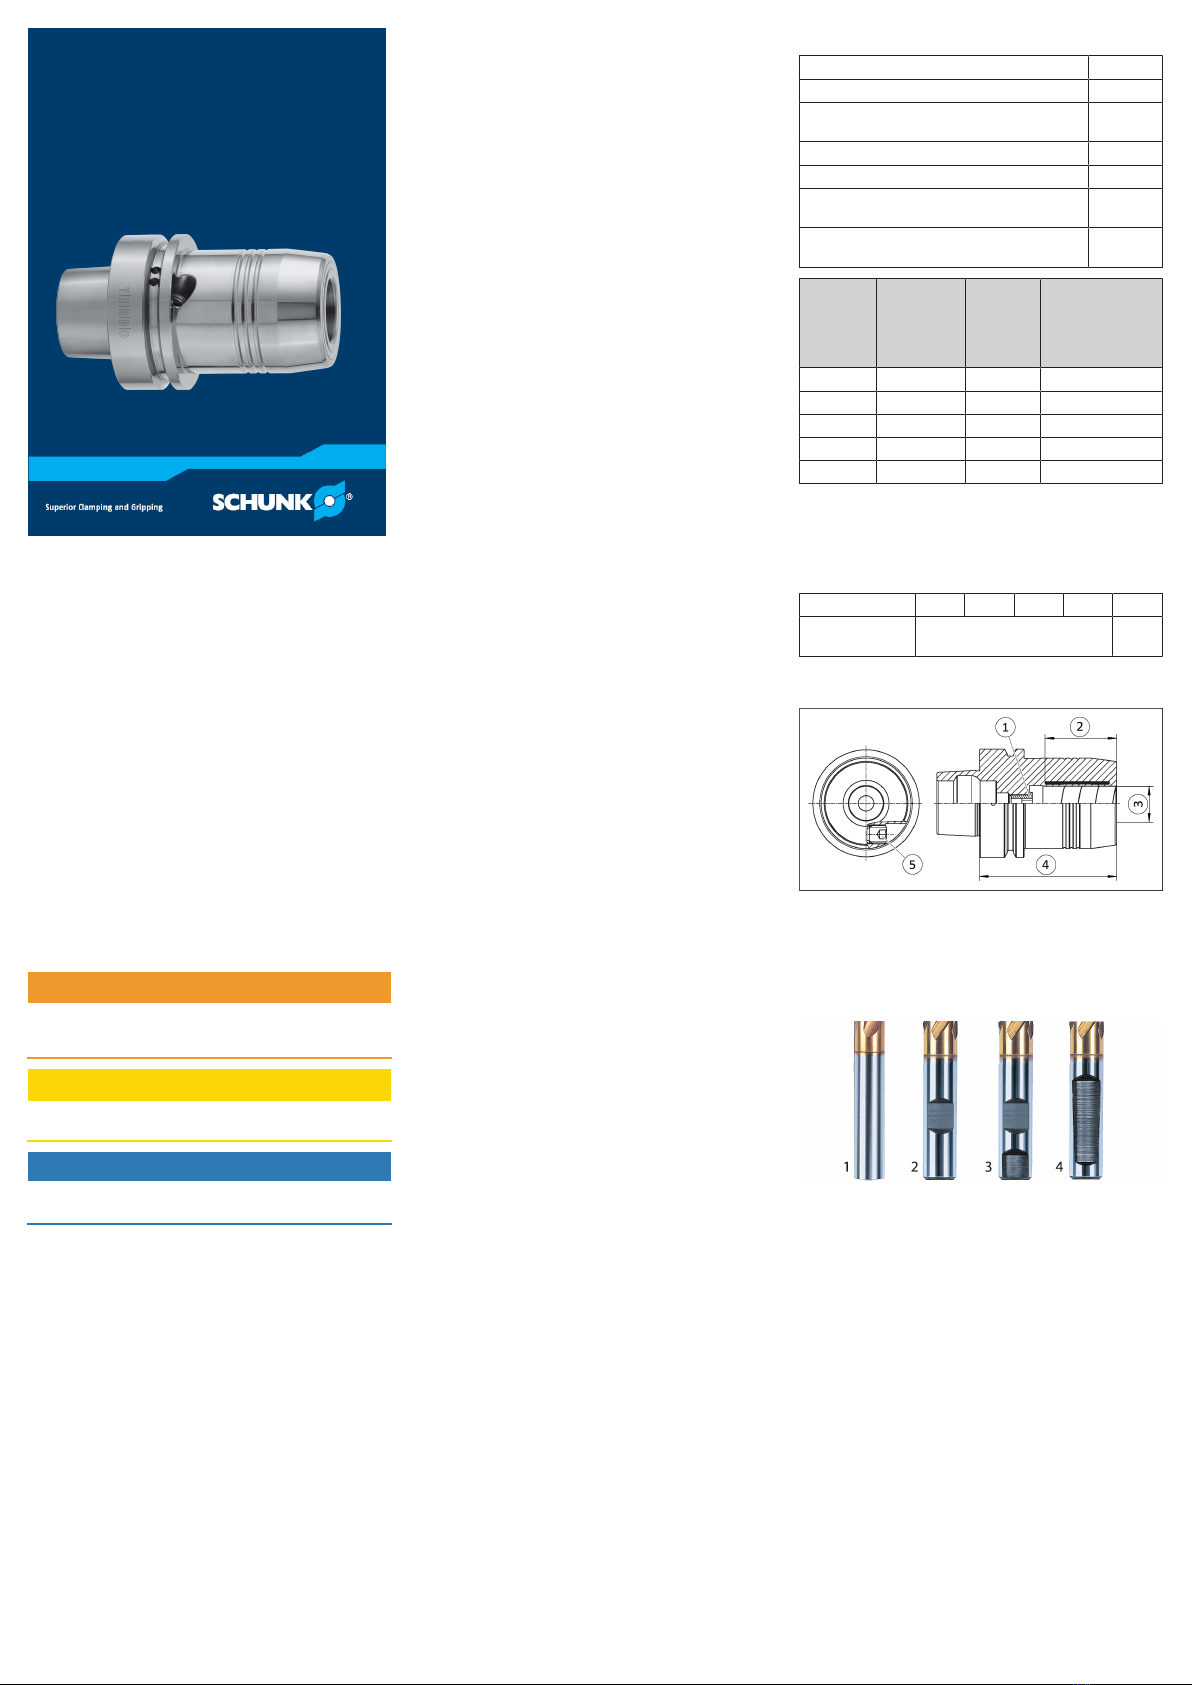
3.1Permitted shank types
1. Shank type according to DIN 1835-1 form A and DIN 6535
form HA
2. Shank type according to DIN 1835-1 form B and DIN 6535
form HB (up to Ø 20 mm)
3. Shank type according to DIN 1835-1 form B and DIN 6535
form HB (from Ø 25 mm)
4. Shank type according to DIN 1835-1 form E and DIN 6535
form HE
Tool shanks with reliefs (forms 2, 3 and 4) can impair the
balancing grade and concentricity of the overall system.


