Scibase Nevisense Instruction Manual

User Handbook
Name:

IMPORTANT: Read “Nevisense - Instructions for use” for detailed
information on how to use Nevisense correctly.
WHAT IS NEVISENSE?
Nevisense is an objective diagnostic support tool for non-visual detection of
malignant melanoma.
Nevisense detects structural changes in the lesion as well as in relation to a
reference area (healthy skin next to the suspicious lesion).
HOW DOES IT WORK?
Nevisense is based on Electrical Impedance Spectroscopy (EIS) technology
which measures the electrical impedance in the tissue. The electrical
properties of skin tissue vary under dierent medical conditions.
Normal and abnormal tissue dier in cell size, shape, compactness and
structure of cell membranes. These dierences inuence the ability of the cell
to conduct and store electricity, which is reected in the Nevisense EIS score.
EIS measures the overall
resistance within the tissue
at altering currents of
various frequencies.
The device sends tiny, harmless unnoticeable
electrical impulses into the skin´s surface.
The only thing the patient will sense from the EIS
measurement is the probe touching the skin.
1 (14)

LESION SELECTION
Only melanocytic lesions with a suspicion of malignant melanoma should be
measured with Nevisense.
Evaluation with Nevisense should always be initiated by a physician.
MEASURE ON:
• Lesions that are accessible by the Nevisense probe.
• Lesions with a diameter between 2mm and 20mm.
• Lesion where a reference measurement with the same underlying
structure can be made close (max. 20mm) to the lesion.
• Lesions where the skin is intact.
• Lesions not in hair-covered areas.
DO NOT MEASURE ON...
Pedunculated
lesions.
Lesion in
contact with
scar or bleeding
lesions.
Acral skin. Ulcerated
lesion.
Foreign
matter such as
ink that might
affect the EIS
score.
Seborrheic
keratosis.
...or genitalia,
eyes or
mucosal areas.
Unhealthy skin
(e.g., psoriasis,
eczema, sun-
burnt skin etc.).
Caution: Do not apply excessive pressure when measuring close to a pacemaker in
order not to damage the pacemaker.
2 (14)

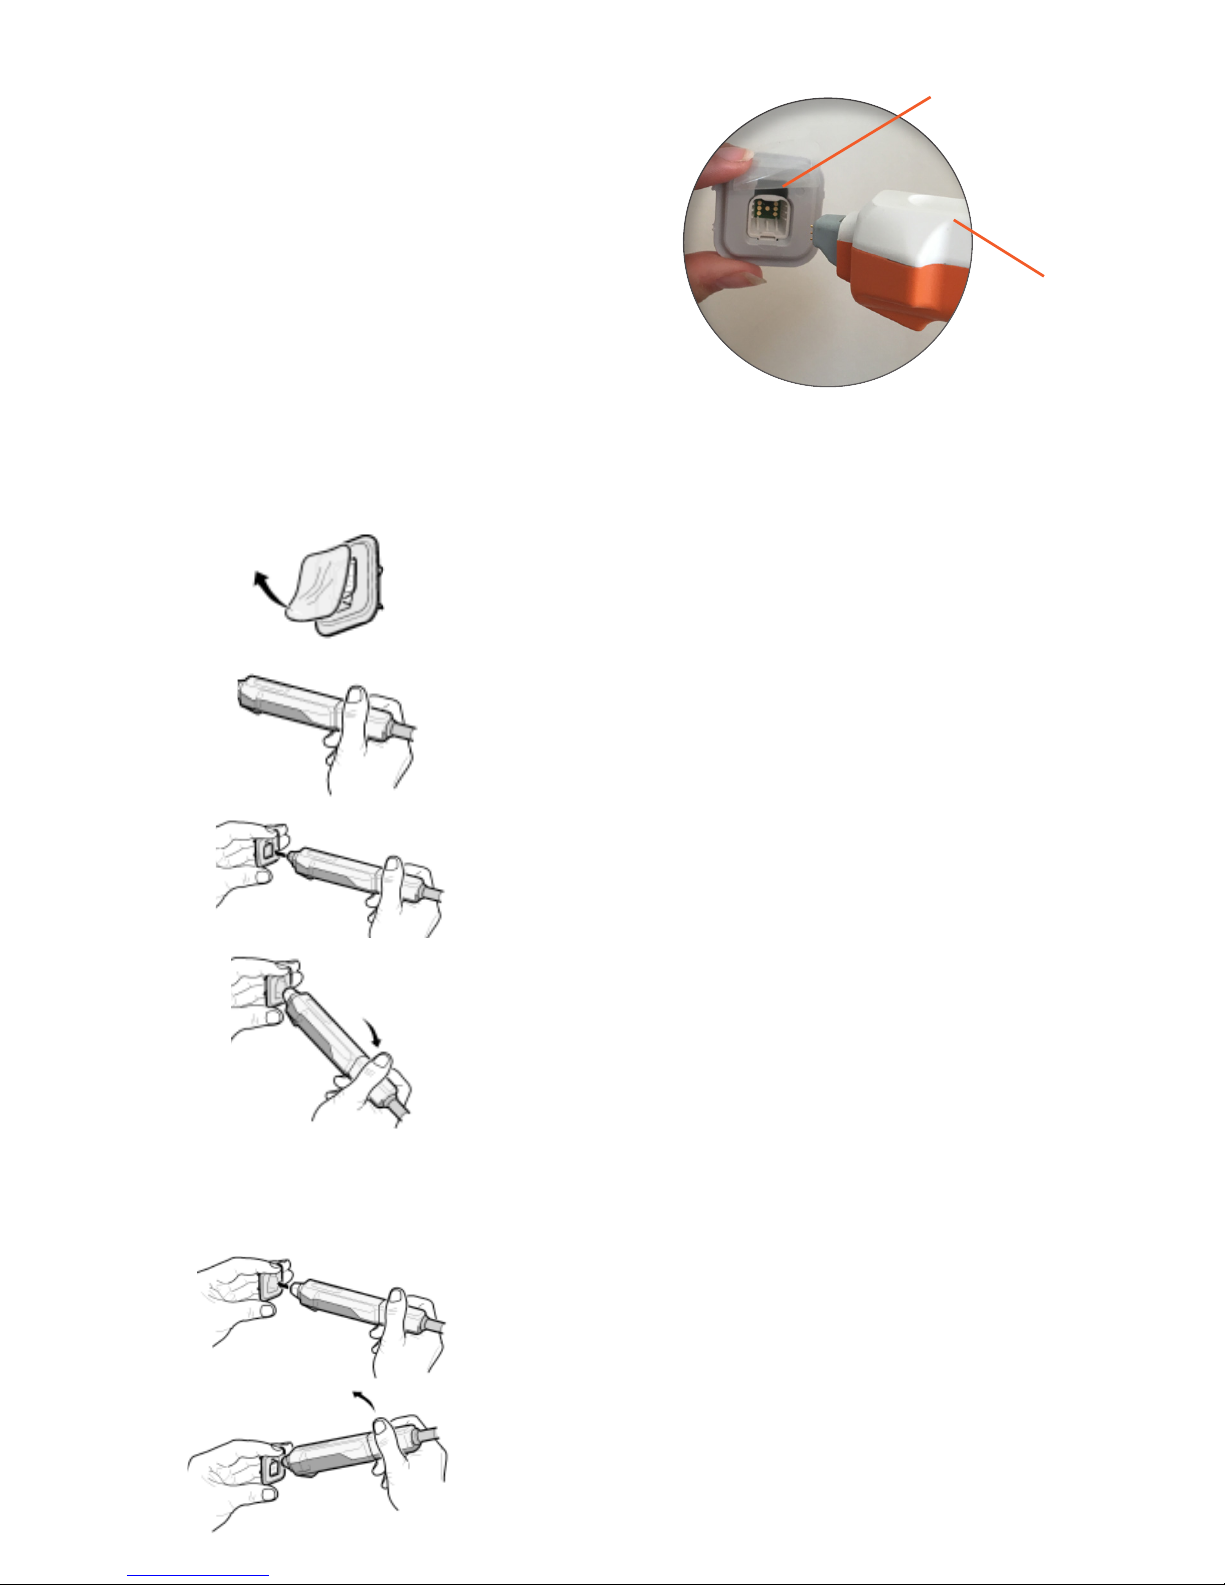
1. Remove the protective lm from the
electrode holder.
2. Hold the probe in the non-moveable part
close to the cable.
3. The probe should have the white side
upwards and the electrode holder the gap
upwards. Press the probe into the holder until
you hear a click. The click indicates that the
electrode is attached to the probe.
4. Angle the probe slightly downwards to
smothly release from the container.
REMOVE THE ELECTRODE
1. Press the electrode into an empty container
until you hear a click. The click indicates that
the electrode has snapped back into the
container.
2. To detach, angle the probe upwards before
pulling back.
Gap upwards
White side
upwards
ATTACH THE ELECTRODE
Warning! The disposable electrode
is for single person use. It has to be
replaced when an examination of a
patient is completed, and also
whenever Nevisense issues a
warning about a used electrode. This
is in order to minimize the risk of
spreading infections and to prevent the
electrode spikes from being worn out.
The electrode is approved for a maximum of 20 measurements.
3 (14)

White side
upwards
IMPORTANT TO REMEMBER BEFORE MEASURING
Only use the wet swabs and dry compresses
that are delivered along with the electrodes.
Make sure that the patient is positioned in a
way that ensures a stable measurement.
Remove hair using scissors (do not use a
razor).
If lesion is located on for example side of nose, it
can be dicult to obtain a reference on same side as
lesion – take reference on the other side of the nose.
NOTE> Reference must be taken from area with
similar skin properties as lesion, e.g. similar
underlying structure.
If lesion is located on an area with high fat deposits,
apply the “Grab and Measure” technique to create a
rmer area to measure.
NOTE> Must be used for both reference and lesion
measurements.
4 (14)

PLAN YOUR MEASUREMENT
Warning! Ensure that a sucient number of
measurements are performed for each lesion,
since the degree of atypia may vary within the
lesion.
Use the Lesion Coverage Tool to determine the
number of measurements needed. One square
of the Lesion Coverage Tool is equal to one (1)
measurement.
12
34
590-0001-03
NOTE> When multiple measurements are needed, repeat the moistening
procedure before each measurement.
Correctly covered lesions:
(better overlap than to risk not
covering fully)
Insuciently covered lesions:
Follow the lesion clockwise to keep track of your measurements and look at
the skin marks from the electrode to make sure that the lesion has been fully
covered. The inner square of the probe marks the measurement area.
Warning! Ensure that the lesion measurement is performed on the lesion, not
outside the lesion. If the measurement is performed outside the lesion, reject
the measurement and measure again.
5 (14)

USER INTERFACE
After log in, the Start screen will show the following options:
Training.
Under this section you will nd training and
instructions on how to measure correctly as well as
the qualication process.
Standard measurement.
With this function you can create patient proles and
enter more information.
Quick measurement.
This function is used if only a quick measurement is
desired. Patient-ID is automatically generated.
Browse archive.
Here you will nd patient data from previous
measurements.
Notes:
Warning! Ensure that the correct age or date of birth is entered when
registering a patient.
6 (14)

REFERENCE MEASUREMENT
1. Choose suitable reference area and plan
your measuerement using the coverage tool.
2. Clean reference area with 5 firm strokes
using the wet swab.
3. Moisten reference area for a minimum of 30
seconds. Remember to apply some pressure
against the skin. Tip: Squeeze out the
remaining liquid in the swab on the skin at the
end.
4. Wipe of all excessive fluid with one firm
stroke using a dry compress.
5. Measure reference area. Make sure
probe is kept stable and 90 degrees to the skin
so full contact between skin and
electrode is achieved.
7 (14)

LESION MEASUREMENT
6. Clean lesion with 5 firm strokes using the
wet swab.
7. Moisten lesion for a minimum of 30
seconds. Remember to apply some pressure
against the skin. Tip: Squeeze out the
remaining liquid in the swab on the skin at the
end. Moistening must be redone between each
measurement.
8. Wipe of all excessive fluid with one firm
stroke using a dry compress.
9. Measure on the lesion and repeat step 7-9
until lesion is covered. Make sure the lesion
has been fully covered before pressing ”Done”.
10. Read the Nevisense EIS score.
Warning! Ensure that the preparation of the skin is performed
accurately, including both moistening and wipe o. The skin
preperation inuences the measurement result. 8 (14)

INTERPRETING THE NEVISENSE EIS SCORE
EIS is a measure of the overall resistance within the tissue at
alternating currents at various frequencies, and since skin has
different electrical properties under different medical conditions, it
is possible to identify a condition, such as malignant melanoma.
Nevisense’s advanced algorithm is then used to classify the lesion
based on measurement data from both the lesion and a reference.
Its output then shows a score between 0 and 10, reflecting the
degree of atypia in the lesion.
Keep in mind that it is the degree of atypia that is reflected with the
Nevisense EIS-score. Therefore it is important to choose a correct
reference area and only measure on lesions that are seen as
suspicious for malignant melanoma. The correlation between the
score given and the Nevisense pivotal study results is presented in
Table 1 as Negative Predictive Value and Positive Predictive Value.
9 (14)

Table1 Nevisense EIS
score
EIS
Negative 098% of suspicious lesions were
negative in the pivotal study.
198% of suspicious lesions were
negative in the pivotal study.
298% of suspicious lesions were
negative in the pivotal study.
398% of suspicious lesions were
negative in the pivotal study.
EIS
Positive 49% of suspicious lesions were
positive for melanoma in the
pivotal study.
513% of suspicious lesions were
positive for melanoma in the
pivotal study.
618% of suspicious lesions were
positive for melanoma in the
pivotal study.
722% of suspicious lesions were
positive for melanoma in the
pivotal study.
839% of suspicious lesions were
positive for melanoma in the
pivotal study.
951% of suspicious lesions were
positive for melanoma in the
pivotal study.
10 64% of suspicious lesion were
positive for melanoma in the
pivotal study.
The Nevisense result is one element of the overall clinical
assessment and should be used in combination with clinical and
historical signs of melanoma.
10 (14)

IMPORTANT TO REMEMBER
Make sure that there is consistency of measurement technique
between reference and lesion measurement, such as;
The underlying structure needs to
be the same for reference area and
lesion.
Moistening time needs to be at least
30 seconds but if more is necessary
for the reference then the same time
needs to be for the lesion.
If lesion is located on an area with
high fat deposits, apply the “Grab
and Measure” technique to create a
rmer area to measure.
11 (14)

Notes:
12 (14)

Notes:
13 (14)

Notes:
14 (14)

LEARN MORE IN THE
”CLINICAL REFERENCE GUIDE” AND IN THE
”INSTRUCTIONS FOR USE”.
Nevisense
Clinical Reference Guide
The EIS Method
and
How to Interpret the Nevisense Result
INSTRUCTION VIDEOS AND MORE MATERIAL
AVAILABLE ON USB STICK AND ON
WWW.SCIBASE.COM/EN/USERS
LOG-IN: nevisense
PASSWORD: melanoma
975-0200-01, June 2016
Table of contents
Popular Medical Equipment manuals by other brands

GE
GE LOGIQ C5 Premium quick guide

Benchmark Scientific
Benchmark Scientific Accuris Instruments MyGel InstaView operating manual

Otto Bock
Otto Bock 4R103 Instructions for use

immedia
immedia 4WayGlide mini Instructions for use

IOPI MEDICAL
IOPI MEDICAL 3.2 user manual

ALSA
ALSA Alsatom SU-MPC SU50 user manual