manuals.online logo
Brands
  1. Home
  2. •
  3. Brands
  4. •
  5. SCO
  6. •
  7. Bicycle
  8. •
  9. SCO Rebel User manual

SCO Rebel User manual

USER MANUAL
User_manual_SCO_Rebel_v1_2017_09_11.indd 1 11-Sep-17 09:36:03
2
User_manual_SCO_Rebel_v1_2017_09_11.indd 2 11-Sep-17 09:36:07
SADEL
TABLE OF CONTENT
Introduktion
Om SCO Rebel
Stelnummer og bon
Oversigt over cyklen
Samling
Bolte og skruer
Forskærm og reeks
Forhjul
Styr og frempind
Instilling
Aheadset styr
Sadel
Indstilling
Pedaler
Bremser
Støtteben
Navbremse
Gear
Gearbeskytter
Tilbehør
Støttehjul
Barnestol
Inden første køretur
Lovkrav
Tjekliste
Vedligeholdelse
Rengøring
Efterspænding
Bremser
Forgael
Kæde
Dæk, slanger og hjul
Gear
Reekser
Opbevaring
Transport
Sikkerhed
4
5
7
8
12
13
14
18
19
20
22
24
26
27
27
28
29
30
32
34
37
38
41
42
43
44
55
56
57
61
71
72
73
74
3
User_manual_SCO_Rebel_v1_2017_09_11.indd 3 11-Sep-17 09:36:07
DEAR CUSTOMER
Congratulations with your new SCO Rebel bicycle!
This manual contains not just a guide that will help
you on how to assemble your new bike, but also
some good advice and guidance on how you best
maintain your bike and minimize the risk of
damage. We recommend that you read the manual
and go through the checklist on page 38, so you
get off to a good start with your new bike.
Please note that this is a universal manual, and it
may therefore contain extra elements, besides
those which are relevant for your model.
ENJOY!
SCO Rebel
4
User_manual_SCO_Rebel_v1_2017_09_11.indd 4 11-Sep-17 09:36:10
SCO is a traditional Danish brand that started in Odense. SCO Rebel
bikes stands out because of a raw design, and they are for all, who
loves speed and action. Serien består af robuste og specialiserede
mountainbikes, der sikrer de optimale køreegenskaber i terrænet. We
give ten years frame warranty on all SCO bikes and you are always
welcome to contact us and get help at the place the bike was bought if
any problems should arise.
5
User_manual_SCO_Rebel_v1_2017_09_11.indd 5 11-Sep-17 09:36:13
YOUR NOTES
Place of purchase:
Date:
Purchase price:
Serial number:
Lock number:
Key number:
6
User_manual_SCO_Rebel_v1_2017_09_11.indd 6 11-Sep-17 09:36:17
IMPORTANT INFORMATION
It is important to note down the serial number of
the bike, in case the bike gets stolen or so.
As it is the owners own responsibility to note this
down, we have attached a formula on the
previous page, so you can easily save the
essential information about your new bike. The
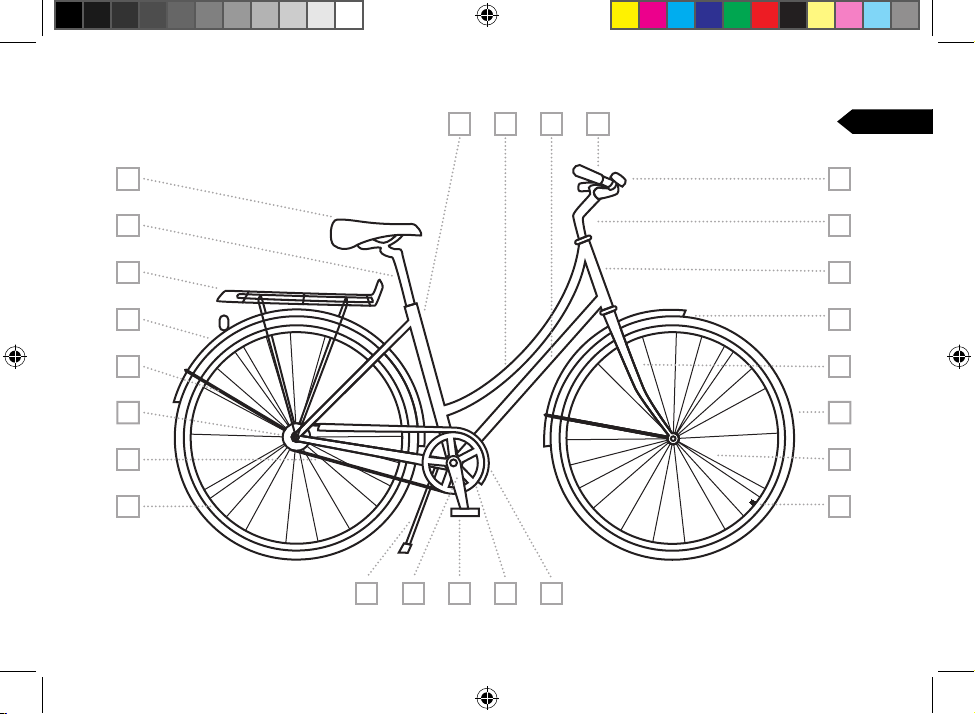
serial number can be found under the crank or
seat tube. The number is engraved in the frame.
It is a good idea to save the receipt for the
purchase of the bike, as it must be provided on
the complaint.
Most insurance companies require a security
approved lock to cover theft. If your bike has
such a lock, you should save the lock certificate
and note down the number of both your lock
and your key.
SADEL
SERIAL NUMBER AND RECEIPT
Serial number
under seat tube
XX0000XXXXX0000XXX
Serial number
under crank
7
User_manual_SCO_Rebel_v1_2017_09_11.indd 7 11-Sep-17 09:36:19
15
23
9
6
5
3
4
25
16
17
1
2
21
8
10
7
18 20 19 22
24 14 13 11 12
8
User_manual_SCO_Rebel_v1_2017_09_11.indd 8 11-Sep-17 09:36:19
WITH INTERNAL GEAR
OVERVIEW OF THE BIKE
9
User_manual_SCO_Rebel_v1_2017_09_11.indd 9 11-Sep-17 09:36:21
1. Luggage carrier
2.Back guard
3.Tire
4.Spokes
5.Fork
6.Front mudguard
7. Rim
8.Gear
9. Head tube
10. Chain
11. Blade
12. Chain guard
13. Pedal
14. Pedal arm
15. Bell
16. Saddle
17. Seatpost
18. Seattube
19. Down tube
20. Top tube
21. Mudguard
22. Handlebar
23. Control stem/stem
24. Kickstand
25 Valve
19
20
10
2
6
5
22
15
16
3
4
8
1
9
17 7 18
11 21 14 13 12
10
User_manual_SCO_Rebel_v1_2017_09_11.indd 10 11-Sep-17 09:36:21
WITH EXTERNAL GEAR
OVERVIEW OF THE BIKE
11
User_manual_SCO_Rebel_v1_2017_09_11.indd 11 11-Sep-17 09:36:23
1. Bagskifter
2. Bremsekabel (for)
3. Dæk
4.Eger
5. Front brake
6. Fork
7. Forskifter
8. Friløbskrans
9.9. im
10. Head tube
11. Chain
12. Klinger
13. Pedal
14. Pedal arm
15. Saddle
16. Seat post
17. Seat tube
18. Frame
19. Handlebar
20. Styrstamme (frempind)
21. Training wheels
22. Valve
ASSEMBLING
TIGHTENING OF BOLTS
You should never over tighten bolts and
screws, as it may weaken them. The
recommended tightness for the bicycle
parts has the following intervals.
TORQUE
The torque is measured in Nm (Newton
meter) and describes how tight a given bolt is
tightened.
20,3
27,0
13,6
17,0
6,8
16,0
Nm - 35,0
Nm - 39,2
Nm - 19,6
Nm - 20,3
Nm - 9,0
Nm - 24,5
Nm
Nm
Nm
Nm
Nm
Nm
12
User_manual_SCO_Rebel_v1_2017_09_11.indd 12 11-Sep-17 09:36:25
Wheels front
Wheels back
Handlebar
Stem
Seat post
Saddle
FRONT MUDGUARD AND REFLEX
If your bicycle does not already have the front
mudguard installed this must be installed. Place
the guard between the two arms of the fork and
attach it with the corresponding bolt.
Note that for some bicycles the white front reflex
must be attached with the same bolt. This is done
by first placing the reflex on the bolt, so the
reflected surface faces forward. After that it can be
continued. The bolt should face forward in the
bike’s direction.
The washer and the nut are mounted on the back
and tightened with appropriate strength.
Please note that there is a legal requirement that
the bike must be fitted with reflexes. Look on page
37 to see which reflexes shall be installed as a
minimum.
Reflex
Front mudguard
Fork
13
User_manual_SCO_Rebel_v1_2017_09_11.indd 13 11-Sep-17 09:36:27
FRONT WHEEL
To mount the front wheel, first loosen the nuts on the
shaft so that it can be mounted on the front fork.
Place the safety washers in the holes in the fork and
tighten the nuts.
There may be certain things to consider depending
on which front brake your bike is fitted with. This is
described for each brake type in the following
sections.
After mounting the front wheel, it may be necessary
to adjust the front brake as described under “brake
maintenance” from page 44.
ASSEMBLING
Brake pipe hanger
V-brake and cantilever
Locknut
A washer
14
User_manual_SCO_Rebel_v1_2017_09_11.indd 14 11-Sep-17 09:36:29
V-BRAKES AND CANTILEVER BRAKES
For bicycles with v-brakes or cantilever brakes it may
be necessary to lower the brake pipe hanger to be
able to mount the wheel.
DISC BRAKES
In case the bicycle has disc brakes, the wheel must be
turned so the rotor mounted on the wheel is on the
same side as the brake caliper mounted on the front
of the bike. If it is a hydraulic disc brake it is important
that the brake is not used until the rotor is mounted
in the brake caliper.
ROLLER BRAKES
For bicycles with roller brakes, push the brake arm up
while placing the wheel in the hub and then tighten
the nuts. The brake arm is pushed up again and the
brake wire is clicked into the wheel in the brake arm.
Brake arm
Brake caliper
Roller brakes
Disc brake
Rotor
15
User_manual_SCO_Rebel_v1_2017_09_11.indd 15 11-Sep-17 09:36:31
WHEELS WITH QUICK RELEASE
If the wheel is mounted with a quick release, this is
done by passing the quick release through the wheel
hub, so that there is a spring on each side of the front
fork. It is important that these springs are placed on
the outer side of the fork’s arms so that the narrow
end of the spring faces the wheel.
Mount the clamping arm by placing it at a 90-degree
angle from the front fork and tighten the screws with
your fingers. Then the clamping arm is pulled up
along the fork.
The quick release must be mounted so the clamping
arm is on the left side of the bike when you sit on it.
ASSEMBLING
Clamping arm
90° angle
16
User_manual_SCO_Rebel_v1_2017_09_11.indd 16 11-Sep-17 09:36:33
17
User_manual_SCO_Rebel_v1_2017_09_11.indd 17 11-Sep-17 09:36:37
HANDLEBAR AND STEM
For bicycles with adjustable or normal stem the
handlebar is already mounted on the stem, so the only
thing you need to do is to mount the free end of the
stem into the head tube at the desired height.
To do this first remove all protective packaging. Be
aware that the plastic cap can be attached to the free
end of the stem which is also removed. If the center
expander bolt on the handlebar is protected by a
rubber stopper this is also removed temporarily.
Insert the stem into the head tube and tighten the
center expander bolt with an Hex key. If the bolt was
protected by a rubber stopper reinsert them so the
bolt is being protected against the weather. Make sure
the minimum mark is not visible over the edge of the
head tube.
ASSEMBLING
Stem
Ekspander bolt
Stem bolt
Headtube
18
User_manual_SCO_Rebel_v1_2017_09_11.indd 18 11-Sep-17 09:36:39
SETTING
To adjust a handlebar with either adjustable or
normal stem loosen the center expander bolt. This
is done in order to raise or lower the handlebar to
the desired height. The bolt is tightened again when
the handlebar has the desired height. It is important
that the handlebar is not set higher than the mark
on the stem as this may weaken the stem.
The angle of the handlebar can be adjusted by
loosening the handlebar’s side bolt and the safety
bolt on the underside of the angle stem. When the
angle is as desired all bolts are tightened again.
BEFORE MOUNTING
If the stem is lubricated with grease before
mounting it will be easier to loosen it again, if it is
necessary to adjust the height later on.
Adjusts angle
Adjusts angle
19
User_manual_SCO_Rebel_v1_2017_09_11.indd 19 11-Sep-17 09:36:41
AHEADSET HANDLEBAR
Some racing bikes and mountain bikes comes with a
handlebar with an aheadset stem. On these kinds of
bikes, the stem will most often be mounted on
delivery, so you only have to adjust, so it faces in the
direction you drive.
Make sure the stem is centered and aligned with the
front wheel. To secure the stem, then tighten the two
screws found on the side near the head tube.
The handlebar itself is mounted by unscrewing the
four angular bolts of the stem and placing the
handlebar in the fitted bracket. When the handlebar
is centered, it is tightened to the desired position by
tightening the bolts alternately a little at a time.
ASSEMBLING
OBS: NOT an
ekspander bolt
20
User_manual_SCO_Rebel_v1_2017_09_11.indd 20 11-Sep-17 09:36:43

Popular Bicycle manuals by other brands

TrikExplor F426E user manual

TrikExplor

TrikExplor F426E user manual

Lippert GLADIATOR Lippert quick start guide

Lippert

Lippert GLADIATOR Lippert quick start guide

Prodeco Technologies G Stride R user guide

Prodeco Technologies

Prodeco Technologies G Stride R user guide

Legend Monza manual

Legend

Legend Monza manual

Geuther 2970 Instructions for assembly and use

Geuther

Geuther 2970 Instructions for assembly and use

FAHRBIKE CRUZ owner's manual

FAHRBIKE

FAHRBIKE CRUZ owner's manual

AmTryke Snappy Foot Assembly instructions

AmTryke

AmTryke Snappy Foot Assembly instructions

Gehring Group Adventurer manual

Gehring Group

Gehring Group Adventurer manual

Cake Makka manual

Cake

Cake Makka manual

Ribble IWOC ONE Quick start user guide

Ribble

Ribble IWOC ONE Quick start user guide

Puky Cat user manual

Puky

Puky Cat user manual

Huffy coaster owner's manual

Huffy

Huffy coaster owner's manual

Felt AR owner's manual

Felt

Felt AR owner's manual

Winther 412 Assembly instruction

Winther

Winther 412 Assembly instruction

WOLTURNUS Fatbike user manual

WOLTURNUS

WOLTURNUS Fatbike user manual

Kettler Quadriga Comp Belt Translation of original operating instructions

Kettler

Kettler Quadriga Comp Belt Translation of original operating instructions

Volae Recumbents Volae owner's manual

Volae Recumbents

Volae Recumbents Volae owner's manual

Giant GLORY DH Specifications

Giant

Giant GLORY DH Specifications

manuals.online logo
manuals.online logoBrands
  • About & Mission
  • Contact us
  • Privacy Policy
  • Terms and Conditions

Copyright 2025 Manuals.Online. All Rights Reserved.