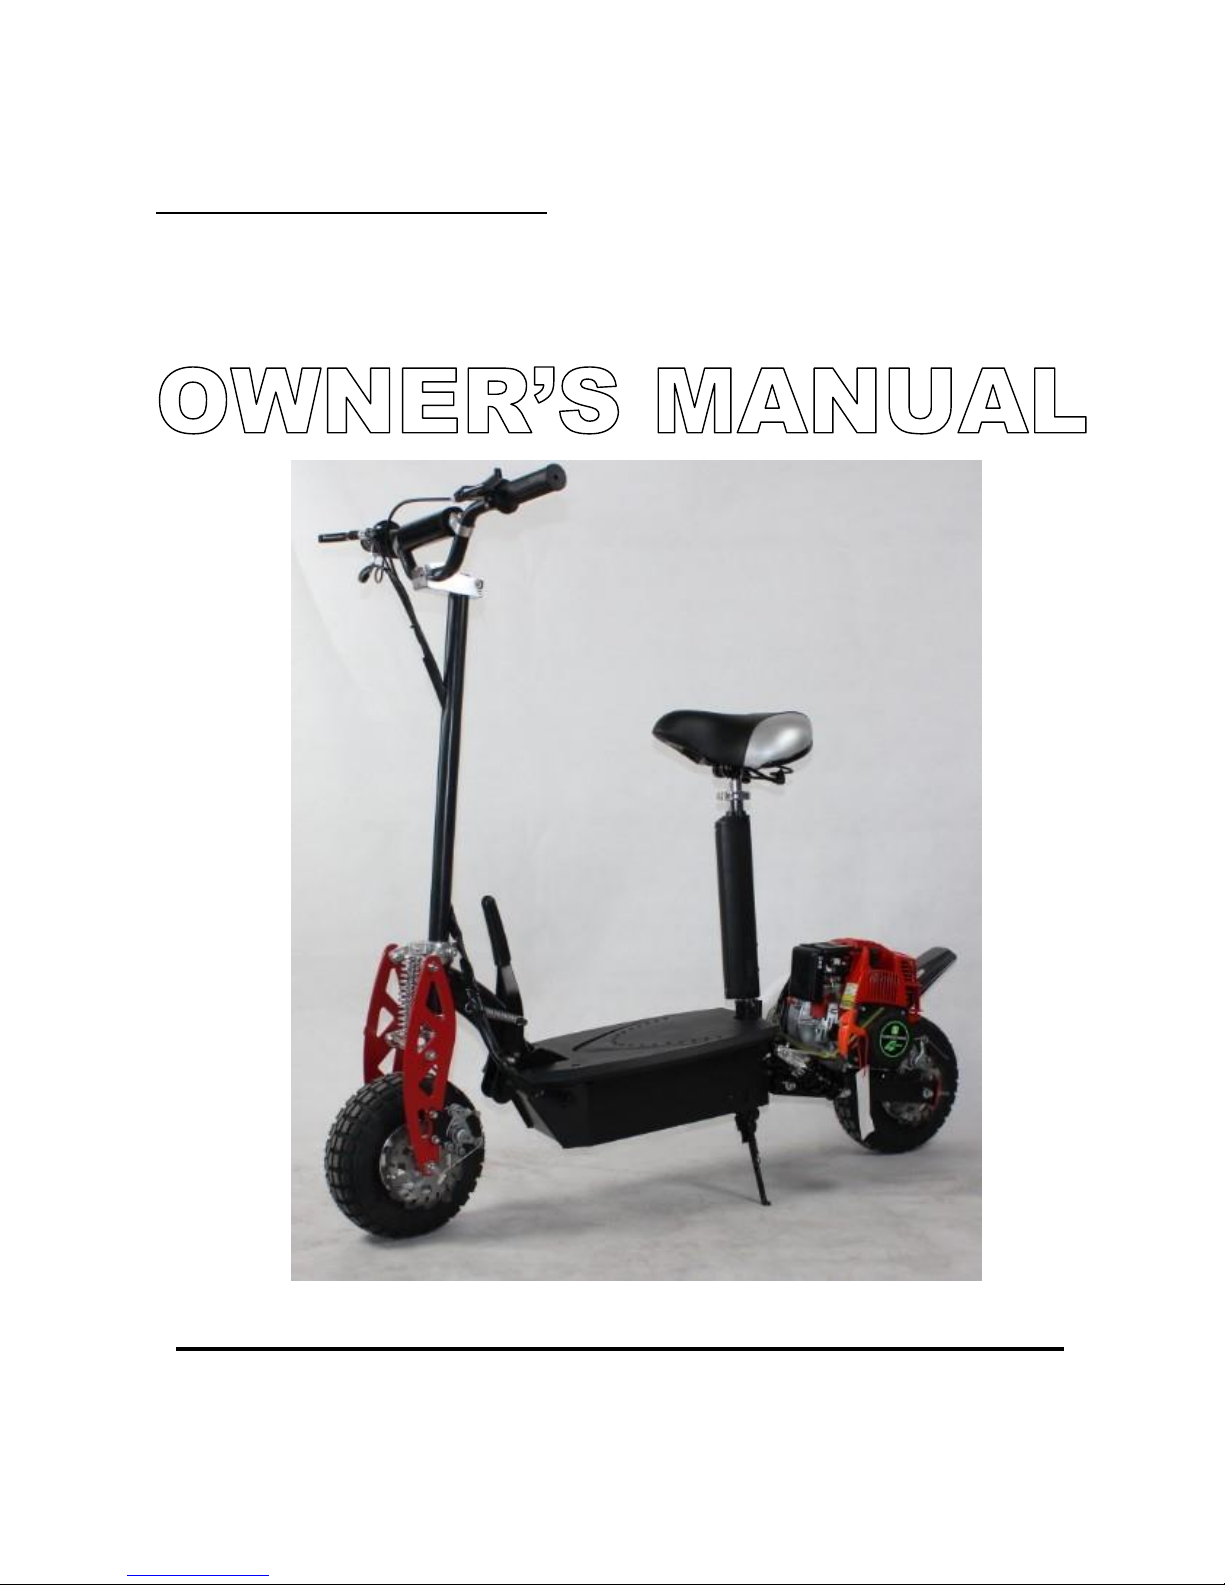
Scooter Wholesales 49cc 4 Stroke Gas Scooter User manual

Powered Personal Transportation
------------SUPER 2013 49CC 4 STROKE GASOLINE SCOOTER-----------
READ INSTRUCTIONS BEFORE USING YOUR NEW SCOOTER

TABLE OF CONTENTS
IMPORTANT INFORMATION ………………………………………………………2-3
QUICK REFERENCE………………………………………………………………......4
GETTING TO KNOW YOUR SCOOTER…………………………………………….5
PACKAGE CONTENTS………………………………………………………………..6
GETTING STARTED…………………………………………………………………...6
ASSEMBLY……………………………………………………………………………6-7
SEAT & SEAT POST INSTALLATION………………………………………………7
ENGINE USE INSTRUCTION………………………………………………………...8
RIDING & BRAKING………………………………………… ………………………..9
FOLDING AND STORAGE……………………………………………………… ….10
BRAKING SYSTEM…………………………………………………………………...10
ADJUSTING BRAKES…………………………………………………………….10-11
TIRE PRESSURE………………………………………………………………………11
RECOMMENDED TOOLS…………………………………………………………….11
ADJUSTING THE HEAD UNIT…………………………………………………….11-12
ADJUSTING THE CHAIN…………………………………………………………12-13
MAINTENANCE SCHEDULE……………………………………………………..13-14
TROUBLESHOOTING GUIDE……………………………………………………….14
TECHNICAL DATA ……………………………………………………………………15
OTHER QUESTIONS………………………………………………………………...15
1

PLEASE BE SAFE WHEN RIDING
ALWAYS WEAR A HELMET AND OBEY ALL LAWS!
IMPORTANT
Protective Clothing/Equipment
Most
accident fatalities
are due to
preventable
head injuries.
Alwayswear a
properly
fitting
motorcycle
type helmet
approved
by
agencies
Always
wear face
shields
or
goggles,
boots,gloves and other
appropriate protective
clothing.
YOUR INSURANCE POLICIES MAY NOT PROVIDE COVERAGE FOR
ACCIDENTS INVOLVING THE USE OF THIS SCOOTER. DETERMINE
IF COVERAGE IS PROVIDED, YOU SHOULD CONTACT YOUR
INSURANCE COMPANY OR AGENT
Failure to follow these instructions will
VOID YOUR WARRANTY!
This PRODUCT IS NOT INTENDED FOR EXTREME or
OFF-ROAD Use! Please take care of your SCOOTER!
DO NOT JUMP or ABUSE THIS PRODUCT!
DO NOT RIDE IN WET/ICY CONDITIONS!
Failure to follow these instructions will
VOID YOUR WARRANTY!

IMPORTANT
PLEASE READ THIS BEFORE USING THIS PRODUCT
READ THIS FIRST!
WARNING
This product does not conform to Federal Motor Vehicle Standards and is not
intended for operation on public streets, roads or highways. Serious injury can
result from the unsafe operations of this product. Operator can minimize these
risks by using certain safety equipment such as: safety helmet, goggles, gloves,
elbow and kneepads and appropriate footwear.
DO NOT operate this product in traffic, on wet, frozen, oily or unpaved surfaces or
under the influence of drugs and/or alcohol. Avoid uneven surfaces, potholes,
surface cracks and obstacles.
DO NOT use a water hose to clean this product. See Product Handbook for more
information.
This product is recommended for riders 16 YEARS OF AGE and older.
SAFETY
Persons without excellent vision, balance, coordination, reflex, muscle and
bone strength and good decision-making capabilities should not use this
product.
Minors without adult supervision should not use this product.
Persons unwilling or unable to take responsibility for their own actions should
not use this product.
The user of this product assumes ALL risks associated with its use. To
minimize these RISKS, the user must wear safety helmet, goggles, gloves,
elbow and kneepads and appropriate footwear.
This scooter is 4-stroke ! DO NOT use engine oil to fill
and mix in fuel tank.
Unleaded gasoline for fuel tank to fill.
Engine oil for machine oil tank to fill.

QUICK REFERENCE
SAFETY GUIDE
SAFETY GUIDE
• The recommended minimum age for riding this scooter is 16 years old.
• To avoid damage to the motor and footplate, do not overload the scooter.
• Never ride with more than one person.
• Inspect your scooter thoroughly before each use for loose or missing parts.
•To avoid the risk of a short circuit in the electrical parts, do not use your
scooter in the rain and never spray or wash off your scooter with water.
• Do not place the fuel tank near fire or heat.
• To avoid damage to the fuel tank, please change the fuel tank or fuel hose if
it has leakage in any place.
• Keep hands, face, feet and hair away from all moving parts.
• Do not touch the engine or wheels while they are rotating.
• Brakes are designed to control speed as well as stop the scooter. Practice
braking for proper slowing down and smooth stops.
• Maintain your SCOOTER as recommended in this Product Handbook.
• Use only quality replacement parts as recommended by the manufacturer.
• Inspect the entire scooter prior to each use. Replace any part that is cracked,
chipped or damaged before use.
*NEVER ALLOW CHILDREN TO OPERATE THE SCOOTER WITHOUT ADULT
SUPERVISION.
*NEVER ATTEMPT TO OPERATE THE SCOOTER WHILE UNDER THE
INFLUENCE OF ALCOHOL.
If a situation arises that is not covered in the manual,
proceed with caution and use good judgment.
Contact your dealer
if you need further assistance

GETTING TO KNOW YOUR SCOOTER
Front & Rear
Hand Brakes
Stop Button Optional Seat
Kit Included
Handle for Fold Design
PP Deck
Front Shocks
Front Inflatable Tire
Front Disc Brakes Lock ring
Kick stand
/ Locker
Rear Shock Power Engine
(Photo’s may vary)
Rear Disc Brakes
Rear Inflatable Tire

PACKAGE CONTENTS
Your Scooter comes with the following items in the box. Please locate all of the
following:
1. Scooter
2. Tool Kit User Manual
3. Seat
4. Seat Post & Clamp
5. Sticker

GETTING STARTED
Please read and understand these instructions and the OPERATING
PROCEDURES section, prior to starting or riding your scooter
Assembly
1. Carefully remove the scooter from the box. Then
install the wheel ,longer spacer on the left and shorter
spacer on the right,the wheel in the middle of both
spacers,be sure to tightening screw.(FIG.1)
2. To unfold the scooter, begin by pressing
down on the FOLDING HANDLE with one
hand while gently pulling up on the handlebars
with the other(FIG.2)
(FIG.1) 3. Fully extend the handlebars to their upright
position until you feel the mechanism lock into
place(FIG.3).
4. Adjust silver clamp to the top of handle bar post .
Be sure to orient the bars in the correct riding
position with the throttle on the rider’s right
side. Secure the handlebars to the post
by tightening the bolts on the clamp with
the enclosed Allen wrench as shown. (FIG.4,FIG.5)
(FIG.2)
5. Secure the hand brakes in place by using
the provided Allen Wrench to first loosen
the tension bolts. Adjust the levers to a
comfortable position and tighten the bolts.
*BE CAREFUL NOT TO PULL ON THE
CABLES!
(FIG.3)
(FIG.4) (FIG.5)

Assembly –Cont:
6. Open outward nylon fastener at both side of PP
deck and lift PP deck as shown, it works as storage
room.(FIG.6)
(FIG.6)
7. Attach the seat post to the seat post
receiver.(FIG.7)
8. Insert the lock into post holder on the top of
PP deck.make sure to fasten the lock.(FIG.8)
9. Attach silver lock clamp to the top of the seat post
as shown.(FIG.9)
10.Pull the upper seat post to the desired position and
tighten the lock clamp securely.(FIG.10)
11. Attach the seat to the upper seat post and
tightening the seat bolts as shown.(FIG.11)
12.This scooter is 4-stroke, DO NOT use engine oil to fill
(FIG.7) and mix for fuel tank. Engine oil for machine oil tank only(FIG.12)
Attention: Change the engine oil every 8-10 hours riding, otherwise warranty would be avoided!
(FIG.9)
(FIG.8)
(FIG.10) (FIG.11)
OIL RULER
HIGHEST OIL LIMIT
UPPER LIMIT
UPPER LIMIT
LOWER LIMIT (FIG.12)

Engine/Motor Safety Instruction
1. Keepthe
engine/motor
free of dirt and debris,
especially
in the
throttle linkage
area.
2. Neverstart the
engine/motor without checking
to see that the
throttle control
is in the idle
position
and
that the
parking
brakeis set.
3. Neverstart the
engine/motor
unlessyou are
properly
seatedwith yourhandsfirmlyon the controls.
4. Nevertamperwith, alter, or changethe
vehicle's
engine/motor
settings.
The
engine/motor governor
is
factory
setand
protects
the
engine/motor
from
damage. Excessive engine/motor
speedis
potentially
dangerous
to the
operator, bystanders,
andthe engine/motor itself.
5. All guardsmustbe in placepriorto
starting
the engine.
6. Operating
the
vehicle
in
conditions
wherewater,mud,snow,dirt, sandor other debris can get into the
throttle
cable
conduit
and/or the
throttle mechanism
cancausethe cable or throttlemechanism to bind,
which may leadto throttle
sticking,
lossof
control,
and
possible
death,injury,and/or
property
damage.
7. Makesure that all
screws,
nuts, and bolts are
properly tightened.
Never
over-tighten hardware
that is
designed
to move,such as front wheels,
spindles, A-arm pivots,
etc.
Restricting moving
partscancause
a lossof controland
possible
injury or death.
8. Always replace torque-type locknuts
with new
locknuts
of thesametype after
removing
the old locknuts.
Priming bulb
(FIG.13)
Instruction for operating
1. Preparation: check stop switch, spark plug and fuel in line and fuel return line if connected properly.
Use unleaded gasoline to fill fuel tank. Machine oil for machine oil tank.
2. Press the clearing priming bulb underneath the carburetor until fuel can be seen in the clear plastic
fuel return line.(FIG.13)
3. Close choke valve.
4. Pull the starter grip briskly and return gently, engine should start within a few pulls.
DO NOT PULL TOO HARD OR THE ROPE WILL BREAK! Then open choke valve and the motor
will be running smooth after it warms up.
5. If there is any difficulties on start-up, open air adjuster a little, turn fuel turning handle, pull up start
handle, engine start, then open air door adjuster.
6. Proper riding: when start-up and climbing, accelerating slowly.
7. Stop: press stop button on the handle bar.

8
RIDING
1. Make sure that all of the exposed bolts and screws are tightened.
2. Start the engine by pulling.(FIG.14)
3. See if need open/close choke valve to start.(FIG.15)
4. Raise the kickstand to its upright position.
5. Put one foot on the deck of the scooter while pushing off with the other foot, gently
rotate the THROTTLE GRIP, on the right side of the handlebars. The scooter will
begin to move on its own engine power.
How to start the engine(FIG.14)
**Your scooter has a variable speed hand throttle. You can control the speed of your
scooter by the amount of pressure you use when rotating the hand throttle. The more
you rotate, the faster you will go.
STOPPING & BRAKING
1. To brake, release the THROTTLE GRIP and depress the BRAKE LEVERS (on the
left/right side of the handlebars. Depressing the brake will disengage power to the
engine.
2. To stop, press stop button on the right side of the handle bar.(FIG.16)
Choke valve (FIG.15) Stop button (FIG.16)

FOLDING & STORAGE
When you are done riding the scooter you can fold it
down for compact storage and transportation. First
remove the seat post and seat, then using one hand, push
down on the folding handle while gently pushing down on
the handlebars. BE CAREFUL NOT TO HIT YOUR HEAD
WITH THE HANDLEBAR, SET YOURSELF AT THE
RIGHT SIDE IS NECESSARY. Push down until you feel
the mechanism lock into the down position.(FIG.17)
BRAKING SYSTEM
(FIG.17)
The scooter is used disc/caliper braking system for the front and rear.They are
both activated by a hand brake lever on the left and right side of the handlebar.
Squeezing the hand brake lever with your left hand activates the rear brake.
Squeezing the hand brake lever with your right hand activates the front brake.
Make sure to release the HAND THROTTLE GRIP when engaging the brakes.
Practice braking on a smooth, dry surface to get used to the feel of the braking
system. Braking distance is affected by wet conditions and loose and uneven
riding surfaces.
Adjusting the Brakes
The Brakes on the scooter should come fully adjusted from the factory.
However, it may be necessary to adjust the brakes from time to time.
To adjust the rear brakes:
For brakes that are adjusted too loose:
1. Adjust the tension screw on the right hand brake lever by rotating it
counter-clockwise until the wheel spins freely.
For brakes that are adjusted too tight:
2. Tighten the tension screw on the right hand brake lever by rotating it clockwise
until the wheel has a slight drag.

(FIG.18)
(FIG.19)
SQUEAKY BRAKES
To adjust the front brakes:
For brakes that are adjusted too loose:
3. Adjust the tension screw on the
left hand brake lever by rotating it
counter-clockwise until the wheel
spins freely.
For brakes that are adjusted too tight:
4. Tighten the tension screw on the
left hand brake lever by rotating it
clockwise until the wheel has a
slight drag.
For Further Front Brake Adjustment
5. Locate the adjustment screw on the
front brake assembly (located
on the left of front wheel). Tighten or
loosen as necessary.(FIG.18)
For Further Rear Brake Adjustment
6. Locate the adjustment screw on the
rear brake assembly ( Located
on the left of back wheel. Tighten or
loosen as necessary.(FIG.19)
The brakes may squeak before they are broken in. This is normal and will not
affect the function or performance of the brakes. With continued use the
squeak should go away.
TIRE PRESSURE
The tire must be inflated to a maximum of 45 P.S.I. It is also recommended to
use a tube additive like Slime, available from any motorcycle shop, to avoid
inconvenient punctures.
Empty all air from the tire, prior to loosening the bolt to split the rim.
MAINTENANCE
RECOMMENDED TOOLS
To adjust and service the scooter you will need the following tools:
/8 mm
11


10/12/13/14/17 mm Open end wrench
Socket Wrench
Air-valve lengthener
ADJUSTING THE HEAD UNIT
The head unit will come adjusted from the factory. However, riding on rough
terrain and general use may cause the head unit to become loose over time. It
may be necessary to adjust the head unit from time to time.
To adjust the head unit:
1. Rotate the handle bar as far right as it will
go to expose the HEAD UNIT. (FIG.20)
2. Using a large adjustable wrench, gently
turn the BEARING LOCK clockwise to
tighten. *DO NOT OVER TIGHTEN OR
IT WILL DAMAGE THE BEARINGS.
(FIG.20)
ADJUSTING THE CHAIN
The chain will come adjusted from the factory. However, it may be necessary
to adjust the chain from time to time. The chain must be well aligned onto the
sprockets in order to avoid uneven wear. This will result in shortened chain
life.
How tight should the chain be?
If the chain is skipping or jumping on the sprockets, this is too
loose and may be harmful.
If the chain is making a humming sound when the wheel is
turning, this is too tight and may cause the chain to snap.
The correct tension is achieved by adjusting the chain from its
loose position to when it becomes lightly tense.

(FIG.21)
(FIG.22)
MAINTENANCE SCHEDULE
To tighten the chains:
Slightly loosen the two axle bolts on both
sides of the rear wheel. Then slowly
adjust the two adjusting screws on each
side of the rear tire until chain reaches
the proper tension.(FIG.21)
Rotate the rear wheel to make sure the
chain is aligned.
Finally, lock and tighten the rear axle
bolts prior to riding. (FIG.22)
Proper care of your scooter will insure optimal performance and longer life
span. The following are a few maintenance suggestions that will keep your
scooter running in top condition:
Daily Maintenance
Perform each time you ride your scooter
Clean the exterior of the unit with a soft, damp rag. (DO NOT
WASH WITH A HOSE)
Check that all nuts and bolts are securely tightened.
Lubricate the chain with any silicone spray, 3&1 oil or any good
clean motor oil.
Check fuel level per start-up, refill fuel in time if fuel is not enough,
check all bolts if tightened. Check fuel if leakage
Warm-up 3~5 minutes after cool start-up, then load
Breaking-in (wear-in) is important to engine, engine is running
within 8 hours, choke must not be opened fully, after 8 hours,
have a complete maintenance to engine, check engine screws
tighten each 8 hours, check machine oil and refill each 8 hours,
check and clean air filter/fuel filter each 8 hours, clear spark
plug and adjust its clearance 0.6~0.7mm each 20 hours,
clear fuel tank and refill if necessary, clear carbon in combustion
chamber and muffler, check stop plug if in good situation.

Change the soft fuel hose each year.
Be sure that engine has a long life; please sure use fuel in
accordance with the instruction.
If engine is abnormal, please have professional people checked
and repaired.
TROUBLESHOOTING
Start-up is hard
Check if fuel line goes smoothly, and if there is air bubble in, press small
Cup to pump fuel into carburetor.
Check the spark plug and wiring for connection.
Check fuel tank filled, or for clogged gas filter.
Check air filter is clogged.
Check the stop switch if short circuit.
If your attempt to start the engine too many times, there might be excess
fuel In the cylinder. Remove spark plug and allow excess fuel to evaporate.
Reassemble.
Remove spark plug to check the gap between spark plug if it is 0.6~0.7mm,
And decarbonized.
Connect spark plug guide line, pull start grip to see if spark plug is produced.
Engine can have a start but stop while working
See if air-filter is clogged.
See if muffler and fuel line is blocked
Adjust idling speed screw(FIG.23), clockwise turning for high speed,
and anticlockwise turning for low speed.
Engine lack of power
Vent on gas tank cap is blocked.
Fuel line has precipitated(sediment), leakage of fuel filter blocked by dirt.
Storage procedure
To store engine, temperature should be -20C~50C, moisture not more than
80%, good ventilation, isolated from easy-burning or erosion chemicals.
If you plan to not use your scooter
If you plan to not use your scooter for a long time, please empty the fuel
Tank and start-up the engine to combust all fuel in the carburetor, and remove
the fuel pipe.

Idling speed screw(FIG.23)

TECHNICAL DATA
:
OTHER
QUESTIONS
Item
Parameter
Item
Parameter
Engine
Single cylinder air-
cooled , 4-stroke
Fuel
consumtion
100km/2.5L
CYD DIA/stroke
39x26mm
Fuel
tank volume
1.5L
Spark plug
A5RTC
Max speed
25-30 MPH
Carburetor
Double films
Whole weight
70lbs
Speed idling
2800+150
Mini gap away
from ground
23cm
Turn way
of engine output
Count clockwise
Load
<300lbs
Spark plug gap
0.6-0.7mm
Package size
117x38x49(cm)
Fire mode
CDI
Length*width*
height
122x62x112(cm)
Start way
Pull start-up
Axel distance
95cm
Fuel
Non-lead petrol(gas)
Tire type
11"All-Terrain
output
49cc
Width of steering
handle
62cm
Rated power
0.7km/6500rpm
Machine oil tank
0.08L
Clutch type
Centrifugal
Tire pressure
45P.S.I.

For additional questions, service instructions, further information ,please go to
contact local dealer
Thank you for purchasing and please tell your friends how much fun you’re having
on the scooter
15
Table of contents
Other Scooter Wholesales Scooter manuals
Popular Scooter manuals by other brands

Zoom
Zoom Stryder quick start guide

NAVEE
NAVEE N65 user manual

Vita Mobility Werks
Vita Mobility Werks V19 user manual

Shanghai Jailing Vehicle Business
Shanghai Jailing Vehicle Business La Vita 150CC Owners book

Leader Fox
Leader Fox Acron operating instructions

Gilera
Gilera Runner 50 1997 Service and repair manual