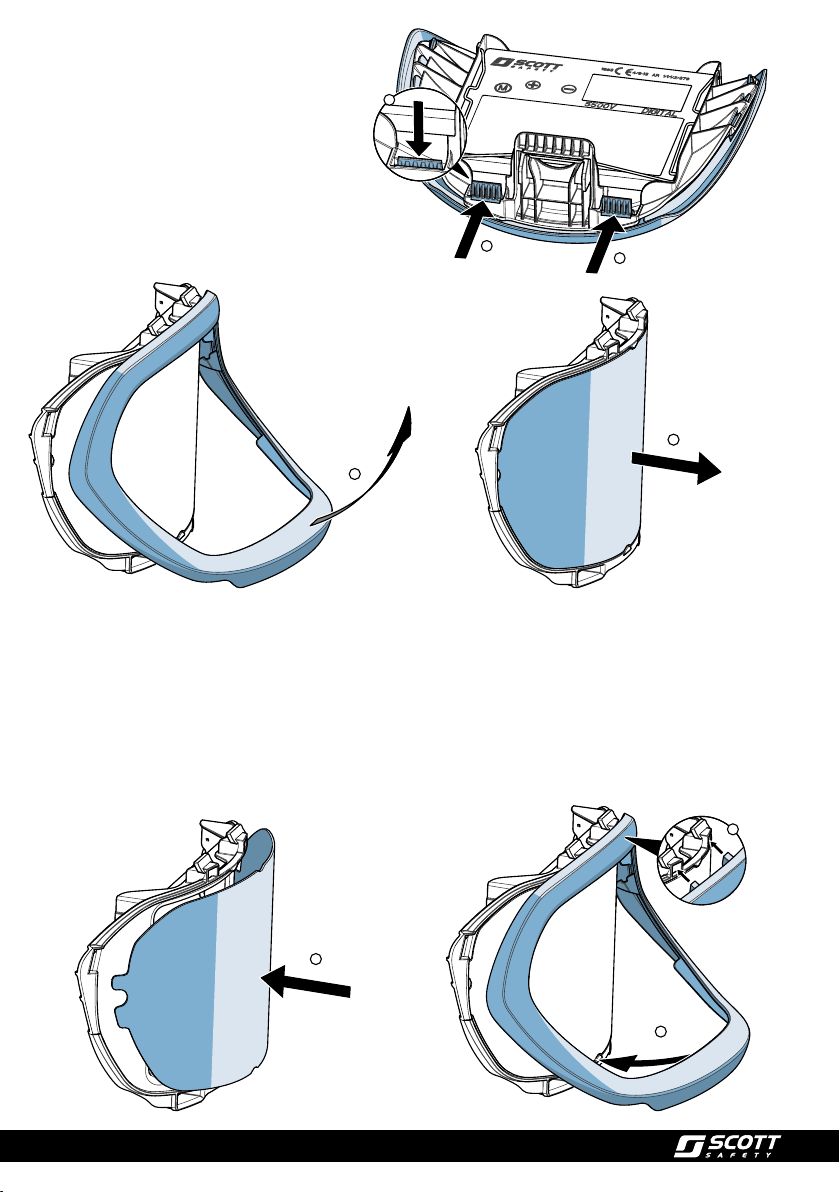
Scott Safety FH4 Manual

FH4
2026623 A
10.2013 0086

Operating and Maintenance Instructions 9
Gebrauchs- und Wartungsanleitung 15
Instructions d'utilisation et d'entretien 21
Gebruiks- en onderhoudsaanwijzingen 27
Instrucciones de Funcionamiento y Mantenimiento 33
Instruções Operacionais e de Manutenção 39
Istruzioni d’uso e manutenzione 45
Οδηγίες λειτουργίας και συντήρησης 51
Kullanım ve Bakım Talimatları 57

FH41
1
2
3
2
1
Removing ADF Carrier
Ausbau Des Schweißerfilter-Halterung
Retirer Le Support De L’ADF
Verwijderen Van Het ADF-Drager
Retirar El Soporte Del ADF
Retirar A Porta-ADF
Rimozione Il Carrello Del Filtro ADF
Αφαιρεση Του Φορέα Του ADF
ADF taşıyıcısını Çikarilmas
Attaching ADF Carrier
Befestigung Des Schweißerfilter-Halterung
Attacher Le Support De L’ADF
Bevestigen Van Het ADF-Drager
Colocar El Soporte Del ADF
Prender A Porta-ADF
Fissaggio Il Carrello Del Filtro ADF
Προσαρτηση Του Φορέα Του ADF
ADF taşıyıcısını Takilmas

2FH4
3
2
1
Removing ADF
Ausbau Des Schweisserfilters
Retirer La ADF
Verwijderen Van Het ADF
Retirar Del ADF
Retirar A Filtro De Soldadura
De Auto-Escurecimento (ADF)
Rimozione Filtro ADF
Αφαιρεση Του ADF
ADF’Nın Çikarilmas
CAUTION If incorrectly opened, the spring loaded wire may
cause minor personal injury
VORSICHT Beim falschen Öffnen kann der federbelastete Draht
zu kleineren Verletzungen führen.
ATTENTION: S’il est mal ouvert, le fil à ressort peut occasionner
des blessures légères.
VOORZICHTIG Wanneer hij verkeerd wordt geopend, kan de
geveerde draad licht lichamelijk letsel veroorzaken
PRECAUCIÓN Si se abre de forma incorrecta, el cable con resorte
puede causar pequeñas lesiones personales
CUIDADO Se for aberto incorrectamente, o arame mola pode
causar lesões pessoais secundárias
ATTENZIONE In caso di apertura non corretta, il filo a molla
potrebbe causare lesioni di lieve entità
ΠΡΟΣΟΧΗ Εάν το άνοιγμα γίνει με λανθασμένο τρόπο, το ελατηριωτό
καλώδιο μπορεί να προκαλέσει μικρό τραυματισμό
DİKKAT Doğru açılmamışsa yaylı yüklü kablo hafif kişisel
yaralanmaya neden olabilir

FH43
2
1
3
Attaching ADF
Befestigung Des
Schweisserfilters
Attacher La ADF
Bevestigen Van Het ADF
Colocar Del ADF
Prender A Filtro De Soldadura
De Auto-Escurecimento (ADF)
Fissaggio Filtro ADF
Προσαρτηση Του ADF
ADF’Nın Takilmas

4FH4
1
2
1
3
4
1
2
3
Removing Spatter Guard
Ausbau Des Spritzschutzes
Retirer La Ecran Facial
Verwijderen Van Het Spatscherm
Retirar Del Protector Contra Salpicaduras
Retirar A Protecção Contra Salpicos
Rimozione Protezione AntispruzzI
Αφαιρεση Προστατευτικου Τηγματων
Siçrama Koruyucusunun Çikarilmasi
Attaching Spatter Guard
Befestigung Des Spritzschutzes
Attacher La Ecran Facial
Bevestigen Van Het Spatscherm
Colocar Del Protector Contra Salpicaduras
Prender A Protecção Contra Salpicos
Fissaggio Protezione Antispruzz
Προσαρτηση Προστατευτικου Τηγματων
Siçrama Koruyucusunun Takilmasi

FH45
Removing Sweatband
Ausbau Des Schweissband
Retirer La Bandeau Anti-transpiration
Verwijderen Van Het Zweetband
Retirar Del Cinta Anti-sudor
Attaching Sweatband
Befestigung Des Schweissband
Attacher La Bandeau Anti-transpiration
Bevestigen Van Het Zweetband
Colocar Del Cinta Anti-sudor
Prender A Fita de Transpiração
Fissaggio Fascia Assorbisudore
Προσαρτηση Ιμάντας απορρόφησης
Ter bandı Takilmasi
Retirar A Fita de Transpiração
Rimozione Fascia Assorbisudore
Αφαιρεση Ιμάντας απορρόφησης
Ter bandı Çikarilmasi

6FH4
Fig. 1
12
3
4

FH47
Fig. 1
12
3
4
Fig. 2
Fig. 3 Fig. 4
1
2

8FH4
Fig. 5
Fig. 6
Fig. 7

FH49
PRE-OPERATIONAL WARNINGS
Please Read Carefully and Fully Understand
Improper use of this equipment may result in Personal Injury or Death. Improper use
includes, but is not limited to, use without adequate training, disregard of the warnings
and instructions contained herein, and failure to inspect and maintain this Respiratory
Protective Equipment. Read and understand all instructions before attempting to operate
this equipment.
This equipment is intended to be used only in conjunction with an organised Respiratory
Protection program.
Before using this equipment, read the contents of EN529:2005 and familiarise yourself
with the requirements for Respiratory Protective Equipment and their potential effects
on the wearer.
PAPR system users must be familiar with workplace hazards prior to using the equipment
and must be fully trained in the use of the apparatus.
Scott Safety headtops must be used with a Scott Safety blower, unless otherwise directed.
Read this manual, the welding filter manual, the PAPR manual, Scott Safety Filter manuals,
prior to using this equipment.
The blower must be fitted with the correct range of filters which are appropriate for the
workplace hazard.
This product must only be used with filters manufactured by Scott Safety. The use of any
other filters will negate the approval and will be likely to reduce the level of protection
provided.
Do NOT confuse EN12941 and EN12942 filter markings with filter markings relating to
other EN standards.
Do NOT use a PAPR in confined spaces, oxygen deficient atmospheres (<19%), oxygen
enriched atmospheres (>23%), or where there is an immediate hazard to life or health.
Local regulations may apply.
Do NOT use if the ambient temperature is outside of the range -10oC to +50oC. Humidity
levels up to 95% RH do not present any operational problems.
Do NOT use if the apparatus is damaged. The headtop and air hose must be inspected on
every occasion before use to ensure that no damage of any kind is evident which could
cause leakage or reduced levels of protection. A monthly inspection of the apparatus is a
mandatory requirement in the UK under COSHH regulations and inspection on a monthly
basis is strongly recommended for all other countries.
Protection will only be obtained if the equipment is fitted correctly.
Protection levels may be reduced if wind speed exceeds 2 meters per second.
In the unlikely event that the PAPR fails while in a hazardous area, there may be an increase
of carbon dioxide and contamination within the headtop. LEAVE THE AREA IMMEDIATELY.
Scott Safety headtops can be used in certain explosive and flammable atmospheres when
used with a an approved blower which is marked as intrinsically safe. It is the employers
responsibility to ensure that the intrinsic safety approval is compatible with the particular
environment.
At very high work-rates, pressure in the apparatus may become negative at peak inhalation
flow.
Filters must not be fitted directly to the headtop.
GB

10FH4
INTRODUCTION
Overview
FH4 is a protective headtop designed to be used alongside Scott Safety
Proflow 160 SC and Tornado powered air purifying respirators (PAPR), a 90
x 110 mm welding filter (Approved to EN169:2002 or EN379:2003+A1:2009)
and one of three types of breathing hose.
FH4 incorporates a Proban®faceseal to provide maximum protection.
FH4 is approved to EN12941:1998+A2:2008, EN175:1997 and EN14594:2005.
FH4 provides personal protection for the eyes and face during welding,
provided by the face shield and welding filter.
When used with a Scott Safety PAPR, this headtop is designed to be used
alongside three types of breathing hose:
400mm Polyurethane self adjusting - Scott PU Stretch
850mm Polyurethane non-stretch - Scott PU non-stretch
800mm Ethylene Propylene Diene Monomer - Scott EPDM
The choice of hose is dependent on your own work practises/needs and
is beyond the scope of this manual. For further information contact Scott
Safety customer services, details at the rear of this manual.
The FH4 headtop is adjustable to fit head sizes with a horizontal measurement
of 50cm - 64cm (measured at brow level, full circumference). Adjustment is
by means of an adjustable handwheel at the rear of the helmet.
FH4 is designed to operate with a flow rate of between 140 litres per minute
and 160 litres per min and are compatible for use with Scott Safety PAPR
systems (EN12941) Please read this manual in conjunction with the respective
system manual prior to use.
Note All new headtops are supplied with a protective film secured onto the
visor. This film is for transit purposes only and must be removed prior to the
headtop being used.

FH411
HOSES
Inspect the breathing hose for any
signs of creasing and ensure that it is
not torn
Ensure that both ends of the breathing
hose are free from dirt or debris and
that there is no damage to either ends
For a Tornado/Proflow hose check
that the ‘O’ ring is in place and in
good condition
HEADTOP & HELMET
Check that the headtop is in a good,
clean condition, free from any damage
and is not torn; paying attention to
the hose inlet, also the browband,
faceseal and head harness
Inspect the spatter guard for any signs
of damage, ensuring it is free from
deep scratches, cracks or crazing
Make sure that there are no blemishes,
solvents or paint that may obscure
vision
PRE-USE CHECKS
Note The following instructions are for the FH4 headtop and breathing hoses.
These instructions must be used alongside the Operating and Maintenance
Instructions for the chosen PAPR.
Note ‘O’ rings and gaskets on all hoses
should be replaced at least annually.
Visor Markings and Meanings (EN175:1997)
Symbol Identification of the Manufacturer Symbol Impact Resistance
SS Scott Safety B Medium Energy Impact
SPECIFICATION
Protection Rating
EN12941:1998+A2:2008
T/Power Proflow
PU stretch hose TH2 TH2
PU non-stretch hose TH2 TH2
EPDM hose TH2 TH2
Ensure the spatter guard and welding
filter are correctly placed and secure
Make sure faceseal band is correctly
attached to locating tabs

12FH4
POWERED AIR SUPPLY
SYSTEM
The PAPR must be checked in
accordance with the operating and
maintenance instructions specific for
the chosen model.
Once all parts have been verified
serviceable then the system can be
fully assembled in preparation for
donning, see section Donning.
When donned correctly the browband
will be central to the user’s forehead and
the headtop will sit comfortably over the
user’s head
When worn correctly the headtop will be
comfortable and a full range of motion
will be achievable
PRE-USE CHECKS DONNING
Offer your head into the headgear of the
headtop
Adjust the sizing wheel at the rear of the
helmet to suit
Lower the mask into position
Adjust the faceseal comfortably under
the chin and around the cheeks
Adjusting mask position
Remove the headtop
Rotate both side buttons anti-clockwise
to loosen (see Fig. 3)
For horizontal position adjust forward
/ backward slider until pivot screw is at
desired location (see Fig. 5)
For vertical position lift and adjust strap,
placing desired hole onto location pin
(see Fig. 6)
For mask angle lift and rotate pivot stop,
placing desired hole onto location pin
(see Fig. 7)
Rotate both side buttons clockwise to
tighten (see Fig. 4)
Test for a good range of motion. The
faceseal should remain in contact with
the face
The Helmet should be a snug fit.
Do not over tighten.
Note Whilst the materials that may
come into contact with the wearers
skin are not known to be likely to
cause irritation to the skin or other
adverse effects to health, they may
cause allergic reactions in particularly
susceptible individuals.
Note The PAPR must go through a
pre-use check in accordance with the
Operating and Maintenance Instructions
manual prior to use.
The breathing hose must be attached to
the blower prior to donning the Headtop
- See Operating and Maintenance
Instructions.
Note On initial use the headtop may
be too tight or too loose. If this is the
case the headtop may be adjusted
to improve comfort using the hand
wheel at the rear of the helmet.
Fully loosen the handwheel at the rear of
the helmet to facilitate donning (see Fig. 1)

FH413
Once free of any hazard switch off the
blower
Loosen the helmet handwheel (see Fig. 2)
Pull the face seal away from under the
chin and off the face
Pivoting the mask away from the face, lift
the headtop off of the head
Place the headtop onto a clean surface
Remove the PAPR in accordance with the
Operating and Maintenance instructions
Proceed with after use cleaning and
storage
Inspect the headtop for worn, ageing or
damaged components
Carefully wipe clean the headtop with a
warm water solution containing a mild
detergent
It is recommended that headtop visors be
wiped clean with Distel® wipes
If necessary, wash the outside of the
breathing hose carefully using warm water
solution containing a mild detergent
Ensure the breathing hose connections
are free from all dirt or debris that could
prevent an effective seal with the blower
Once clean all components must be left
to dry naturally.
Device must be protected from damage
during transportation.
When not in use the equipment should be
stored in a clean, dry environment, away
from direct heat sources between +10oC
and +30oC, at a humidity of less than 65%
RH.
DOFFING
AFTER USE CARE
STORAGE
CAUTION
Do not remove the headtop until you are
in a safe and hazard free zone
Note If during use the equipment may
have become contaminated by hazardous
substances, the contamination must be
identified and properly removed or the
contaminated components must be
replaced before next use.
Disposal of the contaminated components
must be carried out in accordance with
local regulatory requirements.
BSI (0086)
Kitemark Court,
Davy Ave,
Knowlhill,
Milton Keynes,
MK5 8PP.
England
NOTIFIED BODIES
DISPOSAL
Disposal of the components must be
carried out in accordance with local
regulatory requirements.
The products manufactured at our
factories in Skelmersdale and Vaasa carry
a warranty of 12 months (unless stated
otherwise). This includes parts, labour
and return to site The warranty period
runs from the date of purchase by the end
user.
These products are warranted to be free
from defects in materials and workmanship
at the time of delivery. Scott Safety will
be under no liability for any defect arising
from wilful damage, negligence, abnormal
working conditions, failure to follow the
original manufacturer’s instructions,
misuse or unauthorised alteration or
repair.
Evidence of purchase date will need to
be produced for any claims arising during
the warranty period. All warranty claims
must be directed through Scott Safety
customer services and in accordance with
our sales return procedure.
WARRANTY

14FH4
Record test and maintenance details on
the inspection sheet provided at the rear
of this manual.
Information recorded usually includes:
Name of employer responsible for the
apparatus
Make, model number or identification
mark of the apparatus, together with a
description of any distinguishing features
Date of inspection/maintenance
together with name, signature or unique
identification mark of the examiner
Condition of the apparatus, details of any
defects found and any remedial action
taken
Regular and scheduled maintenance
is essential for the integrity of the
equipment.
As well as the pre-use and storage
checks the apparatus must be
checked on a monthly basis, a service
should be performed annually by a
qualified service and maintenance
operative.
A regular monthly maintenance
schedule is performed as per the pre-
use checks which includes a thorough
visual inspection of all components.
Carry out a thorough inspection of
all component parts before and after
each occasion of use.
MAINTENANCE INSPECTION DETAILS
Replacement parts and accessories may be ordered through Scott Safety customer
services. The department can also provide general information on other Scott Safety
products.
SPARES
REPLACING ADF
See page 1-3.
REPLACING SPATTER GUARD
See page 1, 4.
Description Article No Pack Size
FH4 SPATTER VISOR 2027789 10
SWEATBAND 2027311 10
REPLACING SWEATBAND
See page 5.

FH415
VOR-BETRIEBSZUSTAND-WARNUNGEN
Bitte Gründlich Lesen Und Zur Kenntnis Nehmen!
D
Die unsachgemäße Verwendung dieses Gerätes kann in Personenschäden oder Todesfolge
resultieren. Die unsachgemäße Verwendung umfasst - ist jedoch nicht beschränkt auf - den
Einsatz ohne entsprechende Schulung, eine Missachtung der in diesem Dokument enthaltenen
Warnhinweise und Anweisungen sowie unterlassene Inspektion und Wartung dieses
Atemschutzgerätes. Bitte lesen Sie alle Anweisungen gründlich, bevor Sie versuchen, das Gerät
zu betreiben oder zu warten.
Dieses Gerät ist ausschließlich zum Einsatz im Rahmen eines organisierten Atemschutzprogramms
konzipiert.
Lesen Sie vor Gebrauch dieses Gerätes den Inhalt der Norm EN529:2005 und machen Sie sich
mit den Anforderungen an Atemschutzgeräte sowie ihren potenziellen Auswirkungen auf den
Träger vertraut.
Benutzer von PAPR-Systemen müssen vor Gebrauch des Gerätes mit den am Arbeitsplatz
vorherrschenden Gefahren vertraut sein und eine gründliche Schulung zum Einsatz des Gerätes
absolviert haben.
Wenn nicht anders angegeben, müssen Scott Safety Kopfteile zusammen mit einem Scott
Safety Gebläse verwendet werden. Lesen Sie vor Gebrauch dieses Gerätes das Schweißerfilter-
Handbuch, das PAPR Handbuch sowie die Scott Safety Filterhandbücher.
Das Gebläse muss mit dem korrekten Filtersortiment ausgestattet sein, das für die am Arbeitsplatz
vorherrschenden Gefahren geeignet ist.
Dieses Produkt darf nur mit Filtern, die von Scott Safety hergestellt wurden, verwendet werden.
Die Verwendung anderer Filter macht die Gerätezulassung ungültig und beeinträchtigt sehr
wahrscheinlich den vom Gerät gelieferten Schutzgrad.
Verwechseln Sie Filtermarkierungen gemäß EN12941 und EN12942 NICHT mit Filtermarkierungen,
die sich auf andere EN-Normen beziehen.
PAPR-Systeme NICHT in engen Räumen, sauerstoffarmer Umgebung (<19,5%), mit Sauerstoff
angereicherter Umgebung (>23%) oder an Orten verwenden, wo eine unmittelbare Gefahr für
Leben oder Gesundheit besteht. Es gelten u.U. lokale Vorschriften.
Gerät NICHT benutzen, wenn sich die Umgebungstemperatur außerhalb des Bereichs von -10oC
bis +50oC befindet. Eine relative Luftfeuchte von bis zu 95% beeinträchtigt die Gerätefunktion
nicht.
KEINE beschädigten Geräte verwenden. Kopfteil und Luftschlauch sind stets vor dem Einsatz
zu untersuchen, um sicher zu stellen, dass sie keine Beschädigungen aufweisen, die ansonsten
Leckagen bedingen oder die Schutzfunktion beeinträchtigten könnten. Die monatliche
Inspektion des Gerätes ist eine gemäß COSHH-Vorschriften (Vorschriften zur Überwachung von
gesundheitsgefährdenden Stoffen) vom britischen Gesetzgeber erhobene Anforderung. Für alle
anderen Länder wird eine monatliche Inspektion ebenfalls strengstens empfohlen.
Der Schutzgrad wird nur dann erreicht, wenn das Gerät korrekt angelegt wird.
Windgeschwindigkeiten von mehr als 2m pro Sekunde können einen verringerten Schutzgrad
bedingen.
Für den unwahrscheinlichen Fall, dass das PAPR-System in einem Gefahrenbereich versagt, kann
es im Kopfteil zu einer erhöhten Ansammlung von Kohlendioxid und Kontaminationsstoffen
kommen. DEN GEFAHRENBEREICH SOFORT VERLASSEN.
Scott Safety Kopfteile können in bestimmten explosiven und leicht entflammbaren Atmosphären
eingesetzt werden, wenn sie mit einem zulässigen Gebläse verwendet werden, das als eigensicher
gekennzeichnet ist.. Es ist die Verantwortlichkeit des Arbeitgebers sicherzustellen, dass die
eigensichere Zulassung für die jeweilige Umgebung gilt.
Bei sehr hoher Arbeitsbelastung kann bei maximaler Einatemfrequenz innerhalb des Gerätes ein
Unterdruck entstehen.
Filter dürfen nicht direkt am Kopfteil befestigt werden.

16FH4
EINLEITUNG
ÜBERSICHT
FH4 ist eine Schutzmaske, die zum Gebrauch mit Scott Safety Proflow 160 SC
und Tornado luftreinigenden Atemschutzgeräten mit Eigenantrieb (PAPR),
einem 90 x 110 mm Schweißerfilter (Zugelassen gemäß EN169:2002 oder
EN379:2003+A1:2009) und einem von drei Atemschlauchtypen konzipiert ist.
FH4 verfügt über eine Proban®Gesichtsmanschette, die maximalen Schutz
bietet.
FH4 ist gemäß EN12941:1998+A2:2008, EN175:1997 und EN14594:2005
zugelassen.
FH4 gibt durch Gesichtsschutz und Schweißerfilter Schweißschutz für Augen
und Gesicht.
Bei Verwendung mit einem Scott Safety PAPR-System, ist dieses Kopfteil
zum Einsatz mit drei Atemschlauchtypen konzipiert:
einem dehnbaren 400mm Polyurethanschlauch - Scott PU Stretch
einem nicht dehnbaren 850mm Polyurethanschlauch - Scott PU non-stretch
einem 800mm Ethylen-Propylen-Dien-Kautschukschlauch - Scott EPDM
Die Wahl des Schlauches ist von Ihrer eigenen Arbeitsweise/Ihren spezifischen
Anforderungen abhängig und übersteigt den Rahmen dieses Handbuches.
Weitere Angaben erhalten Sie vom Scott Safety Kundendienst, zu dem Sie
hinten in diesem Handbuch weitere Angaben finden.
Die Kopfteile der Serie FH4 sind vollständig verstellbar und lassen sich an alle
horizontal gemessenen Kopfgrößen von 50 - 64cm (in Brauenhöhe gemessen,
voller Umfang) anpassen. Die Einstellung erfolgt mithilfe eines hinten am Helm
befindlichen verstellbaren Handrads.
FH4 ist zum Betrieb mit Durchflussraten von 140 Litern pro Minute bis 160
Litern pro Minute konzipiert und zum Gebrauch mit Scott Safety PAPR-
Systemen (EN12941) kompatibel. Bitte lesen Sie vor Gebrauch dieses
Handbuch zusammen mit dem jeweiligen Systemhandbuch.
Hinweis Alle neuen Kopfteile werden mit einer auf dem Visier angebrachten
Schutzfolie geliefert. Diese Folie dient lediglich zum Schutz während des
Transports und ist vor Gebrauch des Kopfteils zu entfernen.

FH417
Visier-Markierungen und Bedeutungen (EN175:1997)
Symbol Herstellerkennzeichnung Symbol Stoßfestigkeit
SS Scott Safety B Mittlere Schlagfestigkeit
SPEZIFIKATION
Schutzart
EN12941:1998+A2:2008
T/Power Proflow
Dehnbarer PU-Schlauch TH2 TH2
Nicht dehnbarer PU-Schlauch TH2 TH2
EPDM-Schlauch TH2 TH2
SCHLÄUCHE
Untersuchen Sie den Atemschlauch
auf Anzeichen von Verknickungen
und achten Sie darauf, dass er keine
Risse aufweist.
Stellen Sie sicher, dass beide Enden
des Atemschlauches frei von Schmutz
und Ablagerungen und dass beide
Endseiten unbeschädigt sind.
Bei einem Tornado/Proflow-Schlauch
ist darauf zu achten, dass sich der
O-Ring an Ort und Stelle befindet und
in gutem Zustand ist.
ÜBERPRÜFUNG VOR GEBRAUCH
Hinweis Die folgende Anleitung bezieht sich auf FH4 Kopfteile und
Atemschläuche. Diese Anleitung ist zusammen mit der Betriebs- und
Wartungsanleitung des gewählten PAPR-Systems zu lesen.
Hinweis Die O-Ringe und Dichtungen
aller Schläuche sind mindestens
einmal jährlich zu erneuern.
KOPFTEIL & SCHUTZHELM
Überprüfen Sie, dass sich das Kopfteil
in einem guten, sauberen Zustand
befindet, keinerlei Beschädigungen
oder Risse aufweist; achten Sie
dabei auf den Schlaucheinlass und
ebenso auf Augenbrauenband,
Gesichtsmanschette und
Kopfgeschirr.
Untersuchen Sie den Spritzschutz auf
Anzeichen von Beschädigung und
stellen Sie sicher, dass er keine tiefen
Kratzer, Sprünge oder feinen Risse
aufweist.
Stellen Sie sicher, dass er keinerlei
Makel, Lösungsmittel- oder
Farbrückstände aufweist, die die Sicht
beeinträchtigen könnten.

18FH4
Bei korrektem Anlegen befindet sich das
Augenbrauenband in der Mitte der Stirn des
Trägers und das Kopfteil bedeckt den Kopf
des Trägers bequem.
Beim korrekten Tragen des Kopfteils
sitzt dieses bequem und gestattet
uneingeschränkte Beweglichkeit.
ÜBERPRÜFUNG VOR
GEBRAUCH
ANLEGEN
Stecken Sie den Kopf in die Kopfschutz des
Kopfteils.
Stellen Sie mithilfe des hinten am Helm
befindlichen Rads die richtige Größe ein.
Ziehen Sie die Maske in die richtige Position
herunter.
Sorgen Sie dafür, dass die
Gesichtsmanschette bequem unter dem
Kinn und an den Wangen anliegt.
Verstellen des Maskensitzes
Kopfteil abnehmen.
Drehen Sie beide Seitenknöpfe entgegen
dem Uhrzeigersinn, um die Maske zu lösen
(siehe Abb. 3).
In Horizontaler Richtung: den Vorwärts-/
Rückwärtsschieber so verstellen, dass sich
die drehbare Schraube am gewünschten
Platz befindet (siehe Abb. 5).
In Vertikal Richtung: anheben und verstellen
den gurt und das gewünschte Loch auf den
Stift legen (siehe Abb. 6).
Zur Einstellung des Maskenwinkels:
Drehstopper anheben und drehen und das
gewünschte Loch auf den Stift legen (siehe
Abb. 7).
Zum Feststellen: beide Seitenknöpfe im
Uhrzeigersinn drehen (siehe Abb. 4).
Überprüfen Sie, dass eine gute Beweglichkeit
möglich ist. Die Gesichtsmanschette sollte
dabei stets mit dem Gesicht in Kontakt
bleiben.
Der Helm sollte fest aber bequem anliegen.
Nicht zu fest anziehen.
Stellen Sie sicher, dass sich
Spritzschutz und Schweißerfilter an
der richtigen Stelle befinden und
gesichert sind.
Achten Sie darauf, dass das Band der
Gesichtsmanschette korrekt an den
Befestigungslaschen fixiert ist.
Lösen Sie das hinten am Helm befindliche
Handrad vollständig, um das Anlegen zu
erleichtern (siehe Abb. 1).
LUFTVERSORGUNGSSYSTEM
MIT EIGENANTRIEB
Das PAPR-System muss gemäß
Betriebs- und Wartungsanleitung
für das jeweilige Modell überprüft
werden.
Nachdem die Betriebsbereitschaft
aller Teile überprüft wurde, kann
das System in Vorbereitung auf das
Anlegen des Gerätes montiert werden
- siehe Abschnitt Anlegen.
Hinweis Obwohl nicht bekannt ist,
dass die Materialien, die mit der
Haut des Trägers in Berührung
kommen, Hautreizungen oder andere
gesundheitsschädliche Reaktionen
hervorrufen, können sie dennoch bei
besonders empfindlichen Personen
allergische Reaktionen auslösen.
Hinweis Das PAPR muss vor Gebrauch
einer Überprüfung gemäß Betriebs- und
Wartungsanleitung unterzogen werden.
Der Atemschlauch muss vor dem Anlegen
des Kopfteils am Gebläse befestigt werden -
siehe Betriebs- und Wartungsanleitung.
Hinweis Bei Erstgebrauch kann das
Kopfteil zu fest oder zu locker sitzen. Sollte
dies der Fall sein, so kann man das Kopfteil
zur Verbesserung des Tragekomforts
mithilfe des hinten am Helm befindlichen
Ratschenrads verstellen.
Table of contents
Languages: