SDR-Kits R3500D User manual

ASSEMBLY MANUAL FOR
R3500D DIRECTION FINDING RECEIVER KIT
Rev. A3
Updated 13 June 2022
Written by CRKITS
http://www.crkits.com
Thanks for your purchase from us. This model is the upgrade of PJ-80 – an 80-m ARDF direct
conversion receiver kit. It keeps the characteristics of simple, low cost, easy to build, and suitable
for the fox hunting and electronic homebrewing activities among youngsters, especially for the
students of elementary and middle schools.
Cautions
•The power supply is switched by the earphone plug. After use, please unplug the earphone
to switch off the power supply.
•Monophonic earphone is not compatible with this receiver. Use the stereo earphone
instead as attached.
•Pay close attention to differ the 3 diodes: VD1 (1N60), VD2 (FV1043) and VD3 (3V6). They
look very similar, but the letters printed on the body of diode can easily tell.
•The English manual is for your reference only. Please refer to the attached Chinese manual
for more information.
SDR-Kits www.SDR-Kits.net
SDR-Kits is CRKITS Authorised Distributor for Europe
Rev. A3 – 13 June 2022 - Updates by Jan Verduyn SDR-Kits Ltd
The English manual is for your reference only. Please refer to the attached Chinese manual The English manual is for your reference only. Please refer to the attached Chinese manual
Note there is an error in the circuit diagram. The center lead of the Ferrite (Magnetic) Rod
Antenna is connected to GND as shown on the Compoment Placement Drawing
and the PCB legend.
•
Page 1 of 6

A. Main Specifications
1. Frequency coverage: no narrower than 3.5 - 3.6 MHz
2. Sensitivity: No less than 600 meters (when receives T3500B fox transmitter with vertical
antenna)
3. Directivity: The minimum distance for exhibiting directivity is less than 3 meter
4. Power supply: DC 6V (4x AA size batteries)
B. Circuit Diagrams
1. Block Diagram
See the printed manual.
(Boxes from left to right: Antenna, RF amplifier V1, Beating frequency detector VD1, AF pre-amp
V2, AF power amplifier TDA2822M, earphone. The lower box: Variable beating frequency
oscillatorV3)
2. Schematic and PCB layout
See the printed manual in Chinese Language. Note there is an error in the circuit diagram. The
Center lead of the Ferrite (Magnetic) Rod Antenna is connected to GND as correctly shown on the
Compoment Placement Drawing and the PCB legend
C. Assembly Instruction
1. Check and solder parts on PCB
Before soldering, carefully make parts inventory based on the part list to check the quantity, value
and quality of all components. For example, check if the electrolytic capacitor is dried or leaking, or
the coils T1 (black cap) and T2 (white cap) are open, or the diodes and transistors are OK. Pay
attention to the right orientation when installing TDA2822M and its socket (see Fig. 2 on the
printed manual).
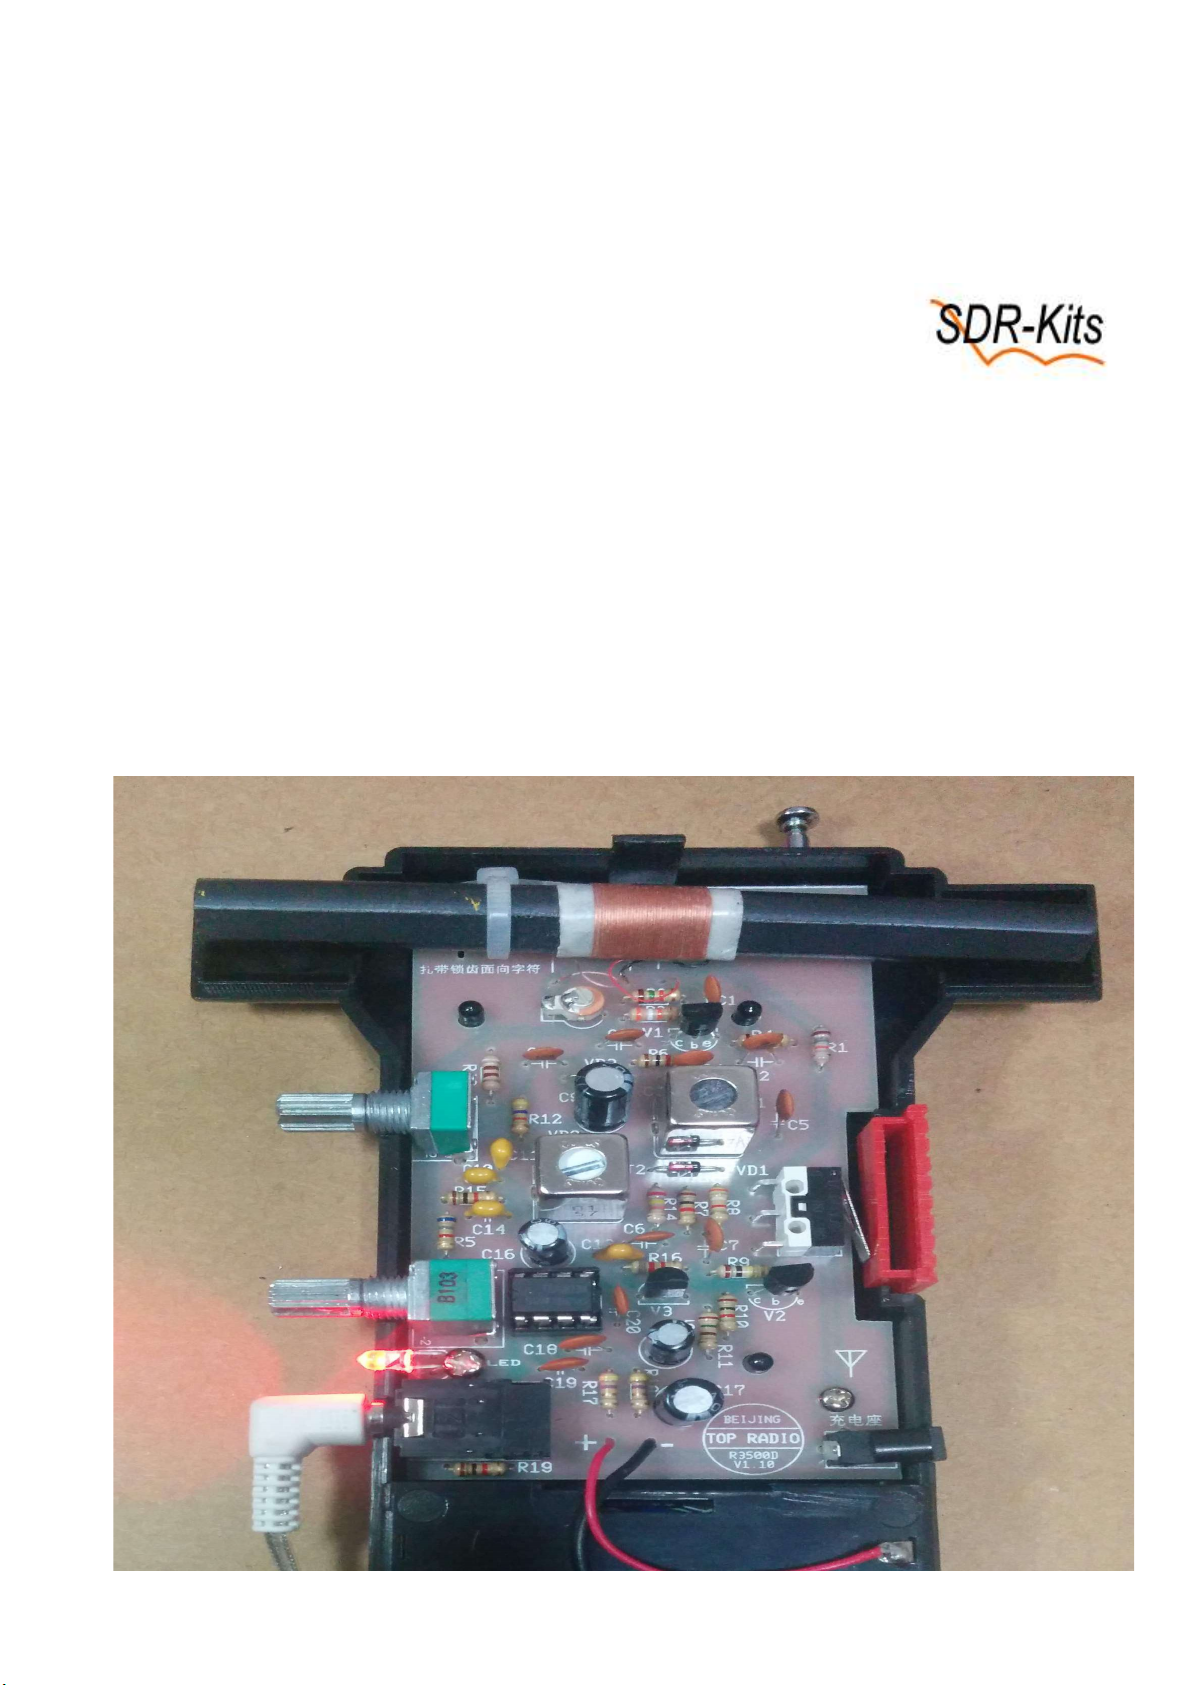
2. Install and fix the magnetic rod
Connect Magnetic Rod Coil as shown on the PCB legend.
Use the white nylon ribbon to fix the magnetic rod onto the PCB.
3. Install the vertical antenna
Insert the telescope antenna from the hole on the top right of the case, and fasten it with screw
and nut. A washer shall be put between the screw and the outside of the plastic case.
4. Cautions for installing the battery wires
Only install battery wires after all the components are soldered and checked okay. Make sure the
polarities are correct.
Page 2 or 6

D. Alignment
1. DC check point
(1) Voltage across the zener diode VD3: 3.4 - 4.4 volt
(2) The bias of transistor V1: The voltage across R4 shall be 0.4 - 1 volt (potentiometer RP1 set to
maximum gain position, the Ic of V1 will be 0.4 - 1 mA)
The bias of transistor V2: The voltage across R10 shall be 1.5 - 3 volt (the Ic of V2 will be 1.5 - 3 mA)
The bias of V3: The voltage across R15 shall be 2 - 2.5 volt (Ic of V3 will be 2 - 2.5 mA)
Normally you don't have to adjust the bias, because the design can cover the variance of the
components.
2. Alignment of the variable local oscillator
(1) If you have a standard RF signal generator
(a) Set potentiometer to the center position;
(b) Set signal generator to 3.5 - 3.6 MHz, CW mode, higher output level. Connect the output
and the ground of the signal generate with a wire. Couple the wire to the magnetic antenna of
the receiver by winding the wire on one end of the magnetic rod for one turn;
(c) Change the output frequency of the signal generator in a wider range. A beating tone shall
be heard from the earphone, this means the local oscillator is working. Set the signal
generator to 3.55 MHz, then align the cap of the coil T2 (white) until the beating tone is heard
again;
(d) Turn potentiometer RP2, the signal of 3.5 MHz and 3.6 MHz all be received at two position
of RP2, which shall be near by the both extreme positions. If 3.6 MHz can not be heard but the
3.5 MHz can be heard at the RP2 position near by the center, please align the cap of T2
counter clock wise; or vise versa.
(e) If the receiving coverage is too wide, replace the R13 with greater value, or vise visa.
(2) If you use 80m fox transmitter
(a) Set potentiometer RP2 to the center position;
(b) Turn on the fox transmitter (3.55 or 3.54 MHz). Place the receiver close to the transmitter
antenna;
(c) Turn the cap of T2 until a beating tone is heard, fine tune it to make the tone nicely (about
1000Hz);
(d) Turn the potentiometer RP2, the signal from fox transmitters of 3.5 and 3.6 MHz shall be
both heard. If only one signal of 3.5 or 3.6 MHz can be received, please fine tune the cap of T2
(see the previous section);
(e) If the receiving coverage is too wide, replace R13 with a greater value, or vise versa.
3. Alignment of antenna tank
Receive a signal of 3.53 MHz from a signal generator or transmitter. Fine tune capacitor CT to peak
the tone. If no peak can be obtained, change the position of the coil on the magnetic rod, then fine
tune CT again.
Page 3 or 6
4. Alignment of the tank in the RF amplifier
Receive a signal of 3.57 MHz from a signal generator or transmitter. Fine tune the cap of coil T1
(black) to peak the tone in the earphone. If no peak can be obtained but the volume is still
increasing towards the extreme counter-clockwise position of the T2 cap, please replace capacitor
C3 with a smaller value. If no peak can be obtained but the volume is still decrease towards the
extreme clockwise position of T2 cap, please replace C3 with a greater value.
5. Testing for directivity
Select an open field far away from power lines and constructions. Set a fox transmitter with a
vertical antenna. Stand at a point of several tens meters away. Test the "8" figure characteristic of
the receiver. (The two null points of some receiver sound little different, a clearer one shall be used
for bearing.) Then add the vertical antenna for the cardio-pattern by pushing S1. Adjust the length
of the telescope antenna to make better cardio-pattern, and remember which side is facing the
transmitter for higher volume. If the cario-pattern can not be heard clearly, please try to change
the value of R15, and test again. The minimum distance on which a cario-pattern can be
maintained is 3 meters.
* R3500D has a charger socket for charging rechargeable batteries. You don't have to take out the
batteries for charging. However, there is no charging or protection circuit built-in, so please make
sure the charger can match the voltage, polarity and type of the rechargeable batteries.
Page 4 or 6

Part List for R3500D ARDF Receiver Kit (1)
www.SDR-Kits.net
Item Value Identification and comments
R1* 18k, 5~20k BRN-GRY-ORG-GLD
R2 15k BRN-GRN-ORG-GLD
R3 39k ORG-WHT-ORG-GLD
R4 1k BRN-BLK-RED-GLD
R5 6.8k BLU-GRY-RED-GLD
R6 1k BRN-BLK-RED-GLD
R7 1k BRN-BLK-RED-GLD
R8 3.9k ORG-WHT-RED-GLD
R9 100k BRN-BLK-YEL-GLD
R10 1k BRN-BLK-RED-GLD
R11 150 ohm BRN-GRN-BRN-GLD
R12 4.7k YEL-VIO-RED-GLD
R13* 910 ohm or 820 ohm, 300~1.5k WHT-BRN-BRN-GLD or GRY-RED-BRN-GLD
R14 24k RED-YEL-ORG-GLD
R15 1k BRN-BLK-RED-GLD
R16 8.2k or 8.0k GRY-RED-RED-GLD
R17 4.7 ohm YEL-VIO-GLD-GLD
R18 4.7 ohm YEL-VIO-GLD-GLD
R19 1k BRN-BLK-RED-GLD
RP1 10k two gang pot - Do not fit Washer and Nut
RP2 10k single gang pot – Do not fit Washer and Nut
CT 5-20p trimmer Trimmer capacitor
C1 0.01μ 103
C2 4700p 472
C3* 47-68p 50
C4 4700p 472
C5 0.01μ 103
C6 0.01μ 103
C7 0.1μ 104
C8 0.01μ 103
C9 470μ electrolytic capacitor
C10 100p 101, yellow, monolithic capacitor
C11 200p 201, yellow, monolithic capacitor
C12 1000p 102
C13 1000p 102, yellow, monolithic capacitor
C14 2200p 222, yellow, monolithic capacitor
C15 4.7μ electrolytic capacitor
C16 10μ electrolytic capacitor
Page 5 or 6

C17 470μ electrolytic capacitor
C18 0.1μ 104
C19 0.1μ 104
VD1 1N60 Glass body diode
VD2 FV1043 Glass body diode
VD3 3.5-4.4V Zener Glass body diode
V1 9014 Transistor, TO-92
V2 9014 Transistor, TO-92
V3 9014 Transistor, TO-92
IC TDA2822M DIP8, with socket
T1 Shielded coil black cap 31.4 uH Signal Frequency
T2 Shielded coil white cap 65 uH Local Oscillator
S1 Antenna switch PCB mount
S2 Part of earphone
connector X
X Earphone connector 3.5mm stereo type, with earphone
W Telescope antenna
Misc. Magnetic Ferrite Rod Long Screw for PCB to chassis – short for Case halves
Screw set
Knobs and buttons For S1, RP1 and RP2
Plastic case With battery holder for 4x AA size batteries
Nylon strip For fixing magnetic rod
Earphone With 3.5 mm diameter connector
Printed manual In Chinese, for alignment, please refer to this
English manual. Also older PJ80 manual is useful.
http://www.crkits.com/r3500dmanual.zip
Link to older PJ80 Documentation:
http://www.crkits.com/pj80kitbuilding.pdf
Note that by design the LO frequency of the R3500 kits for 80 Meter is at Half of the Receive
Frequency, ie runs from 1750-1800 kHz. Success with the Kit!
Note 2: IMPORTANT - Magnetic (Ferrite) Rod Antenna.
Follow the instructions on the PCB. The center lead of the Rod is connected to GND. This is
contrary to what is shown on the Chinese Circuit Diagram.
Note 3: For 1.8 MHz Operation fit additional 150pF capacitor in parallel with C3 and a 39pf
capacitor in parallel with CT. Oscillator Frequency is now the same as Receive Frequency
Part List for R3500D ARDF Receiver Kit (2)
SDR-Kits www.SDR-Kits.net
SDR-Kits is CRKITS Authorised Distributor for Europe
C20 0.01μ 103
Rod antenna, with winding 100uH Note 2.
Page 6 or 6
Table of contents


